Lenovo Laptop Camera Is Not Working! How to Fix?
This passage will walk you through the reason why is your Lenovo laptop camera not working. Then a troubleshooting solution is also provided for you. Come on, check this passage out!
Experiencing a Lenovo laptop camera not working? Don’t worry – we’ve got you covered. In this guide, we’ll explore common reasons why your Lenovo laptop camera may not be working and provide straightforward solutions to get it up and running smoothly. Whether you’re facing hardware or software issues, our step-by-step troubleshooting tips will help you resolve camera issues on your Lenovo device quickly and efficiently.
Why Is the Camera on My Lenovo Laptop Not Working?
Before we fix the camera issue, we should have an overall conception of why the Lenovo laptop camera not working. Then, the next section will show you how to fix it in 6 ways.
Reason 1. Camera is Disabled
the camera is physically covered or disabled. Some laptops have a physical switch or button to enable or disable the camera.
Reason 2. Software Conflicts
Other applications or software might be using the camera exclusively. Preventing it from working with other programs.
Reason 3. Privacy Settings
Check your privacy settings to make sure that you have granted the necessary permissions for apps to access the camera.
Reason 4. Operating System Updates
Ensure that your operating system is up-to-date. Sometimes, updates can include fixes for hardware-related issues.
Reason 5. Driver Issues
Outdated or missing camera drivers can cause problems.
How to fix Dell laptop camera not working? In this section, you will learn about six different methods to check the functionality of your camera. It is important to follow these steps carefully to identify the reasons why the Lenovo laptop camera not working. By troubleshooting each potential issue one by one, we can determine the root cause of the problem. Let’s begin!
Way 1. Check If Your Webcam Is On
During the demonstration, we will provide four effective methods for checking if your webcam is on, with a detailed step-by-step guide.
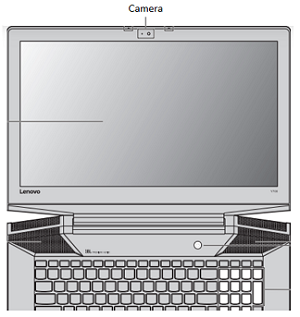
How to Fix Dell Laptop Camera Not Working
Step 1. Physical Check
Many Lenovo laptops have a small indicator light near the webcam. If the camera is in use, this light is usually on. Check for the light next to your laptop’s webcam to see if it’s on.
Step 2. Built-in Camera App
To check if the webcam is on you can also choose to see the built-in Camera App. Open the built-in camera application on your Lenovo PC. Look for it in the Start menu or search for “Camera.” If the camera is working, you should see a live feed from the camera within the app.
Step 3. Device Manager
To access the Device Manager on Windows, right-click on the Start button and select “Device Manager” from the context menu. Once the Device Manager window is open, find and expand the “Imaging devices” category. Your webcam should be listed under this category. If there is an issue with your webcam, a yellow triangle icon may be displayed next to it.
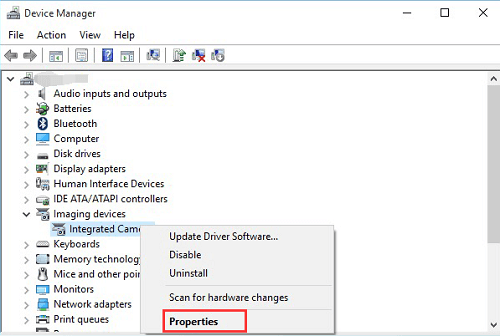
Device Manager Lenovo laptop camera not working
Step 4. Third-Party Apps
If you’re using a third-party application that utilizes the webcam (e.g., video conferencing apps), Use the app’s interface to check the status of your laptop’s camera. It should indicate whether the camera is currently in use. Some monitoring apps provide information about which applications are accessing the camera. This can help you identify any unexpected or unauthorized use.
Remember to only use trusted third-party apps, and be cautious about granting unnecessary permissions. If you identify any suspicious activity or unauthorized camera use, take appropriate action to secure your laptop and data.
Way 2. Check For Software Conflicts
Checking for software conflicts that may affect your Lenovo laptop camera involves a step-by-step process. Here’s a guide to help you identify and resolve potential conflicts:
1. Close all open applications, especially video conferencing apps.
Ensure that no other applications are currently using the camera. Close all open programs and applications, including video conferencing apps, to free up the camera for testing.
2. Use Task Manager (Ctrl + Shift + Esc) to end processes that may be using the camera.
Firstly, open the Task Manager. Navigate to the “Processes” tab and look for any processes that might be utilizing the camera. End these processes by right-clicking on them and selecting “End Task.”
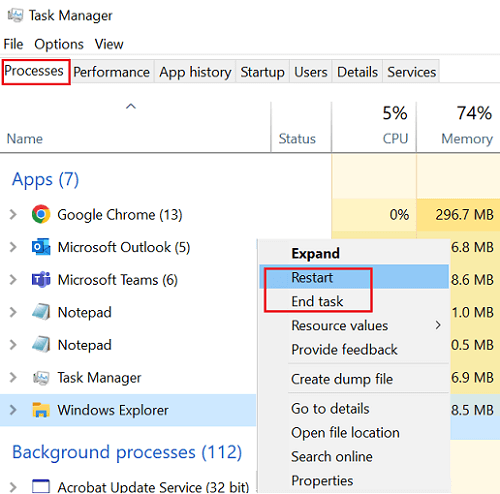
End Task Manager Lenovo laptop camera not working
Way 3. Check Your Webcam’s Privacy Settings
Navigate to “Settings” > “Privacy” > “Camera.” Ensure that the toggle switch for “Allow apps to access your camera” is turned on. Additionally, review the list of apps under “Choose which apps can access your camera” and make sure the relevant applications have permission.
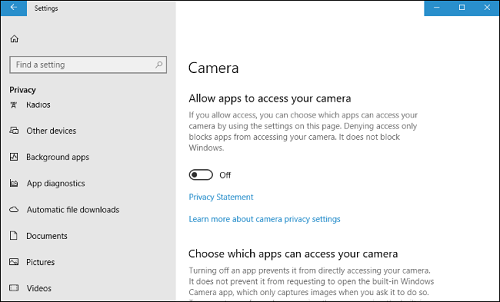
Privacy settings Lenovo laptop camera not working
Way 4. Restart Your Laptop
Sometimes, a simple restart can resolve software conflicts. Restart your Lenovo laptop to refresh the system and close any background processes that might interfere with the camera.
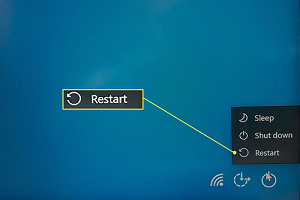
Restart laptop Lenovo laptop
Way 5. Check And Install Updates
- Click the Start, then go to Settings > Update & Security > Windows Update. You can also access it via the shortcut button below: Windows Update.
- Click Check for updates.
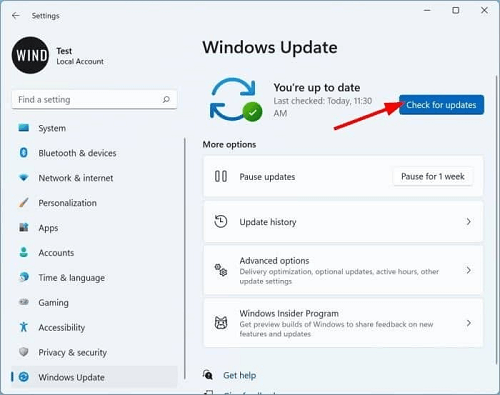
Windows update menu Lenovo laptop camera not working
- If updates are available, you can choose to install them by clicking on “Install Now”.
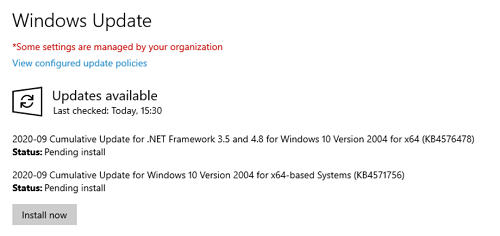
Windows update install now Lenovo laptop camera not working
Way 6. Manually Check And Install Driver Updates
Ensure that your camera drivers are up to date.
Right-click on the Windows Start button, select “Device Manager,” and locate the “Imaging devices” category. Right-click on your camera and choose “Update driver.” Follow the on-screen instructions to update the driver.
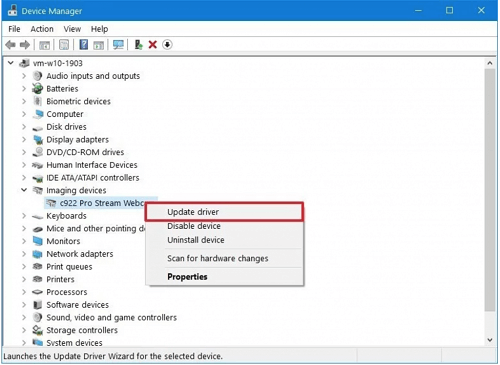
Update driver Lenovo laptop camera not working
The Bottom Line
It can be extremely frustrating when the Lenovo laptop camera not working. However, with the help of troubleshooting solutions, you can easily solve this problem. Just follow these six steps to identify the possible causes of the issue and learn how to fix it once and for all. It’s worth noting that these solutions are not only suitable for Lenovo laptops but also work for other brands of computers, except for Mac.

Joy Taylor


Senior writer of the iMobie team as well as an Apple fan, love to help more users solve various types of iOS & Android-related issues.
Screenify
AnyEnhancer
FocuSee
Vozard
AnyMiro
AnyMirror


