The Best 7 Ways to Fix Dell Laptop Camera Not Working
Is your camera glitch affecting your digital life experience? In this article, we unveil straightforward and practical solutions to address Dell laptop camera not working issues. Dive into the following content to effortlessly resolve camera problems and enjoy a seamless digital experience.
In the digital age, the camera has become an integral part of our lives, whether for communication, work, or entertainment. However, have you ever encountered such a situation: when you are eager to video call with family or participate in a remote meeting, you find that the Dell laptop camera not working properly? After opening the camera, the screen is just dark, or the camera simply won’t start?
Whether sharing beautiful moments in family life or collaborating at work remotely, the normal operation of the camera is crucial to our daily lives. In this article, we will explore the possible reasons for camera failure and provide a series of simple yet practical methods to help you restart your Dell laptop’s camera.
Why Is My Camera Not Working on My Dell Laptop?
The malfunction of the Dell laptop camera not working could stem from various reasons, including driver issues, application conflicts, privacy settings, physical connection failures, and outdated system updates. The combined effects of these factors may result in the camera not being recognized or operational. A comprehensive approach is required to identify and address these issues effectively.
Way 1. Give Permission to The Application
Granting permission to applications is a common method to resolve the Dell laptop camera not working issues. This straightforward permission management can help address camera malfunctions caused by permission problems. Here are the specific steps:
Step 1. Click on the Windows icon at the bottom left of the screen, select the “Settings” icon, or press Win + I on the keyboard to open the Settings.
Step 2. In the Settings window, choose the “Privacy” option. Then, in the left navigation bar, click on the “Camera” option.
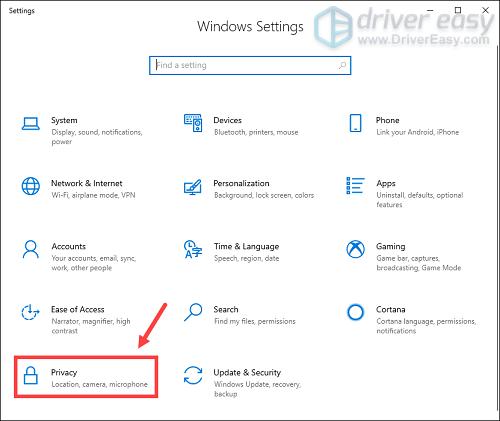
Fix dell laptop camera not working on setting
Step 3. Under the Camera tab, ensure that the “Let apps to access your camera” option is enabled.
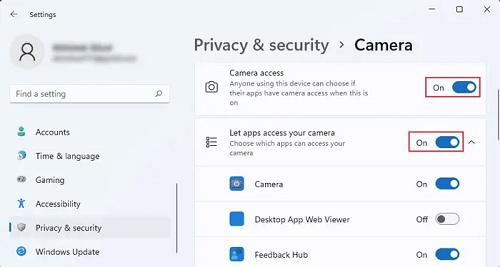
Fix dell laptop camera not working on privacy
Step 4. Scroll through the dropdown list and check the permission settings for each application. Make sure that the applications you intend to use the camera with have been granted access.
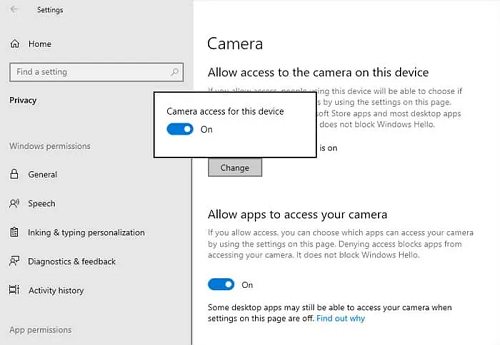
Access camera to fix dell laptop camera not working
Way 2. Scan for Malware
Scanning for malware is one way to address Dell laptop camera not working issues, as malware can interfere with the normal functioning of the camera. Using the built-in antivirus tool is also a method to resolve Dell laptop camera problems. Here are the specific steps:
- Click on the Windows icon at the bottom left of the screen, select the “Settings” icon, and then choose “Update & Security” in the settings window.
- Under “Update & Security,” select “Windows Security,” and then click on “Open Windows Security.”
- In the Windows Security center, choose “Virus & threat protection,” click on “Quick scan,” select “Windows Defender Full Scan,” and click “Scan options.”
- Choose “Windows Defender Full Scan,” and click “Scan now.”

Scanning for malware to fix dell laptop camera not working
The system will commence a comprehensive scan of your computer to detect potential threats. Please patiently wait for the scan to complete.
Way 3. Check the Antivirus Software
Checking antivirus software is a crucial step in resolving Dell laptop camera not working. Some antivirus programs may mistakenly perceive camera access as a potential threat, hindering its normal operation. Firstly, it is essential to grant camera permissions to relevant applications, ensuring that system and application settings are correct. Secondly, by utilizing the built-in antivirus tool, such as Windows Defender, a comprehensive scan can be conducted to eliminate potential disruptions from malicious software.
Lastly, reviewing antivirus software settings to ensure that camera access is not falsely flagged as a threat is vital. These simple yet effective steps contribute to an increased likelihood of normal camera functionality.
Way 4. Reinstall the Webcam Driver
Reinstalling the webcam driver is a key troubleshooting step for resolving Dell laptop camera issues. This method addresses potential damage or obsolescence in the webcam driver, which can lead to camera malfunctions. Begin by accessing the Device Manager, uninstalling the current webcam driver, and then visit the official Dell website to download and install the latest driver for your specific model.
After restarting the computer, verify the camera’s functionality by opening the desired application. Successful driver reinstallation often resolves webcam problems and ensures proper operation.
Way 5. Update Webcam Driver
Updating the webcam driver is another effective method to address Dell laptop camera not working. Outdated or incompatible drivers may result in the camera’s failure to function properly. Follow these steps:
Step 1. First, right-click the Windows icon and select “Device Manager” to open the Device Manager.
Step 2. In the Device Manager, locate and expand the “Cameras” or “Imaging devices” option. Right-click your webcam and choose “Update driver.”
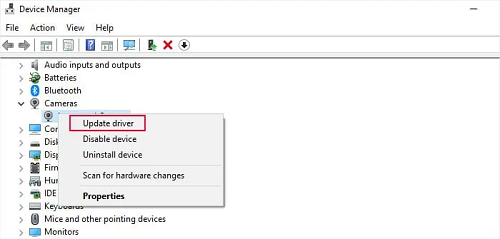
Fix dell laptop camera not working by updating driver
Step 3. In the pop-up window, select “Search automatically for updated driver software.” The system will attempt to automatically find and install the latest webcam driver.
Step 4. After completing the update, it is advisable to restart the computer to ensure the new driver takes effect.
Updating the webcam driver helps to resolve camera issues caused by outdated or incompatible drivers, improving the camera’s performance and functionality.
Way 6. Run Dell SupportAssist
Dell SupportAssist is a system diagnostic and optimization tool provided by Dell, capable of automatically detecting and resolving hardware issues, including camera malfunctions. Here are the steps:
- Open the Dell SupportAssist application and run a system diagnosis.
- If Dell SupportAssist detects camera issues, it typically provides recommended solutions. Follow the indicated troubleshooting steps to address the camera malfunction.
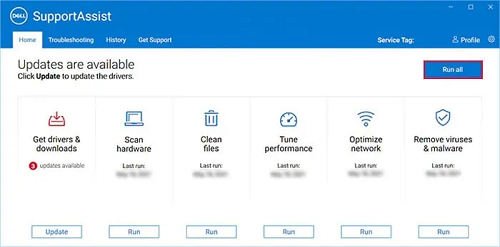
Run supportassist to solve dell laptop camera not working
Way 7. Repair the Camera Device (Hardware)
Repairing the camera device (hardware) is the last resort for resolving Dell laptop camera issues. Sometimes, hardware connection problems may cause the camera to malfunction. Here are the specific steps:
Step 1. Check the camera hardware connections to ensure there are no loose or damaged parts.
Step 2. If there are visible hardware issues, it is advisable to contact Dell technical support or professional hardware repair personnel for assistance. Since hardware repairs require specialized knowledge and skills, professionals can accurately assess and address the problem.
The Bottom Line
Overall, we have provided a comprehensive and well-structured set of solutions to address Dell laptop camera not working. We have covered a range of methods from software adjustments to hardware checks, offering a thorough approach to hardware problem-solving. In summary, through this series of steps, users can systematically address camera issues, ensuring the normal operation of their cameras in various application scenarios.
Product-related questions? Contact Our Support Team to Get Quick Solution >

