How To Fix Asus Laptop Camera Not Working – Find It Fast
Uncover solutions to Asus laptop camera not working issues in 5 ways. This guide provides practical steps, from utilizing the F10 key to troubleshooting and exploring external alternatives. Offering user-friendly tips ensures a smooth experience for video calls and content creation on your Asus laptop.
Picture this: You’re in the midst of a significant virtual meeting, and suddenly your Asus laptop camera not working, leaving you scrambling for a solution. Or, perhaps you’ve attempted to connect with friends and family through video calls, only to find your camera unresponsive. These relatable situations highlight the urgency of resolving Asus laptop camera issues.
This article will explore common issues and provide practical solutions to get your Asus laptop camera up and running seamlessly. Let’s delve into real scenarios and user queries to make this guide more relatable.
Part 1. Possible Reasons Why Asus Laptop Camera Not Working
Before fixing your Asus laptop camera not working, let’s figure out why it’s acting up. Imagine you’re all set for a video call or to capture a moment, but your camera decides to take a break. In this section, we’ll look at common reasons behind your Asus laptop camera not working.
1. Software Glitches:
The intricate dance of software can sometimes lead to glitches within the camera application or the operating system itself, hindering normal camera function.
2. Outdated or Corrupted Drivers:
The vital link between hardware and software, camera drivers, can become outdated or corrupted, disrupting communication and rendering the camera inactive.
3. Privacy Settings:
Incorrect privacy configurations may restrict camera access for various applications, impeding its normal operation.
4. System Updates:
Updates to the operating system or other software can introduce compatibility issues with the camera driver or application, causing disruptions.
5. Hardware Problems:
Physical damage, loose connections, or other hardware-related issues may compromise the camera’s performance. Regular inspection is crucial to identify and address these potential pitfalls.
Part 2. Fix Asus Laptop Camera Not Working In 5 Ways
Getting your Asus laptop camera back on track is like fixing a favorite gadget. We’ve got five super-easy ways to fix your Asus laptop camera not working.
Fix 1. Turn on Asus Camera by Pressing the F10 Key
Step 1. Press the F10 key once. This key often acts as a toggle switch for the camera, turning it on or off.
Step 2. Check Camera Settings. After pressing F10, go to your laptop’s camera settings. You can usually find this in the settings menu or the camera app.
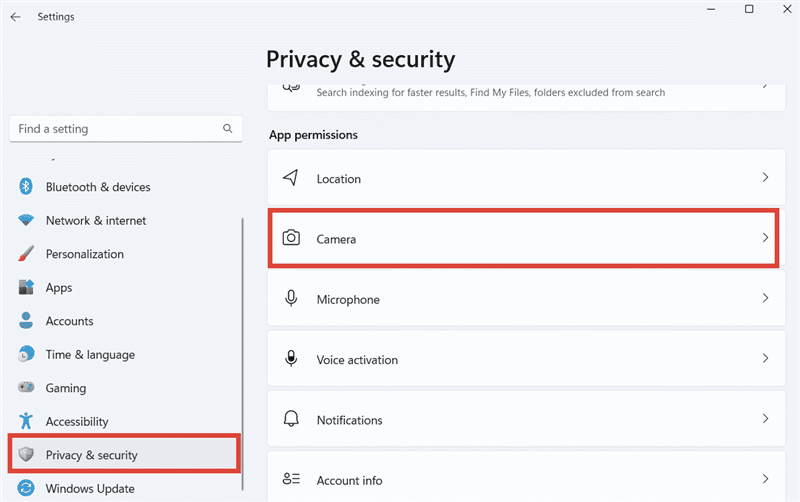
Change camera settings on Asus laptop
Step 3. Verify Camera Activation. In the camera settings, ensure that the camera is activated. Look for an indicator light or a message confirming that the camera is now turned on.
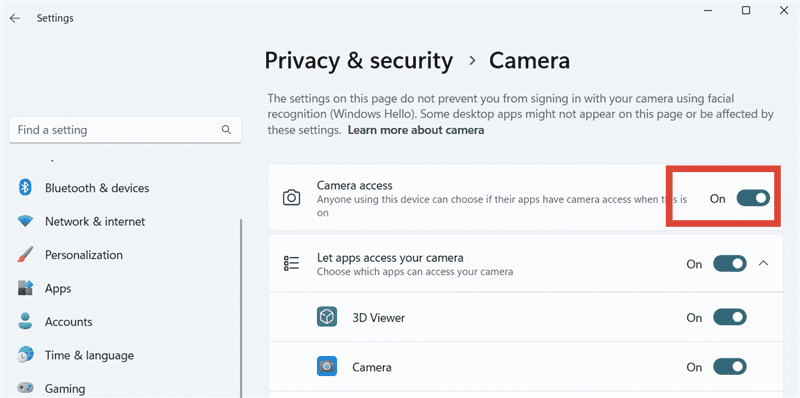
Turn on camera access
Fix 2. Enable Asus Camera in Device Manager
1. Navigate to the Device Manager on your laptop. You can do this by right-clicking the Start button and selecting “Device Manager.”
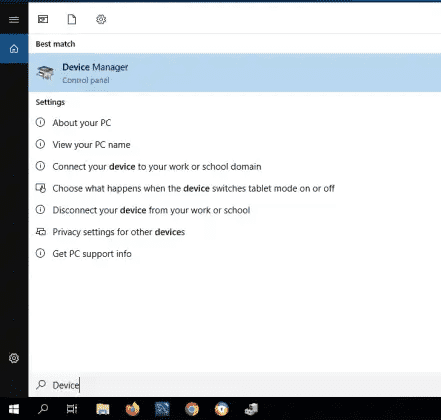
Open device manager on Asus laptop
2. In the Device Manager window, locate the “Imaging devices” section.
3. Find your Asus camera in the list. If it’s disabled, right-click on it and select “Enable.”
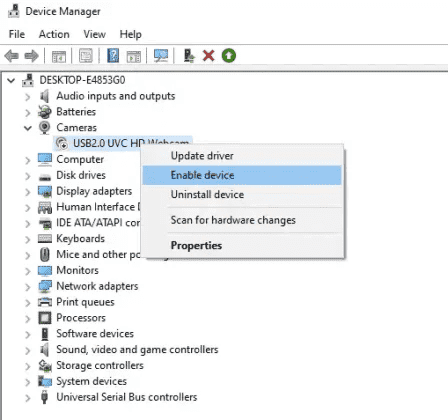
Enable camera device in device manager
Fix 3. Allow Apps to Access Asus Camera
Ensuring your Asus laptop camera plays well with your favorite apps is a breeze to fix Asus laptop camera not working. Here’s a simple guide:
Step 1. Navigate to your laptop’s settings. You can usually find this by clicking on the Start menu and selecting the gear-shaped icon.
Step 2. In the Settings menu, look for the “Privacy” option and click on it. This is where you can control which apps have access to your camera.
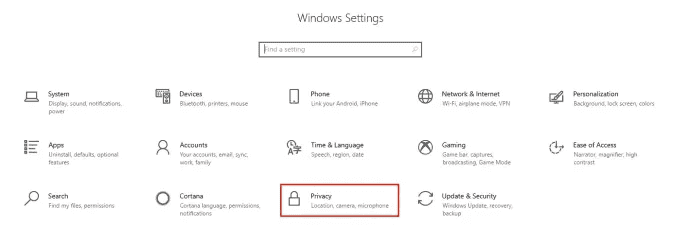
Open Windows settings on Asus laptop
Step 3. Under the Privacy menu, find and click on “Camera.” This will take you to the camera settings where you can manage app access.
Step 4. Make sure the toggle switch for “Allow apps to access your camera” is turned on. This ensures that your camera is ready for action.
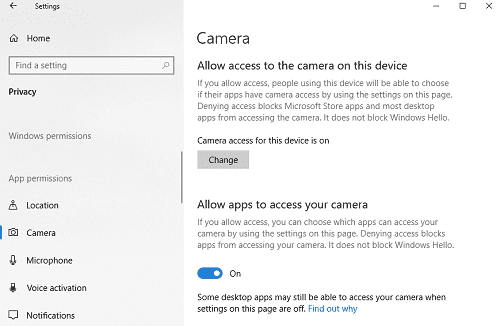
Allow apps to access your Asus camera
Step 5. Manage App Access. Scroll down to find the list of apps that can access your camera. Toggle on the switches for the specific apps you want to grant camera access to.
Fix 4. Troubleshooting Asus Camera problem
When your Asus laptop camera not working, use these troubleshooting methods recommended by the official support.
1. Update Camera Drivers:
- Visit the official Asus support website.
- Locate the drivers section and find the latest camera drivers for your laptop model.
- Download and install the updated drivers to ensure compatibility.
2. Run Windows Troubleshooter:
- Access the Settings menu on your laptop.
- Navigate to “Update & Security,” then select “Troubleshoot.”
- Run the “Windows Store Apps” troubleshooter to identify and fix potential issues with the camera app.
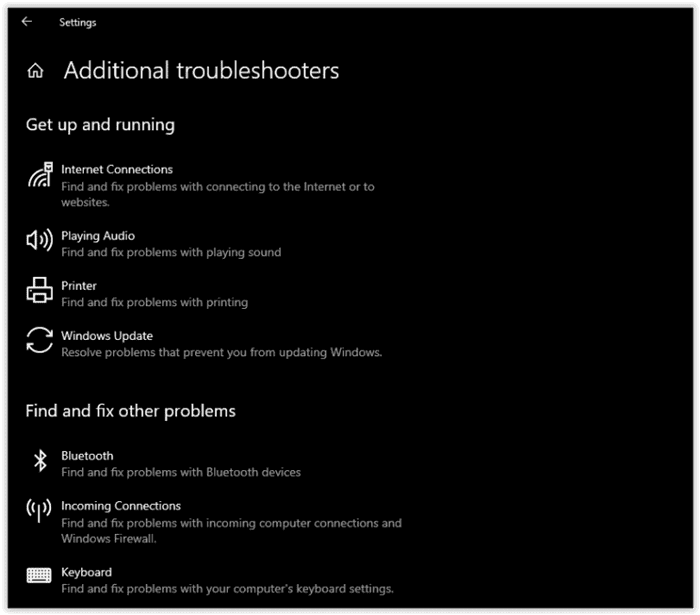
Run windows troubleshooter
3. Check for Windows Updates:
- Go to Settings and click on “Update & Security.”
- Check for Windows updates and install any pending updates.
- Sometimes, camera issues can be resolved by ensuring your operating system is up-to-date.
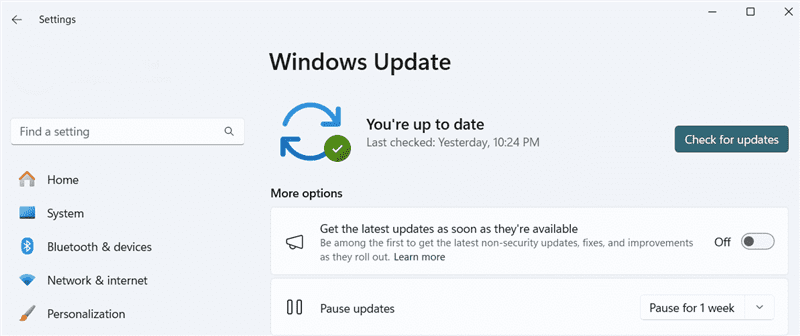
Updating Windows on Asus laptop
Fix 5. Use an External Camera
Consider using an external camera as an alternative solution to solve Asus laptop camera not working. Connect a compatible external camera to your laptop using the USB port. Many external cameras are plug-and-play, requiring minimal setup. Once connected, select the external camera as the default input device in your preferred applications.
Part 3. Tips to Avoid Asus Laptop Camera Not Working
Keeping your Asus laptop camera in top-notch condition is a breeze with these simple tips:
1. Regular Software Updates:
Ensure your laptop’s operating system and camera drivers are regularly updated. Check for updates in the settings menu to maintain compatibility.
2. Handle with Care:
Treat your laptop with care, especially the camera area. Avoid placing heavy objects on the lid and be mindful of potential impacts that could damage the camera.
3. Privacy Settings Check:
Periodically review and update your privacy settings. Confirm that the camera has the necessary permissions to function with your preferred applications.
FAQs about Asus Camera Not Working
1. How to use a built-in camera on Asus laptop?
To use the built-in camera on your Asus laptop, open the desired application such as a video conferencing tool or camera software. Most applications will automatically detect and activate the built-in camera. If needed, check the application’s settings to ensure the correct camera is selected as the input device.
2. Why is my Asus laptop built-in camera not working?
Your Asus laptop built-in camera may not be working due to software glitches, outdated drivers, privacy settings, system updates, or potential hardware issues. Troubleshoot by checking settings, updating drivers, adjusting privacy configurations, ensuring system updates, and inspecting for physical damage.
3. Is it better to use Asus internal or external camera?
The choice between the Asus internal and external camera depends on your specific needs. The internal camera is convenient and built-in for everyday use, while an external camera can offer higher resolution and additional features for specialized tasks like streaming or professional video calls.
Conclusion
In conclusion, resolving Asus laptop camera not working is within easy reach with the practical solutions outlined in this guide. From simple keypresses to adjusting privacy settings and exploring external alternatives, these user-friendly methods aim to revive your camera’s functionality seamlessly.
Try these straightforward methods today, and rediscover the joy of seamless video calls and content creation on your Asus laptop. Your camera is ready for action—give it a go!
Product-related questions? Contact Our Support Team to Get Quick Solution >

