How to Upscale Video to 4K Resolution in 3 Ways
Want to make your videos stand out on bigger screens? Discover a simple method to upscale your footage to 4K resolution. Follow our step-by-step tutorial to effortlessly boost your video’s visual appeal!

Do you want your videos to look sharp and crisp on a 4K Display? We understand it!
Upscaling can significantly enhance the quality of your videos. It makes the video look sharper with clear details, perfect for those big-screen displays where every pixel counts!
With more and more people using 4K devices, upscaling ensures your videos or anime videos continue to attract an audience for years. But the big question remains: how do you upscale a video?
This article is your answer! We will show you how to upscale video to 4K resolution using three powerful tools with step-by-step instructions. From video editing tools to an AI-powered video enhancer solution, we have covered it all.
Ready for it? Let’s go!
Table of ContentsHide
How to Upscale Video to 4K via Adobe Premiere Pro
Premiere Pro is powerful video editing software. It offers advanced tools and effects to enhance your videos. Perfect for professionals and beginners, it makes editing easy.
It effortlessly upscales videos to 4K using advanced algorithms. You can manually adjust the resolution settings or choose from various 4K presets to enhance your videos. The software does the rest to make your videos look amazing!
Let’s see how this 4K video upscaler helps enhance your video to UHD!
Step 1. Create a new project in the Premiere Pro. Then, drag and drop your source video into the field for “Drag media here to create a sequence.”
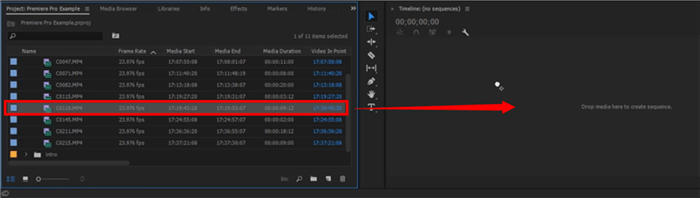
Add the File to the Timeline
Step 2. Go to “File” and hover over “New.” Then click “Sequence” from the list of options.
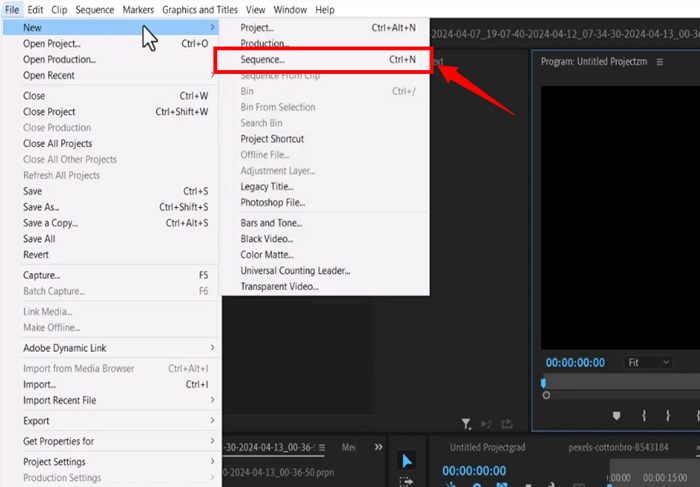
Create a New Sequence
Step 3. A new window will open on your screen. Go to “Sequence Presets.” Expand the “ProRes RAW” folder and open the “4K” section. Select a 4K preset with your desired frame rate.
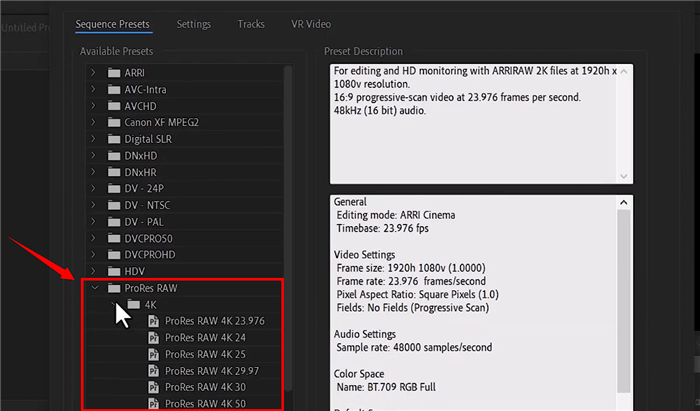
Select a 4K Preset
Step 4. Go to “Settings” to customize the preset further. Check that the horizontal and vertical frame sizes are set to 4096 and 2160, respectively. Then, click “OK.”
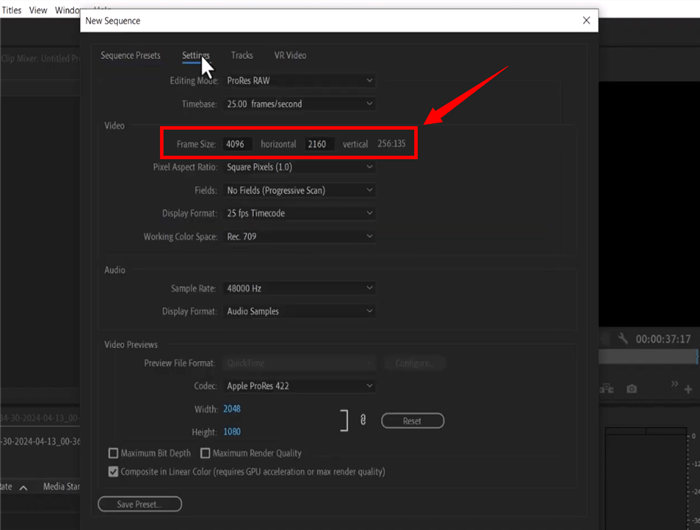
Adjust the Frame Size to 4K Resolution
Step 5. Your video will have black borders around it because it is smaller than the sequence. Right-click on your clip in the timeline. Then, select “Set to Frame Size” to upscale the video.
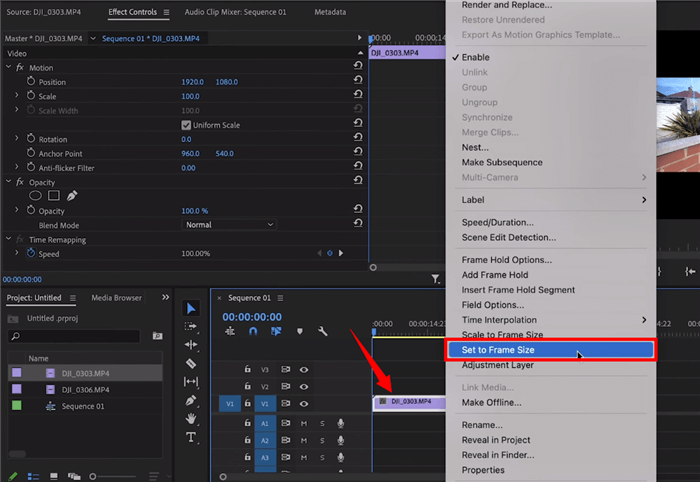
Set the Clip to Frame Size
Step 6. Press “CTRL+M” or “Command+M” on Mac to open the Export menu. Expand the “Format” dropdown and select “H264” from the various formats.
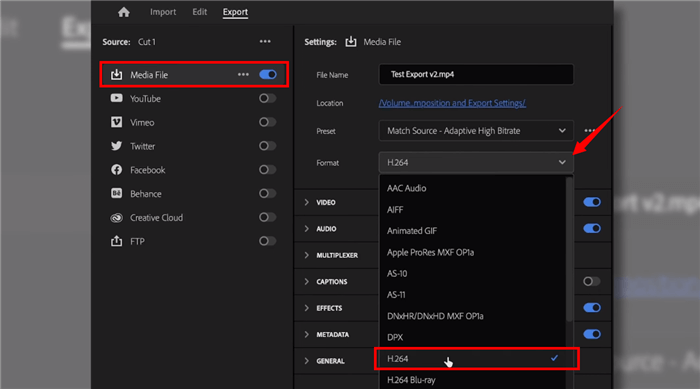
Select the H264 Format
Step 7. Open the “Video” panel and click “Match Source” to match the video to your sequence settings. Click “More” and checkmark “ Render at Maximum Depth” and “Use Maximum Render Quality.”
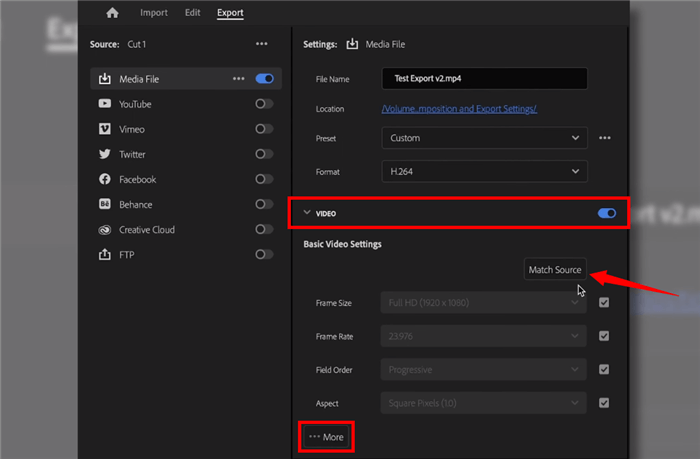
Click Match Source and Expand the More Option
Step 8. Scroll to “Bitrate Settings” and select “VBR, 1 pass.” Then, drag the “Target Bitrate” slider to 30 for smooth video quality. Click “Export” once you’re done.
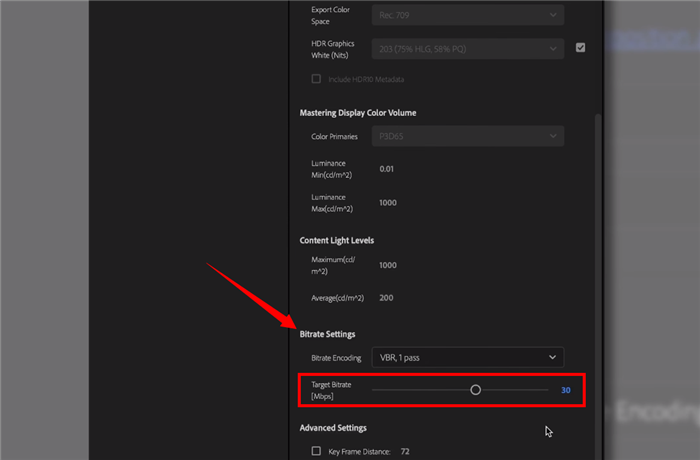
Adjust Target Bitrate
If you’ve found the process of upscaling videos to 4K in Premiere Pro to be quite complex, it’s time to explore an AI video enhancer that simplifies 4K upscaling, offering an automated and effortless alternative. Let’s try this smarter way – AnyEnhancer to enhance your videos!
How to Upscale Video to 4K via AnyEnhancer – 4K Upscaler
Do you want a one-click solution to upscale your videos? AnyEnhancer, a 4K video upscaler, can be your go-to! It is an AI-powered solution that effortlessly upgrades your video’s resolution to 4K. You don’t need to configure complex settings or go through manual editing to enhance your videos.
AnyEnahncer, comes with multiple AI models. These allow you to increase your video’s resolution, remove grain and noise from video, get smoother transitions, colorize the black-and-white videos, and more. It is an all-in-one solution for upscaling your videos without losing details and quality!

AnyEnhancer Webpage Interface
AnyEnhancer – AI Video Enhancement
Download AnyEnhancer to enhance your video quality to 4K resolution, remove grain, smooth motion, and add color to black and white videos with just one click.
Why Choose AnyEnhancer?
Let’s look at the key advantages that make AnyEnahcer the best AI video upscaler!
- AI-driven Solution: AnyEnhancer uses intelligent AI algorithms to upscale videos automatically. This provides seamless results without any effort on your part!
- Upgrade Non-HD to UHD: Upgrade any footage, even 360p and 480p videos, to 4K without blurred or pixelated outputs.
- Upscale without Losing Details: Being an AI-powered upscaler, AnyEnhancer understands video content. This ensures that the video’s details are not lost during upscaling.
- Multiple AI Models: Beyond upscaling videos, AnyEnahncer comes with multiple AI models. You can use them to remove grain from the video and colorize the black-and-white video for high-quality results.
- Optimize the Frame Rate: Struggling with inconsistent frame rates in videos? AnyEnhancer fills in missing frames to achieve smoother transitions up to four times!
Ready to use AnyEnhancer to upgrade your videos? Here’s a stepwise guide for it!
Steps to Upscale Video to 4K Using AnyEnhancer
Free download and install AnyEnhancer on a Windows or Mac device. Then, use the following instructions to upscale your videos to 4K.
Step 1. Launch AnyEnhancer on your computer. Click the “Upload Video” button to import the video you need to upscale. You can also drag and drop it into the program.
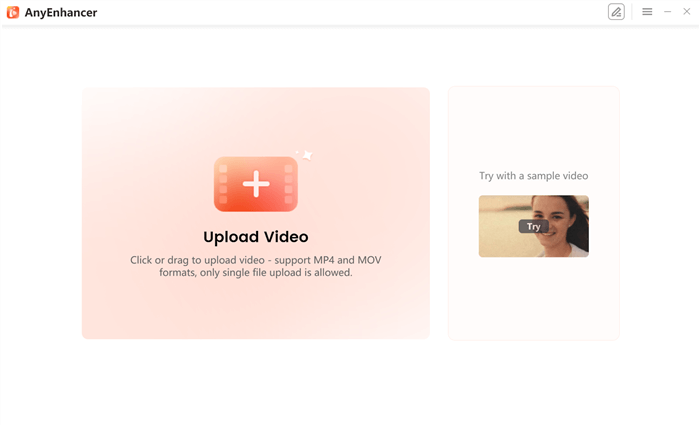
Upload Your Video to AnyEnhancer
Step 2. A new window will open. Select the “Resolution Enhancement” AI model from the right. Then select the “4K” option under Model Settings to upscale the video to 4K.
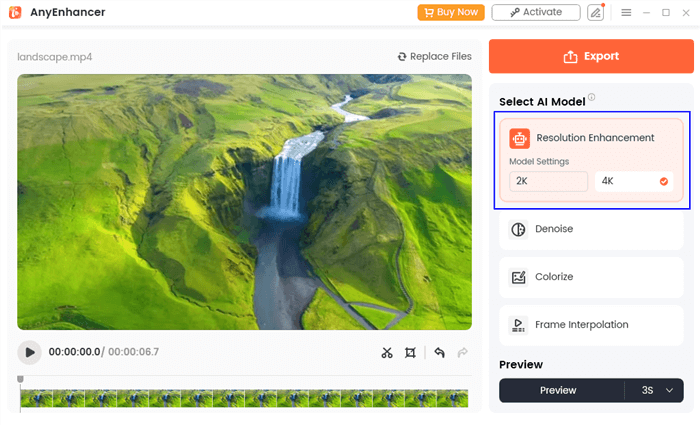
Select the Resolution Enhancement
Step 3. Click the down arrow in the Preview section to choose the preview duration. Then, hit the “Preview” button and proceed.
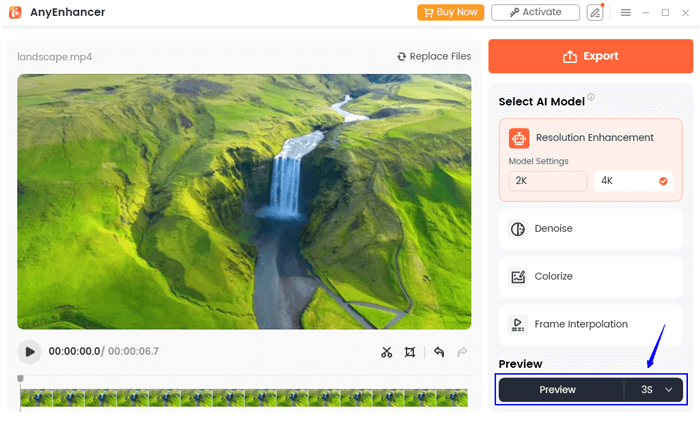
Click the Preview Button
Step 4. You will see a comparison of the enhanced video on the right and the original video on the left. Here, you can review the resolution, number of processed frames, remaining time, and frame count for the playback.
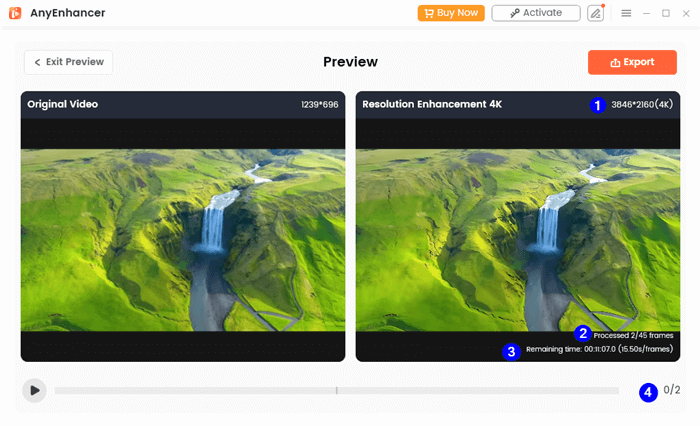
Compare the Video Upscaled to 4K
Step 5. Then click “Export” at the top right to save it to your device. A popup will appear on your screen. From here, rename the file and choose the video’s frame rate, format, and location. Once you’re done, click the “Export” button.
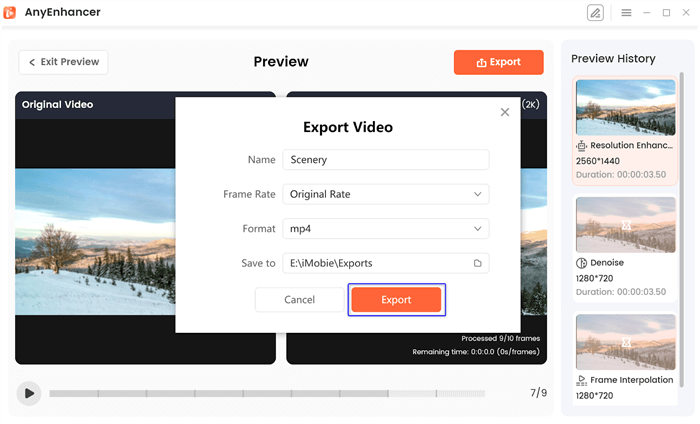
Export the Video
Free Download for all windows & 100% safe Free Download for all mac & 100% safe
Free Download100% Clean & Safe
That was effortless, right? Upscaling videos is a work of a few clicks with AnyEnhancer AI! Let’s move forward now and explore another way to enhance video resolution!
How to Upscale Video to 4K by Final Cut Pro
Final Cut Pro is a versatile video editor that is compatible with Mac devices. It offers various useful video editing tools. These include multicamera editing, advanced color correction, and HDR support.
It also lets you upscale a video to 4K in straightforward steps. It enhances video quality and provides sharp and detailed visuals with advanced technology.
Here’s how to upscale your videos using it.
Step 1. Open Final Cut Pro and click the down arrow in the top left to import your video.
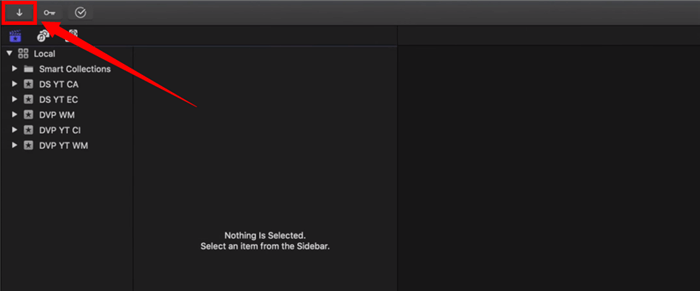
Click the Down Arrow to Import the Video
Step 2. Go to “File” from the top menu and click “New” from the list. Select “Project” from the expanded options.
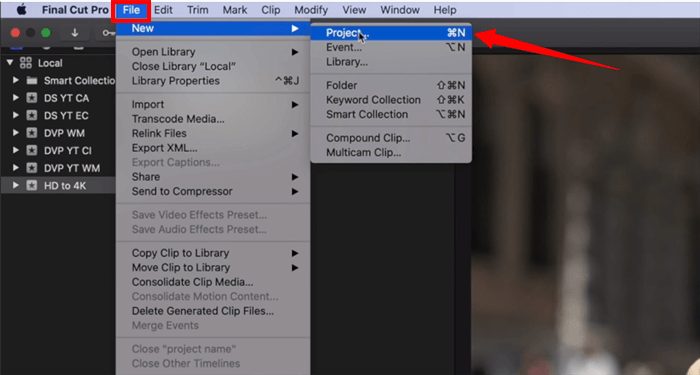
Create a New Project
Step 3. A small window will appear in the top middle part of your screen. Rename the file from here and click “Use Custom Settings” to view advanced options.
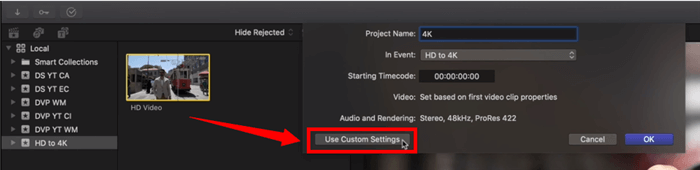
Click the Use Custom Settings Option
Step 4. Go to the Video section and choose “4K” from the Format dropdown. Then select the frame rate and open the Resolution dropdown to choose your desired 4K preset. Click “OK” once done.
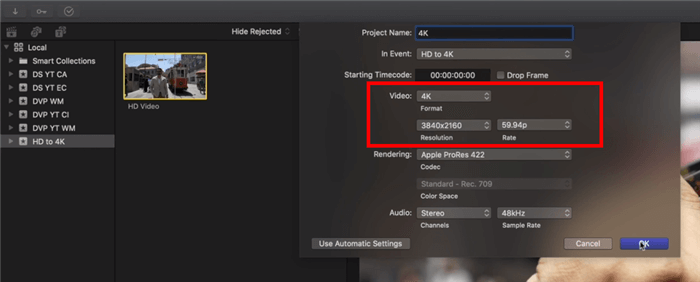
Adjust the Video Resolution
Step 5. Your video will begin to upscale. Drag/drop the video to the timeline and wait for the rendering to complete.
Step 6. Click the “Share” icon from the top right corner and select “Master File” from the list.
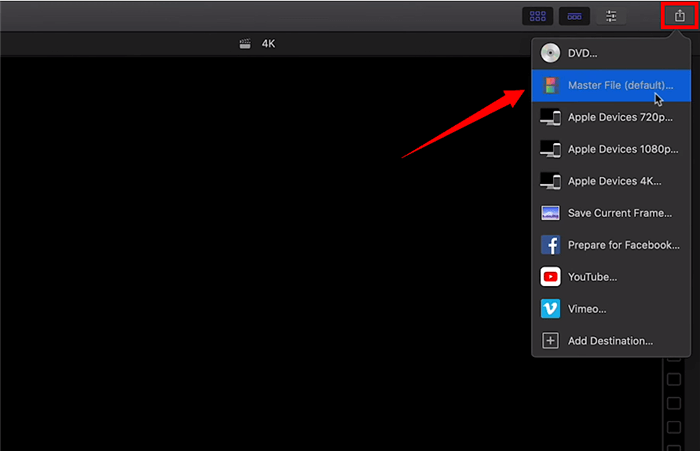
Select the Master File Format
Step 7. Go to the “Settings” section. Open the “Video Codec” dropdown and select H.264. This will lower the large file size while preserving the quality. Click “Next” once you’re done.

Select H264 Format
That’s all about converting videos to a 4K resolution! Both Premiere and Final Cut Pro offer a great solution. However, the quality may not be the best for all videos.
But don’t worry! Continue below to learn the reasons for poor-quality results and how to tackle them.
Factors Affecting Upscaling Results
Struggling with poor video quality after upscaling it to 4K? Let’s break down the essential factors that are responsible for it. Once you understand these factors, you can upscale your videos with crisp results.
Original Video Quality
The quality of the source video significantly impacts the upscaling results. Videos with high resolution, like 1080p, are sharper and more accurately enhanced compared to low-quality videos with blurred details.
Upscaling Method
There are different methods to enhance the quality of your videos. These include manual video editing or automatic upscaling using AI techniques. Compared to video editors, AI-based 4K video upscalers offer more accurate results.
Software/Service Settings
If you’re using a video editor program to upscale your videos, select the appropriate export settings for a 4K resolution. Moreover, you can use adjustment tools like noise and artifact reduction or sharpness to enhance the details.
Hardware Capabilities
Your computer hardware plays a significant role in processing upscaled videos. Powerful processors and high-end graphics cards can easily handle complex upscaling. Comparatively, outdated hardware can cause longer times and lower quality.
Considering these factors, you can get high-quality results when upgrading your videos. Still have questions about upscaling? Go through our FAQs section to find answers!
FAQs about Upscaling Video Quality
What are the benefits of upscaling video?
Upscaling videos offers several advantages. It enhances video resolution, making it appear sharper and more detailed on high-resolution displays. It also reduces blur and fills in missing details to provide a smooth viewing experience.
Can I Upscale Video to 4K Online Free?
Yes, you can upscale videos to 4K online for free. Several online tools offer AI-powered video upscaling services without the need for signups, installations, or configurations. Here are a couple of options: Vmake AI, Media.io, and TensorPix.
What are some common video upscaling techniques?
Video upscaling techniques include manually enhancing the quality using video editing programs or AI upscalers. Editing software uses powerful interpolation techniques to smoothen the keyframes. AI video upscalers add missing details and sharpen them using deep learning.
Can 1080P be upscaled to 4K?
Yes, you can upscale 1080p to 4K. This will require editing tools like Premiere Pro or an AI-powered 4K video upscaler. These solutions work by increasing the pixel count to 4K, reducing noise, and enhancing visual clarity.
Final Words
That’s a wrap for how to upscale a video to 4K resolution! We have shared step-by-step instructions for upgrading video quality using Adobe Premiere, AnyEnhancer, and Final Cut Pro.
These tools offer a handy solution to enhance your videos for a professional look. But with an AI video upscaler like AnyEnhancer, the possibilities are endless!
You can use AnyEnhancer to give your video a brand-new feel in a few clicks! There is no need for manual editing or complex navigation. You can upgrade the video resolution to 4K without losing any details. Try it for an automatic solution to upscale videos with AI.
AnyEnhancer – AI Video Enhancement
Download AnyEnhancer to enhance your video quality to 4K resolution, remove grain, smooth motion, and add color to black and white videos with just one click.
Product-related questions? Contact Our Support Team to Get Quick Solution >
