How to Stabilize Video on iPhone
Wondering how to stabilize video on iPhone? This guide covers easy ways to stabilize videos using iPhone’s built-in features such as Enhanced Stabilization, Motion Tracking and Action mode. Additionally, we’ll be using artificial intelligence to enhance the frame rate of a video and add a touch of smoothness via AnyEnhancer – an efficient video stabilization solution for enhancing stability, tracking motion, and smooth action shots.
Ever taken a video on your iPhone only to find it shaky and hard to watch? Imagine filming a special moment, but the video becomes blurry with movement. Wondering how to stabilize video on iPhone? Thankfully, iPhones have built-in tools such as Enhanced Stabilization, Motion Tracking, and Action mode to help stabilize videos. Plus, there’s AnyEnhancer – a brilliant AI tool that can make videos smoother. With AnyEnhancer, you can steady shaky footage, improve old video quality, and capture action. Let’s explore more details about this!
Table of ContentsHide
Stabilize Video on iPhone with its Built-in Feature
iPhones have built-in capabilities for stabilizing your videos, making them look more professional and appealing. Here are some of its primary built-in features:
Enhanced Stabilization
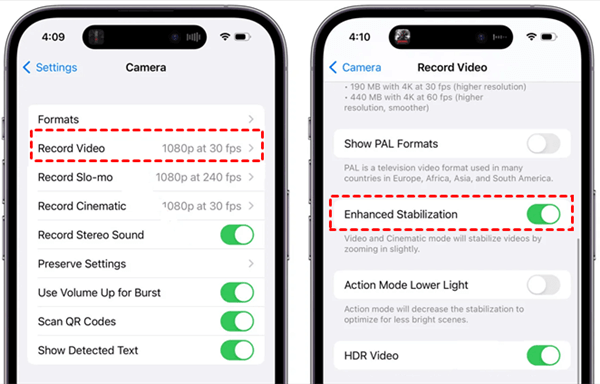
Your movie will appear smoother and more professional thanks to the iPhone’s enhanced stabilization, automatically lessening shakiness. This tool is perfect for hand-held shots, as it steadies movements and minimizes blurriness even if your hands aren’t perfectly still. Enhanced Stabilization adjusts each frame to limit unexpected motion, which is great for capturing important moments on the go. Whether filming a casual video or a memorable event, this feature helps you create clear, stable footage with minimal effort, making it easier to enjoy and share your videos. Here’s how to stabilize iPhone video using this feature:
Step 1. Open “Settings” and choose “Camera”.
Step 2. Tap “Record Video”.
Step 3. Locate “Enhanced Stabilization” and switch it on.

Switch On Enhanced Stabilization
Motion Tracking
Motion Tracking (usually works on Mac) lets you focus on moving subjects with improved clarity and stability, like children playing or pets running. By following the subject as they move, Motion Tracking reduces blur and keeps the focus where you want it. It’s especially helpful in active scenes, ensuring your videos remain sharp and centered on the action. This tool analyzes the motion of a selected reference pattern within the frame, tracking it dynamically so you can enjoy the moment while capturing smooth, focused footage. Here are six key Motion Tracking functions on iPhone:
- Analyze Motion: This feature gathers and saves movement data from your video, allowing it to be applied to other objects. It’s perfect for making other elements follow the video’s movement.
- Match Move: This allows you to lock a moving object to another item in the frame, keeping both in sync as they move together seamlessly.
- Stabilize: Removes unwanted shakiness from your video, making footage appear more stable and professional-looking, ideal for smooth scenes.
- Unstabilize: This function applies captured motion to new elements, adding a natural-looking shake. It is useful when blending added elements with existing footage.
- Track Points: This method tracks the shape and movement of a specific object, such as cutting out a car from the background by following its shape across the scene.
- Track: This function locks the position or focus of an effect (like a blur) on a moving subject, allowing precise adjustments as it follows the subject throughout the video.
Action Mode
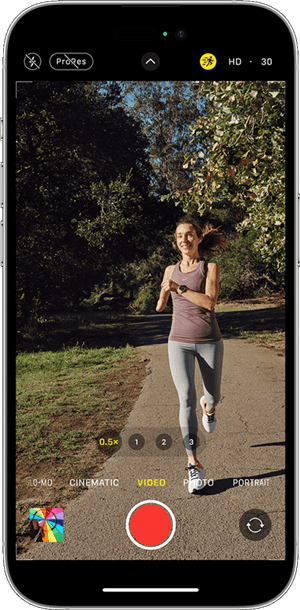
Action Mode is a dynamic tool on the iPhone designed for fast-paced filming, perfect for outdoor adventures, sports events, or any active scene. It minimizes shakiness in high-motion settings, making it easy to record smooth videos even when moving quickly. Action Mode automatically stabilizes each frame, keeping the focus steady on the action and reducing unwanted movement or blurriness. This feature is a go-to for anyone looking to capture crisp, exciting footage in busy or energetic settings without needing additional equipment or tools. Here’s how to stabilize shaky video on iPhone through this feature:
Step 1. Access the Camera app.
Step 2. Swipe through the camera modes and select “Video.”
Step 3. Tap the “Action mode” icon, which looks like a running person, until it turns yellow.

Tap The Action Mode Icon
Step 4. Press the red “Record” button to start filming and enjoy a stabilized video.
How to Stabilize iPhone Video with AI [Recommended]
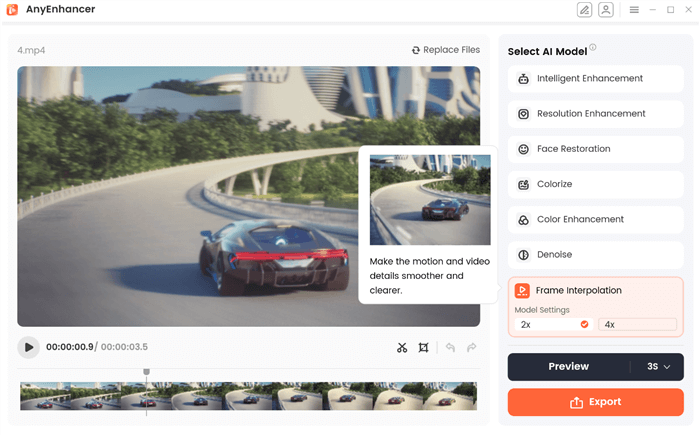
How can you stabilize iPhone videos using AI? AnyEnhancer is an advanced tool designed to enhance and stabilize videos. Its Frame Interpolation model is especially effective for stabilization, increasing the frame rate of your footage to create smoother motion. As a result, your videos will appear polished and professional. With both 2K and 4K options for vivid and colorful effects, the Resolution Enhancement model also enhances the quality and clarity of your video.
AnyEnhancer offers several other capabilities to improve your video experience in addition to stabilization. The Face Restoration model improves facial details for crisper photos and can identify faces in hazy films. The Denoise Model lowers noise to enhance visual quality, while the Colorize Model adds color to black-and-white videos. Finally, the Color Enhancement function enhances the visual appeal of low-quality videos by brightening and saturating them.
Key Features:
- The Intelligent Enhancement model improves both super-resolution and facial clarity at the same time.
- Face Restoration enhances blurry faces by refining facial details.
- The Frame Interpolation model increases the frame rate for smoother video motion.
- The Video Denoiser sharpens images by reducing visual noise.
- Color Enhancement brightens and intensifies dull colors, making them more vivid.
Now, let’s explore the steps to use AnyEnhancer for video stabilization:
Step 1. Free download and install AnyEnhancer on your computer.
Free Download for all windows & 100% safe Free Download for all mac & 100% safe
Free Download100% Clean & Safe
Step 2. Launch the program and click “Upload Video,” or drag your file into the window.

Upload the Original Video
Step 3. Choose “Frame Interpolation” to begin stabilizing your video.

Frame Interpolation Model
Step 4. Click “Preview” to see how the improved video compares to the original version.

Choose the Preview Duration
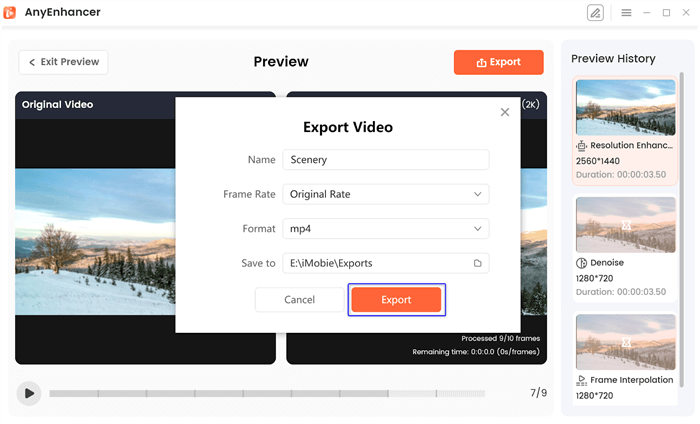
Step 5. Once you’re happy with the preview, select “Export.” After entering a file name and format and choosing a save location, click “Export” once more to finish the procedure.

Export the Video
FAQs on Stabilize Video on iPhone
Can I stabilize old videos?
Yes, you can stabilize old videos using various apps and software. Programs like AnyEnhancer help improve the quality of older videos by stabilizing them and reducing noise, making them look better.
Does stabilization affect video quality?
Stabilization may slightly change video quality, but it improves the overall look by reducing shakiness. Tools like AnyEnhancer can enhance video quality while stabilizing, making the final product more visually appealing.
Will stabilizing my video take a long time?
The time it takes to stabilize a video depends on its length and the software you use. Generally, stabilizing shorter videos is usually quicker, while longer videos may take longer. Most modern tools can provide results in just a few minutes.
Final Words
In conclusion, stabilizing videos on your iPhone can improve their quality and make them look more professional. You can easily reduce shakiness and enhance your video content by using built-in features or reliable software. For an even better experience, we recommend trying AnyEnhancer, which offers features like intelligent enhancement, frame interpolation, and noise reduction to achieve stunning video results.
AnyEnhancer – AI Video Enhancement
Download AnyEnhancer to enhance your video quality to 4K resolution, remove grain, smooth motion, and add color to black and white videos with just one click.
Product-related questions? Contact Our Support Team to Get Quick Solution >

