How to Stabilize Video in Final Cut Pro [2 Methods]
This post will review how to stabilize video in Final Cut Pro using two easy methods. You will learn in-depth how to decouple sequences and adjust camera motions to stabilize your videos. Additionally, AnyEnhancer—an AI-powered motion blur reduction and video stabilization tool—will be introduced to make your videos perfect.
Do you recall a situation when you filmed a video only to discover that the shots were all shaky? Fortunately, this is an area where Final Cut Pro offers specific solutions. When you stabilize the visuals, your clips will look better, enhance the overall result, and be more professional.
Here, you’ll discover two basic methods of stabilizing videos in Final Cut Pro to create professional-looking shots. You do not need to be a professional – just a few swipes, and you will be recording smooth, stable videos. Also, we’ll present an AI-based option to enhance your video even more and improve your video codecs. So, let’s explore how to stabilize video in Final Cut Pro!
Table of ContentsHide
How to Stabilize Shaky Videos in Final Cut Pro
Final Cut Pro is one of the best video editing tools, and it is currently popular and used by professional and novice users. One of the features that may prove particularly useful is Stabilization, which makes it very simple to remove the motion blur from recorded videos.

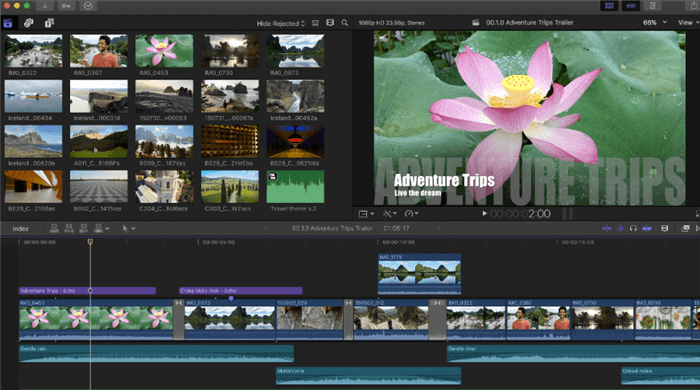
Final Cut Pro X Interface
No matter the type or scale of the project – a short video or a large-scale film, this tool enables you to make the footage appear more refined. Besides Stabilization, Final Cut Pro has other value-added options for enhancing video quality, including Color Correction, Multicam Editing, and Motion Graphics. These tools allow you full control over your editing, leaving your work polished and professional.
Key Features:
- Smooth, shaky footage for a more professional and polished look.
- Easily organize clips without worrying about overlapping or losing sync.
- Fine-tune the color and tone to enhance your video’s visual appeal.
- Sync multiple camera angles effortlessly and switch between them seamlessly.
- Delivers faster performance and smoother editing on Mac devices.
Here are the steps to stabilize your video in Final Cut Pro:
Step 1. Launch the Final Cut Pro on your PC. Import the desired shaky footage into the software and place your clip on the timeline.

Import Media
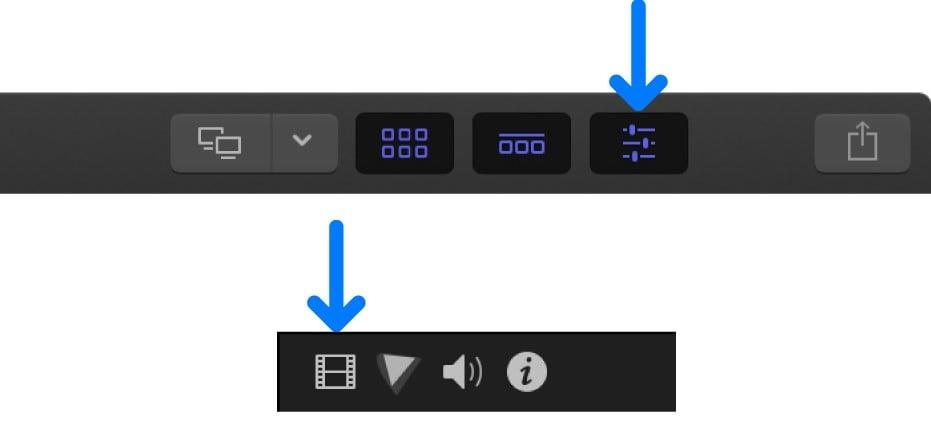
Step 2. Access the Video Inspector by pressing “Command-4” or navigating to Window > Show in Workspace > Inspector and then pressing the “Inspector” button on the toolbar. In the Inspector, click the “Video” tab.

Inspector Toolbar
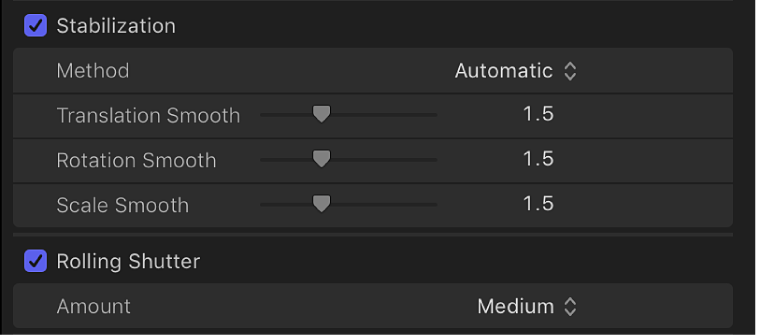
Step 3. Scroll down for the “Stabilization” and “Rolling Shutter” options.
Now, there are three methods to stabilize a video in Final Cut Pro i.e., Automatic, SmoothCam, InertiaCAM.
Method 1. Automatic
As clear from the name, the methods work by analyzing the footage and then determining what stabilization algorithm will work best for the footage. Once you check the box for “Stabilization” it will turn blue, and the software will start analyzing the footage. Check the “Rolling Shutter” box to fix any distortion from fast camera movements.

Automatic Stabilization
Method 2. SmoothCam
Select the arrow next to Automatic and then choose “SmoothCam.” In this method, you can choose and adjust the translation and rotation, and even modify the left, right, up, and down movement for a shot. You can also alter a camera shot’s forward and backward movement with Scale Smooth Slider.
- Translation Smooth: It can adjust horizontal and vertical movement.
- Rotation Smooth: Alter the rotational motion or movement of a shot.
- Scale Smooth: It can adjust the stabilization in a zoom shot.

SmoothCam in Final Cut Pro
Method 3. InertiaCam
If your shot has pans and zooms, the option works perfectly to improve the stabilization. You can adjust the slider for “Smoothing” and increase or decrease the stabilization. It also has a “Tripod” mode to simulate the tripod shot.

InertiaCam in Final Cut Pro
Step 4. Once done, export the footage in Final Cut Pro.
Best Final Cut Pro Alternative to Stabilize Video with AI
AnyEnhancer is an advanced AI tool created to increase the quality of video, especially improving old video quality by applying various AI models. One of those features is the Frame Interpolation, which enhances the frame rate of the video clip and, thus, its smoothness and quality. This model produces frames in between existing frames, providing your video with a smoother look and removing the shakiness.
In addition to frame interpolation, AnyEnhancer offers several other impressive features. Face Restoration helps recognize and restore blurry faces, making facial details clearer. Resolution Enhancement boosts the quality of your video, providing vibrant and colorful visuals with options for 2K and 4K settings. The Denoise Model reduces unwanted noise, improving overall video clarity.
Key Features:
- Intelligent Enhancement applies super-resolution and facial enhancement for clearer details and better quality.
- Restore, enhance, and refine the facial details in blurry videos.
- Colorize Model adds color to black-and-white videos, bringing them to life.
- Color Enhancement boosts the brightness and saturation of low-quality videos.
- Includes various other enhancements to improve video quality and visual appeal.
Here’s how to use AnyEnhancer for color grading in a few easy steps:
Step 1. Download AnyEnhancer from the official website and install it on your computer.
Free Download for all windows & 100% safe Free Download for all mac & 100% safe
Free Download100% Clean & Safe
Step 2. Open AnyEnhancer, click “Upload Video,” or drag your video file into the program.

Upload the Original Video
Step 3. Choose the “Frame Interpolation” Model to improve and stabilize your video’s motion.

Frame Interpolation Model
Step 4. Click “Preview” to compare your original and enhanced video side-by-side.

Choose the Preview Duration
Step 5. If you’re satisfied with the results, click “Export,” adjust your settings, and then select “Export” again to save the final version.
AnyEnhancer – AI Video Enhancement
Download AnyEnhancer to enhance your video quality to 4K resolution, remove grain, smooth motion, and add color to black and white videos with just one click.
FAQs on Stabilizing Video Final Cut Pro
Is it possible to change the stabilization settings of Final Cut Pro?
Yes, the Stabilization can be altered by checking the Stabilization box in the Video Inspector and fine-tuning the parameters to suit the movement shot.
What should I do if Stabilization is not working effectively?
If Stabilization isn’t working well, try adjusting the settings or using additional stabilization tools. You might also consider using alternative software like AnyEnhancer for better results.
How long does it take to stabilize video when using Final Cut Pro?
The stability time of a video varies with the length and the kind of video clip recorded or created. Depending on Final Cut Pro specifications and your computer’s performance, your video will be processed and stabilized.
Final Words
In conclusion, stabilizing videos in Final Cut Pro using the methods described in this article can improve your projects’ smoothness and polished appearance. Therefore, one can stabilize the images in the shaky video by following the easy, quick, and hassle-free techniques mentioned above. For those seeking even better results, AnyEnhancer is a highly recommended tool. Its advanced AI models offer superior Stabilization, frame interpolation, and additional enhancements like color grading and face restoration. Give AnyEnhancer a try to take your video quality to the next level and achieve stunning, polished results.
Product-related questions? Contact Our Support Team to Get Quick Solution >

