How To Reduce Noise in Premiere Pro [Step-by-step Guide]
Looking for a way on how to reduce noise in Premiere Pro? No worries! This detailed guide will unfold the concept of video noise and a method to reduce grain via Adobe Premiere Pro. Want an easy and effective solution? Try AnyEnhancer— an AI upscaling tool to get rid of blemishes, noise, and visual grain in the footage.
Joy Taylor | Last Updated: Aug. 23, 2024
1659 words|5minute
If you’ve been into digital content creation, there must be a time when you might have experienced a noisy video issue. Noise in video can happen for various reasons, including shooting in dark places, poor resolution, unsatisfactory camera results, etc. Whatever the reason, video noise can degrade the quality and ruin the purpose of entertainment for your audience.
However, worry no more; we’ve got you covered with a solution. You can easily remove unwanted pixel variations from your videos with the help of various denoising tools available on the market, and Adobe Premiere Pro is one of them. Adobe Premiere Pro provides users with an easy method to remove grains and visual noise from their footage so that they don’t need to shoot again. We’ll also recommend users with an alternative such as AnyEnhancer – an AI video upscaling tool, to improve resolution and reduce noise effect. Let’s explore how to reduce noise in Premiere Pro detail!
What is Video Noise?
Video noise— an unwanted and unwelcome guest in your videos – can refer to grains and pixel disturbance in your footage that can ruin the overall quality. Visual noise can also deteriorate the video clarity and lower the sharpness, leading to a blurry or distorted feel. There are multiple types of video noise, such as Gaussian noise, Salt and Pepper noise, Shot noise, Periodic noise, and more.
Video noise can happen for various reasons, such as poor camera sensors, higher ISO settings, and more. It leads to pixel distortion that sometimes cannot even be handled in post-production editing. Let’s briefly explore the most common causes of video noise.
- Poor Camera Sensors: If the sensors are not up to the mark and are smaller, it can lead to video noise due to less light entering the camera.
- High ISO Settings: High ISO settings serve as a double-edged sword for videographers. They enhance the camera sensor’s sensitivity but can also add noise to your videos simultaneously.
- Post-Production Effects: Sometimes, post-production editing and effects can add to the noise level of a video rather than minimize it. For example, applying color correction, adding multiple effects, and more can damage the pixels.
Now that you’ve completely understood video noise and explored its major causes, it’s time to explore how to remove grain in Premiere Pro.
How to Reduce Noise in Premiere Pro [Step-by-Step Guide]
Regarding video noise reduction and reducing the visual grain, Adobe Premiere Pro is the top choice! It is a professional-grade editing software that allows you to edit, trim, cut, or improve footage and craft a whole story with its multiple advanced-level AI tools and three-point editing.
The tool offers powerful features when it comes to color correction or setting the tone. You can also add multiple effects and animation to improve the video quality and give it a cinematic feel. It must be noted that removing grain or video noise in Premiere Pro is not a single-effect or one-size-fits-all solution. You’ll need to perform various steps and combine a few effects, filters, and settings to get a final noise-free look.
Step-by-Step Guide to Reduce Noise in Adobe Premiere Pro
Let’s explore the step-by-step guide to reduce the noise effect and eliminate the grains and pixel distortion from your footage to get a professional-looking clip. Here’s how to reduce noise in Premiere Pro:
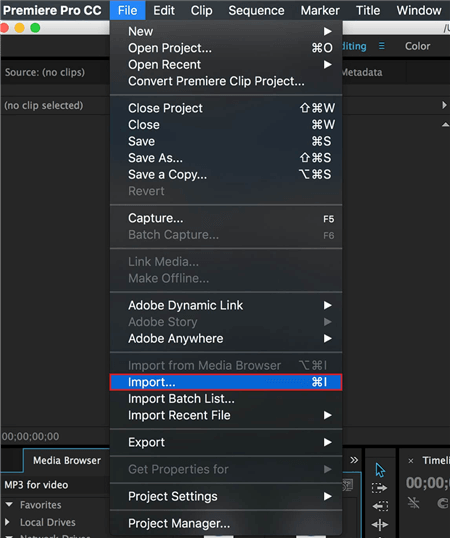
Step 1. Import your Footage in Adobe Premiere Pro
The first step to reduce noise and grain in Premiere Pro is to import the footage. Click on “File > Import” and then create a sequence. Drag the media to the timeline for further editing.
Import Your Noisy Video
Step 2. Add the Media Effect
Navigate to the “Effects” panel in Adobe Premiere Pro. Under the Effects panel, search for “Video Effects” and expand it. Click on “Noise and Grain” and then “Median Effect“.
You can also directly search for the “Median Effect” in the search bar under the “Effects” panel.
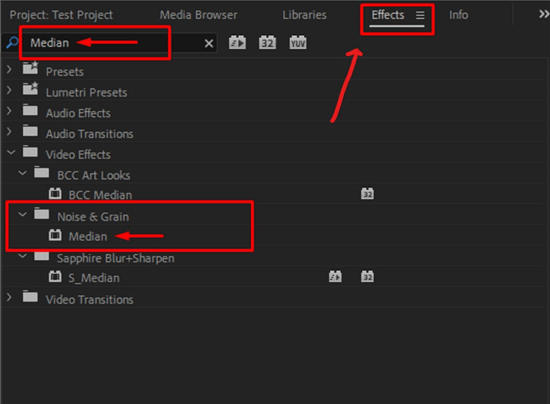
Apply the Median Effect
Step 3. Adjust the Radius
The next step is to adjust the settings for the radius. Navigate to the Effects Control panel and then look for the media effect. Adjust the “Radius Settings” for the Median effect. You can set the value in numbers and see the effect in your footage.
You can keep increasing the number and see the denoising effect in the footage. However, if the Media effect is applied excessively, it can cause blurriness and affect the details in the video.
Step 4. Utilize the Mask
You might not want to add a blurry Median effect to some parts of the video. Therefore, you can utilize the “Mask” to remove unwanted noise and pixel distortion from specific parts of your footage.
Create a Mask from the Effects Control Panel. You can draw any shape or even use the pen to draw the mask shape freely. However, make sure to apply the mask in only those parts of the video where the clip is not moving much, as the mask stays in the same place.
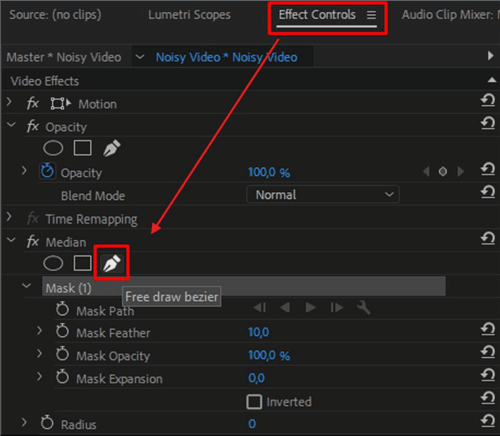
Use Masks for Targeted Noise Reduction
Step 5. Adjust Settings
You can adjust the settings if the mask looks too sharp or has visible edges. Modify the “Feather” and change it to 100 so the mask doesn’t have a visible edge and gives a softer feel.
AI Videos Denoising Solution – AnyEnhancer
If you find it challenging to use Adobe Premiere Pro and are tired of adjusting different settings for every portion of the video. No worries! We’ve got you an all-in-one solution where you can eliminate the noise level in one go. We recommend using AnyEnhancer, an AI video enhancer tool, to boost the resolution, bring clarity, increase sharpness, and reduce the visual grain from your footage – all of which can be done in a few simple clicks.
AnyEnhancer has mature AI technology that can improve the resolution of your videos from 360p or 480p to 4K and even optimize the frame rate by 2X or 4X. Moreover, this upscaling has a brilliant Denoiser AI model that can eliminate the footage’s annoying visual grain and compression artifacts. Don’t want to ruin the quality while improving the sharpness? AnyEnhancer can be your go-to choice, as it can preserve the original hues of the video while removing noise.
Key Features of AnyEnhancer:
- AI Enhancement (Resolution Enhancement) – Improve the video quality without shooting it again with a high-end camera. Boost the resolution from 360p or 480p to 4K while preserving the original details and sharpness of the footage.
- Video Denoising – Visual noise, compression artifacts, and pixel distortion can ruin the footage. Discover the possibilities of removing fuzziness from your clips and adding clarity via the Denoiser AI model.
- Colorize Video – Want to relive the past moments but bring them to life first? AnyEnhancer has the Colorize AI model that can revive the colors of your old footage. It can identify objects and colorize them with a single click.
- Video Frame Interpolation – Videos serve the purpose better when smooth! Add ultra-realistic smoothness via the Frame Interpolation by optimizing the frame rate per second (FPS) by 2X or 4X.
Here’s a step-by-step guide to removing noise from videos via the AnyEnhancer AI tool:
Step 1. Download and install AnyEnhancer on your PC. Launch the software, click the “Add” button, or drag and drop noisy videos into the tool.
Free Download for all windows & 100% safe Free Download for all mac & 100% safe
Free Download100% Clean & Safe
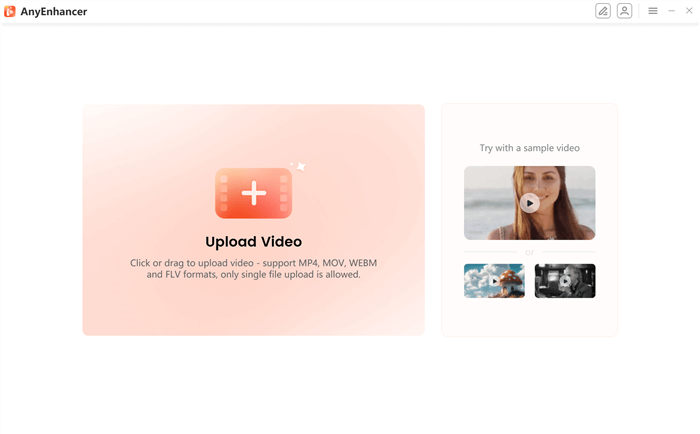
Upload the Original Video
Step 2. The next step is selecting the AI model you wish to apply to your noisy video. You can select the “Denoise,” as in our case.
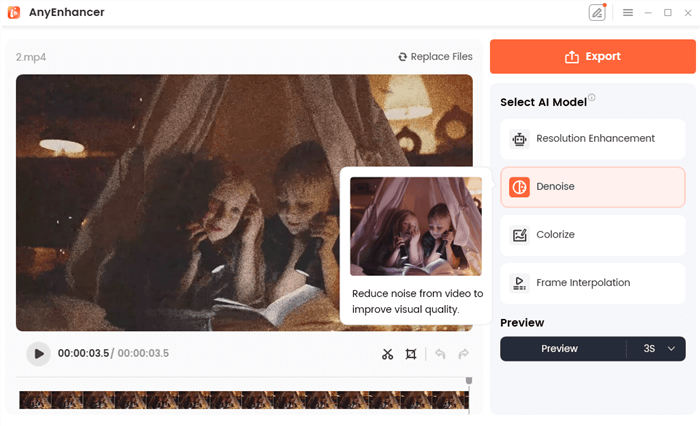
Choose the Denoise AI Model
Step 4. Click on the “Preview” button to start the process. You can set the preview timer to either 3 seconds or 5 seconds.
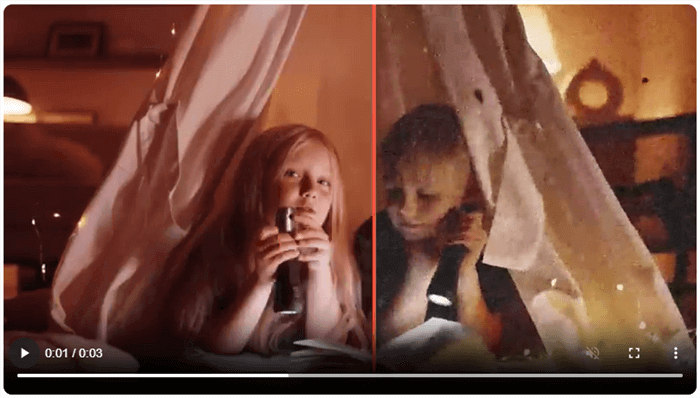
Preview the Effect
Step 5. Once done, click the “Export” button from the top-right corner to save the enhanced-quality TikTok video.
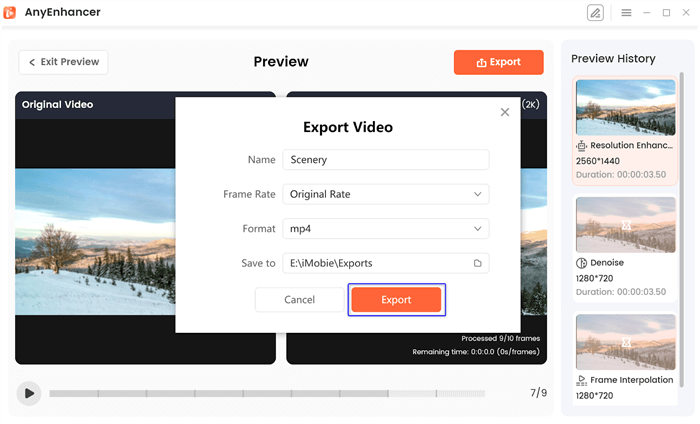
Export the Video
FAQs on Removing Grain in Premiere Pro
Can you reduce noise in Premiere Pro?
Yes, you can reduce the noise and grain effect in Premiere Pro. However, it must be noted that this tool has no single denoising effects that you can drag and drop. You must apply the Media effect, utilize the mask, and adjust the strength to have clear footage.
How can you make a video less noisy and grainy?
You can reduce the noise and grain by adjusting the ISO settings, investing in a high-end camera, having a proper lighting setup, or using an AI video enhancer tool. AnyEnhancer has the Denoising AI model to reduce the grain and pixel distortion.
Final Words
Having noise and grain in your videos can ruin the overall quality and clarity. Denoising in real-time can be a tough challenge unless you invest in a very high-end camera. However, you can utilize the post-production editing technique to minimize the noise level in the footage. Try Adobe Premiere Pro’s Media effect to get rid of grain and visual noise. Apart from this, we recommend an easy and effective tool, i.e., AnyEnhancer, which cannot only remove the visual grain but also improve the resolution to 4K and optimize the FPS by 4X.
Joy Taylor
Senior writer of the iMobie team as well as an Apple fan, love to help more users solve various types of iOS & Android-related issues.
 Screenify
 AnyEnhancer
 FocuSee
 Vozard
 AnyMiro
 AnyMirror
