How To Stabilize a Video on Windows/Mac
Discover how to transform shaky videos into smooth, stabilized footage with this comprehensive guide. Learn valuable tips and techniques, and find out which post-production editors are most effective in enhancing video stability.

Shooting the perfect video always comes with some problems. One of the most common is shaky footage. Hand tremors, movement, or using broken equipment can cause unstable videos.
Thankfully, there are ways to restore your jittery footage to its original smoothness. In this article, we will introduce 3 main methods and AI video stabilizer tools on how to stabilize a video on Windows or Mac.
By the end of this guide, you should have all the info you need. You’ll be able to make shake-free, high-quality videos for your projects.
Table of ContentsHide
What are Video Stabilization Techniques
Recording a scene on video always poses the issue of picture stability. Sometimes, the problem is a constant jittery hand. Other times, it is an unstable camera or quick shot.
Various methods exist to stabilize video. They prevent jumpy output and give it a professional feel. The two main approaches are mechanical and electronic stabilization.
Optic Stabilization:
This applies to stabilizing the camera or lens. The technique employs gyroscopic sensors to track and neutralize motion and vibration. You can also use accelerometers to adjust the camera lens. Sturdy tripods, gimbals, and straps provide added security and minimize slipping.
Electronic Stabilization:
This is the post-production video editing. It involves breaking the footage frame by frame and then removing the shake. The stabilization tool in most editors works on different parameters for a smooth sequence.
Optical stabilization helps minimize blur and shake. However, it cannot eliminate all types of instability, especially in hand-held shots.
DaVinci Resolve and Final Cut Pro offer great stabilization tools. Users can adjust various settings to fit their needs. Let us guide you through a tutorial on electronic video stabilization, and we will see how to remove shaking from videos.
How to Stabilize Video in AnyEnhancer
AnyEnhancer is a cutting-edge video stabilization tool that harnesses the power of AI to transform shaky footage into smooth, professional-quality videos. It offers a seamless solution for video enhancement, allowing you to upscale resolutions, reduce noise, and stabilize shaky videos with ease. Whether you’re a content creator, filmmaker, or simply looking to improve personal videos, AnyEnhancer’s intuitive features and powerful capabilities make it an ideal choice for elevating your video quality to new heights.
Free Download for all windows & 100% safe Free Download for all mac & 100% safe
Free Download100% Clean & Safe
Key Features of AnyEnhancer:
- AI Video Frame Interpolation: Boosts frame rates by 2X or 4X, smoothing out shakiness and eliminating visual disturbances for a cinematic result.
- AI Video Enhancer: Seamlessly scale your videos to 4K high-definition, enriching detail and texture with minimal effort.
- Video Denoiser: Intelligently scans and removes video noise, ensuring a pristine viewing experience.
- Black-and-White Colorization: Utilizes AI to breathe life into monochrome videos with authentic, vivid colors.
To stabilize a shaky video using AnyEnhancer, follow these steps:
Step 1. Free download AnyEnhancer on your Windows or Mac computer.
Step 2. Launch AnyEnhancer on your computer and upload the video you wish to stabilize.
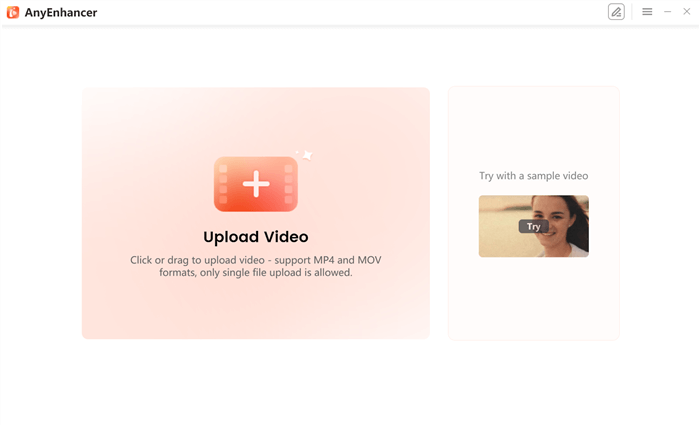
Upload Your Video to AnyEnhancer
Step 3. Select the AI Frame Interpolation model that is designed for frame rate optimization, which is essential for stabilizing videos.
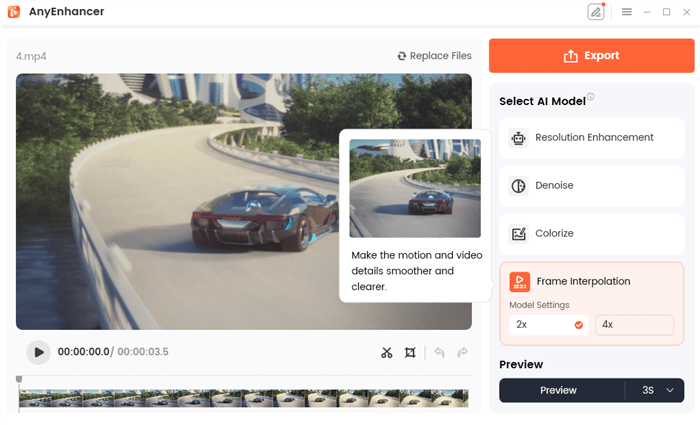
Frame Interpolation Model
Step 4. AnyEnhancer will process your video to increase the frame rate and reduce shakiness. Once the processing is complete, you can preview the stabilized video and export it.
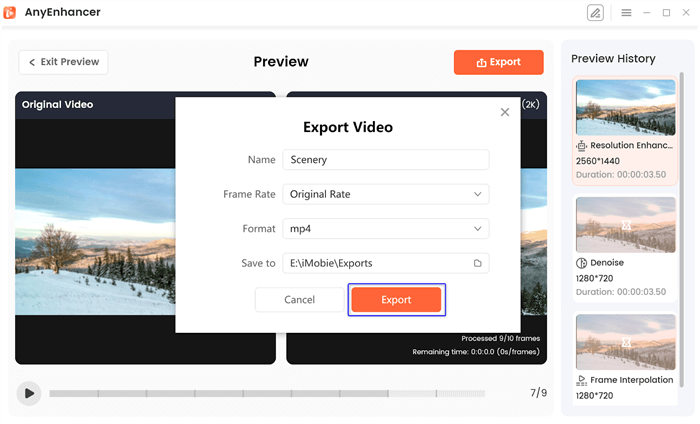
Export the Video
How to Stabilize Video in DaVinci Resolve
DaVinci Resolve is perhaps the most powerful post-production software. It works for all types of video editing. Among the features, it has strong video stabilization. It quickly corrects different types of camera movements and disturbances with high accuracy.
For stabilizing requirements, you can select Zoom, Smooth, and Cutting Ratio. Sliders also help you tweak the degree of stabilization required. Be it barely noticeable trembling or shaky footage, you can fine-tune it in DaVinci Resolve to meet the quality of professional work.
Even though DaVinci’s powerful interface offers different methods to stabilize a video, let’s introduce you to the most authentic method via Stabilization settings.
Tutorial on How to Stabilize Video with DaVinci Resolve:
Step 1. Download and Install the DaVinci Resolve software on your PC. Launch the application and set it up. In the Project Management window, click New Project. Add a name for the project and click Create.
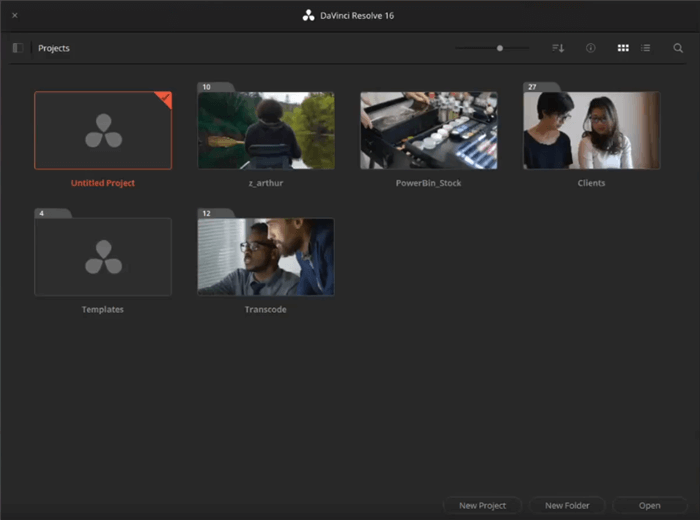
Create a New Project in DaVinci
Step 2. Click the Import Media icon in the toolbar to browse and open videos in the software. Drag your videos to the timeline.
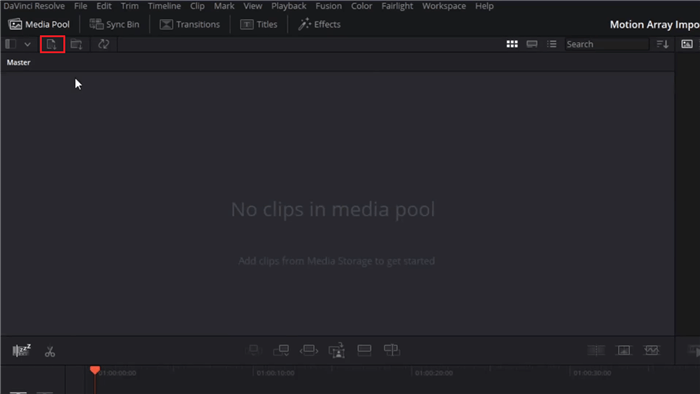
Import Media to Resolve
Step 3. Select the clip on the Edit tab and click the Inspector icon to open the settings window.
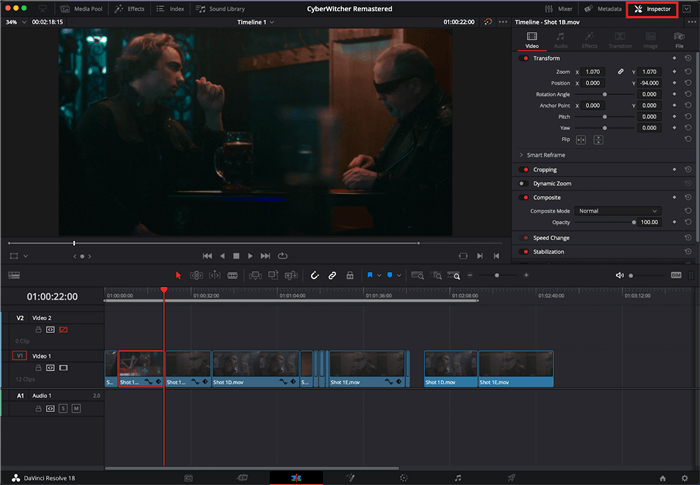
Inspector Tab in DaVinci
Under the Video Inspection settings, navigate to stabilization. DaVinci offers three stabilization modes:
- Perspective: The default setting. This mode enhances the video with simple Pan, Zoom, Tilt, and Rotation.
- Similarity: Uses Pan, Zoom, Tilt, and Rotation analysis and removes unwanted artifacts.
- Translation: Best for light camera movements in the x and y planes.

Stabilization Settings
Select the mode and click Stabilize to apply the settings. Readjust it until the final output aligns with your requirements.
DaVinci’s interface might feel overwhelming, yet it offers robust technology for professional outputs. Offering multi-modes, it ensures smooth frame transition for cinematic sequences.
How to Stabilize Video in Final Cut Pro on Mac
Jittery hands or abrupt turns during shots are the primary causes of shaky videos. Apple’s Final Cut Pro has great tools to make rough clips look professional.
Available on Mac, Final Cut Pro is well-known for its full-featured professional capabilities. The interface is simple and intuitive for novices or tech-savvy editors. Of the many options it offers, video stabilization is one of the most vital tools for video creators.
In Final Cut Pro, built-in tools like InertiaCam and SmoothCam fix different types of motion. They also allow for fine-tuning. To set the degree of stabilization, users must adjust settings. These include Translation Smooth, Rotation Smooth, and Scale Smooth.
Let us guide you through a series of steps to get the best out of this tool.
Step-by-Step Guide to Stabilize Video with Final Cut Pro:
Follow along the steps for a step-by-step tutorial on video stabilization on Mac.
Step 1. Search and launch the Final Cut Pro software on your Mac. If not available, download and install the application.
Step 2. Click File > New > Project in the top toolbar to open a new working space.
Step 3. Navigate and click File > Import > Media to browse and transport videos from PC to software.
Step 4. Click Edit > Insert to select and add clips to the timeline. Alternatively, click the Insert button on the top-left corner of the timeline window.

Insert Clip to the Timeline
Step 5. Select the shaky clip on the timeline and click the Inspector icon on the right side of the toolbar.

The Inspector Button on the Toolbar
Step 6. The Video Inspector settings will open. Click the reel icon to open the Video settings tab.

Video Inspection Settings
Step 7. Scroll down and enable Stabilization. By default, the stabilization is set to ‘Automatic’. It chooses InertiaCam or SmoothCam for your video. Adjust the stabilization parameters.
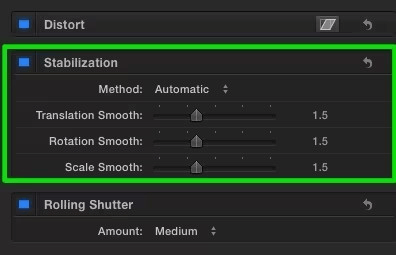
Video Stabilization Settings
Step 8. After adjusting the stabilization, preview the clip. If the video says ‘analyzing for dominant motion’ the software is still processing the settings. Adjust the stabilization parameters if the video is still shaky.
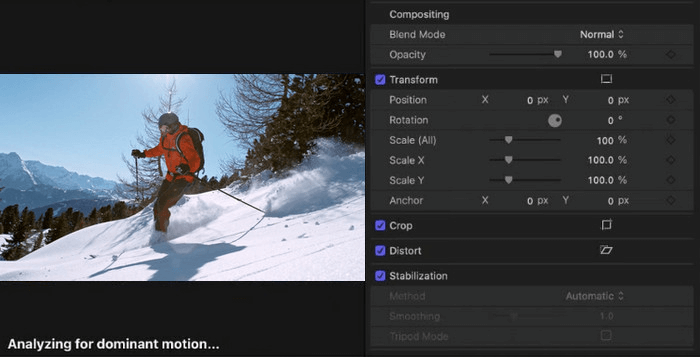
Preview the Stabilization Settings
And that is how simple it is to enhance the value of your work with Final Cut Pro. It offers a powerful solution for Mac users. They can use it to turn their shaky videos into professional cuts.
FAQs on How to Remove Shaking from Video
What is video stabilization?
Recording a scene sometimes presents a problem of the camera’s steadiness while filming. Video stabilization settings fine-tune the camera’s angles. They reduce image motion for better videos.
Why stabilize the video?
Stabilization improves picture quality and removes shakiness for a better look. Also, it promotes better storytelling. It optimizes the subject and action with minimal unintended camera movement. Stabilized videos are also easier to edit. They have different scenes and shots that blend seamlessly in post-production.
Can I stabilize the video in post-production?
Yes. Unsteady hands or misplaced camera turns to produce unstable footage. Use good software like DaVinci Resolve and Final Cut Pro to stabilize. Both offer solid stabilization tools for post-production editing and enhancement.
Conclusion
Nothing is as annoying as shaky videos; thus, you must master how to avoid it. In this article, we looked at some strategies for how to stabilize a video. Accessories, like tripods, gimbals, and camera straps, can greatly reduce shaky footage.
For post-production editing, we looked at two popular video editing options. They were Final Cut Pro and DaVinci Resolve. Both platforms are easy to use and have many excellent stabilization features. Parameters such as Translation, Rotation, and Scale make the editor’s output more tuned. They enable the editor to control the output’s smoothness.
Electronic stabilization helps both pros and amateurs who like to make videos.
Product-related questions? Contact Our Support Team to Get Quick Solution >
