How to Deinterlace a Video Like a Pro
Deinterlace videos to improve frame transitions and motion. Wondering how to deinterlace videos like a pro? Utilize professional-grade tools such as VLC, Premiere Pro, or HandBrake to convert interlaced videos into progressive ones. If you’re new to editing or don’t want the hassle of complex methods, AnyEnhancer— an AI video denoiser— can help remove visual grain and artifacts.
>Have you ever watched an interlaced video with keen interest? No, right? Whether entertaining or informative, videos are a perfect source to engage audiences and capture their attention. However, video noise and visual grain can ruin the viewing experience while distracting the audience. Sometimes, poor lighting conditions can cause the appearance of visual grain, or video corruption can induce pixelation. In all these scenarios, the only solution is to remove the grain or deinterlace the footage.
You must be wondering how to deinterlace a video. Various tools and techniques are available to remove the grainy effect and artifacts and greatly improve the quality of the footage. You can utilize VLC, Premiere Pro, and HandBrake to deinterlace videos. If you’re looking for a simple and quick solution, we’ll also recommend an AI model-based video enhancer tool. Let’s explore further!
Table of ContentsHide
What is Deinterlacing Meaning?
Have you ever seen distorted lines or grainy effects in video footage? This might be due to interlacing technology. Before we define deinterlacing, let’s understand what interlacing is and how it works. Interlacing is an old technique for improving the frame rate. The science behind interlacing is simple! Interlacing divides the video into two fields, i.e., even and odd number of lines in the horizontal direction—the video footage alternates between them to improve the motion.

What is Interlaced Video
In contrast, deinterlacing means converting your interlaced videos into progressive ones. Progressive videos are free from alternate horizontal lines and are smoother than the former ones. You can double the information in each frame within the same resolution by deinterlacing to improve video quality and smoothen the footage. Therefore, a progressive scanning method involves scanning each frame from left to right and top to bottom to display all the pixels.
Now that you’ve understood the concept of deinterlacing, it’s time to explore the methods to deinterlace the videos via professional tools.
How to Deinterlace Video [3 Ways]
In this digital world, no one will watch footage with horizontal lines that cause distortion and pixelation. Deinterlacing footage will help you get rid of visual grain, noise, and even compression artifacts easily. Want to improve your old TV or DVD footage? Let’s explore some deinterlacing methods:
Method 1. Deinterlace Video with VLC
When it comes to deinterlacing videos, especially if you’re a novice in video editing, the name VLC stands out the most! The reason is simple-to-use functionalities and a friendly user interface. VLC is an open-source media player with additional editing capabilities, allowing you to deinterlace footage in simple steps. The best thing about deinterlacing with VLC is that you can turn the deinterlace mode on or off with a simple shortcut key.
This professional grade tool also enables users to choose between various deinterlace modes such as Auto, Discard, Mean, Bob, Blend, X, and more. Ready to explore how to deinterlace with VLC? Here’s the step-by-step guide to do so!
Step 1. Launch the VLC Media Player on your PC. Click “Media > Open File” to play the video you wish to deinterlace.
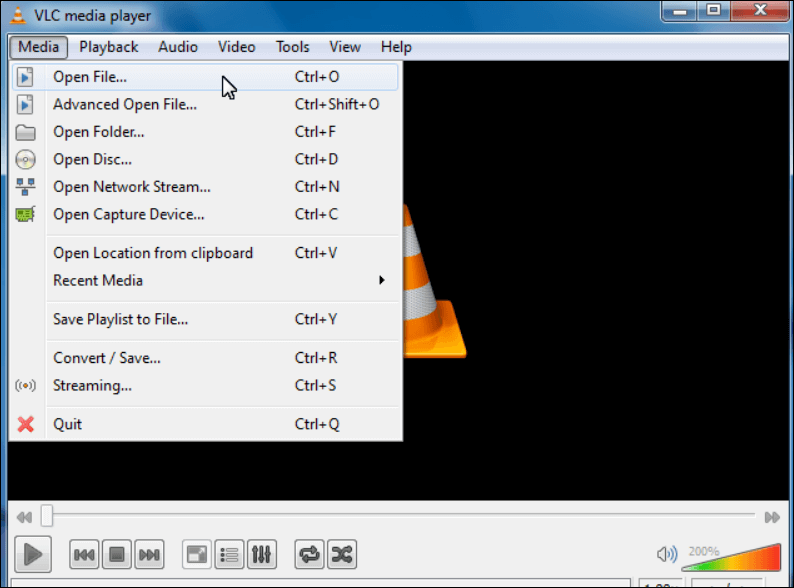
Tap on Media and Choose Open with
Step 2. Navigate to “Tools > Preferences“. Choose from the available options such as Off, Automatic, or ON.
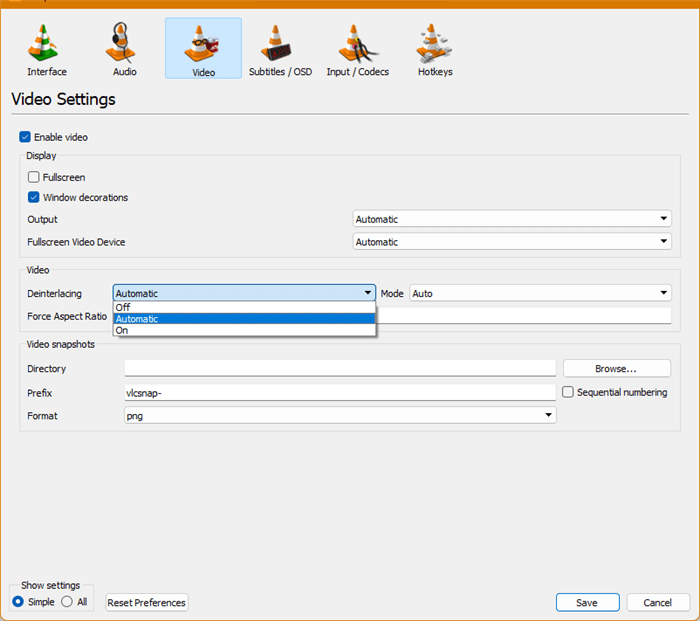
Deinterlace Videos
Step 3. You can also choose from various deinterlace modes in VLC, such as Auto, Discard, Mean, Bob, Blend, X, and more. Click on “Save” to finish the process.
AnyEnhancer – AI Video Enhancement
Download AnyEnhancer to enhance your video quality to 4K resolution, remove grain, smooth motion, and add color to black and white videos with just one click.
Method 2. Deinterlace Video with Premiere Pro
Video editing has reached another level with the Adobe Premiere Pro due to its advanced level editing tools and finest output quality. No matter if you wish to remove grain or deinterlace a video by converting it into a progressive one, Premiere Pro can help! The best thing about deinterlacing with Premier Pro is that you don’t need to adjust multiple parameters or customize the effect. The tool lets you transform your interlaced footage into a progressive one without affecting original quality, resolution, and FPS.
Let’s explore how to deinterlace video with Premier Pro:
Step 1. Launch Premiere Pro on your PC. Create a new project, import the video, and place it on the timeline.

Add the File to the Timeline
Step 2. Once done, right-click on the clip and choose “Field Options.”
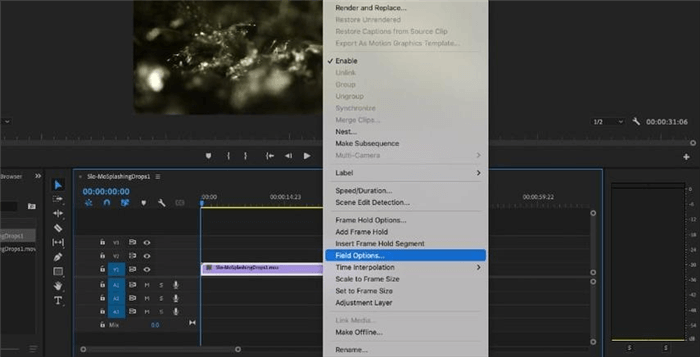
Field Options
Step 3. A new smaller window for Field Options will open in the center of the screen. You can choose from three processing options: “None, Always Deinterlace, and Flicker Removal.”
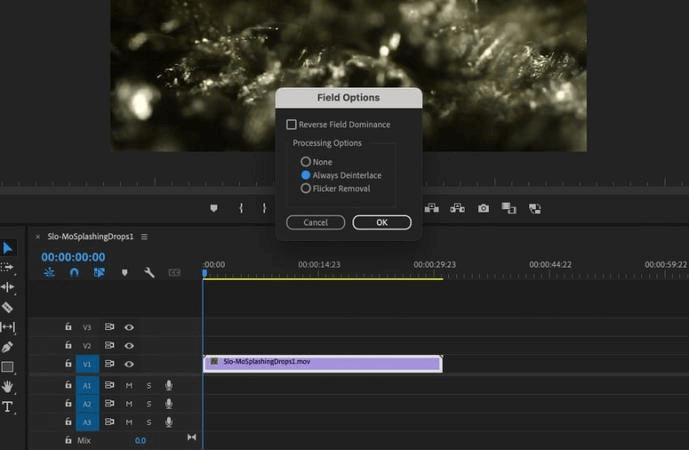
Choose Always Deinterlace
Step 4. Once done, you can preview the results and check which option will work best for you. You can also sharpen the video and improve the quality with further edits. Navigate to “Effects > Video Effects > Blur & Sharpen > Sharpen.”
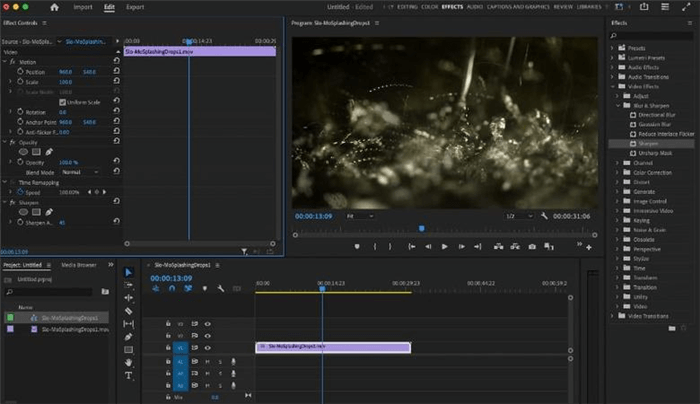
Sharpen the Video
Method 3. Deinterlace Video with HandBrake
Do you like customizations or manipulating settings for additional video quality improvement? If yes, you’ll love the HandBrake tool for removing noise, grain, and visual artifacts. HandBrake is a high-grade desktop tool that offers a deinterlacing video option to improve the motion of videos. Let’s explore the step-by-step guide to deinterlace videos with HandBrake:
Step 1. Launch the HandBrake tool on your PC. Import the video that you wish to deinterlace.
Step 2. Navigate to the “Filters” tab and then find and click on the “Deinterlace” from the options.
Step 3. Choose from the two available options for deinterlacing videos, Yadif or Decomb. Click on the “Start Encode” button to start the process.
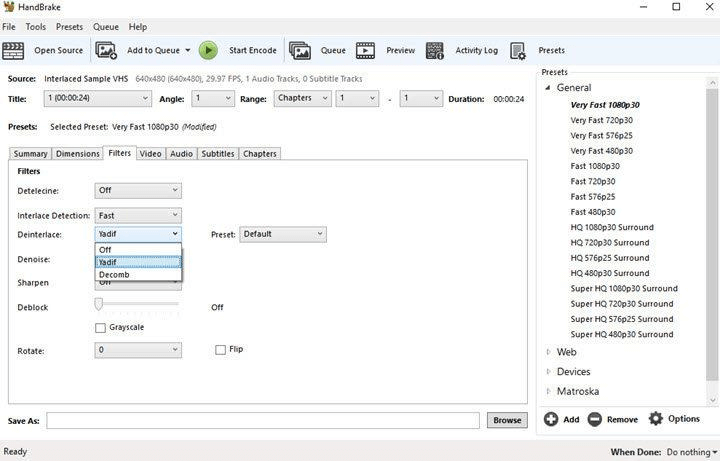
Deinterlace with HandBrake
Step 4. HandBrake also offers the “Interlace Detection” feature to help users determine if a video is being interlaced.
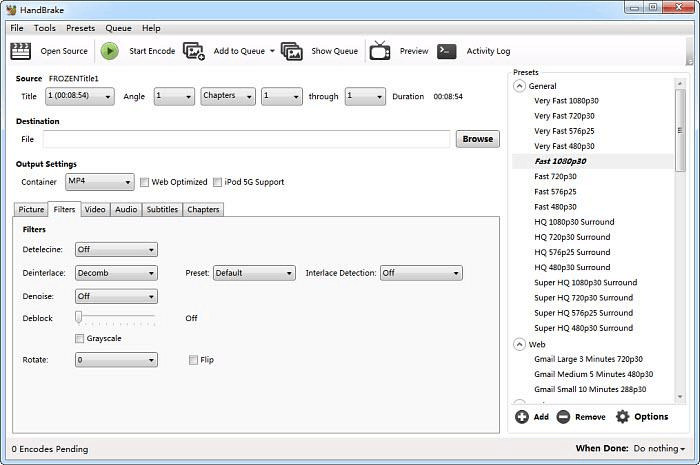
Interlace Detection
Some of the above-mentioned methods or tools can be hard to use, especially for beginners who know nothing about video editing or manipulation. Sometimes, managing the settings or adjusting the filters might be difficult. Therefore, we are recommending an alternative to the tools mentioned above. Let’s find out!
Bonus tips: How to Denoise Video with AI Video Enhancer
Is your video footage ruined by the noise, visual grain, and artifacts, or do you want to deinterlace a clip for more clarity? Whatever the purpose is, AnyEnhancer – an AI Video Upscaling tool can help! This AI video enhancer software can upscale your videos by improving resolution from 360p 0r 480p to 4K and optimizing the frame rate by 2X or 4X. Apart from improving frame transitioning for fast-paced footage, you can enjoy the cinematic feel with more details and textures. The Intelligent Enhancement model can improve not only the resolution but also facial expressions and details.
The “Denoise” model of AnyEnhancer can help reduce the visual grain, blur, and pixel distortion. The video denoiser can turn your old, fuzzy, raw footage into HD masterpieces. You can restore the details of a video and get rid of interferences.

AnyEnhancer Webpage Interface
Key Features
- Discover the possibilities of removing fuzziness from your clips and adding clarity via the Denoiser AI model.
- Utilize the frame rate optimization to increase the FPS by 2X or 4X to make upscaled videos with a professional video Frame Interpolation model.
- Colorize AI models can revive the colors of your old footage. It can identify objects and colorize them with a single click.
- Color Enhancement model can make color correction, revive lifelike colors, and improve visuals on blurred monochrome videos.
- Enhance the resolution from 360p or 480p to 4K while keeping the original details and sharpness of the footage.
Here’s a step-by-step guide to remove noise or deinterlace videos with the AnyEnhancer AI tool:
Step 1. Download, Install, and Launch AnyEnhancer
Download and install AnyEnhancer from the official website. Once completed, launch it and press the “Upload Video” button, or you can also drag and drop videos onto the tool.
Free Download for all windows & 100% safe Free Download for all mac & 100% safe
Free Download100% Clean & Safe
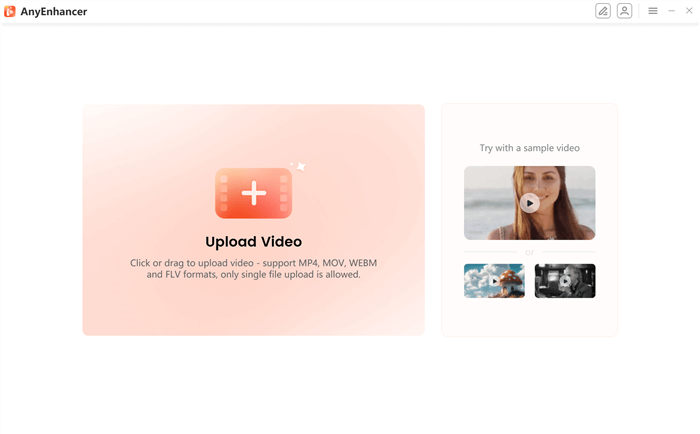
Upload the Original Video
Step 2. Remove Visual Grain and Noise
Choose the “Denoise” first to remove shuttering and visual grain from your videos.

Choose the Denoise Model
Step 3. Improve Resolution
You can also enhance the video quality by boosting the resolution and optimizing the FPS. Choose the “Resolution Enhancement” AI model and choose from 2K or 4K.
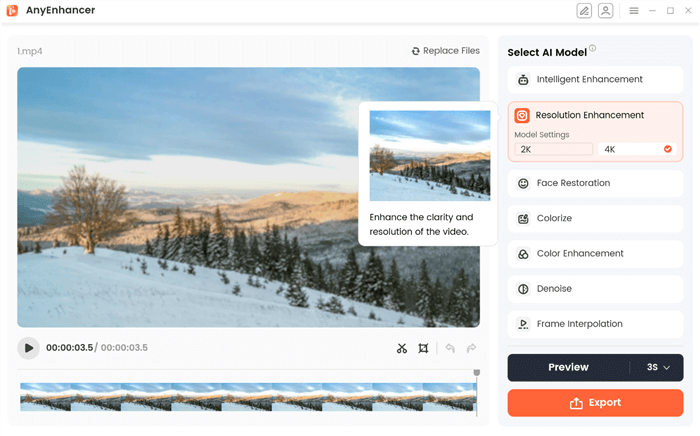
Select Resolution Enhancement
Step 4. Optimize FPS
Select the “Frame Interpolation” AI mode and adjust the settings for Frame Interpolation, such as 2X or 4X.
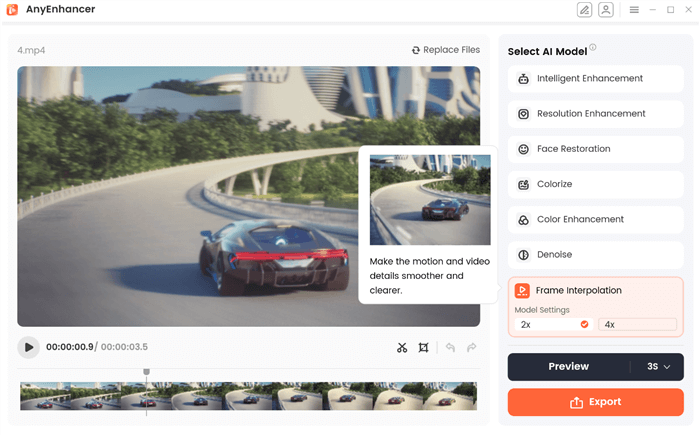
Frame Interpolation Model
Step 5. Preview Changes & Export
Click on the “Preview” button to start the process. You can set the preview timer to either 3 seconds or 5 seconds.
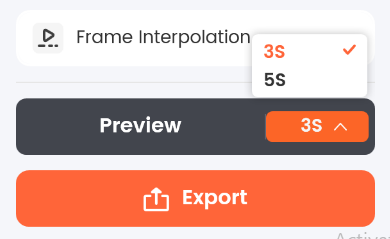
Choose the Preview Duration
Once done, click the “Export” button from the top-right corner to save the enhanced-quality TikTok video.
FAQs of Deinterlacing Video
How to denoise a video professionally?
You can denoise a video with various techniques, such as investing in a good camera, improving lighting, or post-production editing, such as AI tools. We recommend using AnyEnhancer to denoise your footage and remove visual grain for clarity.
Does deinterlacing videos improve quality?
Yes! Deinterlacing a video can optimize the quality by converting interlaced videos into progressive ones in which all pixels are shown at a time for an improved motion.
Final Words
Deinterlacing videos involves converting interlaced videos into progressive footage where all the pixels are shown simultaneously and have a smoother motion. However, you may be wondering how to deinterlace a video. We have compiled multiple methods to deinterlace a video, such as a pro with VLC, Premiere Pro, and HandBrake. If you don’t like the hassle of customizing, utilize the all-in-one AI video enhancer, i.e., AnyEnhancer, to boost resolution to 4K and remove visual grain with its denoiser model.
Product-related questions? Contact Our Support Team to Get Quick Solution >

