How to Fix Pixelated Videos
This article provides a detailed explanation of pixelated videos. You will find reasons and solutions for blurry and unclear videos as you read. You can review the tips to avoid pixelated videos and frequently asked questions .
Joy Taylor | Last Updated: Jul. 31, 2024
2397 words|7minute
Are you tired of squinting at blurry live-streaming videos? Do your videos become unclear when rewatching after you have made them with great passion? Or do they become unclear after you upload them, leaving the audience to guess?
In today’s world, where everything is moving towards clarity, pixelated videos hinder progress and ruin the experience of watching.
Learn more about pixelated videos and why they happen in the first place. If you are worried about solutions, you have come to the right place. Let’s move to the solutions to fix pixelated videos. We have listed two solution tools for you. To get rid of this problem, all you need to do is follow the step-by-step guide.
Fixing Pixelated Videos using Adobe Premiere Pro [Step-by-Step Guide]
Adobe Premiere Pro is one of the best video editors. It allows you to edit videos and clear blurry pixels on a new level. Its vast functionality will enable you to manipulate audio, video, and editing.
Adobe Premiere Pro is well integrated with third-party applications so that you can share without ruining the video experience.
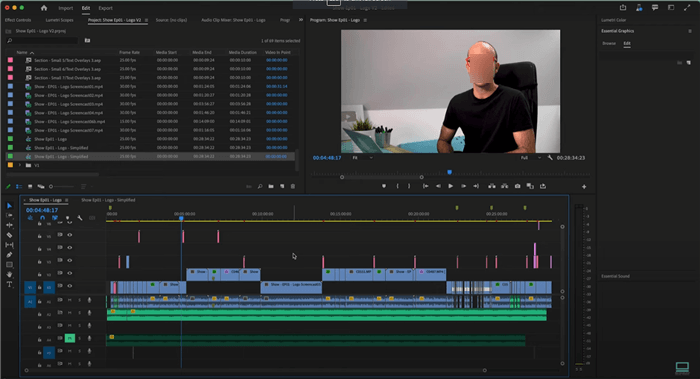
User Interface of Adobe Premiere Pro
Key Features
The key features of Adobe Premiere Pro are listed below
- Add clarity with enhanced speech
- AI audio category tagging
- Collaboration with various apps
- Work faster with text-based editing
- Improved performance
- Streamline editing process
- Export trade it to social media
Subscription Plan: A free trial is available, and plans start at $22.99 monthly.
Let’s follow the step-by-step guide on using Adobe Premiere Pro to fix pixelated videos.
Stepwise guide to Fix Pixelated Videos via Adobe Premiere Pro
You can download and install Adobe Premiere Pro from the Website. The step-by-step Guide is as follows,
Step 1. Launch Adobe Premiere Pro. Click the ‘New Project’ button, and add the pixelated video file you wish to fix.
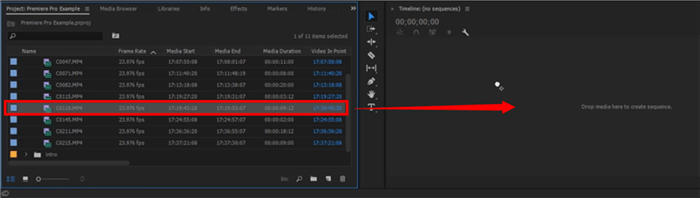
Add the File to the Timeline
Step 2. Could you find the file icon and click it? Look for the ‘Adjustment layer’ and click on it.
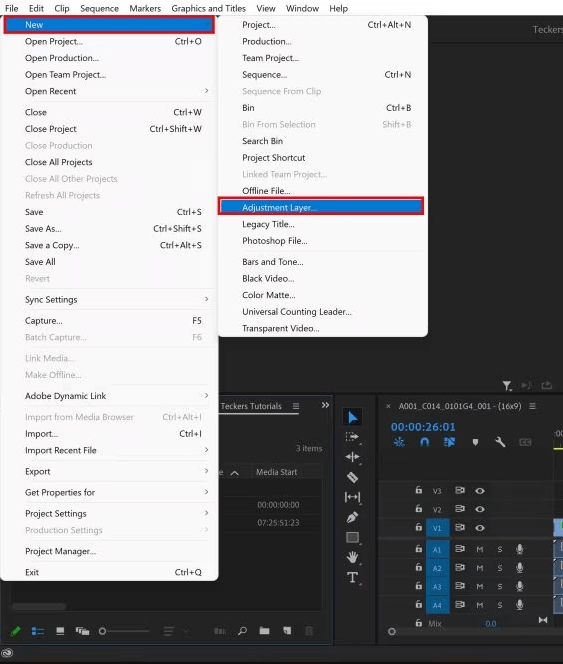
Adjustment Layer Option
Step 3. Drag the newly created adjustment layer to the timeline of your pixelated video to discover various effects before applying them thoroughly.
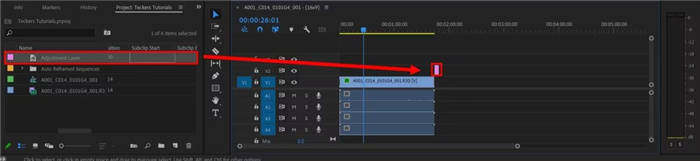
Cut the Adjustment Layer
Step 4. Press shortcut c on the keyboard to select the razor tool. The razor tool divides the Adjustment layer into several clips. Search for ‘sharp’ in Effects.
Find the ‘Unsharp Mask’ and drag it into the corresponding adjustment layer. Click on the adjustment layer and find ‘Unsharp mask.’ Click to expand and manipulate Amount, Radius, and Threshold.
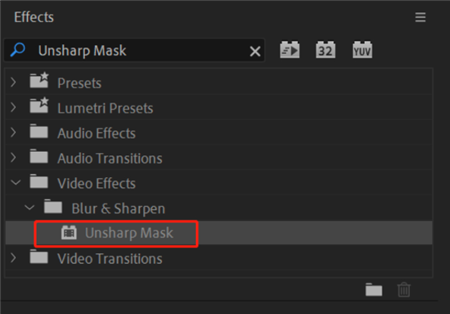
Unsharp Mask Option
Step 5. Adjust the sliders to sharpen the video and your ideal effects. It all depends on your need to sharpen the pixelated video.
To fix pixelated videos using Adobe Premiere Pro, you only need the steps mentioned above. Another tool you can use to fix pixelated videos is AnyEnhancer by iMobie. Let’s learn more about it.
Fixing Pixelated Videos using AnyEnhancer [Step-by-Step Guide]
AnyEnhancer by iMobie is one of the most efficient AI video enhancers for improving pixelated videos. Its AI technology smoothens the video-watching experience, and you can also improve the resolutions of low-quality videos.
AnyEnhancer supports Windows (Windows 10 or later) and MacOS (MacOS 11 or later). Let’s move to the following section to learn more about what this tool offers.

AnyEnhancer Webpage Interface
Free Download for all windows & 100% safe Free Download for all mac & 100% safe
Free Download100% Clean & Safe
Key Features
Here are some of the key features of AnyEnhancer,
- Upscale video resolution to stunning 4K.
- Remove grain and noise from the video to enhance clarity.
- Add natural colors to old black-and-white videos.
- Boost frame rates by 2X and 4X for smoother playback.
- User-friendly with no editing skills needed.
The step-by-step guide on how to use AnyEnhancer to smoothen your videos is discussed in the following section.
Stepwise guide to Fix Pixelated Videos via AnyEnhancer
Free download and install AnyEnhancer from the Website. Once you have installed the tool, follow the given steps,
Step 1. Upload the original file
Launch AnyEnhancer after you have installed it. Click the ‘Add’ button or drag the original video you wish to enhance.
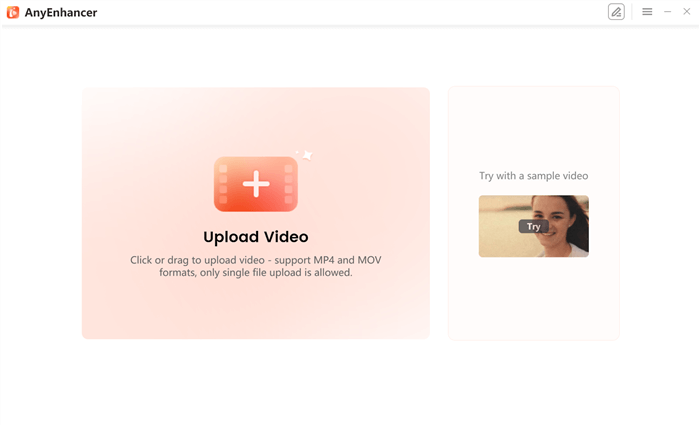
Upload Your Video to AnyEnhancer
Step 2. Choose an AI Model
Choose from the four AI tools listed. To fix pixelated videos, go for Resolution Enhancement.
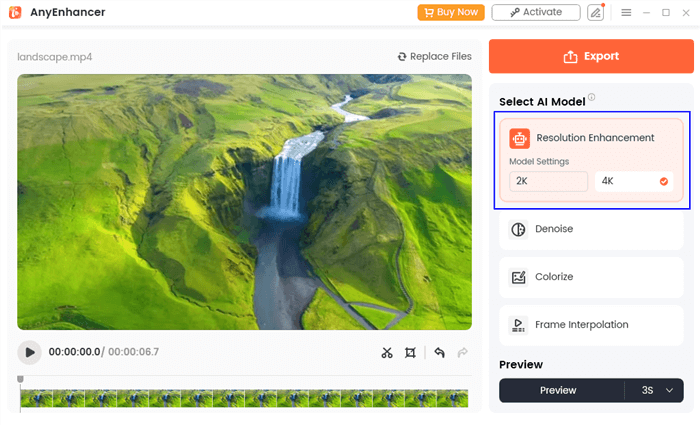
Select the Resolution Enhancement
Step 3. Preview the effects and export.
After you have chosen Resolution Enhancement, select a model setting (2K or 4K). Now, click the ‘Preview’ button. You can choose a preview duration of either 3 seconds or 5 seconds.
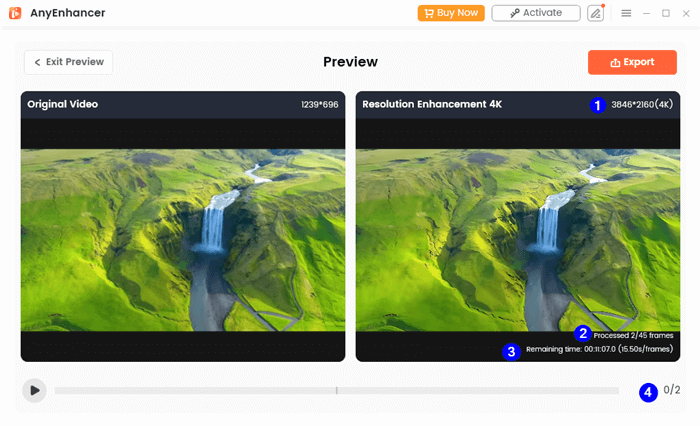
Compare the Video Upscaled to 4K
The preview page shows,
- Resolution
- Progress of processed frame
- Remaining processing time
- Playback bar
Step 4. After finishing the Preview, you may save the processed video by clicking the ‘Export’ button. This window appears once you click the ‘Export’ button. Here, you can edit the name, frame rate, supported format, and export path.
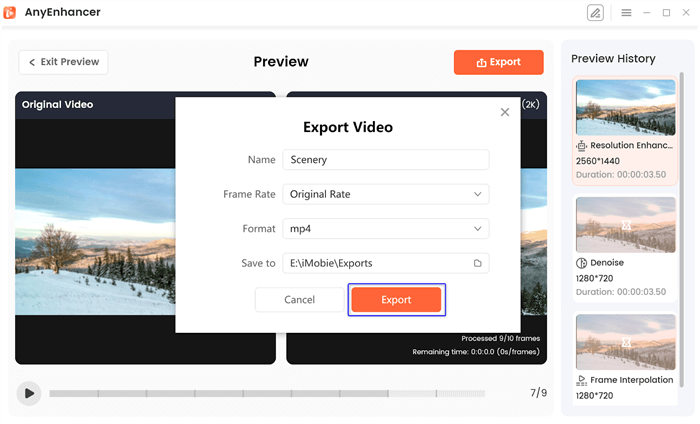
Export the Video
We hope you find the above stepwise guide to fix pixelated videos helpful. In the following section, we have discussed some of the tips to avoid pixelated videos,
What Causes Videos to Become Pixelated?
Your videos might pixelate for several reasons. These might include compression for memory limitation, a poor internet connection, or hardware issues. Compression of video files lessens resolution to optimize storage.
If you are watching live streaming videos, a stable internet connection is required to watch or download them. Your camera might need more hardware to make a clear video, or it might be because of a faulty device,
Without further delay, let’s discuss the causes of pixelated videos individually.
1. Low resolution or compression
Compression removes crucial data to free up space, so compressed videos take up less space. However, because part of the original image detail and information is lost during compression, the video’s visual quality diminishes, resulting in annoying pixelated videos.
Video quality depends on how much the file has been compressed to free storage. To ensure the quality of your videos is maintained, you need to upgrade your storage or use better compression tools. Some tools can compress your video files without damaging the quality.
2. Poor internet connection or buffering issues
When you are watching videos online or from a cloud storage, the video starts buffering before playing. Buffering is the data transfer from the server to your device in real time. This temporary download of data gives you a smooth experience of the videos without any blurring or pixelation.
The internet connection must be good enough to handle the data transfer without interruption. If your internet speed needs to improve, buffering will interrupt your watching experience. The internet connection might be affected by the number of users connected or the internet speed.
3. Hardware limitations
Many hardware-related problems might result in videos that appear pixelated. Some of the hardware issues are listed below,
- The CPU (Central Processing Unit) processes and translates data, including video streams. If overworked or underpowered, it may be challenging to complete the process efficiently, resulting in video pixelation.
- Data that the CPU and GPU need to access quickly is temporarily stored in RAM (Random Access Memory). Insufficient RAM can cause data processing to be sluggish, and buffering problems can arise, resulting in pixelated videos.
- The GPU (Graphics Processing Unit) processes graphics and videos.If it is not adequate to play the desired resolution, your video will not play smoothly and become pixelated.
- Problems with your display device/gadget can affect how videos are processed and displayed. This may result in pixelated videos and blurry images. You must make sure your display is doing fine before anything else.
We hope you have gone through all the causes of pixelated videos by now. Let’s move on to the types of pixelated videos without any delay.
Types of video pixelation
A pixelated video is one whose resolution or quality of the image has been compromised to the point where individual pixels can be seen as distinct blocks or squares. Small features, sharp edges, and refined textures can all appear blurry.
Since pixelated videos result in blurring, buffering, and interrupting, they detract from the viewing experience. We can divide video pixelation into two major types; let’s learn about them.
1. Blocky or mosaic-like pixels
Blocky or mosaic-like pixels refer to a specific type of visual artifact characterized by large, visible blocks or squares of pixels replacing finer details in the image. Blocky or mosaic pixels are usually the result of compression methods.
Compression is done to free up storage space by saving media files at low resolution. You should ensure a stable internet connection to play live streaming videos free from pixelation.
2. Blurry or smudged pixels
Blurry and smudged pixels result in blurry, unclear, or blended pixels. This can be because of a loss of sharpness or clarity. Camera malfunctions, such as poor focus, low resolution, or motion blur, can also result in blurry, pixelated pixels.
Smudged pixels result in the blending of adjacent pixels, degrading the overall image quality and frustrating the experience. Compressing the video file to save or send can result in continuous, blended, and unclear videos.
We have discussed all about the types of pixelated videos and their causes. We hope that we have made it clear.
Tips for Preventing Video Pixelation
We know what pixelated videos are, how to fix them accordingly, and what causes pixelation. You need to take care of some things to avoid pixelated videos. Some of the ways you can prevent pixelated videos are as follows,
Shooting videos in higher resolution
One way to avoid pixelated videos is to shoot them in high resolution. When compressed, videos with high resolution do not lose critical data. To shoot videos in high resolution, you need better gadgets and better tools to edit them.
Ensuring a stable internet connection during video streaming
You must ensure a stable connection to preferred online live-streaming videos. If you don’t have a stable Internet connection, buffering videos will interrupt your videos and frustrate your experience of watching them.
Using high-quality video codecs and formats
Make sure your codec selection balances file size and video quality. MP4 format is one of the best formats for ensuring quality. If there are compatibility issues, use a professional transcoding tool like Handbrake.
Regularly updating video editing software and drivers.
Ensure you use the best video editing software tools available in your resources. You must regularly update your video editing tools to fix existing bugs. Graphic and audio drivers must always be looked after. You must also ensure that other hardware components, like the CPU, motherboard, and storage drives, are up-to-date and functioning correctly.
The following section discusses frequently asked questions regarding pixelated videos and fixing them,
FAQs on Fixing Pixelated Videos
Some of the frequently asked questions regarding pixelated videos are given below,
A. Can pixelated videos be fixed completely?
Yes, pixelated videos can be fixed to some extent depending upon the type of pixelation and tools used. You need to address the cause of pixelation to fix it. For example, if you are watching an online video, you need a stable internet connection to avoid pixelation.
The extent of compression determines the extent of restoration. A video can be fixed to a great extent if it is shot in good quality and compressed later to save storage space. However, restoration might be limited if the compression has resulted in the loss of crucial data.
B. Is it possible to fix pixelation in live video streams?
Yes, you can fix pixelation while watching live video streams. The internet connection must be good enough to buffer the video while you watch it. The internet connection might be affected by the number of users connected or the internet speed.
All you need to do is to stabilize your internet connection to fix pixelated videos during live streaming.
C. How can I avoid pixelation when uploading videos to social media platforms?
To avoid pixelation of videos when uploading videos to social media platforms, you need to make sure of the following,
- Record your videos in the highest resolutions so that if the files are compressed, there is no significant loss of quality.
- To balance file size and quality, use optimal encoding settings.
- Avoid compression where it’s possible.
- Formats like MP4 are better options to secure good quality.
- Each transfer compresses the file to some extent. So uploading directly from the source to social media is better.
- You can use video editors to enhance the resolution of your media file.
D. Are there any free tools for fixing pixelated videos?
Yes, there are some tools that you can use for free to fix pixelated videos. The best free tool you can use to edit for free is VLC Media. Others include Wondershare Repairit, VivaVideo, Clideo, and Shutter Encoder. These tools offer less functionality than paid tools like Adobe Premiere Pro.
Final Words
We would like you to know all about pixelated videos and their various causes and solutions. You can use the above-given tools efficiently to fix pixelated videos. Follow the given guide step-by-step to resolve pixelated videos.
We have also discussed the types of pixelation, their various reasons, and how to avoid them. This is all we have to offer regarding solutions to fix pixelated videos.
AnyEnhancer – AI Video Enhancement
Download AnyEnhancer to enhance your video quality to 4K resolution, remove grain, smooth motion, and add color to black and white videos with just one click.
Joy Taylor
Senior writer of the iMobie team as well as an Apple fan, love to help more users solve various types of iOS & Android-related issues.
 Screenify
 AnyEnhancer
 FocuSee
 Vozard
 AnyMiro
 AnyMirror
