How to Fix Out-of-Focus Video Footage
Unlock the secret to fixing out-of-focus videos with ease. Harness the power of Adobe Premiere Pro and DaVinci Resolve to refine your editing skills and produce sharp, high-quality videos. Get started now on enhancing your video content with these essential editing techniques.
Are blurry videos ruining your shots? Fix out of focus video easily with this guide!
Whether you’re new or experienced, everyone sometimes encounters fuzzy footage. This guide will improve your video skills.
Learn to adjust your camera’s settings. We will also guide you on using tools like Adobe Premiere Pro and DaVinci Resolve.
You will be able to turn blurry videos into clear and professional content.
So get ready to transform unclear videos into stunning visuals. Let’s get started and discover how to improve every video you capture.
Table of ContentsHide
What Causes a Video to be Out of Focus?
Many factors can cause out-of-focus video footage. Here are the most common issues:
- Camera Shake: When shooting handheld without stabilization, the natural movement can cause the footage to shake and blur.
- Incorrect Focus: Missing the intended focus point can blur your video.
- Low Resolution: Videos shot in low resolution tend to appear fuzzy and lack sharpness.
- Wrong AF Mode on Camera: An incorrect autofocus setting can prevent the camera from focusing properly.
- Dirty AF Sensors: Autofocus sensors can collect dirt and debris, impairing their function.
- Dirty Lens Contacts: Dirty contacts on a lens can disrupt communication with the camera, affecting focus.
- Lens Calibration Issues: An improperly calibrated lens can fail to focus correctly, blurring your footage.
Tough Subject Matter or Incorrect Sensor Choice:
Cameras struggle with fast-moving or low-contrast subjects. Choosing the wrong sensor can exacerbate focus issues.
Addressing these factors can significantly enhance the clarity and focus of your video footage.
Now that you know the primary causes of video being out of focus. Next, let’s shed light on how to fix out-of-focus video effortlessly.
How to Fix Out of Focus Video in Adobe Premiere Pro?
Adobe Premiere Pro offers multiple tools to improve blurry footage. One helpful feature is the Unsharp Mask effect. It sharpens images with three settings: Amount, Radius, and Threshold.
Steps to Fix Out-of-Focus Video in Adobe Premier Pro:
Wondering how to fix out-of-focus video in Premier Pro? Just follow the simple steps below.
Step 1. Start a new project and import your blurry video.
Step 2. Place an adjustment layer over the video clip.
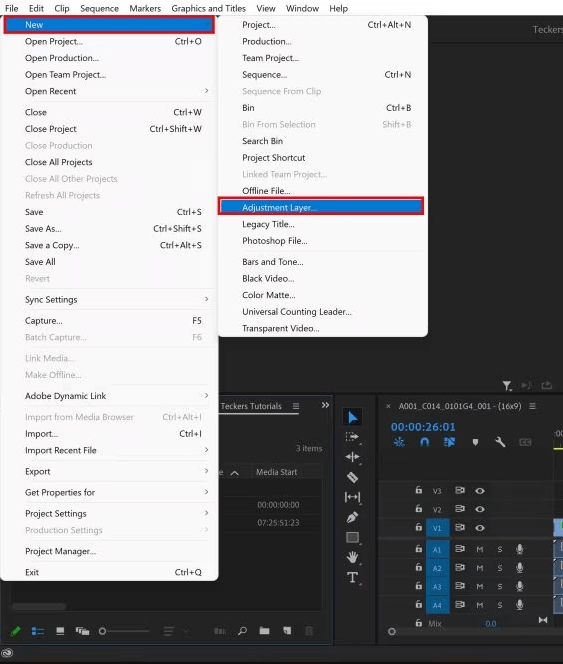
Adjustment Layer Option
Step 3. Add the Unsharp Mask effect to the adjustment layer.
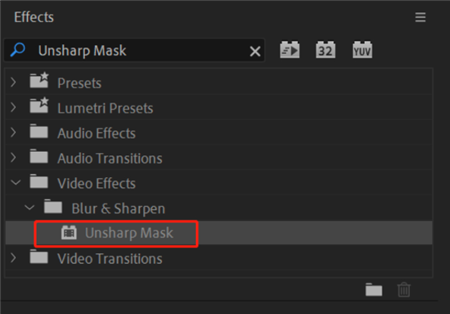
Unsharp Mask Option
Step 4. Fine-tune the Amount, Radius, and Threshold settings to get the sharpness you want.
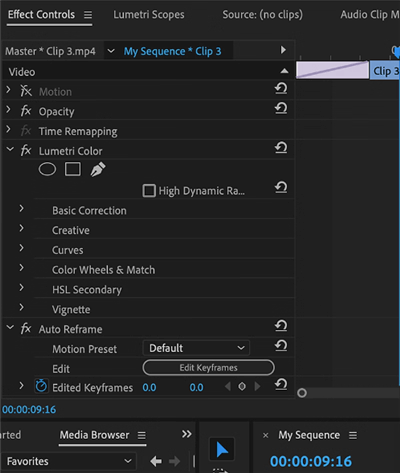
Adjusting the Settings
Step 5. Render and export your enhanced video.
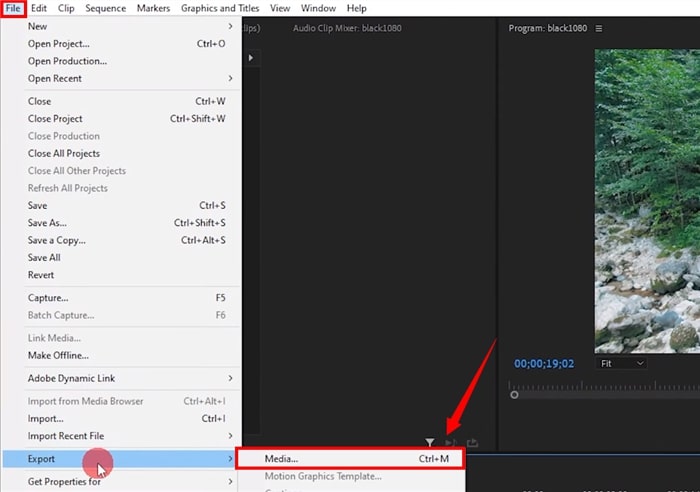
Export the File
Isn’t it effortless to fix out of focus video using Adobe Premiere Pro? It is! Now, let’s move on to another potential fix to resolve the issue.
AnyEnhancer – AI Video Enhancement
Download AnyEnhancer to enhance your video quality to 4K resolution, remove grain, smooth motion, and add color to black and white videos with just one click.
How to Fix Out of Focus Video in DaVinci Resolve?
DaVinci Resolve is an outstanding tool for refining slightly blurry videos. Its sharpening tools allow you to improve the details, making your footage clearer.
Steps to Fix Out of Focus Video in DaVinci Resolve:
Here are the steps to follow.
Step 1. Load your out-of-focus footage into DaVinci Resolve.
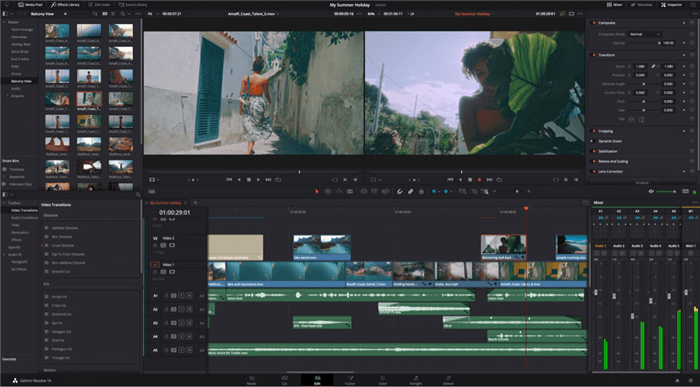
DaVinci Resolve Interface
Step 2. Access the Effects Library and find the Sharpen Edges effect. Place it on the timeline.
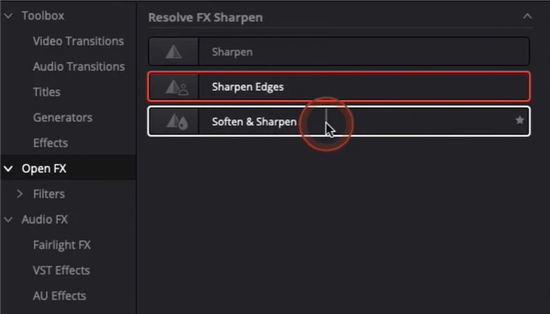
Apply the Sharpen Edges Effect
Step 3. Change the Sharpen Amount and Sharpen Radius to your preference.
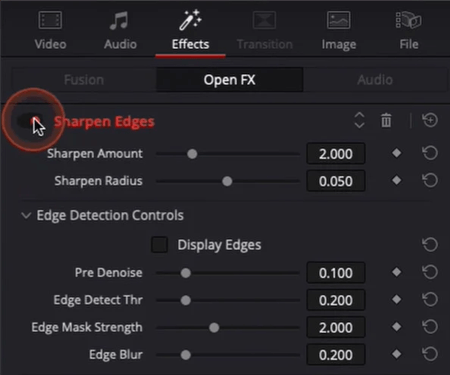
Adjust the Sharpen Effect Settings
Step 4. Review the changes and adjust until you’re happy with the sharpness.
Note: You can also use the Super Scale tool in DaVinci Resolve to sharpen and reduce noise in your footage further.
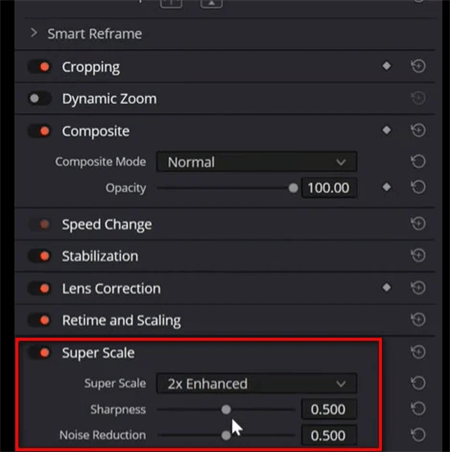
Adjust the Settings of the Super Scale Effect
We have discussed top solutions to fix out of focus video issues. What if there is a way to avoid out-of-focus videos? Let’s discuss it in the following part!
Pro Tip. How to Stabilize a Shaky Video with AI
Shaky videos can detract from the overall quality of your visual content. If you’re dealing with motion-induced blurriness, rest assured that advanced AI video-enhancing tools like AnyEnhancer make video stabilization more accessible than ever. This guide will walk you through the process of stabilizing your videos to achieve smoother, more professional-looking results.
Free Download for all windows & 100% safe Free Download for all mac & 100% safe
Free Download100% Clean & Safe
Key Features of AnyEnhancer:
- AI-powered Stabilization: Automatically smoothens out shaky footage.
- Video Denoiser: Intelligently scans and removes video noise, ensuring a pristine viewing experience.
- Black-and-White Colorization: Utilizes AI to breathe life into monochrome videos with authentic, vivid colors.
- AI Video Frame Interpolation: Boosts frame rates by 2X or 4X, smoothing out shakiness and eliminating visual disturbances for a cinematic result.
Step 1. Upload Your Video
Free download AnyEnhancer and launch it on your computer. > Import the shaky video you wish to stabilize.
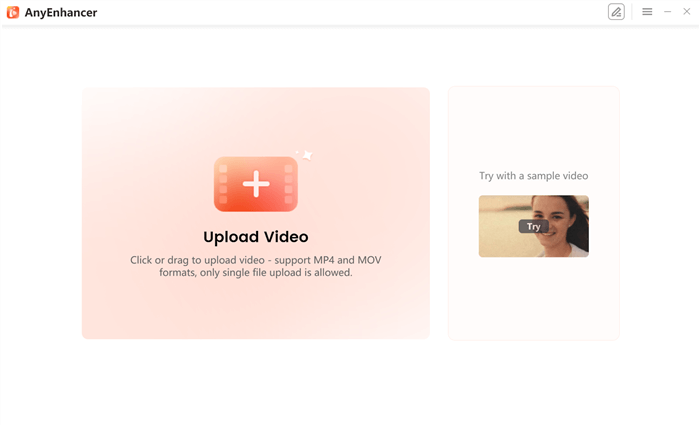
Upload Your Video to AnyEnhancer
Step 2. Select the Video Stabilization AI Model
Navigate to the AI models available within AnyEnhancer. Choose the Frame Interpolation model that best suits your needs.
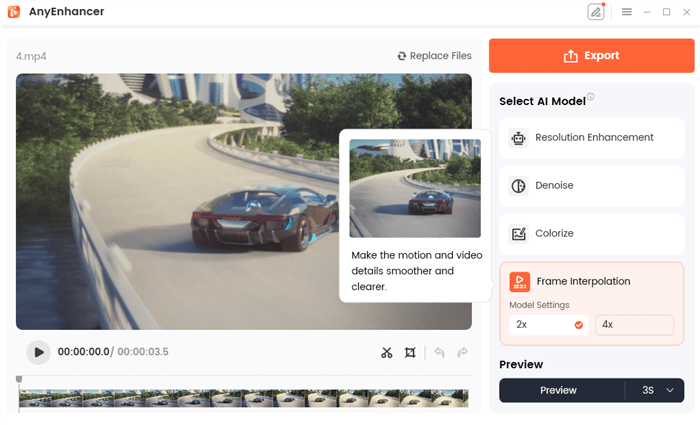
Frame Interpolation effect
Step 3: Adjust Settings for Optimal Results
Fine-tune the stabilization settings, such as 2x or 4x, as needed to customize the AI’s performance for your specific video requirements.
Step 4: Preview and Export
Preview the stabilized video to ensure it meets your expectations. Once satisfied with the stabilization, proceed to export the video. Save your enhanced video in your desired format and resolution.
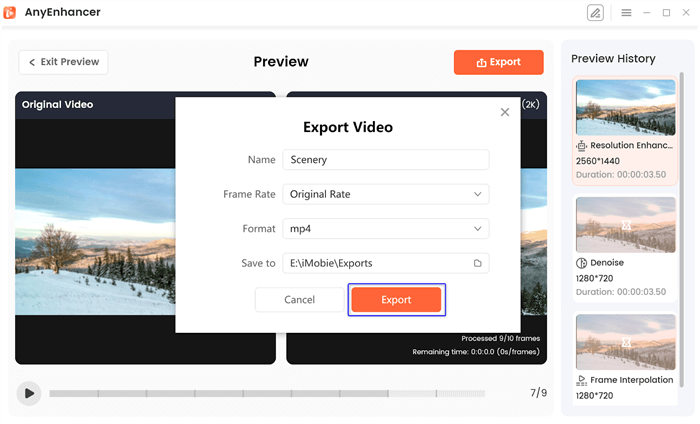
Export the Video
How to Prevent Out-of-Focus Videos?
Avoid blurry videos by fine-tuning your camera setup. Here’s how to keep your shots clear and focused:
- Get to know your camera’s focus settings. Use autofocus for normal scenes and manual focus when it gets tricky.
- You can use a tripod or stabilizer to hold your camera steady. This will prevent hand movements from blurring the video.
- Good lighting helps your camera use faster shutter speeds, which sharpens your video.
- Make sure the autofocus is set right for where you’re shooting.
- Use manual focus for better control in difficult scenes.
- Does your camera focus on peaking and zebra patterns? Use them to keep your shots sharp.
- A tripod or gimbal keeps your camera still and your video focused.
These steps will help keep your videos sharp and professional. Still, have some questions in mind? Let’s address them in the following section.
FAQs on Fixing Out-of-Focus Videos
Can I fix a blurry video on my smartphone?
Some apps can sharpen videos. However, programs like Adobe Premiere Pro or DaVinci Resolve on a desktop are more effective.
Should I use auto or manual focus?
Autofocus is good for everyday scenes. Switch to manual focus for more complex scenes to gain finer control.
How can I check if my camera’s autofocus sensors need cleaning?
If your camera has trouble focusing in bright settings, the sensors might be dirty. Refer to your camera’s manual for how to clean them.
Can I adjust a blurry video in Premiere Pro without an adjustment layer?
You can apply the Unsharp Mask effect right on your video. However, an adjustment layer is better because it allows adjustments without changing the original video.
What if I can’t fix the blur with editing?
If editing can’t resolve the blur, reshooting might be necessary. Alternatively, you could creatively use the blur in your project for a unique effect or a montage.
Final Words!
In conclusion, it is straightforward to fix out of focus video with the right approach. Quickly improve your video’s clarity using tools like Adobe Premiere Pro or DaVinci Resolve.
Key steps include carefully adjusting settings and preventing issues using clean gear and stabilizers like tripods.
This way, your videos will look sharp and professional, captivating your audience effectively. Keep these tips handy, and you’ll master video clarity quickly.
Product-related questions? Contact Our Support Team to Get Quick Solution >

