Davinci Resolve Color Grading: What is & How to Color Grade Using It
This guide explains that Davinci Resolve color grading enables you to correct or enhance your video’s colors, contrast, or even brightness. It is convenient and effective for enhancing video resolution. We suggest using AnyEnhancer, a versatile AI enhancing and upscaling tool, to get even more desirable color grading for the videos.
Joy Taylor | Last Updated: Sep. 24, 2024
1575 words|5minute
Davinci Resolve is a beneficial tool for color correction and grading that allows you to alter the contrast, intensity, and balance of your videos. This guide will explain what Davinci Resolve color grading is, its significance, and the steps to implement when editing your videos. If you are unfamiliar with this, do not worry – the steps are well articulated and very easy to understand. AnyEnhancer – an AI color grading and video enhancer – is also recommended to achieve the highest quality of color grading. So, let’s start exploring both more deeply!
What is Davinci Resolve Color Grading?
DaVinci Resolve is a professional video post-production software for editors and digital colorists. It has the standard features of a modern editor and is combined with precise coloring and grading options. The color grading in Davinci Resolve is the feature used to change and improve the coloration of the videos.
From novices processing their first video to enthusiastic professionals, color grading can enhance their video quality and make it look better. It is popular in films, television shows, and YouTube videos to establish the balance of colors or emphasize some aspects.
This lets you make corrections such as tones, saturation, and contrasts to achieve your preferred video appearance. These Color Wheels will allow you to set the dark, middle grey, and brightness standards. Another useful tool is Curves, which will enable you to adjust certain tones for greater accuracy.
How to Color Grade in DaVinci Resolve [Step-by-step Guide]
The color grading in Resolve option allows you to enhance the quality of your videos by correcting or enhancing the colors, luminance, gamma, and contrast. Color grading remains an important element in eye-catching and professional-looking videos. Now, we are going to explain how you can begin the process of color grading in DaVinci Resolve to further enhance your videos.
Using Color Correction
Most color grading stems from color theory; however, there is a basic issue of color correction that you must first deal with. Color correction helps recover elements such as shadow and highlight that may be washed out when shooting in a flat mode. For this:
Step 1. Open the “Color Page” in DaVinci Resolve for color correction tools.
Step 2. Right-click your footage and choose “Show Scopes” to see color details.
Step 3. Use the “Lift” slider to lower shadows and clarify dark areas.
Step 4. Adjust the “Gain” slider to raise highlights and enhance light areas.
Step 5. Fix unwanted hues with the “Color Wheels” by dragging sliders to balance colors.
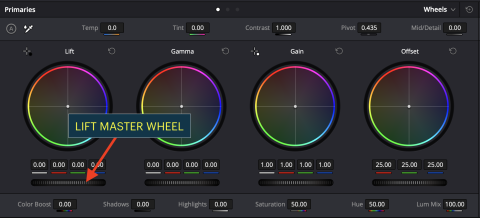
Color Wheels
Step 6. Add your color grade to a new node above the corrected one for creative adjustments.
Applying Color Grade Using Various Tools in DaVinci Resolve
After color-correcting your footage, you can apply a color grade using various tools in DaVinci Resolve.
1. Organizing with Nodes
Nodes are essential for organizing color grades in DaVinci Resolve. Each raw footage starts with one node, but you can add more to apply different adjustments in a specific order.
Step 1. Press “ALT+S” to add a new node.
Step 2. Right-click on each node, select “Label Node,” and name them to organize your workflow.
Step 3. You can apply Exposure adjustments in the first node, Contrast and Saturation in the second, and Hues in the third. Using nodes effectively allows you to manage and control your color grading process more precisely.
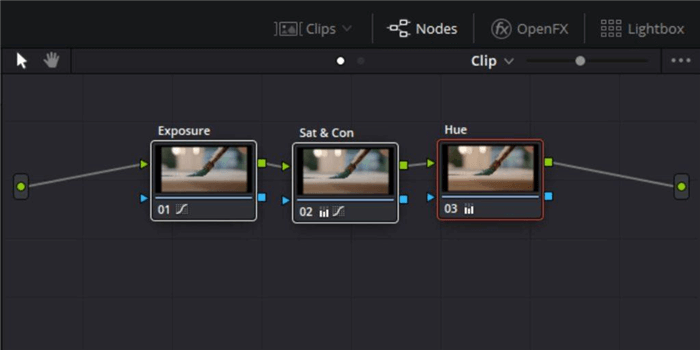
Nodes Option
2. Adjust Colors with Color Wheels
Contrast wheels within the lower left corner of the DaVinci Resolve interface enable color adjustment. They are the shadow control, mid-tone control, highlight control, and general control tool. To adjust the colors, use these:
Step 1. Choose the node you want to adjust.
Step 2. In the Color Wheels window, manually enter values or drag the wheels left and right to change the colors.
Step 3: If the footage has an unwanted hue, click the center of the Color Wheels and move the wheel in the opposite direction of that hue to correct it.

Make Adjustments with Color Wheels
To see your changes, press “Shift + D” to compare the edited footage with the original. When a specific node is selected, press “Control/Command + D” to turn it off.
3. Enhance Colors with Curves
The Curves tool in DaVinci Resolve offers a flexible way to adjust the contrast and color of your entire footage. Unlike Color Wheels, which adjust specific areas, Curves allow you to fine-tune the footage. You can:
- Adjust details by clicking and dragging different points along the curve line.
- Add multiple points to create keyframes for various adjustments.
- To modify specific colors, use the vs. Curves:
- Hue vs Hue: Shift one color to another, changing the color of objects.
- Hue vs Sat: Adjust the saturation level of a particular color.
- Hue vs Lum: Change the brightness of a specific color.
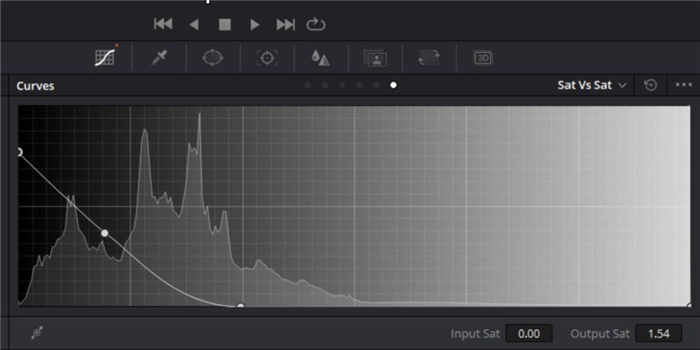
Use Curves
You can begin by selecting the hue you want to alter from the “Custom” drop-down menu at the top right of the Curves panel.
4. Applying LUTs in DaVinci Resolve
LUTs (Look-Up Tables) are preset color templates that instantly give your footage a polished and consistent look. They are useful for matching colors across different cameras and achieving a professional appearance quickly. For this:
Step 1. Download the LUT you want to use.
Step 2. Import the LUT by dragging and dropping it into the main LUT directory in DaVinci Resolve.
Step 3. Add a new node to your timeline and make any color corrections to the first node.
Step 4. In the bottom left corner of the screen, click the drop-down menu next to “Color Space” and choose your LUT from the list.
Video Color Grading by AnyEnhancer [AI Solution]
Want to see how AI can boost your color grading? AnyEnhancer has advanced AI tools to make your videos look amazing. The Colorize Model adds vibrant colors to black-and-white videos, while the Color Enhancement Model brightens and saturates low-quality footage.
AnyEnhancer also offers other useful features. The Face Restoration model sharpens faces in blurry videos, Frame Interpolation smooths motion, the Denoise Model clears up noise, and the Resolution Enhancement model improves clarity with 2K and 4K options. These tools can enhance your video quality.
Key Features:
- The tool applies super-resolution and facial enhancement simultaneously, making people clearer and improving overall video quality.
- It restores and enhances blurry facial features, ensuring greater clarity and recognition.
- The frame rate can be increased to smooth out motion, improving visual quality.
- Noise and graininess are reduced, producing a cleaner and sharper image.
- Video quality can be upgraded to 2K or 4K, giving your footage a more vibrant and detailed effect.
Now, let’s explore the steps for AnyEnhancer Color Grading:
Step 1. Free download and install AnyEnhancer on your computer.
Free Download for all windows & 100% safe Free Download for all mac & 100% safe
Free Download100% Clean & Safe
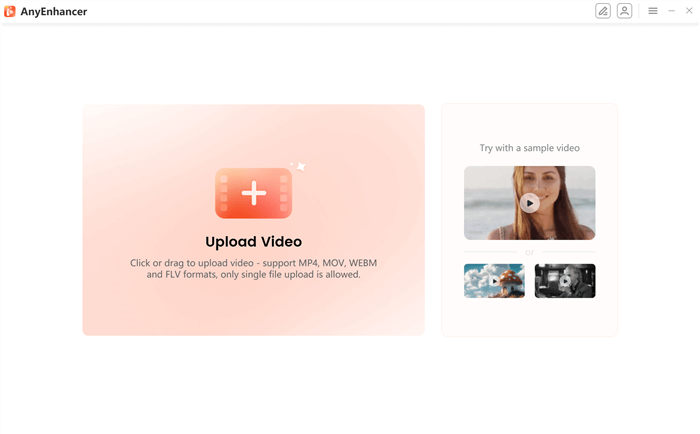
Step 2. Open the application. Click “Upload Video” in the main interface or drag your video file into the program to import it.
Upload the Original Video
Step 3. Choose the “Colorize Model” to add color to black-and-white footage or the “Color Enhancement Model” to enhance the colors in your video.
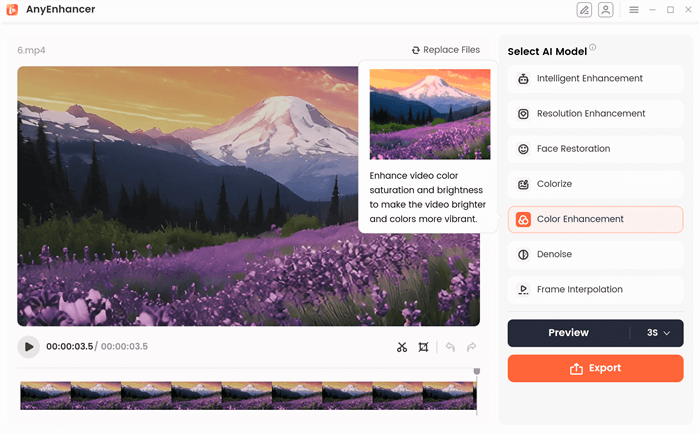
Choose the Color Enhancement Model
Step 4. Click “Preview” to compare the original and enhanced videos side-by-side.
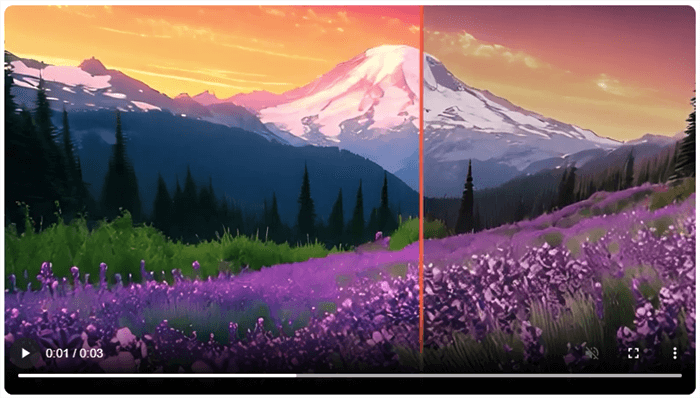
Preview the Color Correct Effect
Step 5. If you’re satisfied with the preview, click “Export” to save the enhanced video. Complete the export settings and click “Export” again to finalize the process.
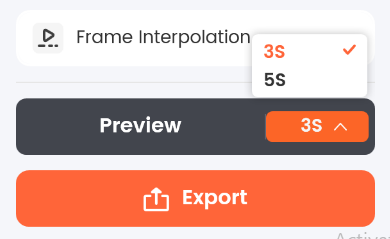
Choose the Preview Duration
FAQs on Davinci Resolve Color Grading
Is DaVinci Resolve suitable for simple color corrections?
Yes, DaVinci Resolve is very good for primary corrections. Its features allow for easy control of exposure, contrast, and even color balance.
How do LUTs work in DaVinci Resolve?
LUTs quickly apply preset color grades to footage. They help achieve a consistent look or match footage from different cameras.
Can AnyEnhancer help with color grading?
Yes, AnyEnhancer enhances the colors of dull-looking footage. Its Color Enhancement Model boosts vibrancy and saturation for a polished finish.
Final Words
In conclusion, DaVinci Resolve has potent features in color grading, from primary correction to customized color grading using LUTs. To take your video quality even further, consider using AnyEnhancer. Its Color Enhancement Model adds a layer of vibrancy and polish, making your footage stand out. Try AnyEnhancer today to elevate your video quality and effortlessly achieve professional-looking results.
AnyEnhancer – AI Video Enhancement
Download AnyEnhancer to enhance your video quality to 4K resolution, remove grain, smooth motion, and add color to black and white videos with just one click.
Joy Taylor
Senior writer of the iMobie team as well as an Apple fan, love to help more users solve various types of iOS & Android-related issues.
 Screenify
 AnyEnhancer
 FocuSee
 Vozard
 AnyMiro
 AnyMirror
