Everything You Need to Know about Voice Over a Video
Creating video content has proven to be a very influential strategy for creators, brands, and businesses in the present digital space. And if you’re looking to make your videos more engaging, adding voice-over is one of the best ways to go about it.
Joy Taylor | Last Updated: Mar. 14, 2024
1135 words|4minute
By adding voice-over to your videos, you can efficiently communicate information about your videos to your audience, making it easy for them to understand what they see. Read this post to learn all you need to know about voice-over a video and how to voice-over a video without requiring background knowledge.
What is Voice Over a Video
Voice-over, just as the name suggests, is a technique that involves adding a voice (in the form of narration or spoken commentary) to a video. It’s usually used to provide an explanation or context to visuals that viewers see in a video, enabling them to understand what they are seeing better.

How to Add Voice Over a Video
What Makes a Great Voice-Over
Adding voice-over to a video is not just about recording your voice and uploading it to your video. There are certain criteria that make a great voice-over, which include the following;
● It Must Be Captivating: To be able to grab the attention of your viewers, you need to understand how to breathe life into your script. Every sentence of the voice-over must have an artistic expression that the audience can easily connect with.
● Perfect Phrasing: Clarity in speech is very important in voice-over. Your voice-over must convey words precisely while maintaining a natural flow. This ensures that the message that you’re trying to pass is easily understood by any audience regardless of their level.
● Tone Modulation and Voice Intensity: This is another factor that determines a good voice-over. You need to understand how to modulate tone and intensity to suit your content. Whether it’s a commercial, an animated character, or a documentary, you must use a vocal delivery that matches the mood and context of the project.
● Versatility: The voice-over artist must be capable of adapting to various projects, from corporate presentations to animated films. This is to ensure that the message is conveyed in the voice-over in a convincingly and linguistically correct manner.
How to Add Voice Over a Video
The best way to add voice over a video is to use video editing software. And Movavi Video Editor is the most reliable choice in this case. The Movavi Video Editor is a tool that makes all kinds of video editing operations very straightforward for any user. It does not matter whether it’s your first time handling a video, this tool has the perfect toolset to help you add voice-over, cut, trim, split, and do lots more without encountering any problem.
Moreover, Movavi Video Editor is not limited to just adding voice-over and performing basic video editing tasks. It also supports rich filters, titles, stock media, transition effects, chroma key, motion tracking, and many more features that you can use to take your video to the next level.
Key Features
- The Movavi Video Editor offers AI-powered tools such as background change, motion tracking, and noise removal, enhancing the editing process with smart automation.
- It boasts diverse editing capabilities, allowing you to perform various editing tasks such as cutting, cropping, trimming, rotating, resizing, reversing, color adjustments, overlaying titles, etc.
- Create professional-looking videos with voice-over within a few clicks using intuitive video and audio editing tools.
- Share edited videos directly to third-party platforms like YouTube, Vimeo, etc within a few clicks.
Step 1: Download & Install Movavi Video Editor
Step 2: Launch The Tool
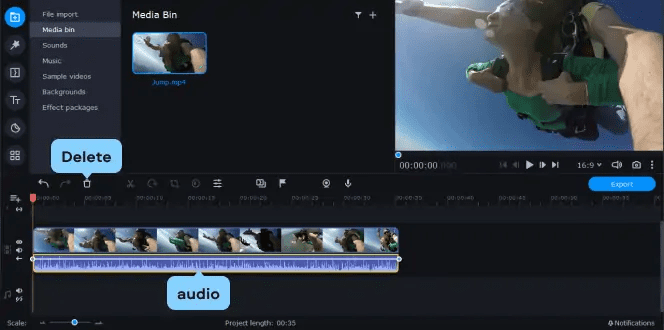
Once the installation process is complete, launch the Movavi Video Editor app and click on “Add File” to upload the video to which you want to add voice-over. Then, drag and drop it to the software’s “Timeline”.

Add Files & Clip to Timeline
Step 3: Add Voice-over to Video
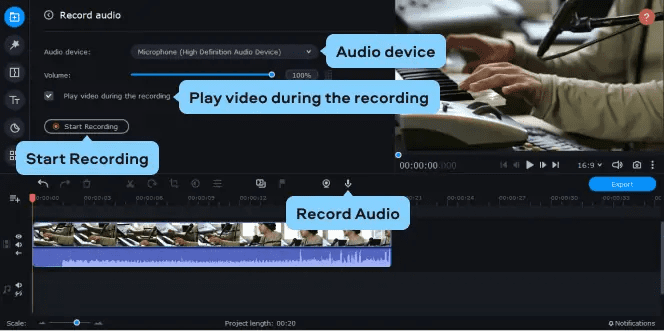
Now, click on the “Microphone” icon in the “Toolbar” and select your “audio record settings”. Then, click on “Start Recording” to record the voice-over.

Record Voice Over
● After you’re done recording the voice-over, click the “Stop Recording” button and play your video to preview the recorded audio.
Step 4: Edit Background Sound
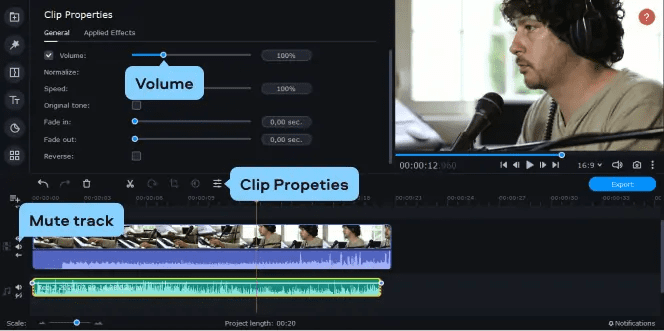
If your video has a soundtrack that could interfere with the recorded voice-over, click on the video click from the “Timeline” and select “Clip Properties”. Then, drag the volume slider to around “15%-20%”. You can also mute it if you wish.

Edit Background Sound
Step 5: Preview & Save Video
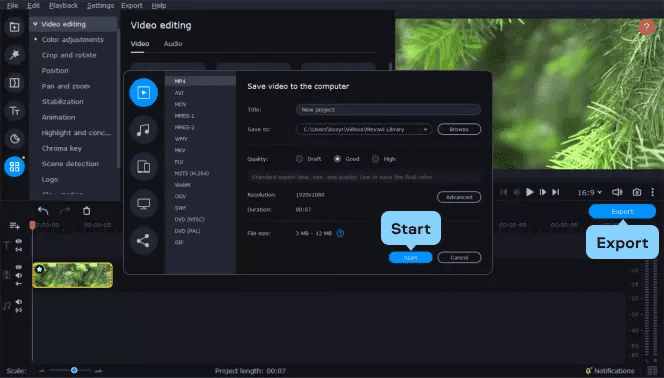
After you complete the editing process, preview your video and click the “Export” button that’s right at the bottom of the “Preview box”. Then, select relevant settings and a preferred location to store the video on your computer. Click “Start” to finish.

Preview & Export the Video
Use Movavi Video Editor to add a voice to a video. You can introduce the steps and recommend some popular voices in the editor.
FAQs about Voice Over a Video
1. How do you put your voice over a video?
To put your voice over a video, you need to record your voice using the built-in microphone in Movavi Video Editor. Then, use the tool’s features to sync the recorded voice-over with the video. Use the steps we provided in our article to our your voice-over video.
2. How to do voice-over videos on iPhone?
It is very easy to add voice-over to your videos on iPhone. All you need is the built-in iMovie app. Here is how;
Step 1: Open “iMovie” on your iPhone and select “Movie”.
Step 2: Select the “Video” that you want to add voice-over and tap on “Create Movie”.
Step 3: Tap on the “Video clip” in the “Timeline”.
Step 4: Tap the “Plus (+)” icon right above the timeline at the top-left corner. Scroll down and select “Voiceover”.
Step 5: Tap on “Record” from the recording feature that appears on your screen to record your voice.
Once you’re done, select “Stop” and save the new video clip.
3. How to dub a Video in English?
To dub a video into English, you need first to create a translation of the original language. Then, once you do that, you need voice actors to record the new dialogue with voice-over technique while watching the video.
Conclusion
That’s all in today’s guide, and we hope you found it helpful. Remember, voice-over is just a simple technique that you use to create explanation videos without showing your face. And if you ever decide to add voice-over to your video, the Movavi Video Editor is the best tool for the job.
Joy Taylor
Senior writer of the iMobie team as well as an Apple fan, love to help more users solve various types of iOS & Android-related issues.
Screenify
AnyEnhancer
FocuSee
Vozard
AnyMiro
AnyMirror


