How to Transfer Music from iPhone/iPad/iPod to Flash Drive
Want to save iPhone storage by transferring songs to a USB flash drive? In this guide, we will show you detailed steps to transfer music from iPhone, iPad or iPod to a flash drive.
iPhone Music Tips
iPhone Music Transfer Tips
Having too many music files stored on an iOS device will take up limited storage space. Saving the songs to a flash drive is a good way to keep the music safe as well as make more memory for an iPhone, iPad, iPod. It may come with a challenge when you try to transfer music from your iPhone, iPad, or iPod to a USB, and this guide will give you a quick solution.
Transfer Music from iPhone/iPad/iPod to Flash Drive with AnyTrans
AnyTrans is an iOS transfer tool that is capable of transferring and managing almost all types of content on your iOS devices. You can check the features below to know why we recommend this tool for you to transfer music from iPod to a USB stick.
AnyTrans – iOS Music Transfer
- Transfer songs from iPhone, iPad, and iPod to a USB flash drive.
- Transfer music from iPhone/iPod/iPad to computer, to iTunes, to another iOS device.
- Massively delete unwanted songs from iDevice.
Free Download100% Clean & Safe
Free Download100% Clean & Safe
Free Download * 100% Clean & Safe
Step 1. Connect iPhone to your computer.
Free download and install AnyTrans on your PC/Mac, and then connect your device to the computer via a USB cable. Also, remember to plug in your USB flash drive.
Step 2. Enter the Music managing page.
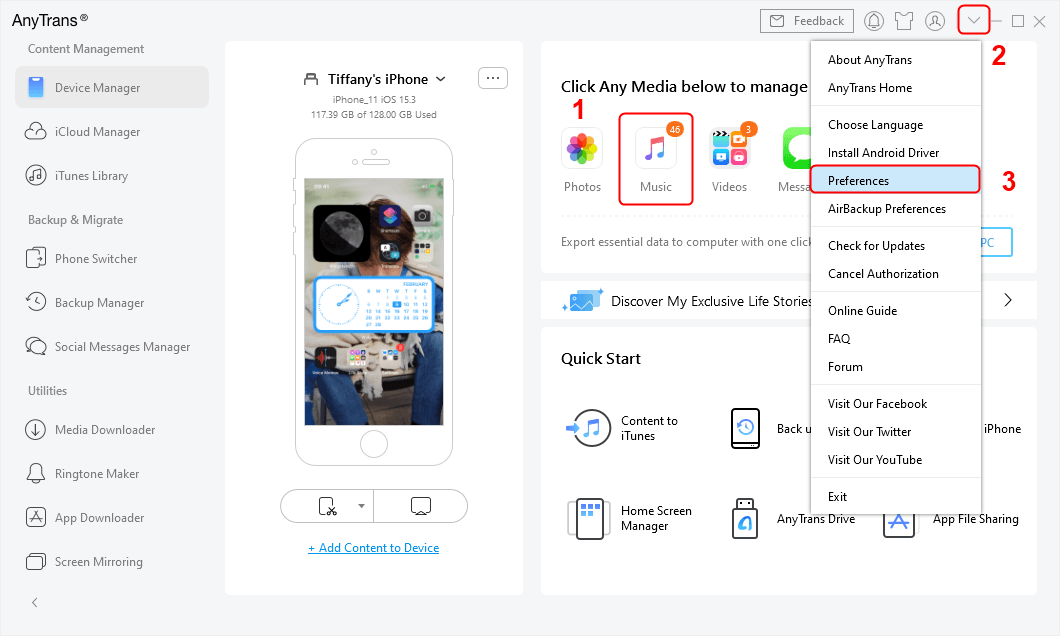
Once AnyTrans has detected your device, click on “Music” on the right side of the interface, all your music will be listed here.
Step 3. Change the export path.
Click on the setting menu on the upper right corner, choose Preferences to change the export path.
Step 4. Choose your USB stick as the export path.
Find the “Export Path” option, click “Select”, and choose the flash drive as the export path.

Choose Music and Change Export Path
Step 5. Start transferring iPad/iPod songs to the USB stick.
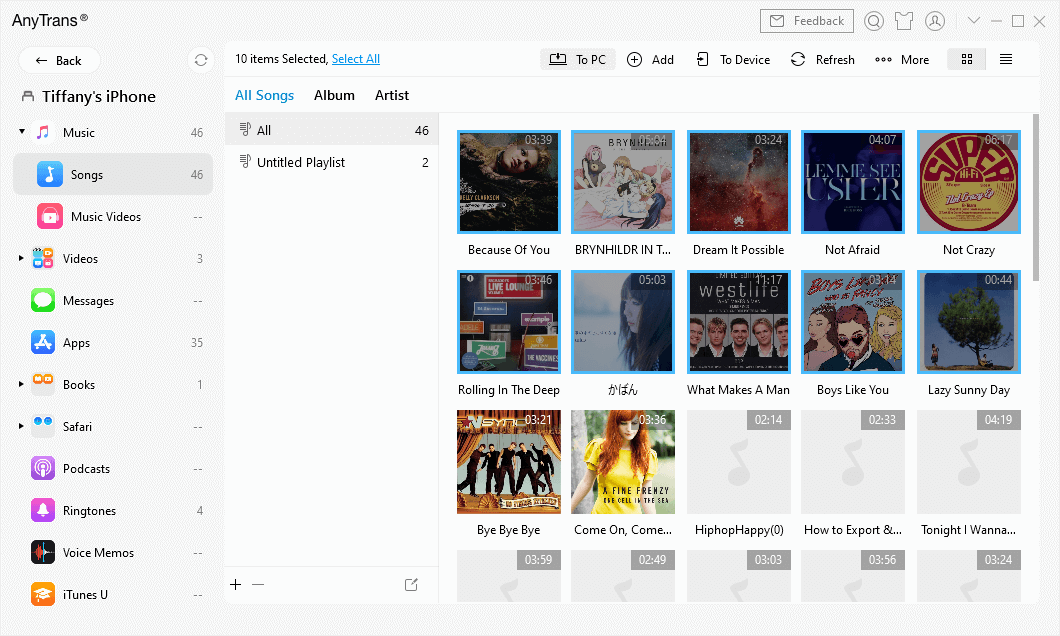
Preview and select the music you need to transfer, click on “Send to PC” to begin transferring.

Choose Music and Transfer
The Bottom Line
As you can see, using AnyTrans to transfer music from iPhone/iPad/iPod to USB is very easy. Besides music, you can also transfer videos, movies, photos, and more to USB from iPhone/iPad/iPod. If you still have any questions in mind, be free to contact our support team via Email, they will reply to you within 24 hours. Please share this guide with your friends if you think it is worthy.
More Related Articles
Product-related questions? Contact Our Support Team to Get Quick Solution >

