How to Transfer Photos from iPhone to External Hard Drive
Want to transfer files from iPhone/iPad to external hard drive? This guide will show you how to make it with a step-by-step tutorial.
In the past, you may always back up your iPhone/iPad with iTunes. But as time goes by, you may find that the backup files can take up considerable space on your computer. And, you can connect iPhone to an external hard drive and transfer photos from iPhone directly to it.
Here in this guide, we will show you how to transfer photos from iPhone directly to an external hard drive on Windows, Mac, or without a computer.
Transfer Photo Files from iPhone/iPad to External Hard Drive Directly
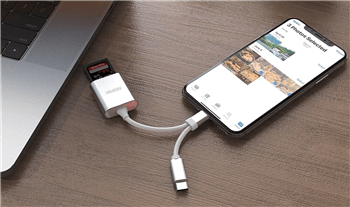
If you seek to transfer files from iPhone to external hard drive without computer, you can make use of an adapter or a USB-C cable. The advantage of the special cable is that you can easily and conveniently transfer files among your iOS devices and your external hard drive without computer, anywhere and anytime. Here, we will demonstrate how to transfer files from iPhone or iPad to external hard drive without computer.

Transfer Photo Files to External Hard Drive Directly
- Connect your iPhone directly to the external hard drive via a USB-C cable or an adapter.
- Locate the photos or other files you’d like to transfer.
- Tap the “Share” icon on the upper-right corner and choose the external hard drive as the destination.
In this way, you can transfer all files from your iPhone/iPad to external hard drive, such as photos, contacts, messages, contacts, etc.
Transfer Photos from iPhone to External Hard Drive on PC/Mac
Chances are that users don’t have such an adapter to connect the iOS device to the computer. Don’t worry. As long as you have a professional iOS data manager named AnyTrans, you can also transfer iPhone photos to external hard drive on your own. Now, let’s take a look at AnyTrans’ outstanding features.
- It can help you transfer files from iPhone/iPad to external hard drive easily, including music, photos, videos, contacts, messages, notes etc.
- It allows you to add files from external hard drive/computer to your device without erasing the existing data.
- It enables you to view the details of your iCloud backup and export the data from iCloud backup to external hard drive easily.
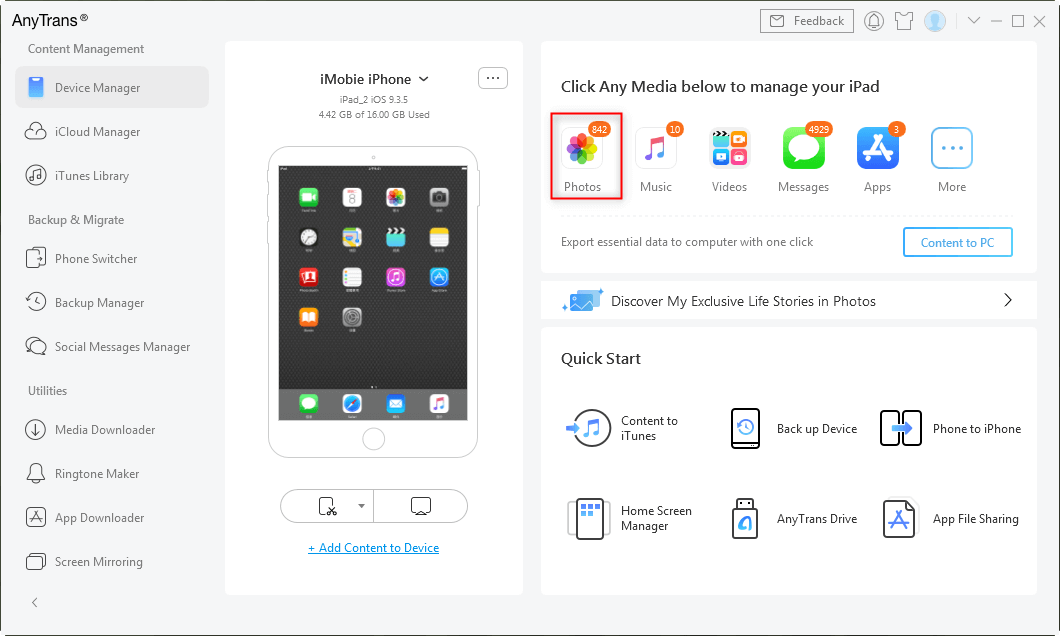
Step 1. Free install AnyTrans and launch it on your Windows or Mac > Connect your iPhone/iPad to computer > Plug in your external hard drive. Click on the Photos or other types of files on right panel of the homepage.

Connect iPad to the Computer and Choose Photos
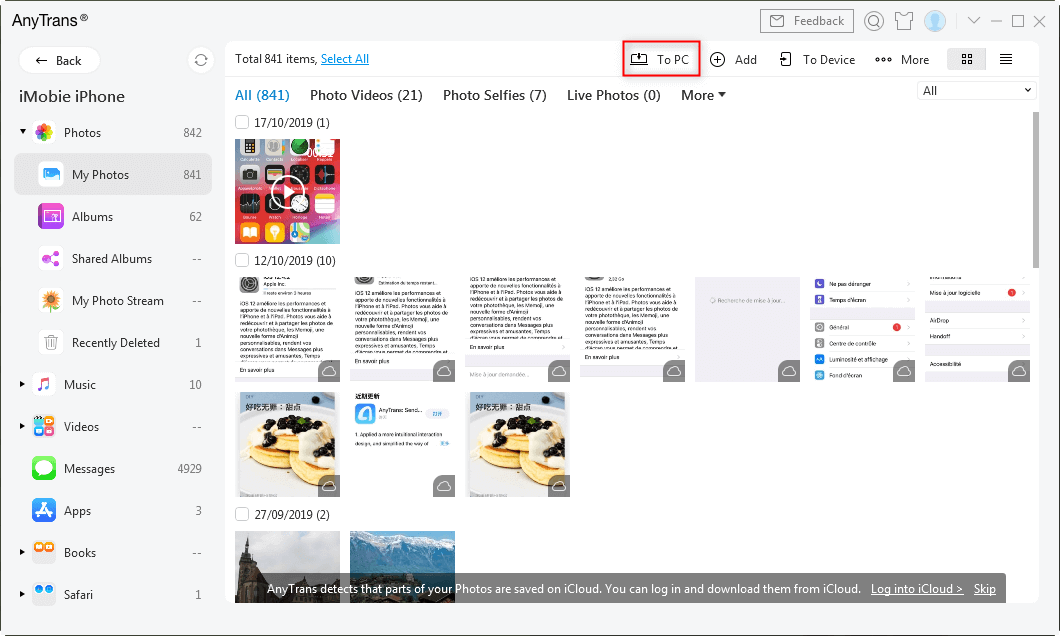
Step 2. Select the photos or other types of files you’d like to transfer > Click on the To PC/To Mac button > Choose your external hard drive as destination > Click on Open.

Choose Photos and Click Send to PC
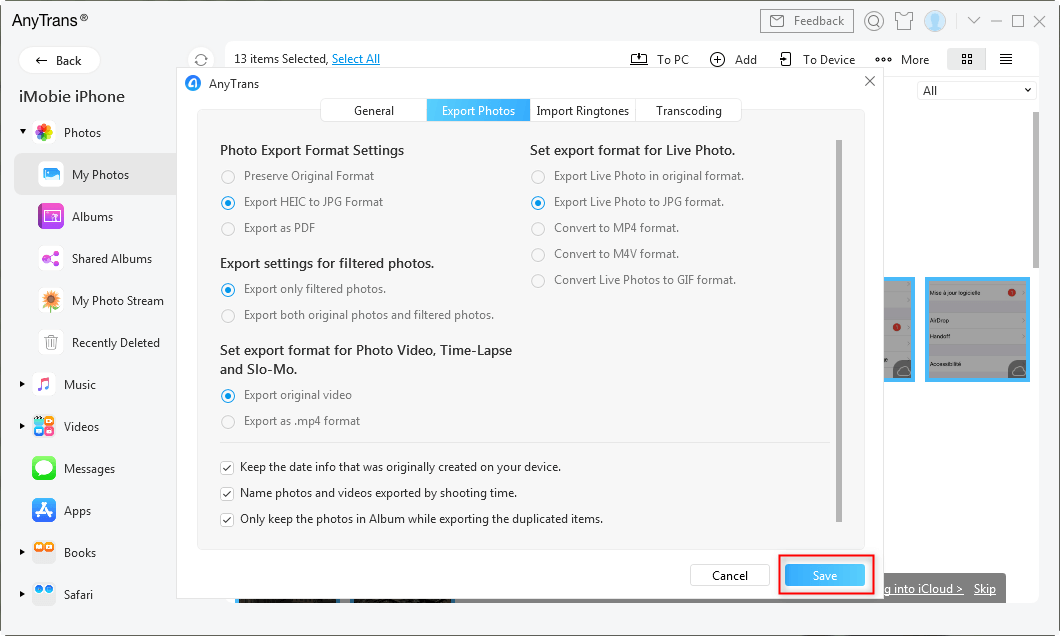
Step 3. After hitting the To PC button, you should go for some settings and click on the Save button.

Choose Your External Hard Drive as Destination
Transfer Photos from iPhone to External Hard Drive on Windows 11
Except for Anytrans transferring, you can use Microsoft Photos on any Windows 11, Windows 10, or Windows 8 and share photos easily. Here are the steps to share photos from iPhone to external hard drive on Windows:
Step 1. Connect both iPhone and external hard drive to the PC. Make sure your iPhone is connected and trusted on your PC.
Step 2. Once connected successfully, Microsoft Photos pops up a window. Click Import.
Step 3. Check From a connected device (your iPhone). Select the photos you want to transfer and make sure the external hard drive is the receiving device.
Step 4. Tap on Import items to start transferring.
Furthering Reading: Transfer Photos from iCloud to External Hard Drive >
The Bottom Line
AnyTrans can always put your important data in the right place. If you are interested, just click here to have a free trial! If you have any questions about this guide or AnyTrans, you can send an email to tell us. We will reply to you as early as possible.

Joy Taylor


Senior writer of the iMobie team as well as an Apple fan, love to help more users solve various types of iOS & Android-related issues.
Screenify
AnyEnhancer
FocuSee
Vozard
AnyMiro
AnyMirror


