How to Retrieve Notes from from iPad/iPad Pro/iPad mini/iPad Air
Want to recover deleted notes on iPad but don’t know how? Read this guide to see how to recover deleted notes on iPad 2/3/4, iPad mini 2/3/4, iPad Pro or iPad Air 2.
iOS Data Disappeared/Lost
- iPhone Data Lost After iOS Update
- iPhone Contacts Lost After Update
- Photos Lost After iOS Update
- Voice Memos Lost After Update
- iBooks Lost After Update
- iPhone Notes Lost After Update
- iPhone Music Lost After Update
- iPhone/iPad Safari Bookmarks Lost
- Notes Disappeared from iPhone
- Photos Disappeared from iPhone
- Text Messages Disappeared
- Calendars Disappeared on iPhone
- Recover Deleted iPod Messages
- Recover Deleted Apps on iPad
- Retrieve Deleted Notes on iPad
- Restore iPad without Data Loss
No matter you or somebody accidentally deleted some important notes on your iPad, or you find that notes vanished from your iPad without no reasons. That will be a crazy thing for most iPad users. When encounter above situations, how can you recover deleted notes on iPad? Even when you haven’t synced your iPhone, iPad or iPod touch with iTunes on your computer before you deleted or lost notes.

How to Recover Deleted Notes on iPad
The answer is absolute YES. Here, we’d like to share you 3 different methods to recover deleted notes on iPad. Of course, these method is also suitable for other devices, like your iPhone, iPod touch.
Hot Topic: 2018 Best iPad Data Recovery Software Review >
Before we start, there is something you must clear,
- Recovering deleted notes with iTunes and iCloud backup (Method 3 and Method 4) need you to erase all existing data on your device firstly, and these deleted files can’t be recovered anymore. In addition, both the two ways will be a blind full restore. You can’t recover only deleted notes.
- Since Apple offers no way for users to check the iTunes iCloud backup files details, you have to be 100% sure that the iTunes or iCloud backup you choose to restore from does contain the notes you lost, or you will lose other important files on your device and can’t get back the deleted notes either. If you’re not sure whether the backup includes the deleted notes or not, then Method 3 and Method 4 are not recommended.
Method 1. How to Recover Deleted Notes on iPad via Recently Deleted Folder
When you delete notes on iPad, they will remain on your iPad for 30 days before being permanently removed from the device. So, you can check the “Recently Deleted” folder to confirm whether your deleted notes are there or not.
Step 1. Open Notes app on your iPad > Tap the Back Arrow on the top left corner to go to the folder screen.
Step 2. Tap on “Recently Deleted” folder > Click on the “Edit” button in the upper right corner > Select the deleted notes you want to recover > Tap on the “Move To…” button > Choose a folder to store your deleted notes.
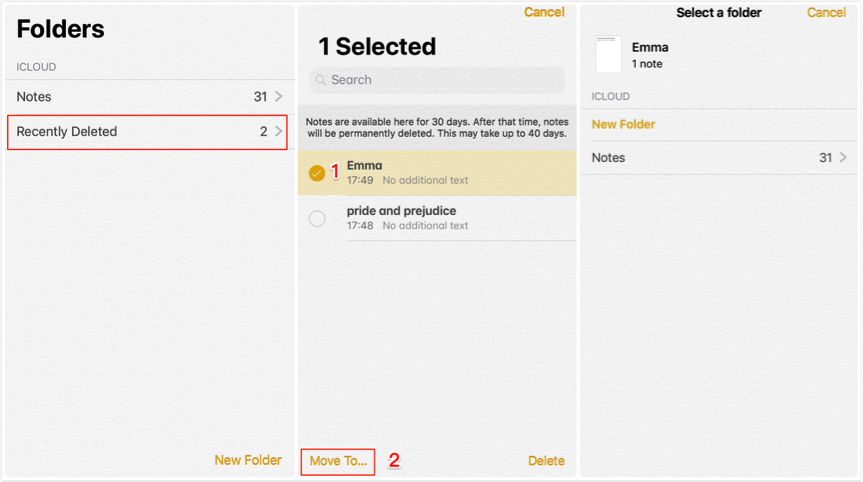
How to Recover Deleted Notes on iPad via Recently Deleted Folder
Method 2. Recover Deleted Notes on iPad without Backup
For these users who have made no backup, or the backup doesn’t contain the lost notes, here’s the last way to recover deleted notes on iPad. PhoneRescue for iOS, the #1 iPhone iPad data recovery tool in the market, has helped over millions of iOS users recover deleted or lost files successfully, including notes. And below are its highlights on recovering notes on iPad.
- Three recovery modes to ensure the highest recovery success rate. No matter you have backup or not, you can get your notes back.
- Unlike traditional iTunes or iCloud backup recovery way, you can recover only lost notes. Also, you can preview your deleted notes before recovering and select the one(s) you prefer most to recover.
- Supports all iPad models: iPad, iPad 2, iPad 3, iPad 4, iPad mini, iPad mini 2, iPad mini 3, iPad mini 4, iPad Air, iPad Air 2, iPad Pro, etc.
- Beside notes, it also supports recovering deleted messages, videos, contacts, photos, notes, calendar and so on.
- 100% guarantee for your data and information privacy.
Step 1. Download iPad notes recovery tool.
Free Download PhoneRescue for iOS to your computer and run it.
Free Download * 100% Clean & Safe
Step 2. Connect iPad and choose recovery mode.
Connect your iPad to computer with USB cable and choose “Recover from iOS Device”. Click Next to scan deleted iPad data.
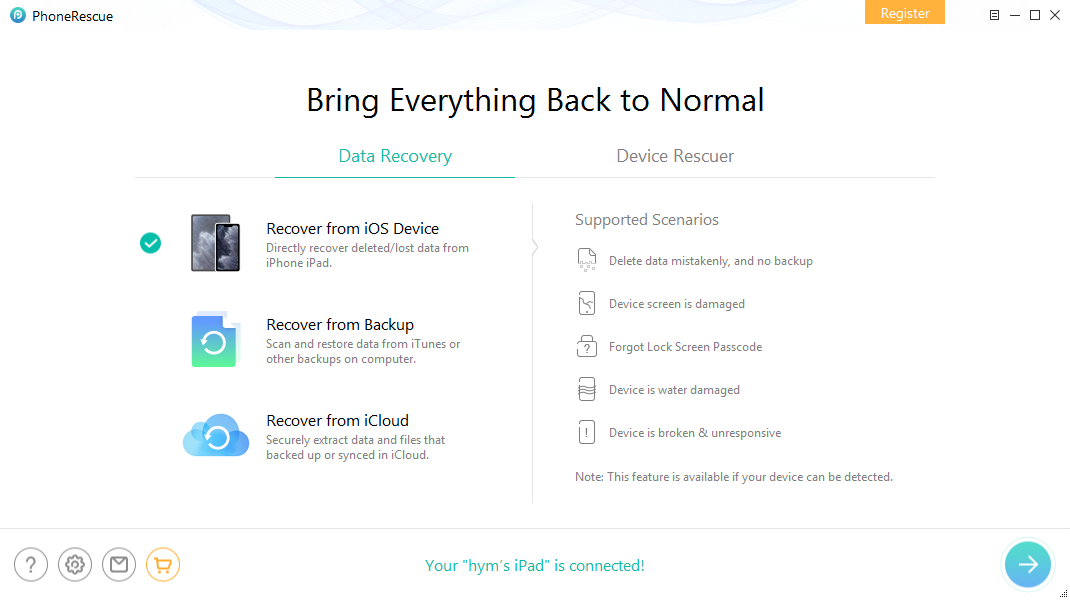
How to Recover Deleted Notes on iPad – Step 2
Step 3. Scanning the deleted notes on your iPad.
By default, all categories will be selected. Please uncheck Select All option and then choose Notes. Click Ok to start scanning.
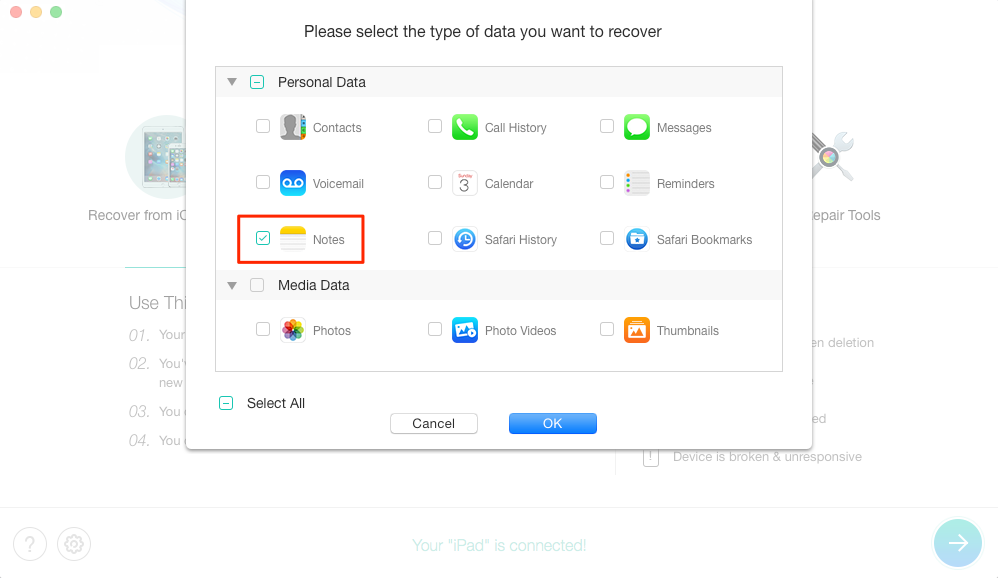
How to Recover Deleted Notes on iPad – Step 3
Step 4. Select the notes to recover.
Select “Notes” on the left. You can use filter to get only the deleted items. Just preview and select the notes you want to retrieve. And PhoneRescue for iOS allows you to retrieve deleted notes directly to your iPad. Or you can extract selected notes to computer and save them as printable format.
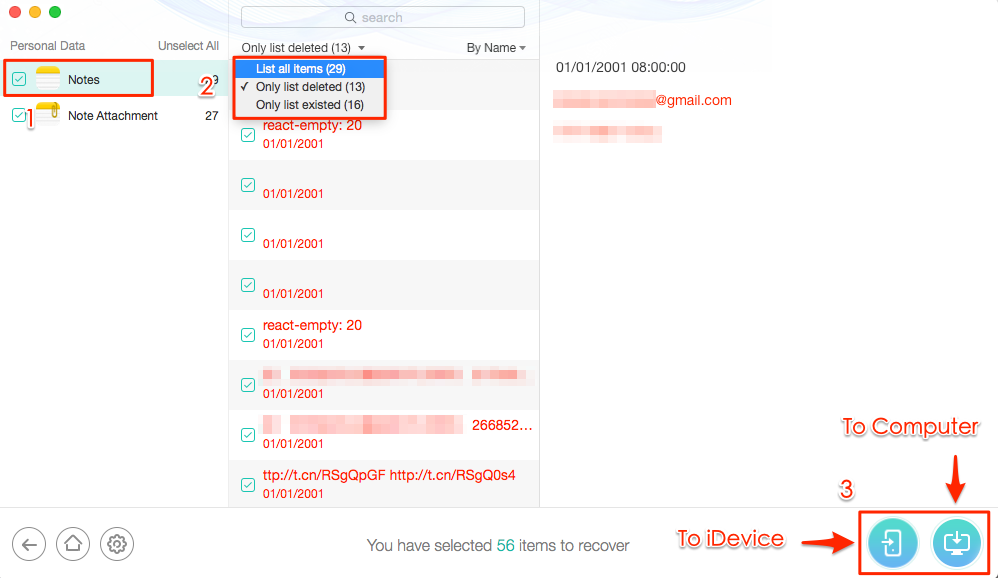
How to Recover Deleted Notes from iPad – Step 4
If you cannot find the deleted notes on iPad, you can select Recover from iTunes Backup or Recover from iCloud in Step 2 to get back deleted notes on iPad.
PhoneRescue – iPad Notes Recovery Tool
This professional tool can help you recover deleted notes on iPad 2/3/4, iPad mini/Air/Pro easily and quickly. Download it now and follow this guide to recover deleted notes on iPad in minutes.
Method 3. How to Recover Deleted Notes on iPad with iTunes Backup
If you have made an iTunes backup before losing your notes, and are quite sure that your lost notes were stored there, then follow the steps below to recover deleted notes on iPad with iTunes.
Step 1. Launch iTunes on your computer > Connect your iPad to the computer with its USB cable.
Step 2. Click the Device icon when it appears in iTunes > Choose Restore Backup option > Select the backup that contains your lost notes.
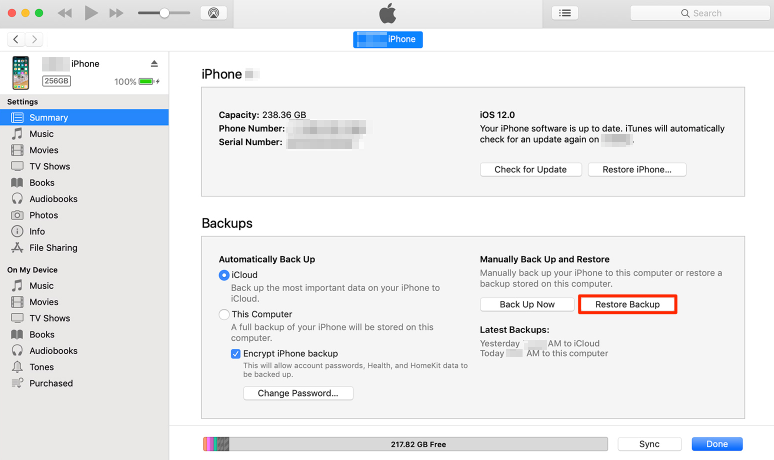
How to Recover Deleted Notes on iPad with iTunes
Step 3. Click on Restore button and wait for the process to finish. Don’t disconnect your iPad until it restarts.
Method 4. How to Recover Lost Notes on iPad with iCloud [without Computer]
Recovering notes with iCloud will also erasing all settings on your iPad. If you don’t want to wipe anything while recovering, move to Method 2 to complete it.
Step 1. Open Settings on your iPad > General > Reset > Tap on Erase All Content and Settings option.
Step 2. Reach the Apps & Data screen > Choose Restore from iCloud Backup option > Sign in your iCloud account (Apple ID) > Choose backup > Select the backup contains your lost notes to restore.
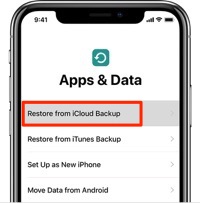
Recover Notes on iPad with iCloud
The Bottom Line
With above three methods, you may have retrieved your deleted notes on iPad successfully. And as you can see, PhoneRescue for iOS can help you recover deleted notes on iPad safely, and you can also preview notes on your backup and extract them to computer or directly transfer to your iPad. Why not give it a try?
Product-related questions? Contact Our Support Team to Get Quick Solution >


