4 Ways to Download Music From iPhone to Computers
Want to transfer songs from iPhone to computer but do not know how? This guide will tell you how to transfer music from iPhone to computer with ease.
Read in: Read This Article in
AnyTrans – Transfer Music from iPhone to Computer in Seconds
AnyTrans provides the quickest way to download music from iPhone to computer. You can transfer iPhone music in just a few seconds. Supports the latest iPhone 16 and iOS 18.
As a computer can’t access iPhone music directly, it’s necessary to transfer music from iPhone to computer with a transferring tool. In this case, Apple developed iTunes for users to manage media files, developed iCloud for users to store content in the cloud, and developed AirDrop for users to transfer content between iPhone and iPhone, as well as Mac.
Since iTunes only supports transferring purchased music and AirDrop only applies to iPhone and Mac. These are still not helpful when we want to transfer non-purchased music to the computer or when we want to transfer music from iPhone to a Windows PC. So, you may wonder if there is a way to transfer music from my iPhone to computer? Don’t worry, here we will focus on music transferring, and tell you how to transfer music from iPhone to the computer. Whether you are using a PC or a Mac, this post will help you.
Further Reading: Top 5 Free Offline Music Apps for iPhone to Download Songs >
Transfer Music from iPhone to Computer without iTunes
The ultimate way to transfer music from iPhone to computer is using AnyTrans. This way is available for both Windows and Mac computers. Without iTunes, AnyTrans allows you to transfer more than just purchased music. All the music files stored on your iPhone can be transferred in one click. You can check the main features of AnyTrans in the following:
AnyTrans – iPhone Music Transfer
- Transfer both purchased and non-purchased music to computer.
- Add music to the iPhone from the computer without wiping data.
- No harm to transferred music files and other iPhone content.
- Transfer photos, contacts, messages, notes, and more.
Steps to Transfer Music from iPhone to Computer without iTunes:
Step 1. Download AnyTrans and install it on a computer > Open it and connect your iPhone to the computer. After it recognizes your device, you could see the category management part on the right side.
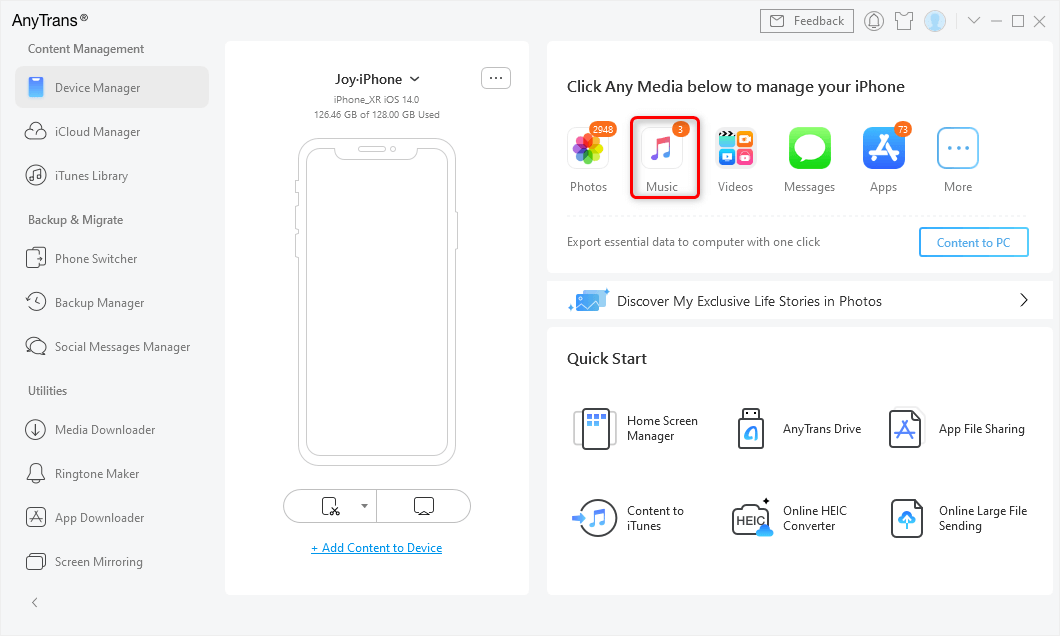
Choose Music in AnyTrans
Step 2. Click Music to enter the iPhone music file management page. Select the music you want to transfer > Click To Computer button to copy music from iPhone to computer directly.
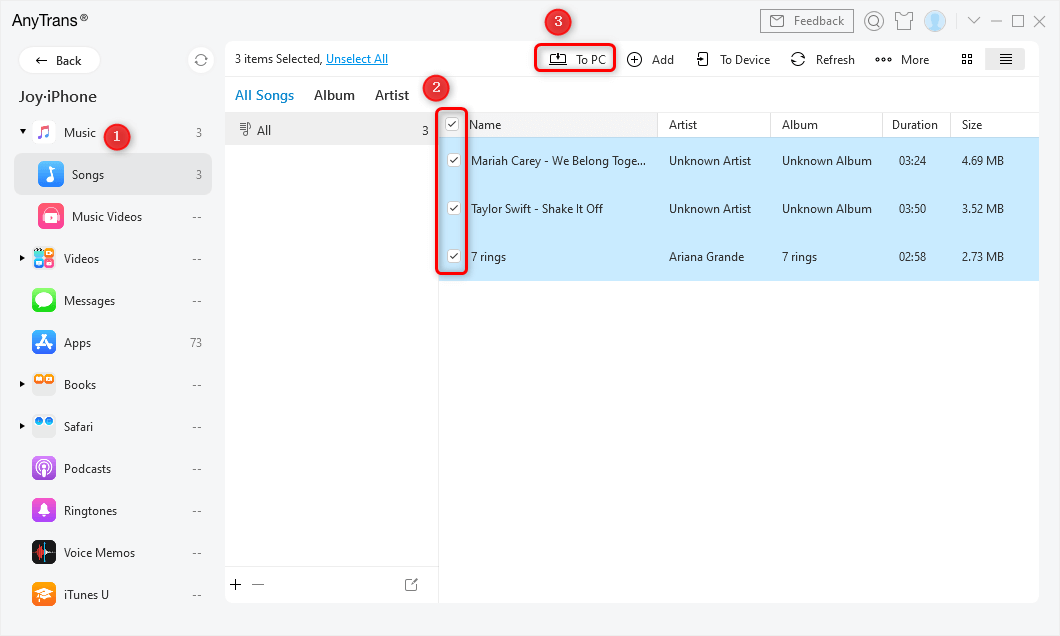
Select Songs and Click to PC/Mac
Step 3. Now you have successfully transferred songs from iPhone to the computer. Click on “View files” on the screen to have a check.

Check the Imported Music on Computer
Transfer Music from iPhone to PC with iTunes Free
How to transfer music from iPhone to computer free? There is the solution. As we mentioned, you can transfer music from iPhone to the computer using iTunes, but before we start, you need to know that this method could only transfer purchased music to your iTunes. With iTunes, you can put music on the iPhone but there is no official way to import non-iTunes purchases from iPhone to iTunes. And considering iTunes errors happen all the time, it would be better for you to make a backup first.
Steps to transfer iPhone music to computer with iTunes:
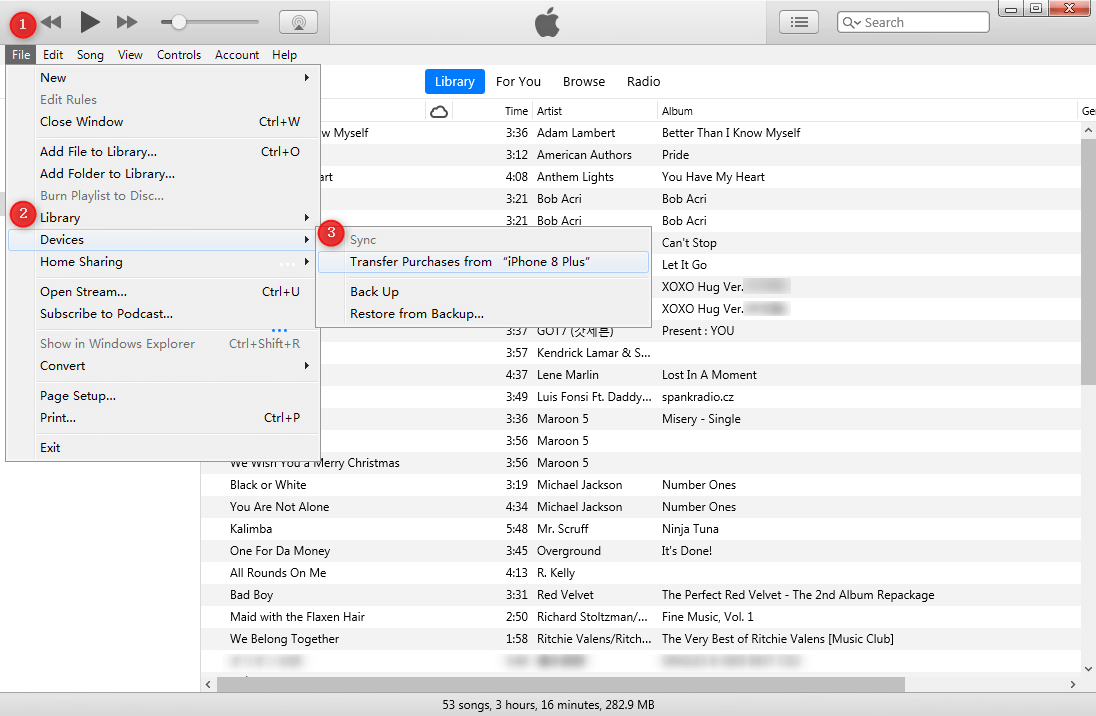
1. Download the latest version of iTunes on your computer > Connect your iPhone to your computer.
2. Click File on the upper left corner of the iTunes window > Devices > Transfer Purchases from “your iPhone name”.
3. If iTunes asks you to authorize your computer, go to Accounts > Authorization and choose to Authorize the computer.
4. Wait for the purchased music to finish transferring > Click Recently Added on the left side of the iTunes window > Choose the purchased music that you want to save > Click on the Download button. If you don’t see the Download button, the music is already on your computer.
Transfer Music from iPhone to Computer with iTunes
Download Music from iPhone to Computer in iTunes Store
If you’ve purchased the music on your iPhone, but you accidentally deleted the music from your iPhone or iTunes, you can re-download it from iTunes on the authorized computers and devices (up to 10 total). No need to connect with your iPhone. Here are the steps:
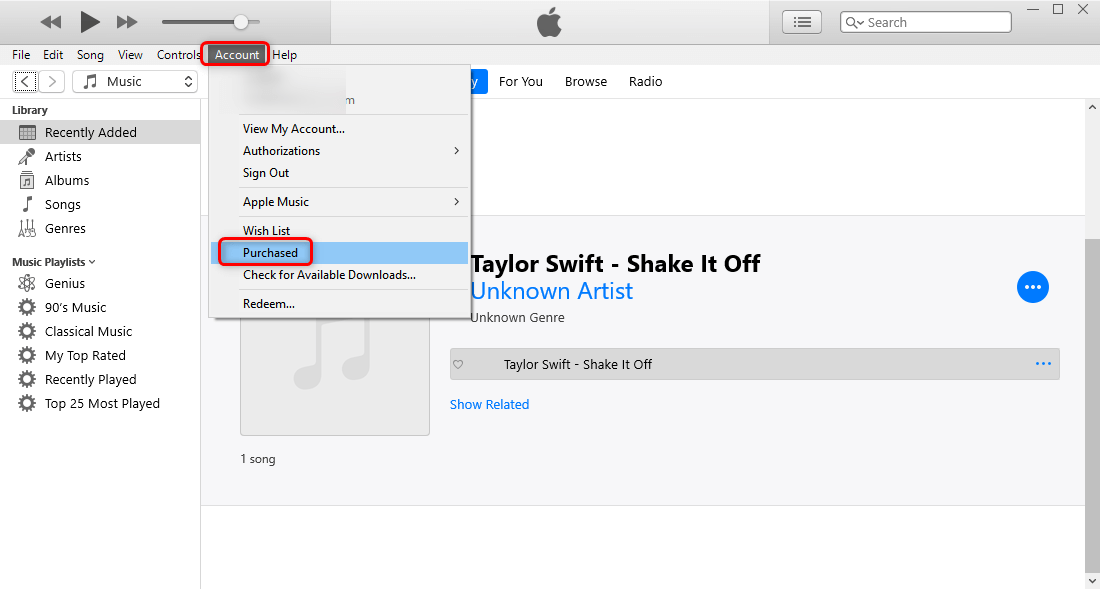
1. Open iTunes and click Account at the top of the iTunes window.
2. Choose “Sign In” and enter your iCloud account (Apple ID) that you used to buy the music.
3. Under “Account” > Click “Purchased” > “Music“.
4. Click the “Not in My Library”.
5. Click the download button to redownload the purchased music to your computer.
Re-download Purchased Music from iTunes
On macOS Catalina and later, there is no iTunes, but you can also download previous iTunes Store purchased music in the Music app on Mac.
1. Open the Music app on your Mac, click iTunes Store in the sidebar.
2. If you don’t see iTunes Store in the sidebar, go to Music > Preferences > General > Make sure iTunes Store is selected > OK.
3. Click Purchased > Click Music to see all your purchases and the ones not currently in your music library.
4. Click the Download button to re-download the music you want.
Transfer iPhone Music to Mac with Finder
If you are using a MacBook running macOS Catalina and later, you can also use the Finder app to sync music from iPhone to Mac. Besides music, Finder supports transferring videos, photos, and other files from iPhone for free.
Steps to transfer music from iPhone to Mac computers with Finder:
1. Launch the Finder app on your Mac. Then use a USB cable to connect your iPhone.
2. Click your iPhone on the Mac computer and select Music from the top bar.
3. Click Sync music onto your iPhone. Here you can choose what music files are to be synced on your Mac.
4. Wait for the process to transfer music from iPhone to Mac with Finder. Don’t exit the app during the process, or your transfer can be interrupted.
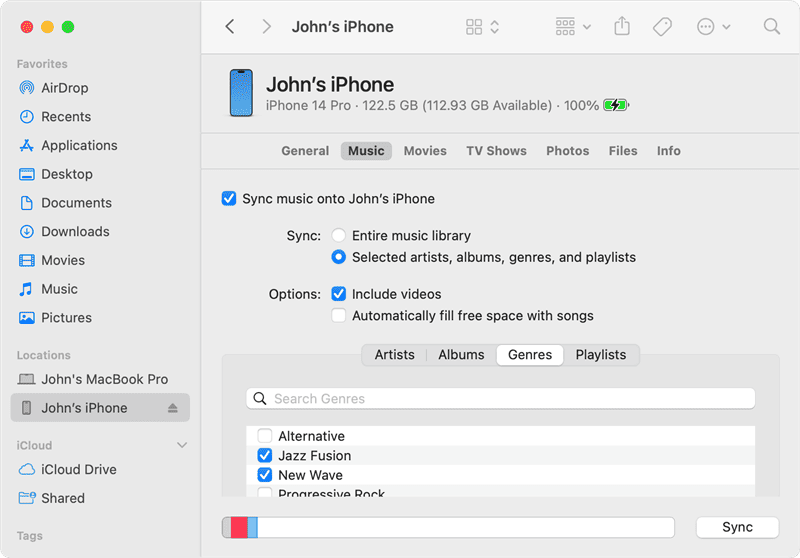
Sync iPhone Music in Finder
For iPod users, you can also get how to add music to iPod without iTunes with the help of AnyTrans.
Bonus Tip: How to Transfer Music from iPhone to Computer Wirelessly
When you do not have a USB cable at hand, or your iPhone cannot be recognized by your computer, you can try this tool to find a better way to transfer files – AnyTrans app on iPhone, which can easily help you to transfer music from computer to iPhonewirelessly.
Now follow the steps below to transfer music from computer to iPhone X/XS/XR wirelessly. Make sure both your computer and iPhone are connected to the same Wi-Fi network, and cellular data would not work in the following steps.
Step 1. Install AnyTrans app on your iPhone.
Step 2. On your computer: Enter anytrans.io in your browser, then you shall see a QR code on this page with your iPhone AnyTrans app.
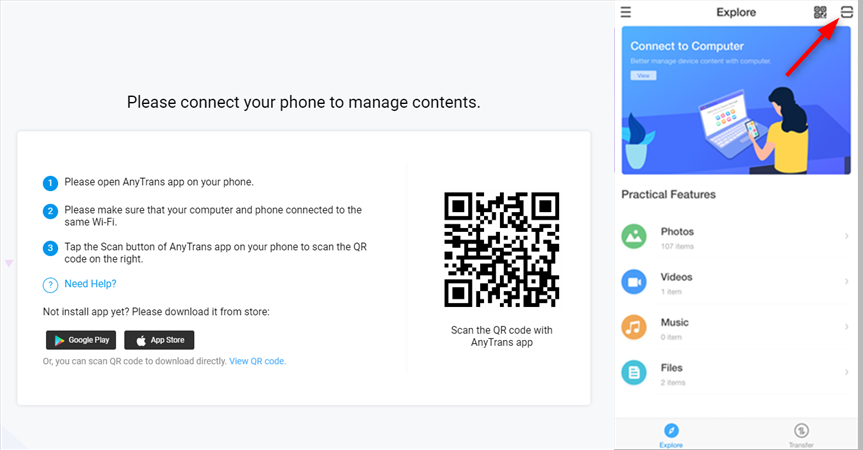
How to Transfer Music from iPhone to Computer Wirelessly – Step 2
Step 3. On your iPhone: Select the music you want to transfer and click Send button.
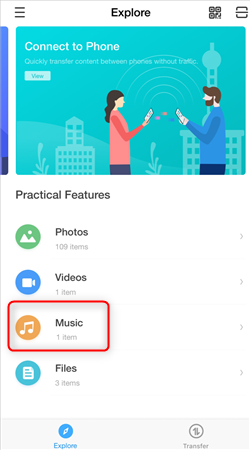
How to Transfer Music from iPhone to Computer Wirelessly – Step 3
The Bottom Line
With the help of AnyTrans, you can easily transfer songs from iPhone to the computer. Except for transferring music from iPhone to the computer, you can also get music from iPhone to iTunes, even transfer music from computer to iPhone. If you will need to transfer other iOS files from iPhone to iPhone/computer/iTunes, or from Mac/PC/iTunes to iPhone, turn to AnyTrans to help you make it in minutes.

Joy Taylor


Senior writer of the iMobie team as well as an Apple fan, love to help more users solve various types of iOS & Android-related issues.
 Screenify
 AnyEnhancer
 FocuSee
 Vozard
 AnyMiro
 AnyMirror
