How to Fix: iTunes Error 3259
Got iTunes error 3259 when connect to the iTunes Store, download music or other purchases? Worry not. Here are 7 different and reliable solutions for you to fix the iTunes error 3259 easily.
iTunes Error
iTunes Sync Error
iTunes Connect Error
iTunes Update & Restore Error
iTunes Purchase Error
iTunes error 3259 is one of the most common errors users meet when trying to update iOS devices, connect to the iTunes store, download music, or other purchases with iTunes. It is typically shown in the following formats:
- iTunes could not connect to the App Store. An unknown error occurred (error 3259). Make sure your network connection is active and try again.
- There was an error downloading your music (error 3259).
- Cannot connect to iTunes Store. An unknown error has occurred.
- Network Connection Timed out (-3259).
If you are also facing the same situation as above and stuck on iTunes error 3259, then here are some useful solutions for you. In this article, we will share you 7 best ways that we collect from users who have fixed the iTunes error 3259 successfully. Now, let’s check it.
How to Fix: iTunes Error 3259
Solution 1. Update to the Latest Version of iTunes
The obsolete version of iTunes may cause the error 3259. So, check and update your iTunes to the latest version.
Solution 2. Uninstall and then Reinstall iTunes
If upgrading to the latest version of iTunes did not solve the iTunes error 3259, then simply uninstalling and reinstalling iTunes to fix the error.
Solutions 3. Check Internet connection
According to many users, a bad Internet connection may cause iTunes error 3259. So, check your Internet connection and make sure that you have a stable Internet connection while using iTunes.
Solutions 4. Allow iTunes in Firewall on Your Computer
If you have enabled built-in Firewall or other third-party Firewall on your computer, it may prevent iTunes from accessing network connections and generating the error 3259. In this case, you just need to allow iTunes in the Firewall by adding iTunes in the Firewall whitelist.
Solution 5. Disable Firewall & Antivirus
If allowing iTunes in Firewall not work, you can choose to temporarily disable Firewall and antivirus software on your computer. It should solve the iTunes error 3259. And once you have completed the job with iTunes, you can re-enable Firewall and Antivirus, as you prefer.
Solution 6. Contact Apple Support
If all these 5 solutions couldn’t work out, you may have to contact Apple support team to report your issues. Or you can also go to the local Apple Store.
Solution 7. Get Rid of iTunes Error Safely with No Data Loss
When fixing iTunes errors, many users are very worried about the loss of their data. Now, we can tell you not to worry about this problem at all, because of AnyFix, an efficient and risk-free iTunes troubleshooter. Quickly solve your iTunes problem in just a few steps.
Free Download * 100% Clean & Safe
Step 1. Free download AnyFix, install it on your Mac/PC. Then launch it.
Steps 2. Choose “iTunes Repair” function in the interface.
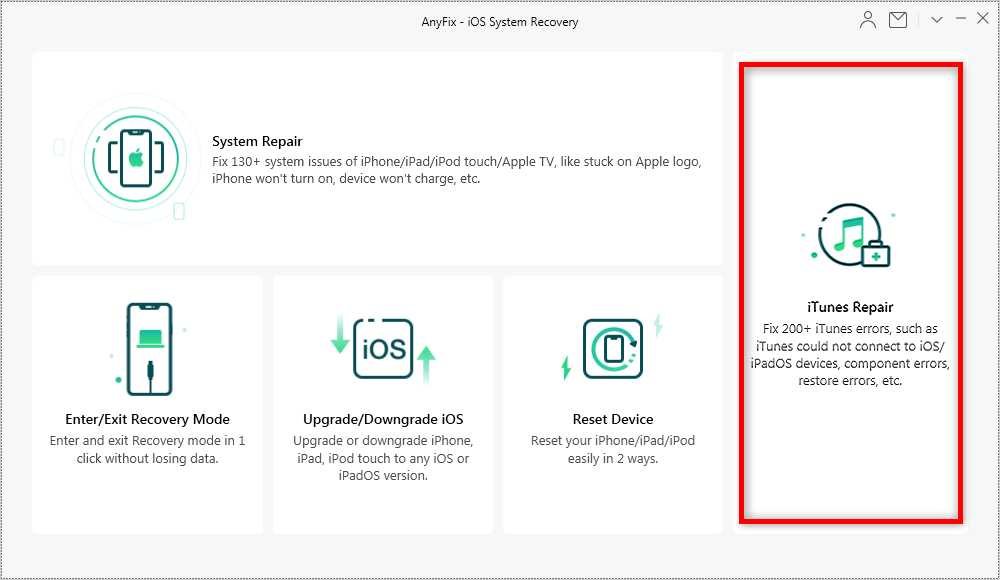
Choose iTunes Repair in AnyFix
Step 3. Choose “iTunes Installation/Download/Update Errors” mode > Click “Fix Now” button to proceed.
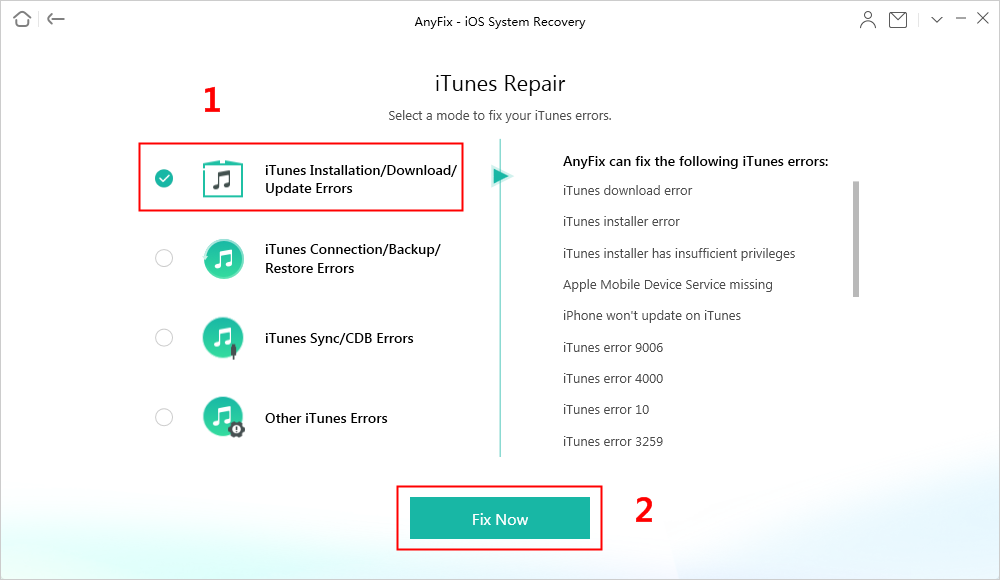
How to Fix iTunes Error with AnyFix
Step 4. Click “Fix Now” button to proceed after analyzing process is over > Click “OK” to give AnyFix permission, then the repair will start.
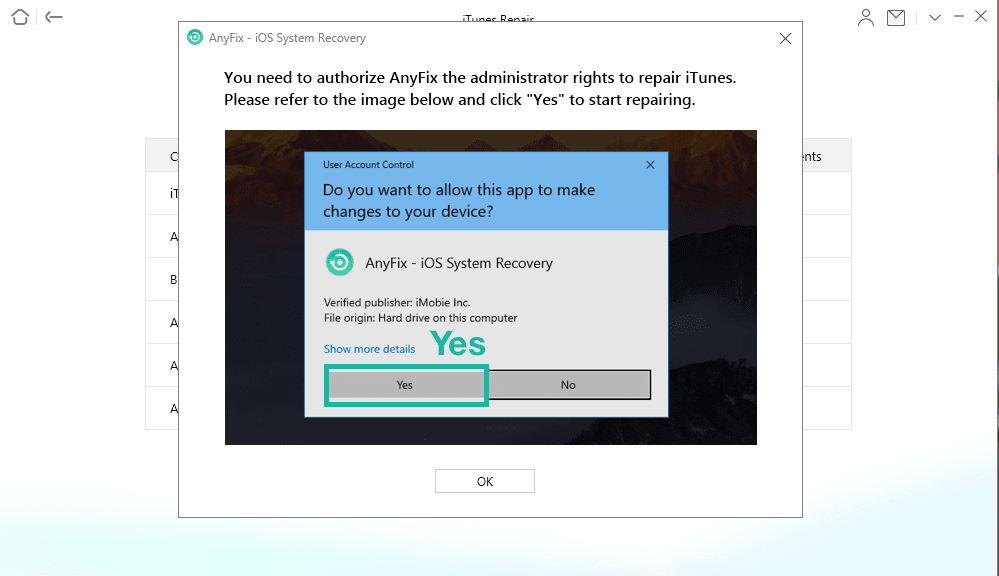
Authorize AnyFix to Repair iTunes
Step 5. Just a moment, your iTunes problem will successfully be solved. Then you can choose to go back to “iTunes Repair” page or open your iTunes.

Repair Completed
How to Restore iPhone without iTunes
Since iTunes comes with lots of errors and instability, plenty of users are preferring to another reliable way – PhoneRescue for iOS to finish the restoring job. PhoneRescue for iOS has been trusted by millions of iOS users for iPhone restoring, and data recovery.
To ensure you restore all wanted files to the device, it offers you 3 different restore modes: from iPhone directly (without any backup, from iTunes backup, and from iCloud backup. Also, different from traditional iTunes or iCloud backup recovery way, it allows you to preview backup details and select the files you needed to restore. Not a blind full restore.
More importantly, it has no existing data to erase and replaces needs. All your previous data will be kept safe after the restoring process. Now, follow the simple steps below to see how to restore iPhone without iTunes.
Step 1. Free Download PhoneRescue for iOS and install it on your computer.
Free Download * 100% Clean & Safe
Step 2. Connect your iPhone to the computer > Choose Recover from iTunes Backup mode > Click Right Arrow to proceed.
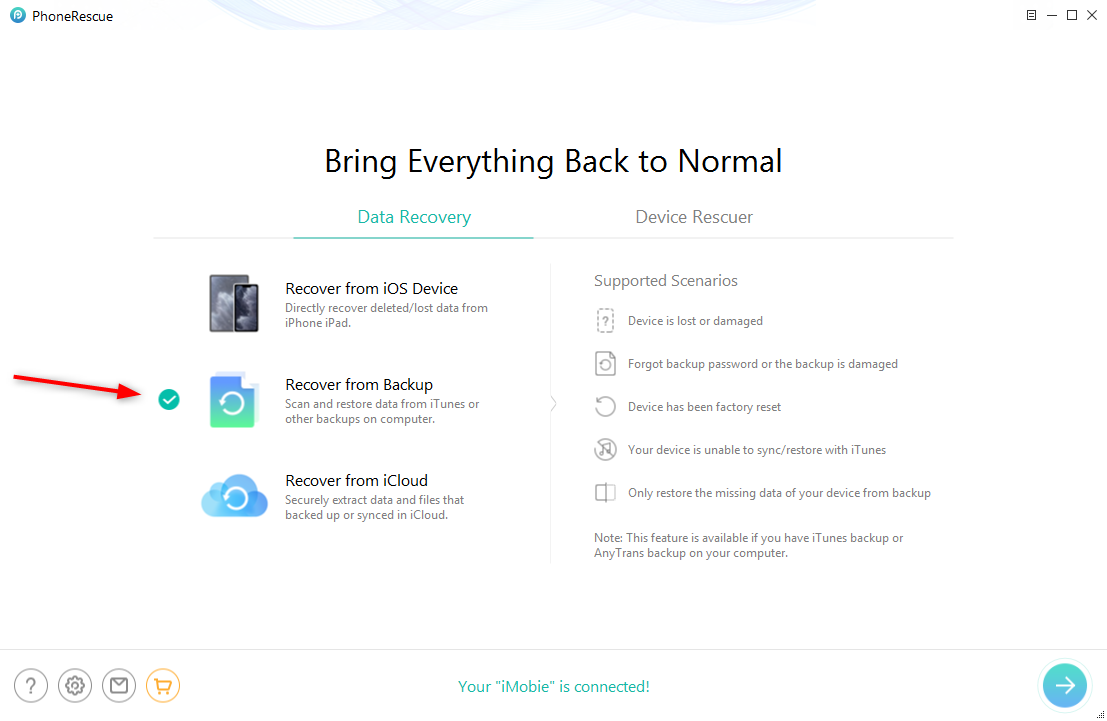
How to Restore iPhone without iTunes – Step 2
Step 3. Choose the iTunes backup that contains the files you want to restore > Click Right Arrow to go to the next page > Check the file categories you want to restore > Click OK button to extract the files you selected.
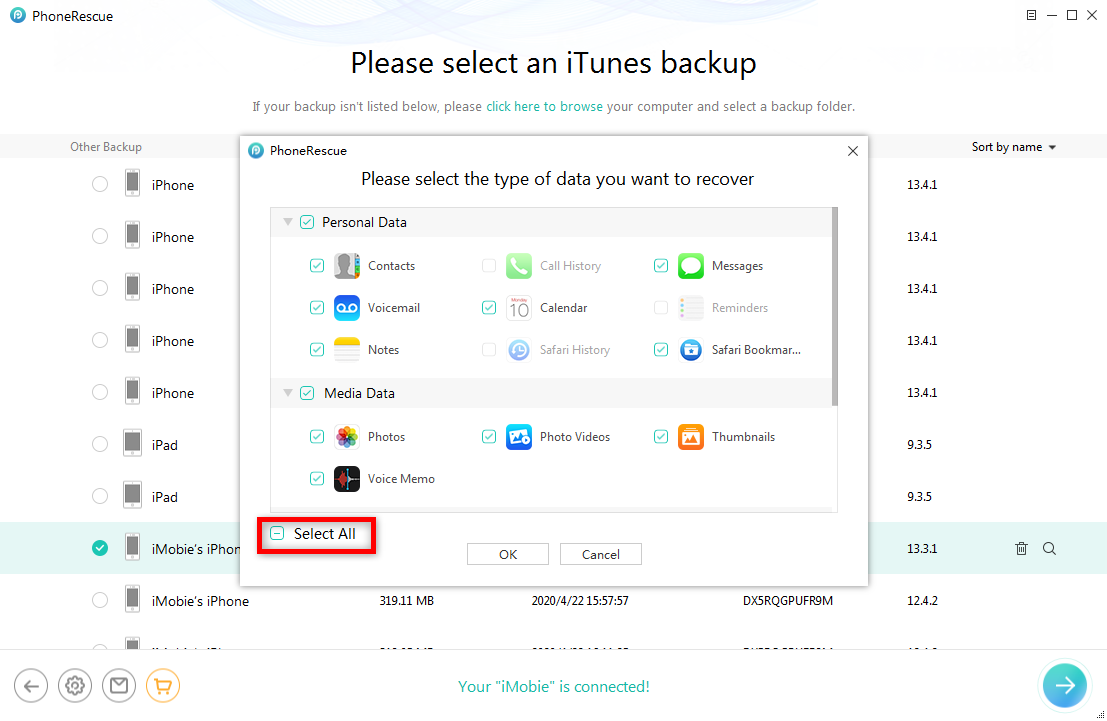
How to Restore iPhone without iTunes – Step 3
Step 4. Preview the files in your iTunes backup and select the files you want to restore > Click to iOS Device button to restore them to your iPhone’s correspond app directly, or you can click the to Computer button to save them on your computer for a backup.
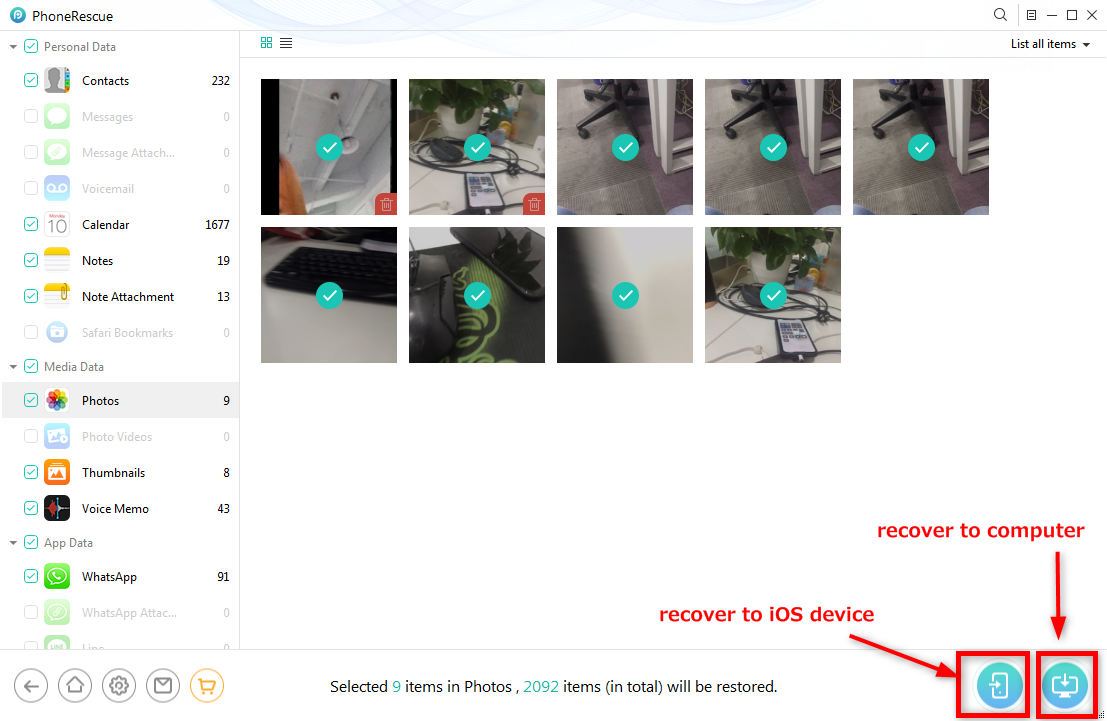
How to Restore iPhone without iTunes – Step 4
If the iTunes backup doesn’t contain the files you want to restore, you can choose to restore from iCloud backup or your iPhone directly by checking the two guides below.
How to Restore iPhone from iCloud backup >
How to Restore iPhone without Backup >
The Bottom Line
Hope you have fixed iTunes error 3259 successfully with the above 7 solutions. If you have another trouble when fixing error code 3259, just leave them in the comments and we will reply to you soon. Lastly, PhoneRescue for iOS is also able to recover deleted files for various situations, like water damaged, system crash, accidental deletion, etc. So, don’t hesitate to give it a try for free now.
Product-related questions? Contact Our Support Team to Get Quick Solution >

