5 Ways to Transfer Photos from Laptop to iPhone with/without iTunes
Want to transfer photos from pc to iPhone 14/13? This guide will show you the most 5 efficient methods to transfer pictures from laptop to your iPhone with or without iTunes, and using iCloud.
Computer to iPhone Transfer
- Transfer Files Laptop to iPhone
- Transfer Files PC to iPad
- Transfer Photos Computer to iPhone
- Transfer Photos Laptop to iPhone
- Transfer Photos Mac to iPhone
- Download Music Computer to iPhone
- Transfer Music Laptop to iPhone
- Add Mp3 Computer to iPhone
- Send Videos Laptop to iPhone
- Sync Contacts Mac to iPhone
- Transfer Apps Computer to iPhone
- Transfer Music Computer to iPod
AnyTrans – Transfer Photos from Laptop to iPhone
To copy your photos from laptop to iPhone, AnyTrans enables a quick transferring process to do. Besides, you can add more files like messages, videos, music, etc. from computer to iPhone, and vice versa.
Before you change to a new iPhone, you may backup important data such as photos on your old iPhone to your laptop. When you get the new iPhone, you need to copy those photos to your new iPhone 14/13. Or, you may have saved thousands of your holiday photos on your home laptop, and want to sync some to your handy iOS devices, like the new iPhone 14/13 or iPhone 14/13 Pro. So that you can enjoy them on your device.
If you have searched about how to transfer photos(videos) from laptop to iPhone, you may find iTunes is the typical way to go. However, iTunes sync is complicated for fresh users, and it may erase the previous photos on your iOS device. In this post, we also provide you with a non-iTunes way to transfer photos from laptop to iPhone without iTunes, which supports any Windows laptop, Samsung, DELL, or Mac.
How to Transfer Pictures from Laptop to iPhone without iTunes
As iTunes is not an easy-to-use tool and it erases photos on the iPhone when you restore them to the iPhone, so many users want to know how do I transfer photos from my laptop to my iPhone without using iTunes? One of the best ways to do this is to use an iTunes alternative – AnyTrans. It is a comprehensive iPhone data manager. Unlike iTunes, AnyTrans not only does not damage existing data on your device, but also has many features that iTunes does not have, such as allowing users to delete photos directly from the software, as well as support for exporting photos in a variety of formats, including HEIC, JPG, JPEG and more!
Have a quick look at its main features on photo transferring (iOS 16 and iPhone 14 supported).
AnyTrans – iPhone Photo Transfer
- Drag & Drop photos from any laptop to your iPhone.
- Original photo data and photo quality can be maintained.
- Add more files like music, videos, etc. from computer to iPhone.
- Besides, you can transfer photos from iPhone to laptop as a backup.
Download for Win100% Clean & Safe
Download for Mac100% Clean & Safe
Now, Freely Download AnyTrans on your Laptop firstly of all. Then follow the simple steps below to learn how to transfer photos from laptop to iPhone with USB in minutes:
Method 1. Drag and Drop Photos from Laptop to iPhone Directly
Step 1. Connect iPhone to Laptop and Head to Drag Files
Open AnyTrans on your laptop and connect iPhone to laptop via USB cable > Choose Device Manager > Move mouse over the iPhone and tap on +.
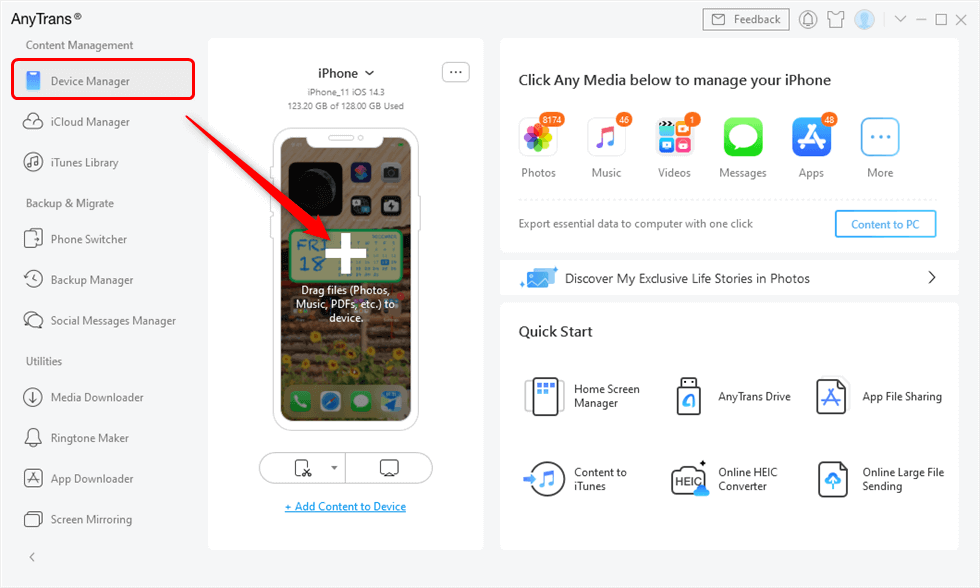
Drag Files from Computer to iPhone Directly
Step 2. Select Pictures on Laptop to Transfer
Choose photos from your computer and open them. The photos will be added to your iPhone immediately.
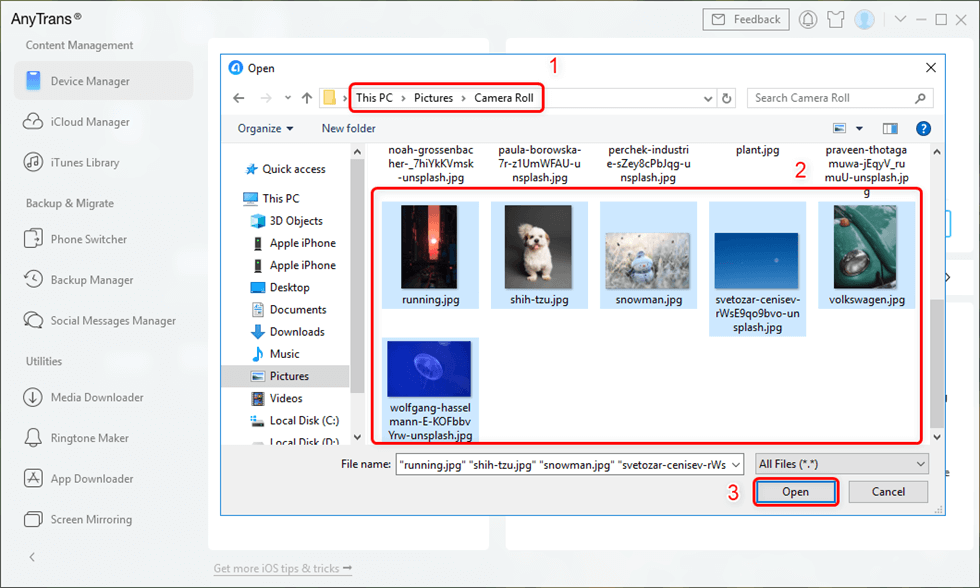
Preview the Photos and Select them to your iPad
Method 2. Add Single Files or Photo Folders to iPhone under Management
Except for the above way, AnyTrans also enables you to manage iPhone files as you like.
Step 1. Open AnyTrans and click Device Manager > Tap on Photos category.
Step 2. Then your photos will be listed in categories as below > Click the Add button, here you can choose files selectively or the whole photo folder to move.
Step 3. Besides, you can click the To PC/To Device button, which allows you to select photos to PC/another iDevice.
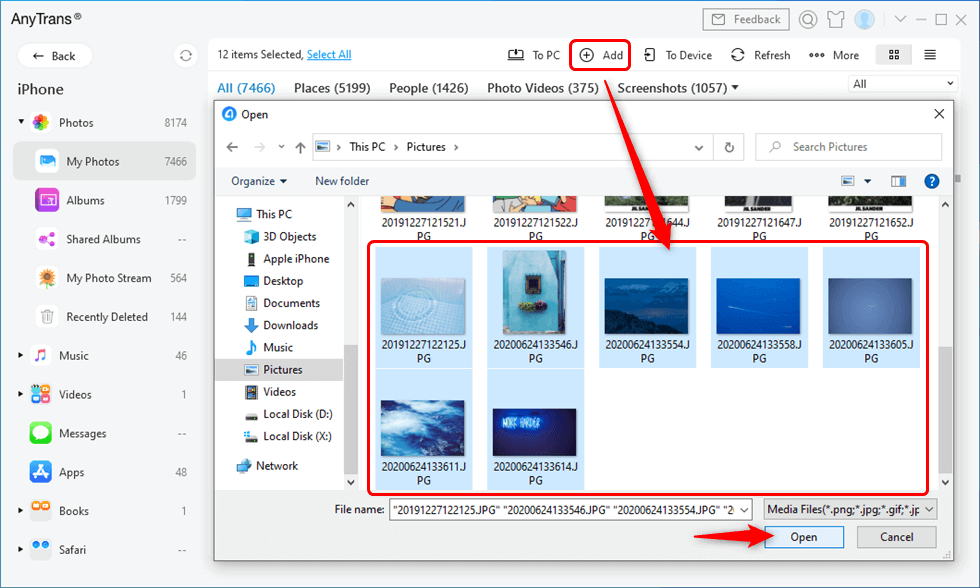
Add Photos from Computer to iPhone
- You can also send videos, ringtones, music, audiobooks, messages, contacts, notes, books, Safari bookmarks/history as well as other up to 25 file types from laptop to iPhone.
- AnyTrans also allows you to manage iCloud data and iTunes media files.
- Since iOS 11, all iOS devices will use HEIC photos by default, while this format is not widely accepted yet. If you have trouble converting HEIC photos into other formats, you could try a free web-based tool – iMobie HEIC Converter. For example, you can easily convert HEIC photos into JPEG with drag and drop with this tool.
You can also view the video to see how to copy photos from PC/laptop to iPhone with AnyTrans:
Free Download * 100% Clean & Safe
How to Transfer Photo from PC to iPhone with iTunes
With iTunes, you are able to transfer photos to your iPhone from the laptop on both Windows and Mac. However, we do not recommend that you use iTunes to transfer your photos directly. Here are some limitations of iTunes.
- iTunes can only sync one folder at any one time.
- iTunes desn’t allow you to delete photos.
- iTunes will erase your iPhone’s data if you want to restore photo from PC to iPhone.
Here are steps about how to use iTunes to transfer photos from laptop to your iPhone
Step 1. Run iTunes and connect your iPhone to your laptop.
Step 2. Click the iPhone icon on iTunes.
Step 3. Click Photos taps in the right panel.
Step 4. In the photos menu, click on the “Sync photos from” option.
Step 5. Choose the folder you want to transfer > Select the “Selected folders” option.
Step 6. Click “Apply” to start transferring the photos from your laptop to your iPhone.
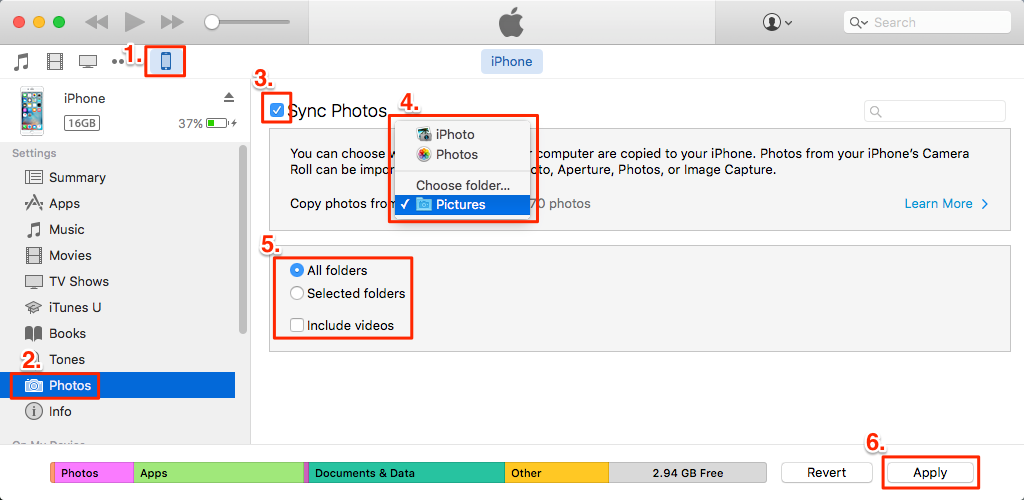
Sync Photos from Laptop to iPhone with iTunes
Sync photos with iTunes will erase the already existing photos on your iPhone.
Tips. How to Fix iCloud is On issue?
While transferring photos from laptop to iPhone using iTunes, some of you may get the notification of “iCloud Photo is On”, that is because iTunes can’t transfer photos with iCloud Photo is On. You have three solutions to this.
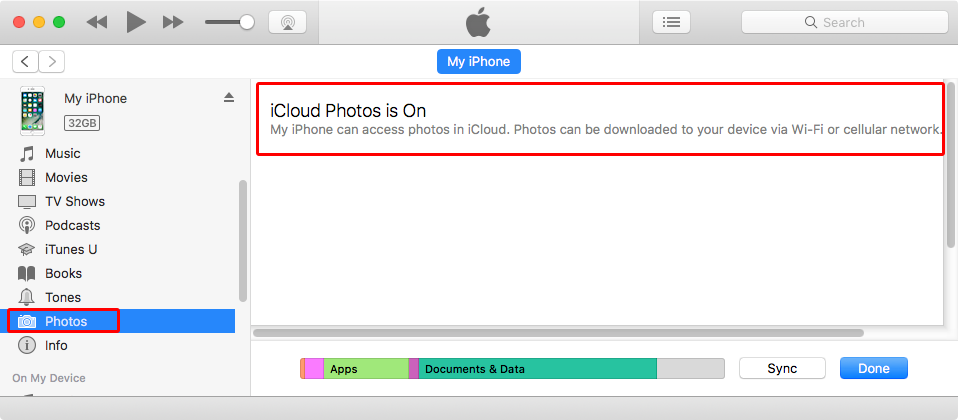
Transfer Photos from Mac to iPhone – iCloud Photo is On
Solution 1. Turn off iCloud Photo. Go to Settings > [your name] > iCloud > Photos. Switch the button next to Photos, then select Remove from iPhone or Download Photos & Videos, now your iCloud Photo is turned off.
Please note that after turning off the iCloud Photo Library, you have to remove all the iCloud photos on your iPhone or download these iCloud photos to iPhone which would be a large burden for your iPhone especially if you are still running 16 GB or 32 GB plan. If these are not what you want, you may refer to the next solution.
Solution 2. You can also transfer photos from your laptop to iCloud, all newly added photos can be synced to your iPhone soon. Please refer to this post to get details. How to Transfer Photos from Computer to iCloud >
Solution 3. You can just sync photos just like Part 1 shows. AnyTrans would not erase any data and don’t require you to turn off the iCloud Photo.
Share Photos from Laptop to iPhone Using iCloud
The iCloud Photos feature allows iOS users to share photos and videos between Mac, iPhones or iPads, and even a Windows PC. Like iTunes, iCloud has certain disadvantages.
- iCloud only has 5GB free space to store your photos.
- Deleted photos in iCloud don’t disappear permanently.
Before we start, please make sure that the software is up to date on your iPhone iPad iPod touch, Mac, or PC computer. Also, connect your devices to a strong and stable Wi-Fi network. Now, follow the steps below to export photos using iCloud.
Step 1. Set up iCloud on both your iOS device and computer and signed in with the same Apple ID.
Step 2. On your iPhone, iPad, or iPod touch, go to Settings > [your name] > iCloud > Photos, then turn on iCloud Photos.
Step 3. Turn on iCloud Photos on your computer and upload photos from your computer to iCloud. Then sync the photos to your iPhone iPad iPod touch using iCloud.
How to Enable iCloud Photos on Mac:
Step 1. Go to System Preferences > iCloud.
Step 2. Click the Options button next to Photos.
Step 3. Then select iCloud Photos.
How to Enable iCloud Photos on Windows:
Step 1. Download iCloud for Windows > follow the steps to set up iCloud Photos on your laptop.
Step 2. Check Photos, and click Options.
Step 3. Check iCloud Photo Library and Upload new photos and videos from my PC, then click on the Apply button.
Step 4. Navigate to the File Explorer and find iCloud Photos, just open it.
Step 5. Click on the Uploads folder, click Add photos to upload the photos you want to copy to iCloud.
Step 6. Wait for a while, all your photos should be uploaded to your iCloud. Then you can find the uploaded photos on your iOS device Photos app.

Upload Photos from PC to iCloud
If you don’t want to install iCloud for Windows on your Windows laptop, you can Open a browser > navigate to iCloud.com > Log in with your Apple ID > Upload the photos from your PC to iCloud.
Further Reading: How to Access iCloud Photos on iPhone/iPad >
Move Photos from Laptop to iPhone with Email
Email could also be a simple way to transfer photos from laptop to iPhone. This method is suitable when you just want to transfer a few photos to the iPad, as there is a limitation on the size of the attachment. In other words, this is OK if you have to do this occasionally but not in a very efficient way.
Step 1. Choose the specific photo you need, just send them as an Email attachment to yourself.
Step 2. On your iPhone, log in with the same email account and you’ll see the photo.
Transfer Photos from PC to iPhone via Google Photos
As long as you use google photos on both your computer and iPhone, when you upload photos to google photos on your computer, they will also be synced on your iPhone. Or you can choose some Drive services like Google Drive, OneDrive, or Dropbox which will also allow you to transfer photos from computer to iPhone and vice versa. Here is how to use Google Photos to transfer photos from your iPhone to the computer.
Step 1. On your computer, go to Google Photos and create a new album.
Step 2. Choose photos from the computer to upload to Google Photos.
Step 3. On your iPhone, go to App Store and install Google Photos, and log in with the same account on your computer.
Step 4. Then photos will sync to your iPhone Google Photos.
Step 5. You can now download photos synced from Google Photos to your iPhone.

Sync Photos from Computer to iPhone with Google Photos
Bonus Tip. Download iCloud Photos to iPhone or Computer
If you’ve already uploaded pictures to iCloud, here is an easy way for you to view iCloud photos on any laptop or device then download them. You can sign into your iCloud on iPhone and download photos to iPhone or sign in on a computer so that you can get photos on the desktop. Here are the steps to download photos:
Step 1. Open Brower and go to iCloud.com > Log into your Apple ID and click Photos.
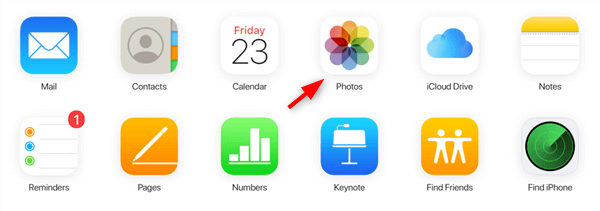
Login iCloud and Check Photos
Step 2. Preview the photos saved in your iCloud account > Select your favorite photos and tap on the “Download” icon to continue. Finally, you will get those pictures on your iPhone or laptop computer.
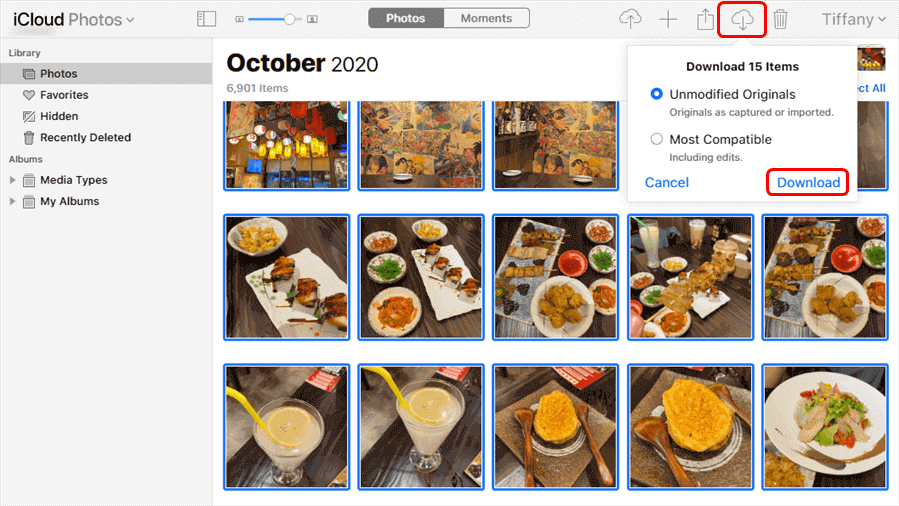
Login iCloud and Check Photos to Download
The Bottom Line
That’s all for the methods to import photos from laptop to iPhone. Besides transferring photos, you can also use AnyTrans to easily transfer WhatsApp, music, contacts, videos, and some other types of files from laptop to iPhone, and vice versa.
AnyTrans also guarantees you 100% Safe & Security. During this process, all the contents on your iPhone will be kept safe, and you won’t lose any data or files. So why not download AnyTrans and have a free trial on your Windows notebook or MacBook?
AnyTrans – Transfer Data to New iPhone
Free download AnyTrans to start moving data from your laptop to your new iPhone 13, including contacts, messages, photos, apps, etc.
Free Download100% Clean & Safe
Free Download100% Clean & Safe
Free Download* 100% Clean & Safe
More Related Articles
Product-related questions? Contact Our Support Team to Get Quick Solution >

