How to Convert HEIC to JPG on PC/Mac Easily
Want to convert photos from HEIC to JPG but do not know how? This guide will tell you how to change iPhone photos from HEIC to JPG or JPEG/GIF/PDF in 5 methods.
iPhone Photos Tips
Export Photos from iPhone
Import Photos to iPhone
Fix iPhone Photos Problems
Other iPhone Photos Tips
HEIC is a new image container used by default on new iPhone photos since iOS 11. Now when you take a photo with iPhone 7 or later models, you will get a high-quality picture just as before but only at half the file size, which can help you save storage.
However, since it is a new container format, you may meet incompatibilities when you want to check your iPhone photos on computer. This is when you might want to know how to convert HEIC to JPG on PC/Mac. To help you out, here in this guide we will tell you 5 methods to make it.
Convert HEIC to JPG/JPEG/PDF on PC
Method 1. Transfer HEIC to JPG via AnyTrans
AnyTrans is one all-sided iOS data transfer tool that can help users transfer data from iOS devices to computer/iTunes/iCloud and vice versa. Also, you can sync iPhone/iPad to new iPhone/iPad. As for photos management, it can convert HEIC to JPG when transferring photos from iPhone to computer. Check the features below about AnyTrans HEIC to JPG:
AnyTrans – iPhone HEIC to JPG
- Export all heic photos to jpg or pdf format.
- Support transfer original and filtered photos on iPhone/iPad.
- Allows exporting live photos originally or to jpg/gif/mp4 format.
- Support transfer all iPhone/iPad photos to computer/iPhone/iPad.
Free Download100% Clean & Safe
Free Download100% Clean & Safe
Free Download * 100% Clean & Safe
Now, follow the steps below to convert iPhone HEIC to JPG:
Step 1. Download AnyTrans and install it on your computer > Connect your iPhone to computer via USB cable.
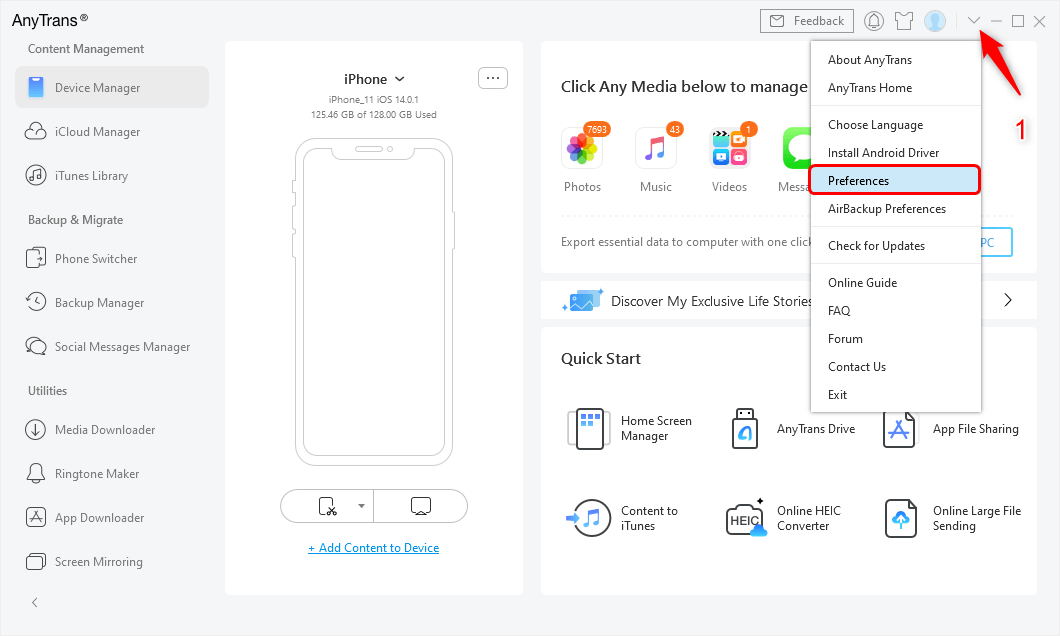
Step 2. Click the button on the top-right corner > Choose “Preferences”.

Choose Preference from Homepage
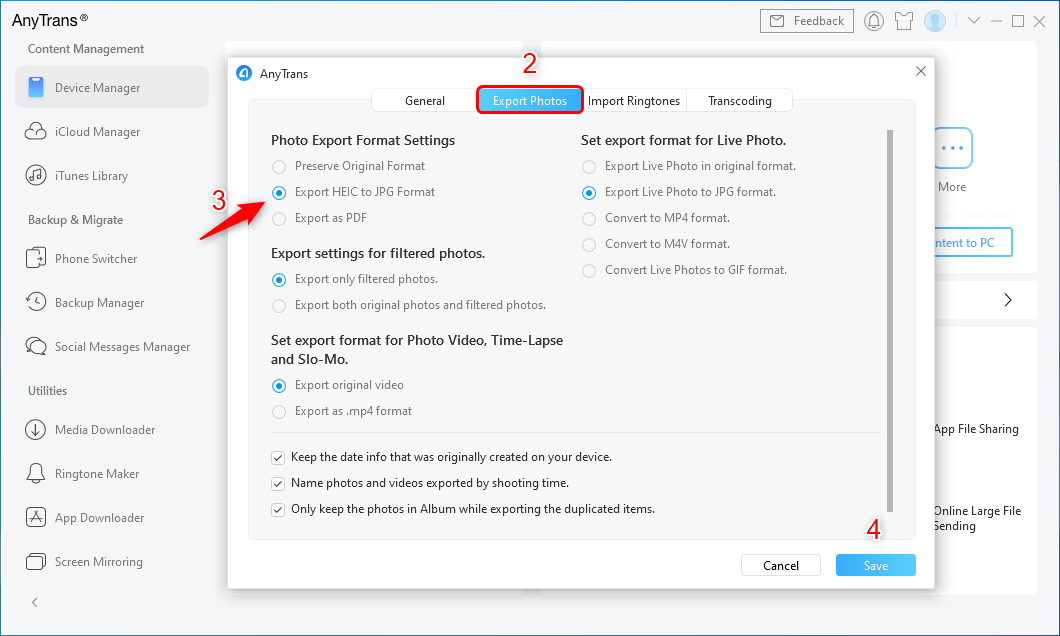
Step 3. Select “Export Photos” > Choose “Export HEIC to JPG format” > Click “Save” to continue.

Set Export HEIC to JPG Format
Step 4. Settings finished, you can start the transfer. Click Device Manager > Photos on the homepage.
Step 5. Select the photos you want to transfer > Click “To PC” to start > Then all transferred photos will be displayed in JPG format.
Method 2. Use iMobie HEIC Converter to Change HEIC Easily
You may also want to convert HEIC image to more formats including JPEG, PNG, and GIF. Then there is a free tool for you – iMobie HEIC Converter, which is a free web-based application that allows you to upload and convert your HEIC files to a widely supported format. You can follow the steps below to convert HEIC to JPG or other formats easily:
Step 1. Open a web browser on your PC or Mac and go to the iMobie HEIC Converter website.
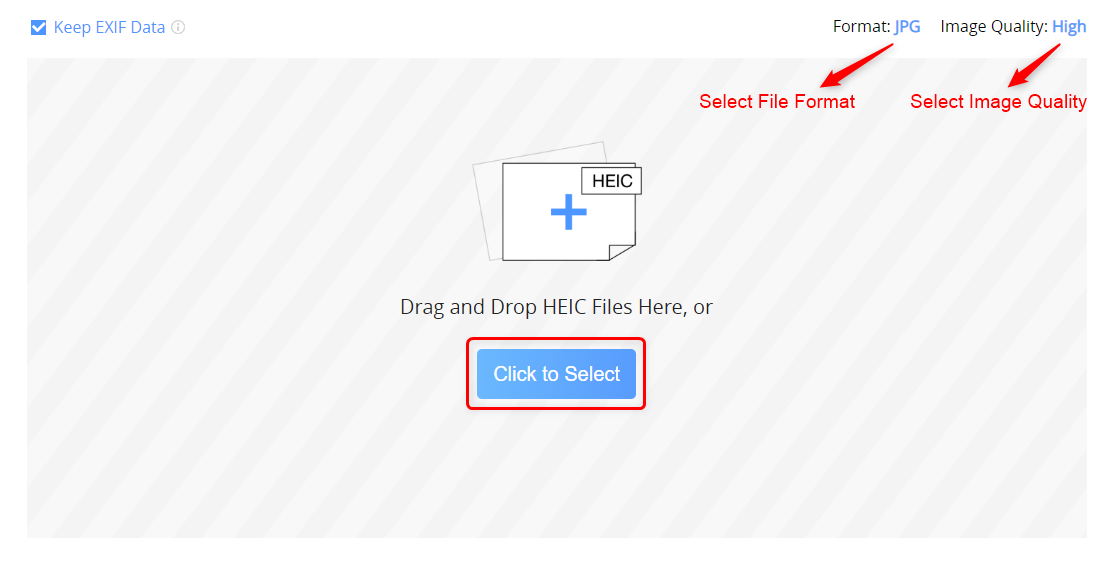
Step 2. Select the file format (JPG, JPEG, PNG & GIF are supported), and the image quality (High, Medium & Standard are supported) from the drop-down menu. Click on “Click to Select” button to upload your HEIC files from computer. You can drag and drop your files as well. Checkmark Keep EXIF Data if you’d like to preserve your EXIF data.

Use iMobie HEIC Converter to Convert and Open HEIC Files on Computer
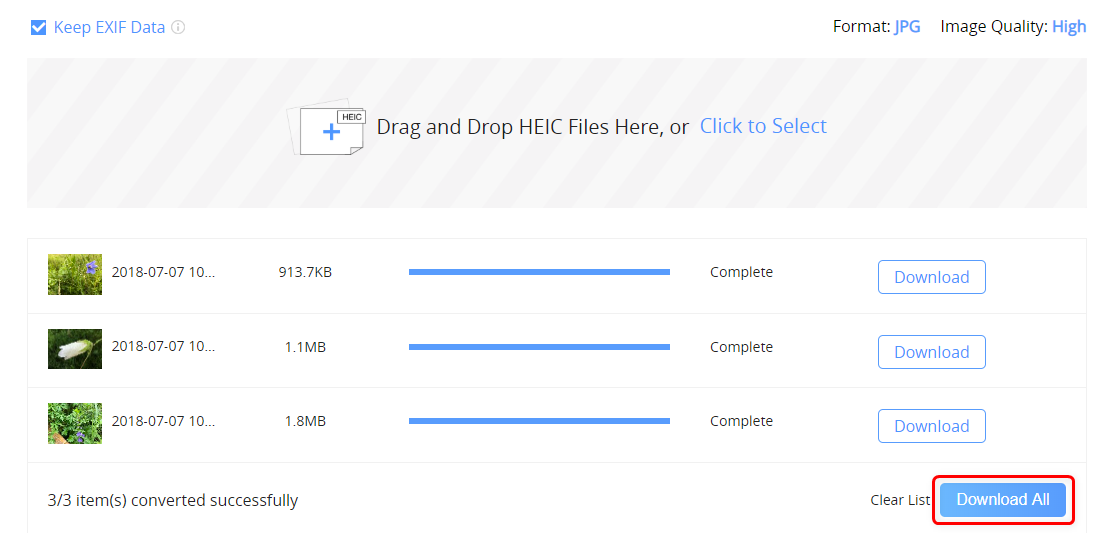
Step 3. When finished, click “Download All” to save the files to your computer. Your converted JPG files should now be available for you to view on your Windows PC and Mac.

Download Converted Photos to Your Computer
You can batch convert HEIC to JPG on computer with this tool. And also you don’t need to worry about how to import HEIC into Lightroom on Windows and Mac, or how to open HEIC files in Photoshop.
How to Convert HEIC to JPG on iPhone
Method 1. Turn off the High Efficiency
You can simply disable this new feature on iPhone. Go to Settings > Camera > Formats > Choose Most Compatible under CAMERA CAPTURE. In this way, the photos will be captured as JPEG, the default format since the first iPhone.
After the Most Compatible set, it will save your videos in H.264 (AVC) format. And if you want to record video in 4K/UHD again, you need to turn High Efficiency back on. Then your photos will be saved as HEIC certainly.
If you have HEIC photos and need to convert, use the methods above.
Method 2. Turn on Automatic Transfer
It will change HEIC to JPG automatically when you transferring photos from iPhone to PC or Mac computer. So you do not have to use a HEIC to JPG converter. Go to Settings > Camera > Formats > Choose Automatic under TRANSFER TO MAC OR PC.
Method 3. Email the HEIC Files
Another way you can try to convert iPhone HEIC images to JPEG is to email the HEIC image to yourself from iPhone, and it will change HEIC to JPEG format automatically. After that, you can download HEIC images on your PC or Mac by accessing your email account.
Further Reading: How to Convert HEIC to JPG on Google Drive >
The Bottom Line
That’s all for how to change HEIC photos to JPG on computer and on iPhone. Besides, AnyTrans and iMobie HEIC converter allow you to convert HEIC files to JPEG and PDF. If you have any question, just leave a comment and we will reply to you soon. If you think this guide is helpful, just share it with your friends.
More Related Articles
Product-related questions? Contact Our Support Team to Get Quick Solution >

