How to Fix Facebook Notifications not Working on iPhone
Are your Facebook notifications are not working on iPhone? Seeking the methods to fix Facebook notifications not working iPhone issue? Luckily, there are some ways that you can try on your iPhone so that you won’t miss out any notification.
Several iPhone users have reported that their iPhone Facebook notifications not working and users are facing a different kind of issue related to the Facebook app notifications. Some have reported that notification sound is disabled automatically and for some other users, they got message notification, but actually, there was nothing in the Facebook message inbox.
That’s why we thought that now it’s time to help people to come out of this frustrating and annoying situation. In this guide, we have compiled several methods to fix it.
How to Fix Facebook Notifications not Working on iPhone
Facebook notifications not working issue is faced by both users who have the latest iPhone 12 or who have older iPhone model. For this reason, we have provided those methods only that work regardless of the iPhone model.
Before moving towards the methods, you have to sure that you have connected your iPhone to Wi-Fi or mobile network.
Method 1. Check Facebook Notification in Settings
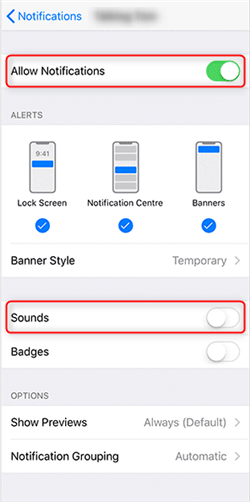
Sometimes, iPhone users do not receive Facebook notifications because Push notifications are turned off on Facebook. Therefore, you need to turn on back manually from your iPhone settings. For many iPhone users, this method works great.
Go to the “Settings” app or menu and after that, navigate to the “Notifications” menu. Then, look for the “Facebook” app from the list. Once able to find it, open it and enable the “Allow Notifications”.

Turn on Facebook Notification
Method 2. Check the Do Not Disturb
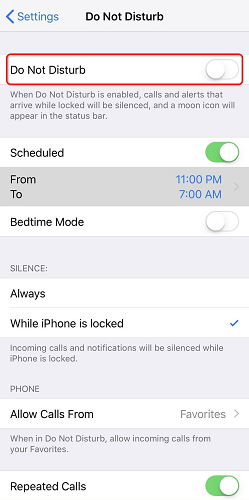
If the Do Not Disturb option is enabled on your iPhone, then this can be the reason why you are not receiving your Facebook app notification. So, you need to turn it off.
You can check by opening the “Settings” app and then, tapping on the “Do Not Disturb”. After that, check if it is enabled, then disable it.

Check Do Not Disturb
Method 3. Reinstall Facebook App
Turn on Facebook Notifications manually and still, Facebook iPhone notifications not working? Then, you must delete the Facebook app from your iDevice and then, reinstall the app from the App Store. You can delete the app by long-pressing the app icon and then, clicking on the delete icon. Once it is deleted, then visit the App Store and download the Facebook app.
Method 4. Update Facebook App
Sometimes, the older version of the Facebook app creates minor issues. Therefore, make sure that you have installed the latest version of the Facebook app.
Open the App Store app and then, tap on the “Updates” tab from the bottom tab bar. After that, you will see all the apps that need to be updated, and if you see Facebook also on the list and then, update it.
Method 5. Check the Notification Settings on Facebook
If you already checked the above methods and Facebook notifications still can’t be received. You may need to check the notification settings on Facebook itself. Here are the quick steps:
Open Facebook on your iPhone > Tap the menu button (the three horizontal lines) > Scroll down and tap Settings & Privacy > Choose Notification Settings > Under What Notification You Receive/Where you receive notifications section, toggle on Push (and if you want to receive an email or SMS, you can toggle on Email and SMS).
Method 6. Update iOS Version
If your Facebook already has the latest version, then check the next update for your iPhone. It is because, for the proper working of an iPhone, you need to install the latest version of iOS. Moreover, updating the next version of the software will also solve many minor software issues.
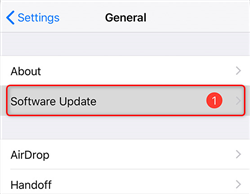
Open the “Settings” app and then, open the “General” menu. Thereafter, you will see the “Software Update” option and if it has notification of the next update, then tap on it. Then, install the next update. After updating your iPhone software, this will certainly solve the Facebook push notifications not working iPhone issue.

Update iOS Version
Method 7. Restart your iPhone
Restarting an iPhone is another efficient method that you must try to fix Facebook iPhone notifications not working. If the issue is caused due to a software problem, then this method will probably solve your Facebook notification problem.
The Bottom Line
Now, you know all feasible solutions that you can try to fix Facebook notifications not working iPhone problem. All the above-mentioned methods are effective and many iPhone users who were facing this issue resolved it with the help of our guide. If there are other tips that work, please share your idea in the comment area below.
Product-related questions? Contact Our Support Team to Get Quick Solution >

