All Things to Know About What is Screen Recording
Do you have a superficial knowledge of screen recording and would like to explore more about it? Discover everything about screen recording here by reading through our comprehensive overview.
Visuals are crucial in every content creation process. According to research, visual representation helps the audience understand and digest content better and faster than verbal representation.
There are multiple ways to create visuals or pictorial representations for your content, and screen recording is one of the best options available. Whether you want to create a how-to guide, share ideas, or even describe a problem in detail, screen recording should come in handy.
In case you want to discover more about screen recording, you are in the right place. Here, we explore everything about screen recording plus how to create a high-end screen recording from the comfort of your home. So read on!
What Is a Screencast?
Also known as screen recording, screencast is a video recording process that lets you capture every noteworthy moment you find on your mobile or computer screen with the corresponding audio narration. The corresponding content is often used for numerous purposes, from tutorials to presentations, product demos, how-to guides, and several others. Besides, screencasts offer a quick and convenient way to air your view, data, or information in the simplest form without being in contact with the recipient.
What Is a Screen Recorder?
A screen recorder is an application or software designed to help you capture every noteworthy movement you have on your display screen. It offers a convenient way to conserve memory and disseminate information to a large audience from any part of the globe.
What Is Screen Recording Used For?
Below are some of the uses of screen recording:
- Training and Onboarding New Employees
Are you looking for a simple yet affordable way to deliver training to your new employees? Then just screen-record it! With screen recording, you can quickly make detailed instructional clips and demonstrations about everything that your new employee needs to get done.
You don’t have to spend so much time organizing orientation programs to lecture your workers anymore. Screen recording helps you deliver the needful in detail within the shortest possible time while your employees can easily view, digest, and follow up at their own pace.
Screen recording also comes in handy when you need to show off your product to audiences from different parts of the globe. Based on research, the potential consumers of every product are more convinced after viewing/seeing descriptive clips of what they want to invest in. With screen recording, you can easily explain everything your product has in store in the simplest English that even a layman can understand and get convinced to use it.
Screen recording also plays a crucial role in educational institutes as teachers now use it as a means of responding to or resolving queries sent by students. Tutors also use it as a teaching or lecturing source to discuss and explain new topics to students. Additionally, it comes in handy for students, especially absentees looking for a quick way to catch up with the class.
What Is a Good Screen Recorder and How to Choose?
A good screen recorder is hard to come across because of the tons of recording apps on the internet presently, which make selection tough and stressful. Besides, the majority of screen recorders online are known for poor quality results. To assist you with making the right selection, here are some key factors to consider before investing in a screen recording suite:
Before investing in a screen recording suite, it’s crucial you consider the user interface. We strongly advise that you select a tool with a simplified interface that anyone, regardless of tech proficiency, can easily manage without involving any third party.
- Video Editing/Enhancing Tools
As we all know, video editing is an integral stage of every video recording project. It’s at this stage you discover and make amendments to all the errors you have in your recordings plus polish your content to suit your project requirements.
It won’t be nice browsing the internet for a video editing suite after completing a video recording task. Instead, your video recorder should also support editing tools. If not all the editing tools, the basic ones should be readily available to end-users. For instance, a good video recording tool should support markup tools, cropping tools, trimmers, and others.
Though there are free video recording suites, the majority come with premium subscription plans, which you must pay before you can access all the features the software holds. It’s best you consider the subscription packages before investing, as you don’t want to break your bank when there are other affordable options.
Another key factor to look out for when purchasing or investing in a screen recorder is the resolution. You want a software that captures your screen in high quality, precisely Full HD, 4K or 8K which are the best resolution format.
Does the screen recorder support direct sharing of the resulting content on social media platforms like YouTube, Facebook, Twitters and others? If not, it’s not worth using. You should get a screen recorder with a flexible sharing option that lets you export your recordings to family, friends, and your other favorite contacts via any platform.
Why You Might Need to Record Your Screen?
Find below some of the crucial reasons why you might need to record your screen:
- To create an explanatory video that anyone can listen to and understand without difficulty.
- To record those nice moves and mind-blowing moments on your gaming screen so you can show them to other players.
- To capture live webinars you know you won’t participate fully or can’t follow up in real time.
- Record live streams for later viewing.
How to Make a Screen Recording
Screen recording is super easy, but the approach differs depending on the device you are using. Check and follow the appropriate instructional guide for the device below:
On Computer
For folks with a computer system, whether Windows or Mac, you can use a professional screen recording suite like Screenify to capture your entire screen or specific portions. This software offers a convenient way to capture your screen, webcam, and audio simultaneously without involving any third party.
It records any type of content displayed on your computer screen, such as games, live streams, YouTube clips, and several others. Due to the clean UI, Screenify can be operated by anyone, no matter the tech proficiency level.
Besides screen recording, Screenify is great for creating personalized or self-demonstration videos. One reason why it finds application in nearly all areas of life, from marketing to sales, advertisement, educational institutes, content creation, and lots more.
Steps to Use Screenify to Make a Screen Recording
Step 1. Download and Install Screenify on Computer.
Step 2. Launch Screenify on your computer, and select Record screen mode.
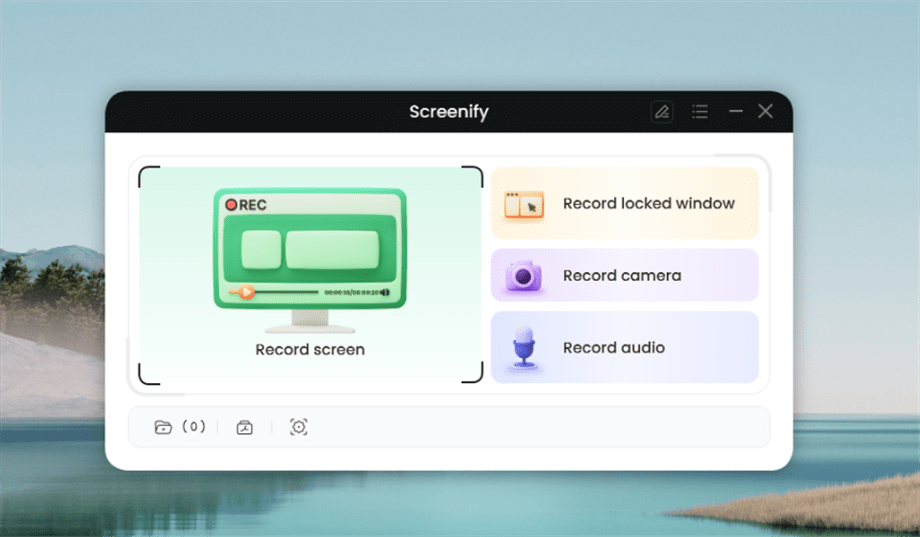
Select Record Screen Mode
Step 3. Configure Recording Settings aims to configure settings like system audio before recording.
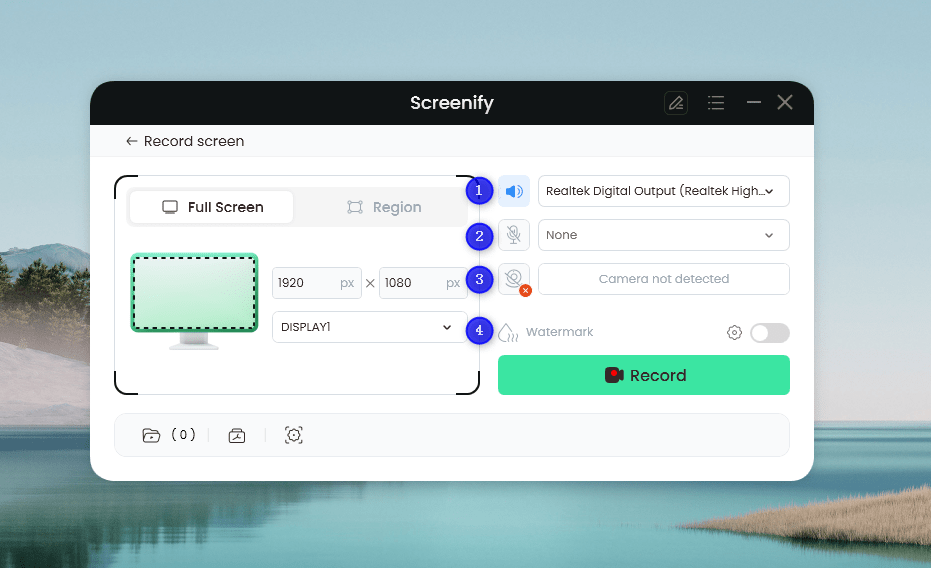
Set Configure Recording Settings
In this setting menu, you can:
1 Choose the System audio.
2 Choose the Microphone you want to record.
3 Choose the Camera you want to use.
4 Choose whether to add a watermark.
Step 4. Select Recording Screen.
The screen mode offers two recording options: you can either record the entire screen or select a specific region to record.
Option 1. Full Screen Record
Please select Full Screen mode and choose the display you need to record. Hit Record button to initiate recording.
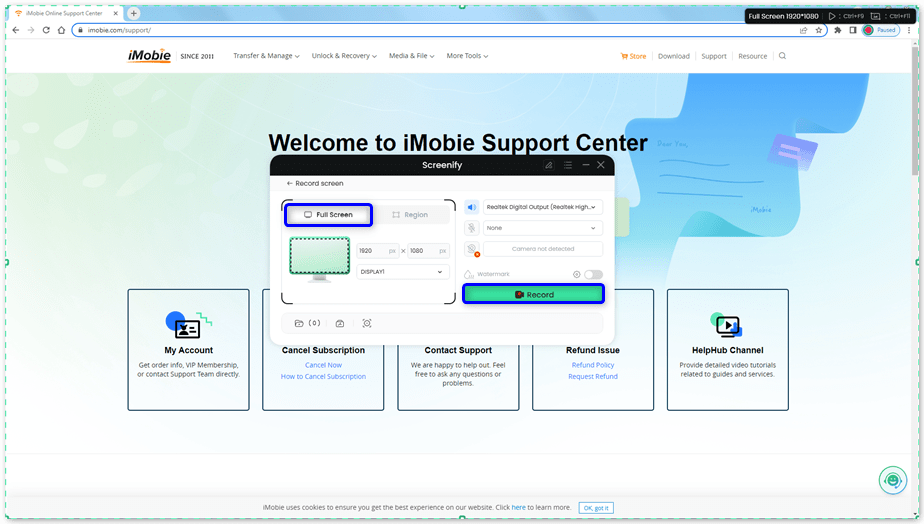
Select Full Screen
Option 2. Region Record
To record region, you need to manually select the recording area. After selection, you can still adjust the selected area. It supports customize selection, full screen, and proportional selection based on common social media dimensions.
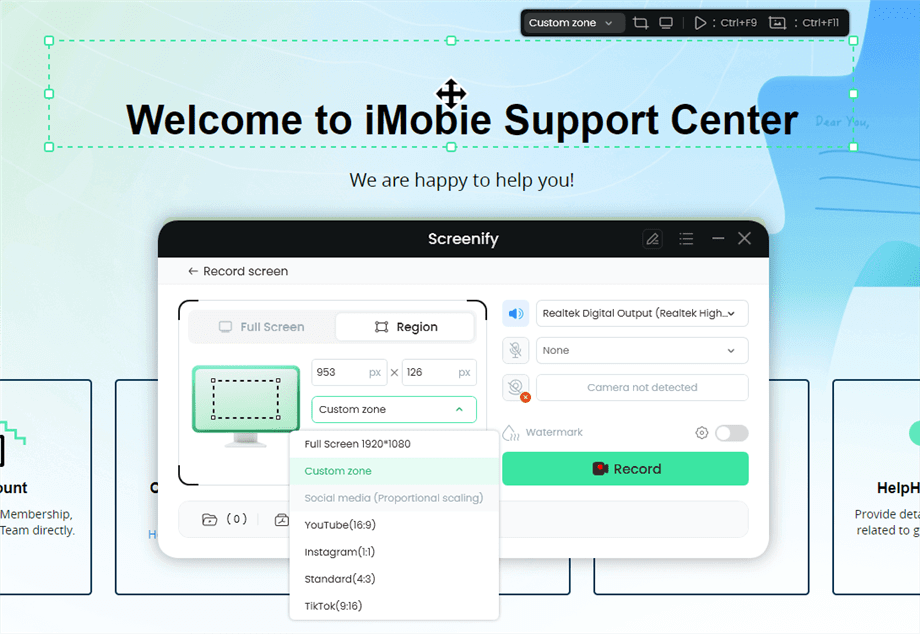
Record Region
Step 5. Wait for the Recording Countdown.
There is a 3-second countdown to help you prepare the recording after you are ready to start recording.
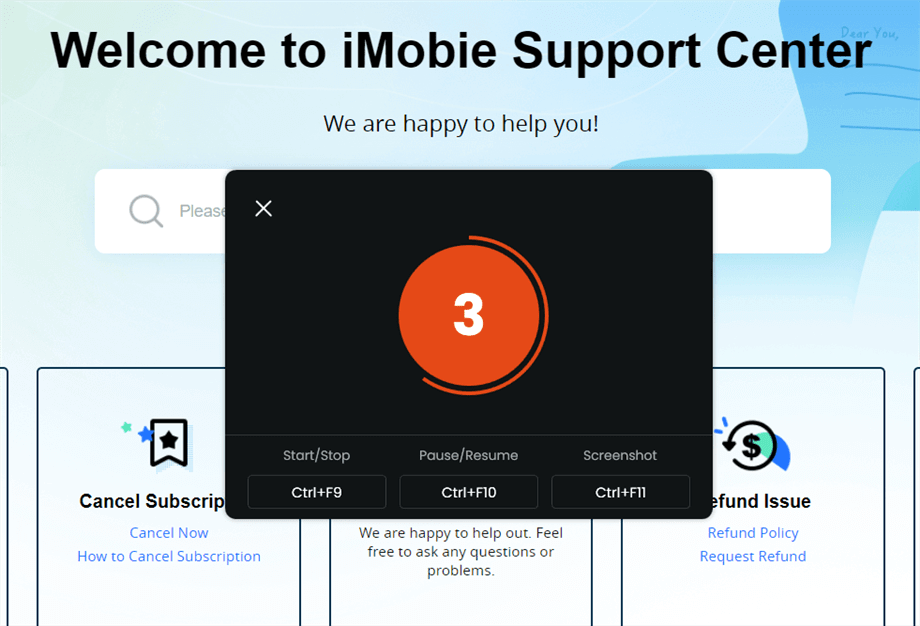
Wait for the Recording Countdown
If you would like to see a recording countdown before your recording starts, you can enable the countdown option. Or you can tap it off. View this post to know how to set the countdown option.
Step 6. Start Recording.
The recording will begin after a 3-second countdown. You can make annotations on the recording interface during the recording.
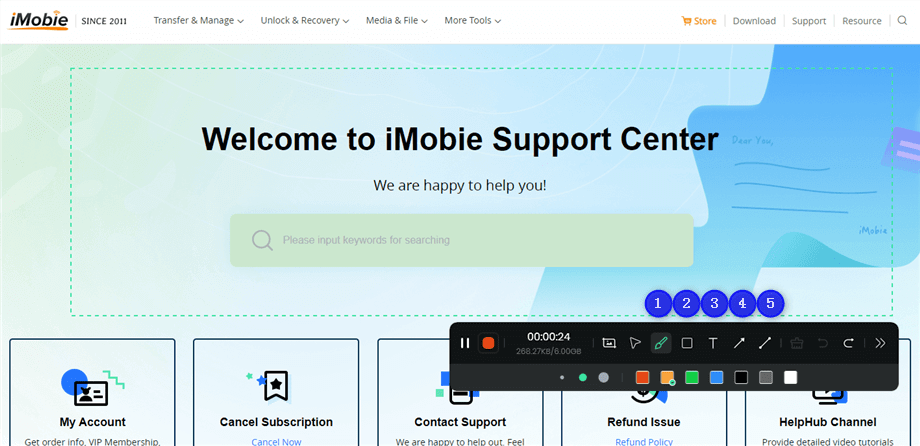
Annotate the Screen during Recording
With the toolbar, you can add the annotation in the screen:
1 Brush: Draw freehand on the screen recording interface to highlight or illustrate specific areas during the recording.
2 Rectangle: Draw rectangular shapes on the screen recording interface.
3 Text: Add written notes or labels directly onto the screen recording interface.
4 Arrow: Draw arrows on the screen recording interface to point out and emphasize specific areas.
5 Line: Draw straight lines on the screen recording interface to underline or connect specific points.
The toolbar can be expanded or collapsed. This feature allows you to access various tools and options when needed, and hide them to keep the workspace uncluttered when they are not in use.
Step 7. Record Screen Process Completed.
When the recording is completed, you can click the red Stop button to end the recording. Your recorded files will be displayed. From here, you can preview and manage the recorded content as needed.
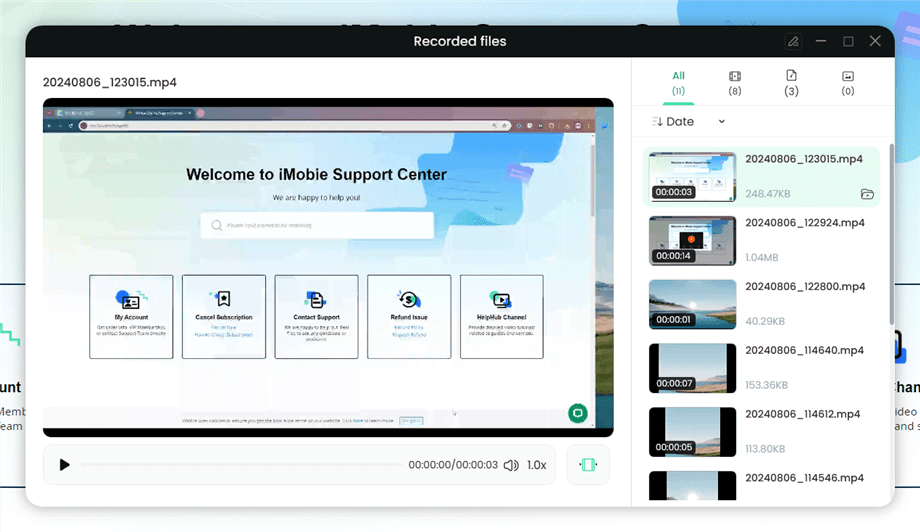
Preview the Recording
You may also want to know: How to screen record protected videos
On iPhone
Apple smartphones come with a pre-installed screen recorder which you can use to capture your screen. It allows you to record any content displayed on your iPhone with minimal hassles. The built-in screen recorder captures content such as live streams, video conferencing calls, and social media content. However, for the video conferencing calls, this recorder doesn’t include the corresponding audio narration while capturing your screen.
If you want to record your iPhone screen using the pre-installed recorder, follow these steps:
- Swipe down from the top left corner of your screen to launch the Control Center (if you use an iPhone with no home button). However, if your device uses the home button, just swipe from the bottom of your screen to get a similar output.
- Locate the Screen Recorder button and click on it.
- Next, open the content you want to capture and recording will commence immediately.
- To stop recording, go to the control center again and click on the screen recorder button. The resulting content can be found in the Photos app on your device.
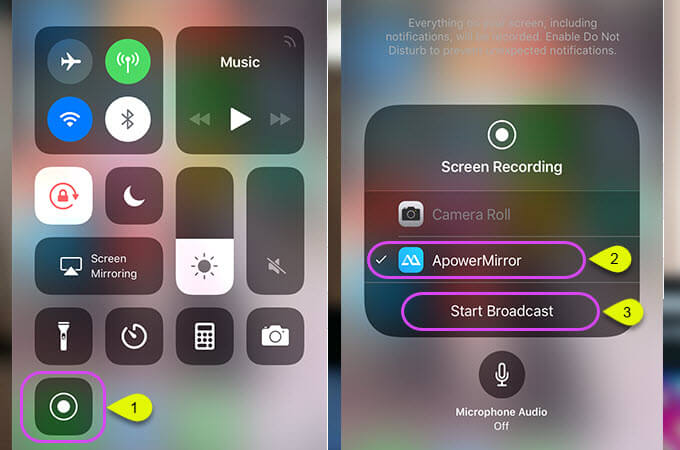
Open Control Center and Tap on Screen Recording
On Android
Most of the latest Android brands running on the Android 11.0 and later version come with a built-in screen recorder that you can bank on to help you capture your phone screen. If you own this type of device, use the stepwise guide below to record your screen:
- Swipe down your screen and click on the gear button to open the Quick Settings panel.
- Locate and tap the Screen Recorder button.
- Next, proceed to configure audio and video settings. After that, hit the Done button.
- If this is your first time recording your screen, your device will send you some prompts for you to grant permissions. Please do so by clicking the right buttons.
- Recording will start immediately. Click the Stop icon when you are done capturing your screen.
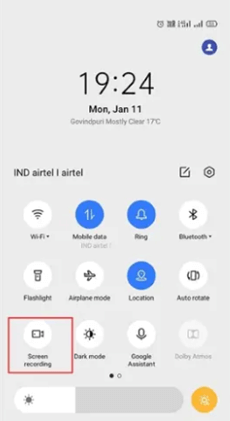
Android Screen Recording Feature
FAQs
Garner more information about screen recording by reading through the questions and answers below:
Where do screen recordings go?
Screen recordings are usually stored in your local storage for most screencast tools, especially for the built-in recorders. We also have some third-party tools that do this. A typical example is the Screenify. However, for screen recorders like Loom, the resulting content is stored in the cloud.
Can someone tell if you are screen recording?
No one or website will be able to tell you if you’re screen recording or not.
Final Words
Hopefully, you have everything about screen recording at your fingertip now that you’ve read through the article above. In case you have any suggestion or addition to the information above, kindly use the comment section. Screenify is our most preferred screen recording option. The software captures your screen with high-end quality.

Joy Taylor


Senior writer of the iMobie team as well as an Apple fan, love to help more users solve various types of iOS & Android-related issues.
Screenify
AnyEnhancer
FocuSee
Vozard
AnyMiro
AnyMirror


