Guide: How to Record a Webinar Easily
Whether you are attending a webinar for educational, informational, or promotional purposes, recording the whole session is a wise thing to do. Keeping this in mind, we have introduced 3 apps for webinar recording in this article.
Attending a webinar is one thing; however, remembering everything that was discussed during it is almost impossible, except if you have superhuman powers!
So, if you have ever attended a webinar and wished you could save all the valuable information for later use or to share with others, you’re not alone!
Webinars are an excellent way to learn, network, and keep up with the latest trends, but sometimes life gets in the way, and we can’t make it to the live event. That’s where webinar recording comes in!
In this guide, we’ll show you 3 apps to easily record a webinar, whether you’re the host or a participant. Don’t worry; you don’t need to be a tech whiz to do this! We’ll keep it simple and straightforward for you.
By the end of this guide, you’ll be able to record webinars like a pro!
So, let’s get started!
What is a Webinar?
Webinars are short for “web-based seminars.” They allow people from all over the world to interact with each other in real time. So, you can attend webinars from anywhere, as long as you have an internet connection.
They’re usually hosted using video conferencing software, which makes it convenient to participate and engage with others.
Why are Webinars Important?
Webinars are quite important in our fast-paced digital age. Because they are:
- Accessible
Webinars allow people from all over the world to participate and gain knowledge. No matter where you are, as long as you have an internet connection, you can join in and learn from experts. - Convenient
You can join the event from anywhere, be it your cozy home, busy office, or even while on the go! No need to worry about travel or a physical presence. - Cost-Effective
Hosting a webinar can be a great way for businesses, educators, and organizations to save money while still connecting with their audience. In fact, many people find webinars to be more cost-effective than organizing physical events. - Interactive
Webinars are not just boring lectures anymore; they are actually quite interactive. You can connect with presenters and other participants, which creates a collaborative and fun learning environment.
Can I Record a Webinar on My Computer?
Of course! You can definitely record a webinar on your computer.
There are several ways to do this, depending on your own preferences and the software you’re using to host the webinar. Most webinar platforms offer a recording feature that allows you to capture the entire session, including audio, video, and presentation materials.
However, the recording features of these webinar platforms have limited features. That’s why you can also use a screen recorder for webinar recording. With screen recorders, you can capture everything happening on your screen, from the webinar video and audio to any other open windows or applications.
Best Screen Recording Apps Recommendation
Now that you know what webinars are and that you can record them on your computer, let’s explore three recommended screen recording apps that can help you easily capture webinar sessions.
- Screenify
- Loom
- QuickTime Player
Let’s have a detailed overview of each app and how to use it.
1. Record a Webinar with Screenify Easily
Screenify is a screen recording tool that lets you record your screen and audio simultaneously and then export your recordings to popular video formats like MP4, AVI, and MKV.
Whether you’re recording a webinar, a presentation, a tutorial, or even gameplay, Screenify is the perfect choice. It’s packed with awesome features that make creating video presentations and marketing videos a breeze!
Let’s have a look at some of the key features of Screenify:
- User-Friendly Interface
Screenify has a simple and intuitive interface, and it is easy to get started with. - Free
Screenify is free and has no time limit or watermark. - Simultaneous Screen And Audio Recording
With Screenify, you can record your screen and audio simultaneously. - Webcam Recording
Screenify supports screen recording as well as webcam recording. - Annotations and Effects
Screenify lets you add annotations and effects to your recordings, such as text, arrows, shapes, and highlights. - Video Formats
You can export your recordings to a variety of video formats, including MP4, AVI, MKV, and WMV, and upload them directly to YouTube and Vimeo.
Steps to use Screenify for Webinar Recording
Here’s a step-by-step tutorial on using Screenify for recording a webinar:
Step 1. Download, install, and launch Screenify on your computer.
Free Download * 100% Clean & Safe
Step 2. Now choose the mode you want to use in your recording.
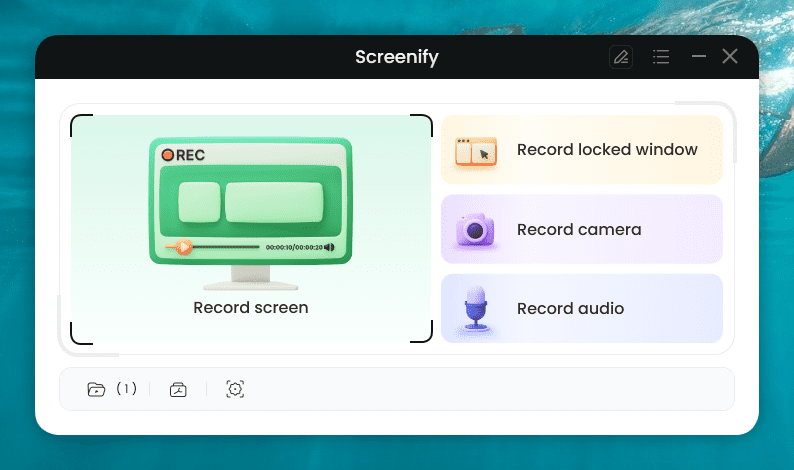
Choose the Mode You want to use
Step 3. Configure the settings before recording. Then, choose the recording screen. It has two options: either record full screen or a specific region. Select your preferred mode and hit “Record.” Then, there will be a three-second timer. After this countdown, the recording will start.
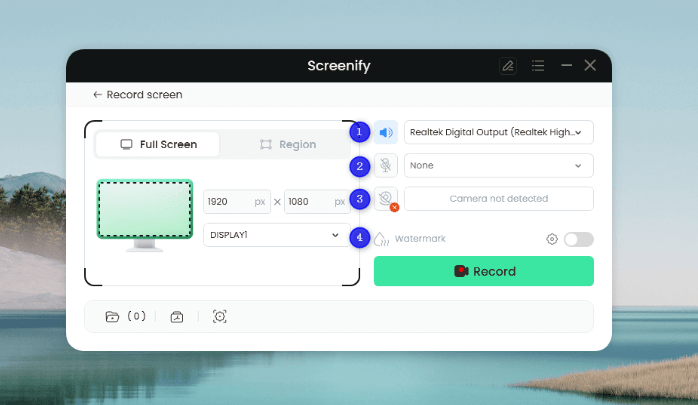
Configure the Settings and Hit the Record Button
Step 4. You can add annotations while recording the screen. You have brush, shape, text, arrow, and line options here.
Step 5. After you have finished recording, click on the Red “Stop” button. Your video will be displayed, and now you can preview and edit it.
2. Record a Webinar with Loom
Loom is basically a video messaging tool that helps you communicate with others visually and at your own pace. However, it also has a screen recording feature that enables you to easily record your screen, webcam, and audio and then share your recordings with others using a single link.
Loom is especially popular with remote teams, as it makes it easy to collaborate and connect with others, no matter where you are in the world.
Plus, individuals love using Loom to create engaging video tutorials, presentations, and other types of content.
Steps to Use Loom for Webinar Recording
Follow these steps to record a webinar using Loom:
Step 1. Download and install Loom on your PC, and select “Screen Only” from the interface.
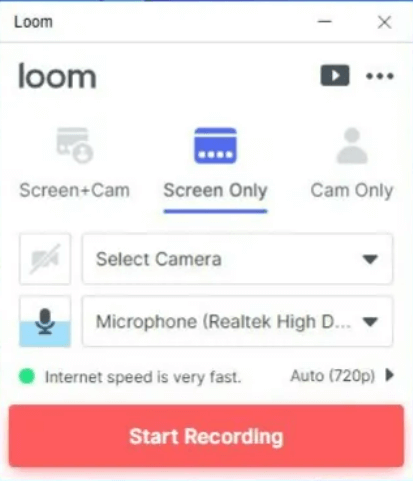
Select Screen Only for Webinar Recording
Step 2. Now, set the parameters for the specific area you want to record. You can select full screen, window only, or custom.

Change the Recording Settings in Loom
Step 3. Select your camera and microphone from the available options and click “Start Recording.”
After a 3-second countdown, Loom will start recording your screen.
3. Record a Webinar with QuickTime Player
QuickTime Player is a free multimedia player developed by Apple, compatible with all macOS and iOS devices. With QuickTime Player, you can enjoy watching a wide range of audio and video formats, including MOV, MP4, AVI, and MP3.
However, QuickTime also has a screen recording function, using which you can record video and audio from your screen or webcam. It’s a versatile and powerful player that’s perfect for both personal and professional use.
Steps to Record Screen using QuickTime Player
Here’s a step-by-step tutorial to use QuickTime Player on Mac for webinar recording:
Step 1. Launch QuickTime Player on your Mac and go to “File > New Screen Recording.”
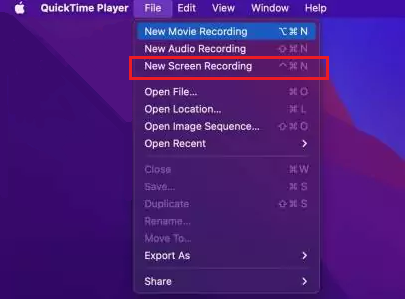
Choose New Screen Recording
Step 2. A pop-up window with screen recording options will appear. Click on the small arrow next to the “Record” button and select your microphone from the list.
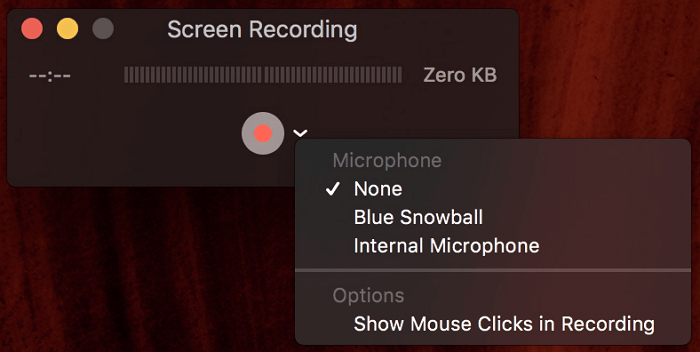
Select Microphone for QuickTime Recording
Step 3. Click the “Record” button and click on the screen to record the full screen. Or you can select a custom area or window for recording.
Step 4. Click “Start Recording” to start screen recording.
And that’s how you record a webinar using 3 simple and easy screen recorder apps on your PC.
Frequently Asked Questions (FAQs)
Q. Can I save a webinar on my PC?
Yes, you can save a webinar on your PC. Whatever screen recording tool you select for webinar recording has an option to save your recorded file to local storage. Therefore, once you finish recording, you can select a destination folder to save it.
Q. How do I record a Zoom webinar without permission?
As per Zoom guidelines, you cannot record a webinar without permission. As soon as you select “Record,” it sends a notification to all the participants, after which they can stay or leave the meeting.
However, if you use a third-party screen recording tool, you can record a Zoom webinar without the permission of the participants.
Q. Are webinars live or pre-recorded?
The purpose of a webinar is to have an interactive session with the audience; therefore, most of the time, it is live. However, if it’s an informative or promotional video with no audience interaction, it can be pre-recorded.
Conclusion
Webinars are a fun and interactive way to learn, share, and connect with like-minded people in the digital age. They are super flexible, efficient, and inclusive, making them the perfect way to expand your knowledge and professional growth.
However, if you’re unable to attend a webinar or want to save it for future reference, recording it is the go-to solution. Most webinar platforms, like Zoom, have a recording option, but it comes with limited features,
Therefore, you need a third-party tool with advanced features for webinar recording. In this article, we have discussed 3 screen recording apps and how to use them to record your screen. So, the next time you have a webinar to record, you know where to look!
Happy recording!
Free Download * 100% Clean & Safe

Senior writer of the iMobie team as well as an Apple fan, love to help more users solve various types of iOS & Android-related issues.
Product-related questions? Contact Our Support Team to Get Quick Solution >
