How to Use GoPro as Webcam on Windows and Mac [Full Guide]
Unlock the potential of your GoPro by converting it into a high-quality GoPro webcam for Windows & Mac. This guide walks you through each step. We’ll also show you how to make optimal recordings using Screenify.
Webcams play a pivotal role in professional meetings or casual chats with friends. However, the in-built cameras on many computers just don’t meet users’ expectations. But if you own a GoPro, there’s good news waiting for you. The ability to transform your GoPro into a GoPro webcam offers a significant upgrade. With its wide-angle lens and high-resolution capabilities, the GoPro can be an excellent alternative to standard computer webcams.
This guide shows you how to use a GoPro camera as a webcam on both Windows & Mac computers. At the end, we’ll also show you how to record your GoPro webcam using Screenify. But before we get started, let’s answer if using a GoPro as a webcam is possible.
Is It Possible to Use a GoPro as a Webcam?
Yes! You can indeed use a GoPro as a webcam. The latest GoPro HERO11 Black, HERO10 Black, HERO9 Black, and HERO8 Black models are equipped to function as webcams.
By connecting your GoPro camera to your computer with a USB cable, you can enjoy a superior video experience. But remember, you might need an external microphone for audio during webcam mode, as this isn’t natively supported. It’s also essential to note that older GoPro models are incompatible with this feature. So make sure to check your model’s compatibility with the GoPro webcam utility before attempting to use it as a webcam.
What You Need to Use Your GoPro as a Webcam
It’s crucial to have the right setup to transform your GoPro into a webcam. Here’s a compiled list of essentials:
- Camera Model: Ensure you have a compatible GoPro model, such as the GoPro Hero 8, 9, 10, or 11 Black.
- Computer: A PC or Mac running Windows 10 or later. If you’re using macOS, it must run on the 10.14 or later version.
- Software: You also need the GoPro Webcam App and the latest firmware for your GoPro.
- Connectivity: A USB 3.0 or USB-C cable is required to link your GoPro to your computer.
- Mounting & Positioning: A tripod designed for GoPro or other special mounting equipment to get your desired angle.
If you have them right now, let’s see how to set up a GoPro webcam on Windows first.
How to Use Your GoPro as a Webcam on Windows
If you want to enhance your video quality on Windows using your GoPro, you need the Windows 10 or later version. And if you have one, let’s move on to the practical steps. Follow this step-by-step guide to set up GoPro webcam on Windows:
Step 1. Before anything else, ensure your GoPro has the latest firmware. You can update your camera through GoPro Quik or a manual update.
Step 2. Download & install the GoPro Webcam desktop utility app. Once the app is installed, you need to restart your PC.
Step 3. Switch on your GoPro and link it to your Windows computer using the USB cable. Your camera will automatically switch to USB mode.
Step 4. To preview before you go live, right-click the GoPro icon in your status bar. Now select the “Preview” option. It helps you gauge the wide field of view in advance.
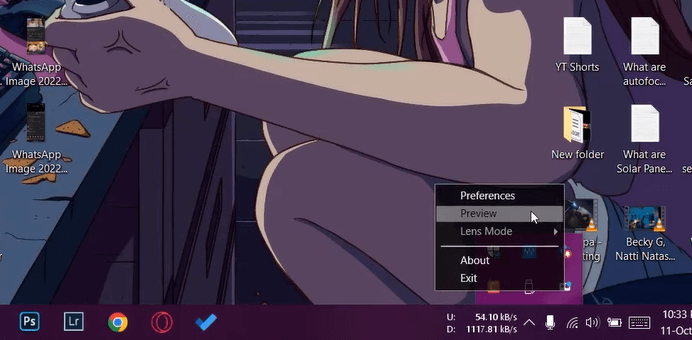
Preview GoPro Webcam
Step 5. Launch the software where you intend to use the GoPro webcam. Then choose “GoPro Camera” as the desired camera. Note: For those who’ve already launched their app, you might have to exit and reopen it to see the GoPro Camera option.

Select GoPro Webcam
Step 6. Once you select the GoPro Camera in your software, you’ll notice a red dot on the GoPro icon in your status bar. This indicates that the GoPro is in action. And you are ready to rock and roll.
How to Use Your GoPro as a Webcam on Mac
GoPro’s versatility is evident as it integrates with both Windows and MacOS. For those with a Mac, you can also utilize your GoPro camera to enhance your video quality. Here’s your guide to setting up a GoPro webcam on your Mac:
Step 1. Ensure your GoPro is up to date with the latest firmware. As with the Windows setup, update via GoPro Quik or manually.
Step 2. Download and install the GoPro Webcam app, keeping in mind the OS requirement. Once installed, you should see the GoPro icon in your Status bar at the top of your screen.
Step 3. Turn on your GoPro and link it to your Mac via a USB cable. A USB 3.0 port is recommended for optimal battery life.
Step 4. Once connected, the GoPro icon in the status bar will sport a blue dot. It will show a successful link, and your GoPro will be in USB Mode.
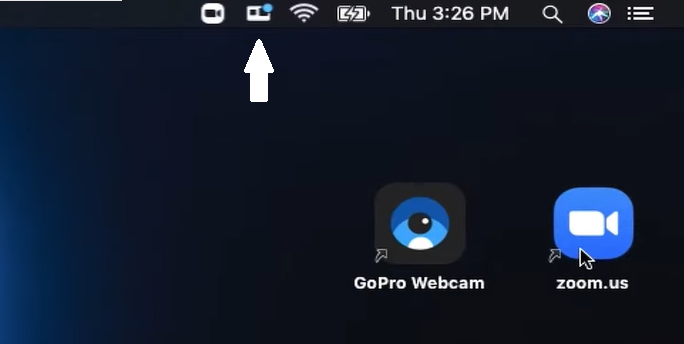
GoPro Connected to Mac
Step 5. Open the application where you wish to use the GoPro webcam. Choose GoPro Camera as your desired camera.
Step 6. Once the GoPro Camera option is selected, your camera will initiate the GoPro Webcam mode. The GoPro icon in the status bar will display a red dot. It indicates that the GoPro webcam is capturing.
Having set up your GoPro as a webcam on both Windows and Mac, the next logical step is to capture those moments or meetings. After all, what’s the point of having excellent video quality if you can’t record and replay it? Let’s dive into the best ways to record your GoPro webcam feed.
How to Record Video from GoPro Webcam via Webcam Recorder
With the rise of digital communication, having a reliable video recording tool has become indispensable. There are many recording tools available for various needs. However, if you’re seeking a blend of power and simplicity, look no further than Screenify. Screenify is a free yet powerful screen and video recording tool. Exclusive to iMobie users, this software ensures you capture the best quality. Moreover, you can record without any watermarks or time constraints. And it can accommodate both screen and webcam recording with audio.
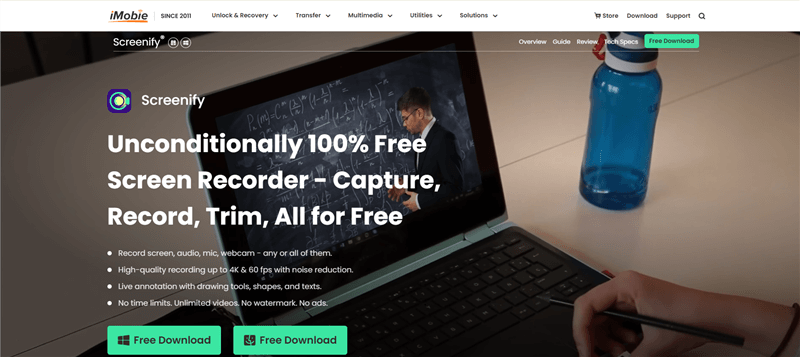
Screenify Website Interface
Key Features of Screenify
- High-Definition Recording: Capture screen and webcam in 1080p HD/4K.
- No Restrictions: Record videos with no watermarks and no time limits.
- Multiple Recording Modes: Choose from 4 distinct recording modes.
- Customization: Utilize webcam filters and virtual backgrounds during recording.
- Local Saving: Save unlimited recordings to your computer with just a single click.
- Editing in Real-Time: Add annotations during recording for a dynamic presentation.
Steps to Use Screenify
Step 1. Download and Install Screenify on Computer.
Step 2. Launch Screenify on your computer, and select Record screen mode.
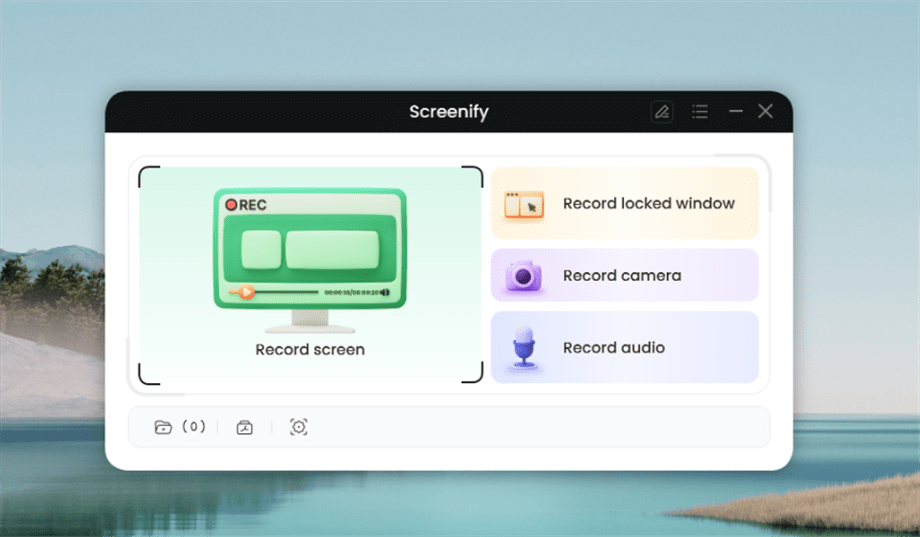
Select Record Screen Mode
Step 3. Configure Recording Settings aims to configure settings like system audio before recording.
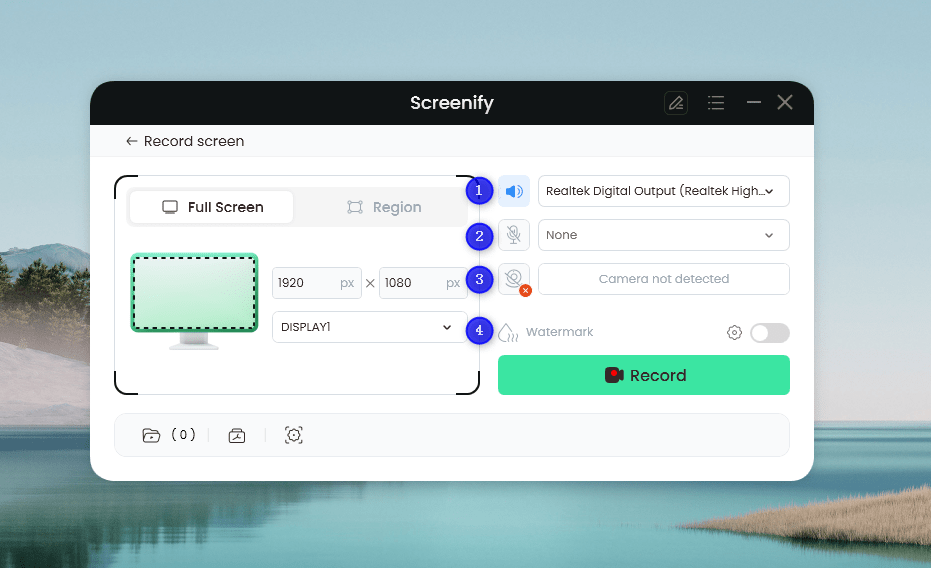
Set Configure Recording Settings
In this setting menu, you can:
1 Choose the System audio.
2 Choose the Microphone you want to record.
3 Choose the Camera you want to use.
4 Choose whether to add a watermark.
Step 4. Select Recording Screen.
Option 1. Full Screen Record
Please select Full Screen mode and choose the display you need to record. Hit Record button to initiate recording.
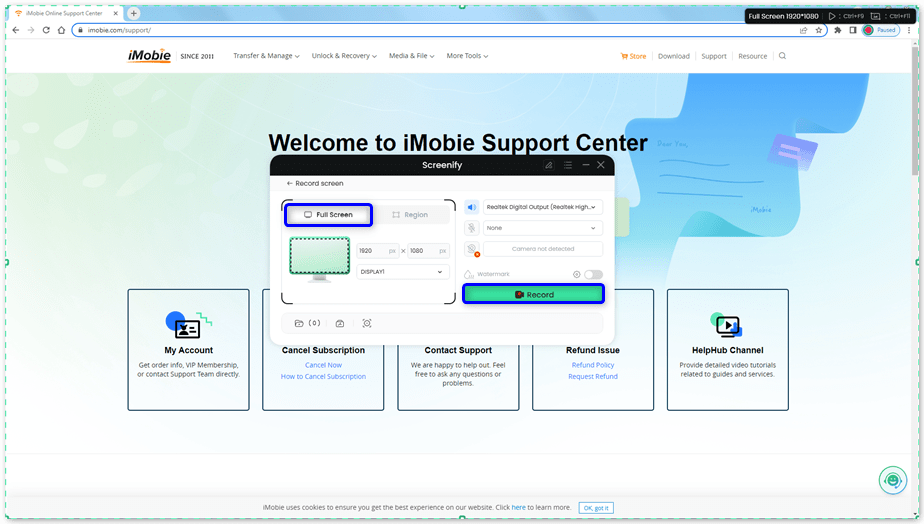
Select Full Screen
Option 2. Region Record
To record region, you need to manually select the recording area. After selection, you can still adjust the selected area. It supports customize selection, full screen, and proportional selection based on common social media dimensions.
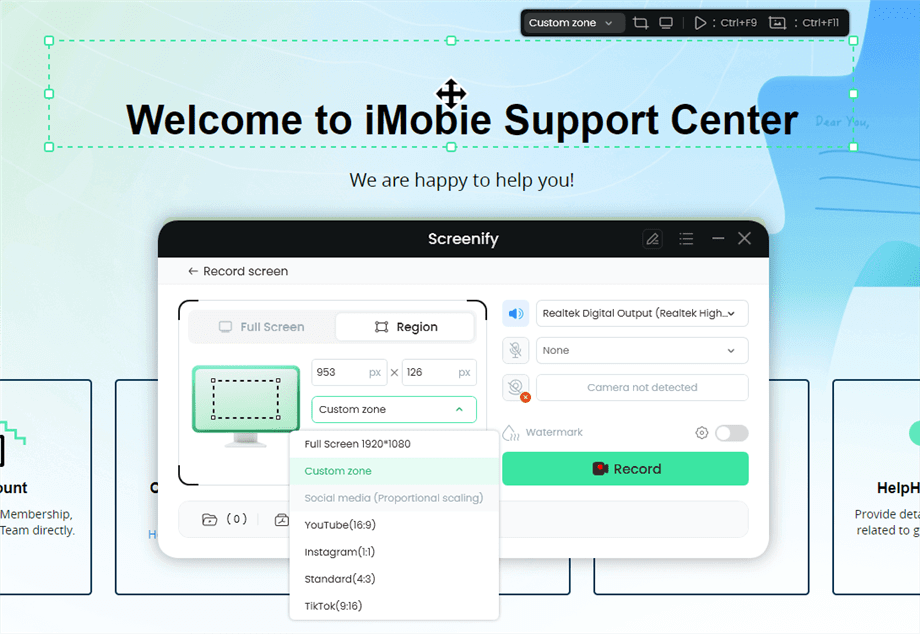
Record Region
Step 5. Wait for the Recording Countdown.
There is a 3-second countdown to help you prepare the recording after you are ready to start recording.
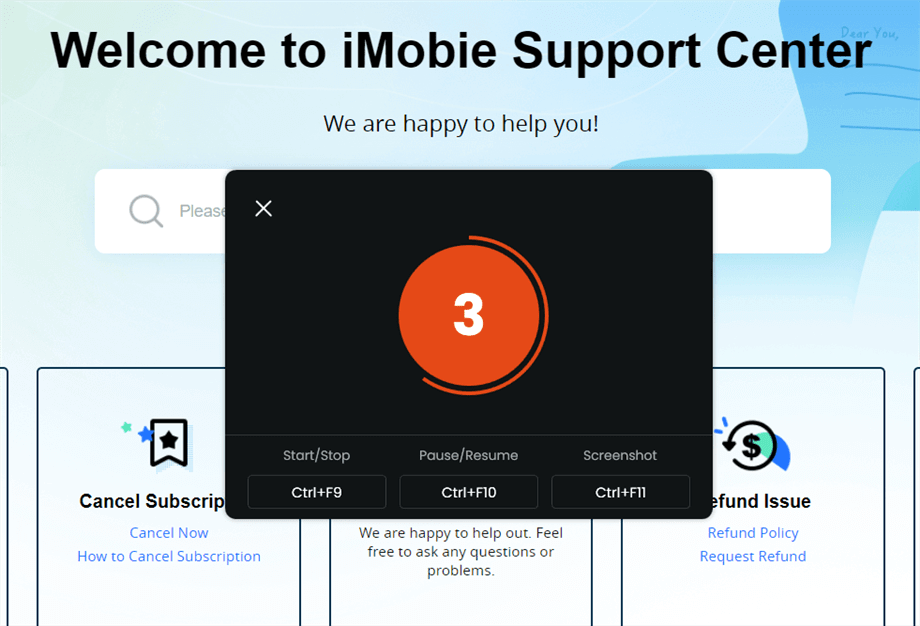
Wait for the Recording Countdown
If you would like to see a recording countdown before your recording starts, you can enable the countdown option. Or you can tap it off. View this post to know how to set the countdown option.
Step 6. Start Recording.
The recording will begin after a 3-second countdown. You can make annotations on the recording interface during the recording.
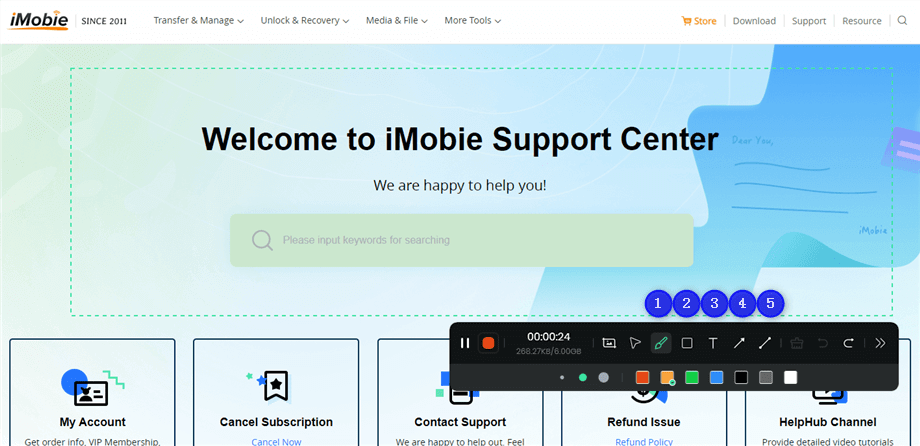
Annotate the Screen during Recording
With the toolbar, you can add the annotation in the screen:
1 Brush: Draw freehand on the screen recording interface to highlight or illustrate specific areas during the recording.
2 Rectangle: Draw rectangular shapes on the screen recording interface.
3 Text: Add written notes or labels directly onto the screen recording interface.
4 Arrow: Draw arrows on the screen recording interface to point out and emphasize specific areas.
5 Line: Draw straight lines on the screen recording interface to underline or connect specific points.
Step 7. Record Screen Process Completed.
When the recording is completed, you can click the red Stop button to end the recording. Your recorded files will be displayed. From here, you can preview and manage the recorded content as needed.
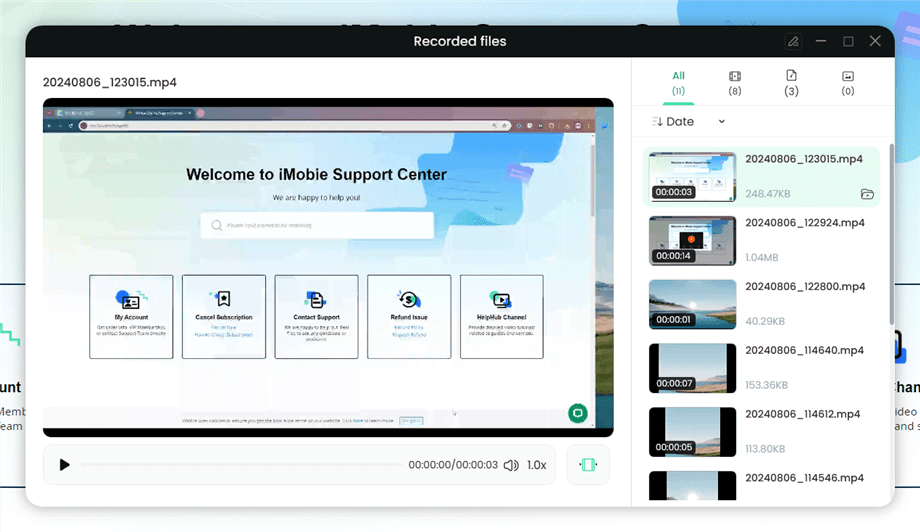
Preview the Recording
You may also want to know: How to screen record protected videos
With these steps, you are all set. Now create top-notch video content using your GoPro as a webcam and Screenify as your recording tool of choice!
Frequently Asked Questions
How do I connect my GoPro 11 to my computer?
First, to connect your GoPro HERO11 to your computer, ensure that your camera’s firmware is up-to-date. Then, power on your GoPro and connect it to your computer with a USB cable. Once connected, the camera will go into USB mode, and your computer should recognize it.
You may face some issues with HERO11’s recognition. In those cases, perform a Connections reset as a temporary workaround until firmware fixes are released.
How do I use my GoPro as a webcam for streaming?
First, update your camera to the latest firmware and install your computer’s GoPro Webcam desktop utility. Once installed, connect your GoPro using a USB cable. A blue dot on the GoPro icon in the status bar will indicate the successful connection. After that, launch your preferred streaming application and select “GoPro Camera” as your camera source. Your GoPro will then switch to webcam mode, ready for live streaming.
Final Words
Convert your GoPro into a formidable GoPro Webcam. It will give you unmatched video quality on both Windows and Mac. In this guide, we have shown you how to use GoPro as a webcam.
And to capitalize on the prowess of your GoPro Webcam, you need a reliable recording partner. Screenify emerges as the perfect ally. It offers seamless recording in the finest quality. So, if you want to record and replay your GoPro Webcam sessions with precision, give Screenify a shot!
Free Download * 100% Clean & Safe

Senior writer of the iMobie team as well as an Apple fan, love to help more users solve various types of iOS & Android-related issues.
Product-related questions? Contact Our Support Team to Get Quick Solution >
