4 Best Ways to Record Zoom Meeting on iPhone
Recording your Zoom meeting is a great way to capture all the activities that happened on the video conferencing app. But how do you do that on a mobile device like an iPhone? Learn how to record Zoom meetings on iPhone without stress using the guide shared in this post.
Since the COVID-19 outbreak, the Zoom video conferencing app has taken over our means of communication throughout the globe. Whether you need to connect with families, friends, or business partners, the app offers a convenient, safe, and effective way to reach out to everyone. End-users are allowed to connect via video calls or audio calls.
Regardless of your connection mode, you can always record your Zoom meetings with sounds, if you know you won’t be available for the live gathering. The approach to follow is super easy but can be quite technical for someone using an iPhone. If this is the same for you, this post has got you covered.
Here, we’ve prepared a quick and straightforward guide that you can follow to capture or record Zoom meetings on your iPhone in lossless quality. Read on, as we delve into the full stepwise guide!
1. Using iPhone Built-in Recorder
With the built-in recorder on your iPhone, you can capture everything happening in your Zoom meeting with minimal hassles. This pre-install screen recorder lets you record all sorts of Zoom meetings, whether audio or video, and then stores the resulting content on your device.
iPhone Built-in Recorder offers unlimited recording hours, so you don’t have to worry about time limits. There are not many requirements for you to successfully capture Zoom meetings via this recorder. Just ensure that you have enough storage space and you have the screen recorder feature in the control center for quick and easy navigation.
Kindly check your storage space using the stepwise guide below:
- Open the Settings panel on your device by hitting the gear icon you have on your home screen.
- Head down the screen displayed, and click on the General icon so you can proceed.
- Next, click iPhone Storage. Please keep patient with your iPhone to analyze its system for the storage used, and the one left.
If you don’t have the screen recording feature in control center, follow the steps below to do so:
- Head to the Settings menu screen, and click on Control Center.
- Alternatively, you can type Control Center in the search field on your iPhone, and click on the most suitable icon.
- Underneath the INCLUDED CONTROLS panel, ensure you have Screen Recording selected. If not, head to MORE CONTROLS, and select the corresponding icon.
Once all of the above is set, use the guide below to record Zoom meetings on your iPhone via the built-in screen recorder:
Step 1: Open the Zoom meeting then swipe from the top right corner of your screen (if you use an iPhone with no home button) to launch the Control Center. For folks with an iPhone with the home button, kindly swipe from the bottom of your screen to get a similar result.
Step 2: Locate the Screen Recording feature, and click on it. Without further ado, a 3 seconds timer will load. After that, head to the Zoom meeting screen, and start recording all the activities that are going on.
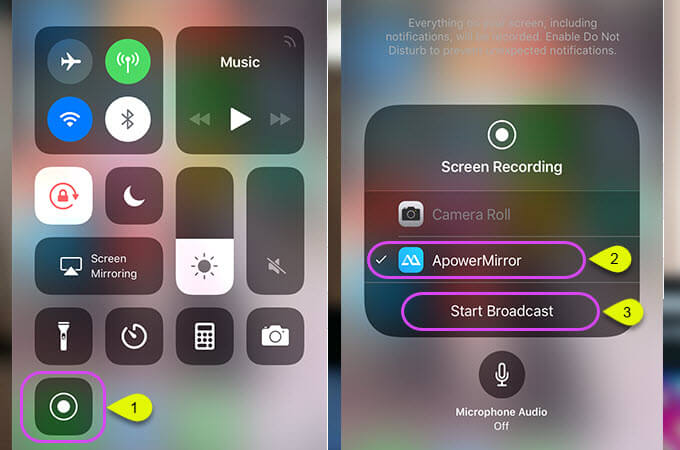
Open Control Center and Tap on Screen Recording
Step 3: Wait for the screen recording to capture your screen to your satisfaction, then launch the Control Center again using the same approach in step 1. Click on the Screen Recorder button to end the recording.
Limitations
- iPhone built-in recorder does not include internal audio to your recordings.
- Recording Zoom meetings with this method drains your RAM, which in turn slows down the operations of your iPhone.
- You must have enough storage on your iPhone before carrying out this operation using this technique.
2. Using Screen Mirror APP
For folks looking for a larger display screen to record their Zoom meetings, you can count on a screen mirroring app like ApowerMirror, a screen mirroring platform that allows you to cast your iOS screen on any computer system. This software also offers real-time recording, as it allows you to record all the activities happening in your Zoom meeting in high quality.
ApowerMirror powers everything required in a professional screen mirroring tool, and it’s very flexible to operate. With the comprehensive interface software, you can easily mirror your phone screen with synchronized audio in lossless quality without experiencing lags. Both Windows and Mac computers connect perfectly with this software.
Stepwise Guide to Record your Zoom Meeting on iPhone Using ApowerMirror
Step 1: Get ApowerMirror on your iPhone, and PC/Mac via the appropriate source, preferably Apple store and the official website respectively. Launch the app on both devices.
If you are using WiFi as your preferred connection mode, please click on iOS/iPadOS on your PC/Mac screen then select WiFi.
Connect your iPhone and PC/Mac to the same router. After that, swipe down from the top right corner of your iPhone screen, and click on the Screen Mirroring icon.
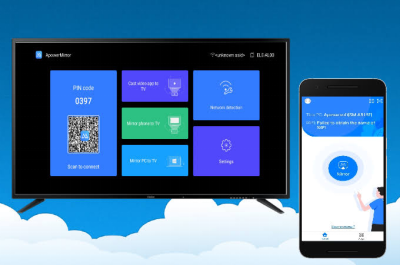
ApowerMirror Interface
Step 2: A screen showing the nearest screen mirroring device will come up on your iPhone. Click on the corresponding icon, and wait a few seconds for the connection to approve. Once done, you will find your iPhone screen on your PC/Mac immediately.
Step 3: Now, launch the Zoom meeting page on your iPhone and it will be displayed on your computer screen. While the meeting is on, locate the Screen Recording feature on AnyMiro on your PC/Mac, and click on it. Screen recording will commence in no time.
Exercise patience till you are done with recording the Zoom meeting, then click on the corresponding icon on the ApowerMirror software page to end screen recording. The resulting content will be saved directly to your computer local drive.
3. Zoom’s Cloud Recording Function
Another technique to recording Zoom meetings on your iPhone is to use the Zoom’s Cloud Recording feature. The feature allows you to record everything happening on your Zoom screen. However, mind you, you must be the host, co-host for you to use Zoom’s Cloud Recording.
Alternatively, you can reach out to the host to grant you permission to record the Zoom meeting. If any of these preconditions can’t be met, then there’s no way to record your screen using the Zoom’s Cloud Recording feature.
You can follow these set of instructions below to record your Zoom meeting screen via Zoom’s Cloud Recording function:
Step 1: Launch the Zoom video conferencing app, and join or host a meeting. While the meeting is on, locate the Toolbar panel at the bottom of your screen, and click on the More icon.
Some options will appear. Kindly select Record to the Cloud from the list, and Zoom will start capturing audio, video, and live chat immediately.
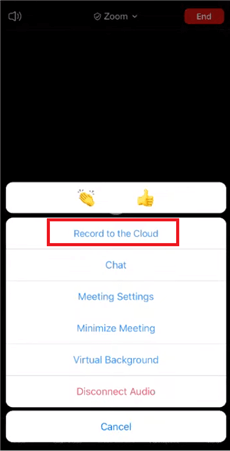
Record Meeting to Cloud
Step 2: When you’ve recorded the Zoom meeting to your satisfaction, click on the Recording icon at the upper left corner of your iPhone display screen to end the process.
Step 3: Recording can take a while before stopping, so wait patiently. Once done, export and save the recorded file. A link containing the recording will be sent to your email (if you are the host of the meeting). If you aren’t the host, you can connect with the hist to help you with the link.
Limitations
- No permission from the host means you cannot record your screen with the Zoom’s Cloud Recording function.
- Poor audio and video quality.
- The recorded file is only available on Zoom cloud.
4. Using a third-party iPhone Screen Recorder
With Record it! you can record your iPhone screen to capture live Zoom meetings for later viewing. This iOS screen recording app can also be used for other applications such as games, and more. It’s pretty simple to operate, and its services are offered at no cost.
To use the Record it! App, follow the set of instructions given down here:
- Launch the Apple Store on your iPhone, and enter Record it! in the empty search field.
- Hit the Enter button and select the appropriate app icon.
- Download the app, and open it for screen recording operations. Once the app comes up, click Start Recording, then launch Zoom so it can start capturing the event happening there.
- After completing the screen recording, click on the right icon to stop and save the resulting content to your iPhone.
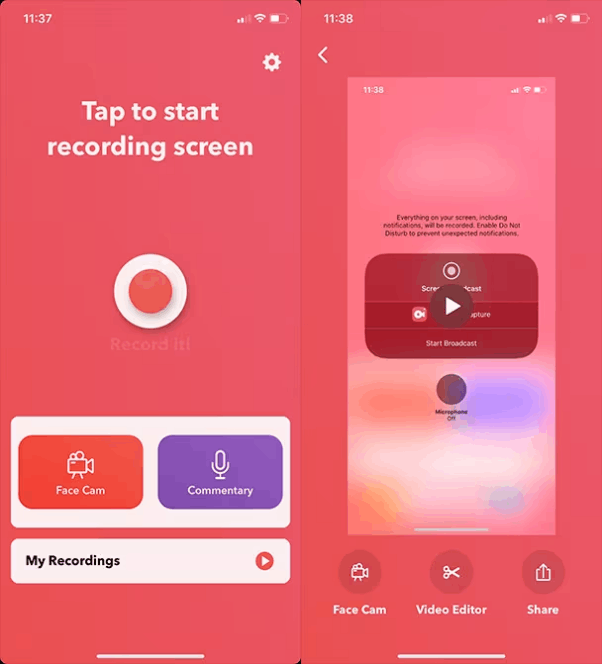
Record it! App Interface
Tip for How to Record Zoom Meeting on PC/Mac
Not recording your Zoom meeting on iPhone but PC/Mac? You need a screen recorder to capture your Zoom live gathering. There are tons of screen recording utilities available on the internet that you can bank on to capture your screen on the video conferencing app, Zoom. However, Screenify is the best choice because of the outstanding services it offers.
Screenify is a professional screen recording suite tailored for users of all levels, whether tech-literate or not. It powers 4 recording modes that you can choose from to capture your Zoom meeting screen. This software captures your screen, audio, and webcam in lossless quality, and stores the final content directly to your computer’s local storage.
With Screenify at your fingertip, you can determine your audio recording source, select your preferred recording dimension, pick the most suitable resolution format for your resulting content, and more. There’s maximum flexibility when using this platform for your screen recording services.
Key Features
- With one click, you can record your screen, audio, or webcam with lossless quality.
- The software provides you with a beginner-friendly interface to ease screen recording operations.
- Screenify allows you to record your laptop screen without any watermarks.
- Screenify is 100% free to use.
- Polish your recordings using the annotation tools integrated into Screenify. Some of the supported annotation functions include stylus, text, drawing tools, shapes, and more.
Steps to Record Zoom Meeting on PC/Mac via Screenify
Step 1. Download and Install Screenify on Computer.
Step 2. Launch Screenify on your computer, and select Record screen mode.
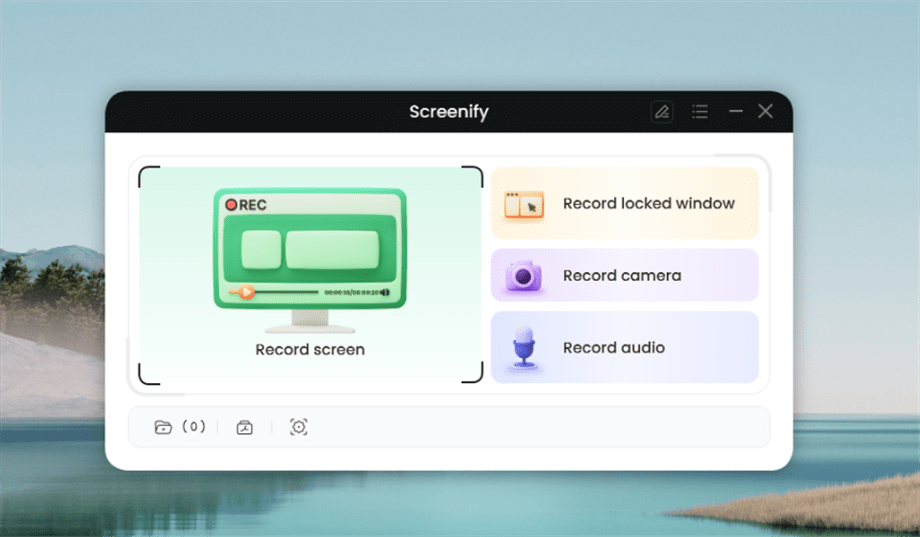
Select Record Screen Mode
Step 3. Configure Recording Settings aims to configure settings like system audio before recording.
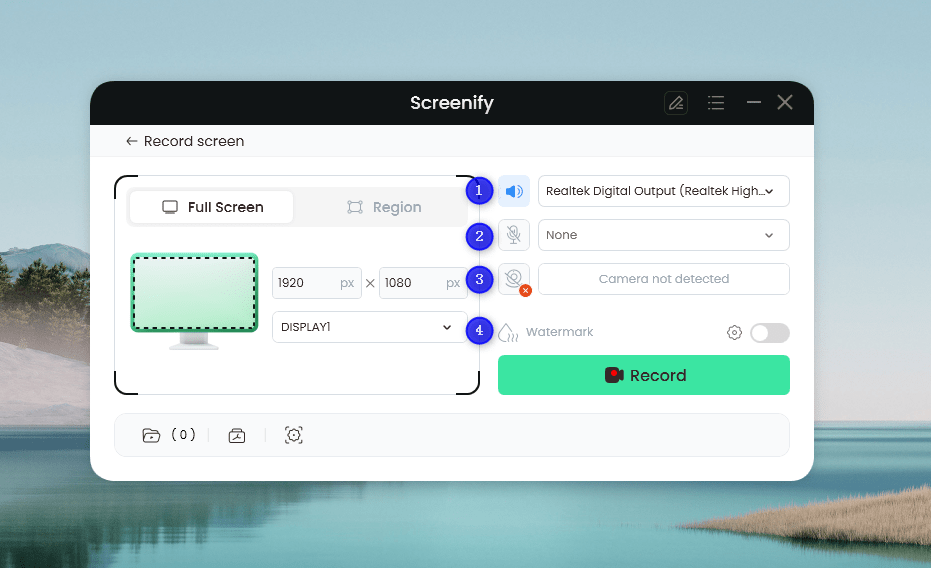
Set Configure Recording Settings
In this setting menu, you can:
1 Choose the System audio.
2 Choose the Microphone you want to record.
3 Choose the Camera you want to use.
4 Choose whether to add a watermark.
Step 4. Select Recording Screen.
Option 1. Full Screen Record
Please select Full Screen mode and choose the display you need to record. Hit Record button to initiate recording.
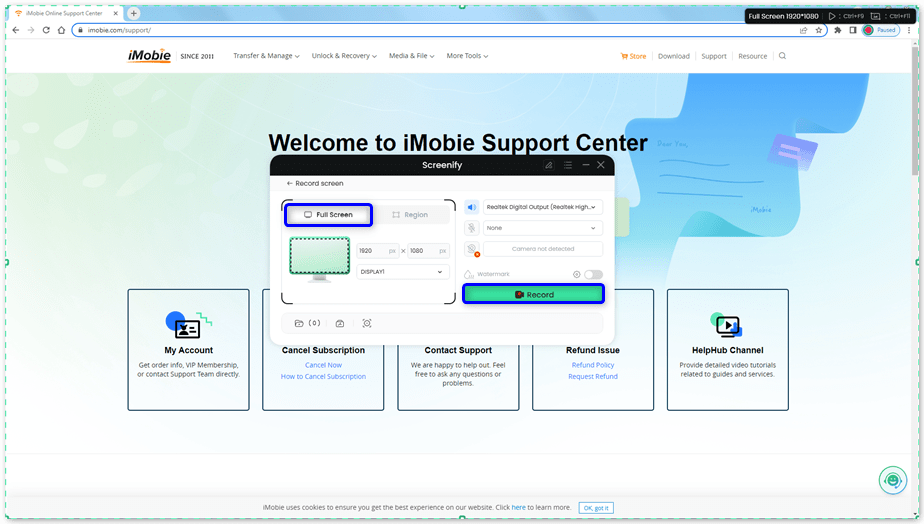
Select Full Screen
Option 2. Region Record
To record region, you need to manually select the recording area. After selection, you can still adjust the selected area. It supports customize selection, full screen, and proportional selection based on common social media dimensions.
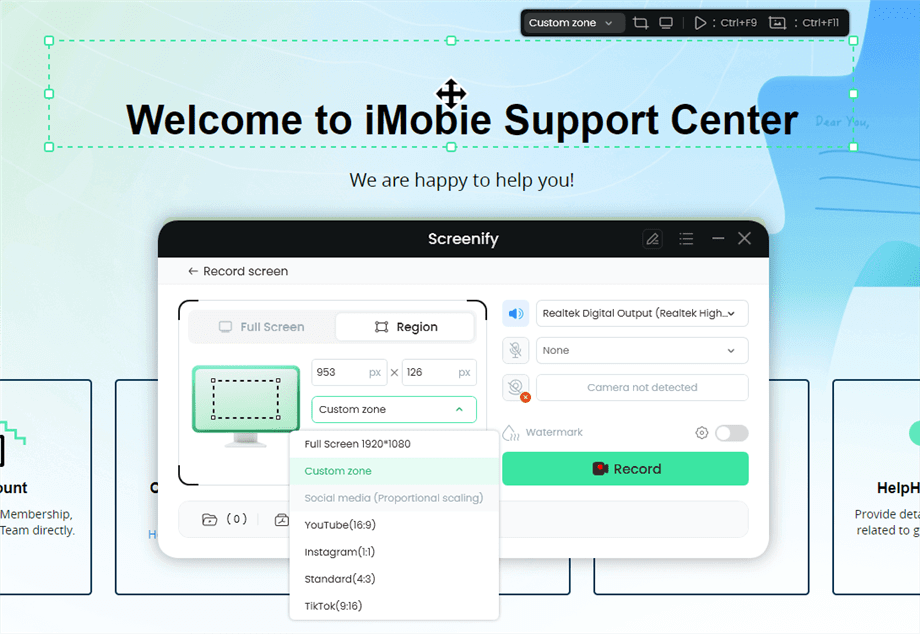
Record Region
Step 5. Wait for the Recording Countdown.
There is a 3-second countdown to help you prepare the recording after you are ready to start recording.
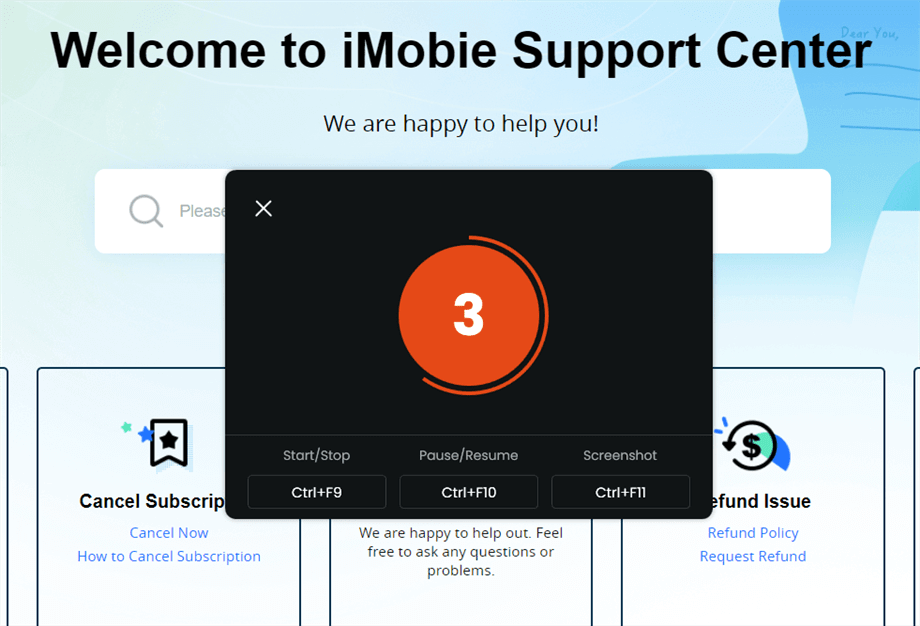
Wait for the Recording Countdown
If you would like to see a recording countdown before your recording starts, you can enable the countdown option. Or you can tap it off. View this post to know how to set the countdown option.
Step 6. Start Recording.
The recording will begin after a 3-second countdown. You can make annotations on the recording interface during the recording.
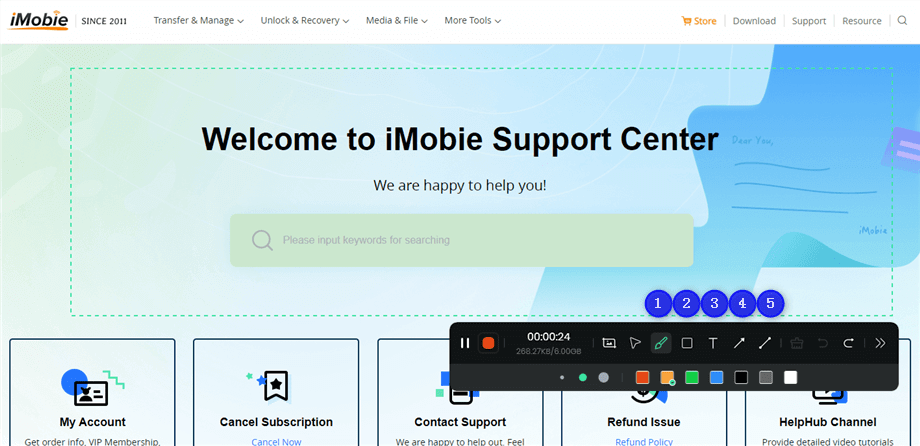
Annotate the Screen during Recording
With the toolbar, you can add the annotation in the screen:
1 Brush: Draw freehand on the screen recording interface to highlight or illustrate specific areas during the recording.
2 Rectangle: Draw rectangular shapes on the screen recording interface.
3 Text: Add written notes or labels directly onto the screen recording interface.
4 Arrow: Draw arrows on the screen recording interface to point out and emphasize specific areas.
5 Line: Draw straight lines on the screen recording interface to underline or connect specific points.
Step 7. Record Screen Process Completed.
When the recording is completed, you can click the red Stop button to end the recording. Your recorded files will be displayed. From here, you can preview and manage the recorded content as needed.
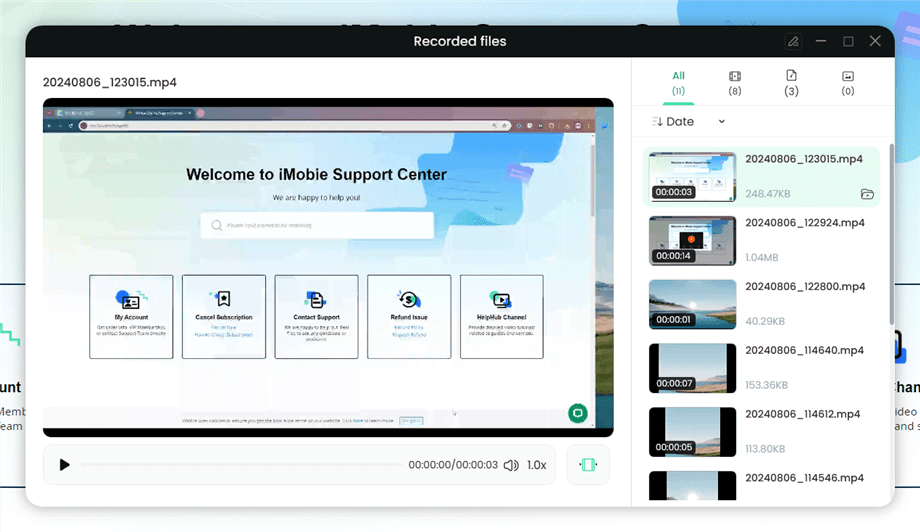
Preview the Recording
You may also want to know: How to screen record protected videos
Related FAQs about Zoom Meeting Recording
Q1. Why can’t I record on Zoom on my iPhone?
Recording Zoom meetings on your iPhone shouldn’t be a challenge. But sometimes, you might experience difficulty. Here are some of the reasons for such:
- You aren’t the host or co-host of the Zoom meeting.
- You don’t have the permission to record Zoom meetings from the host.
- The meeting host isn’t on the Zoom premium version.
Q2. Can you record a Zoom meeting on iPhone if you are not the host?
Yes, you can!
Participants of a Zoom meeting can always capture everything happening in the live gathering on their iPhones. You can do this directly from the Zoom meeting by seeking permission from the host of the event. But if you don’t want to follow this approach, you can employ the services of the built-in screen recorder on your iPhone, use a third-party screen recording software, or screen mirroring tool.
Q3. How to record Zoom meeting meeting on iPhone with audio as a participant?
Recording Zoom meetings on iPhone with audio as a participant can be tough for anyone without the right screen recording suite at hand. We do not recommend using the iPhone built-in recorder because it isn’t designed to capture internal audio.
Q4. How to record Zoom meeting with audio?
Capturing Zoom meetings with internal audio requires an external screen recorder like Screenify if your recording source is a PC or Mac computer system. However, if you use a mobile device, we suggest you use the AnyMiro screen sharing suite.
Final Words
Recording Zoom meetings on your iPhone isn’t a big deal anymore with this guide at your fingertip. We’ve demonstrated the 4 best ways to record Zoom meetings using your iPhone. Choose the technique that suits you.
For folks with PC/Mac, you can always count on Screenify to help you record your Zoom meetings. The software offers multiple recording modes that you can use to capture all of the activities in a Zoom meeting. It doesn’t matter whether you are in an audio only meeting, or video + audio meeting, Screenify will record according to your needs.
Free Download * 100% Clean & Safe

Senior writer of the iMobie team as well as an Apple fan, love to help more users solve various types of iOS & Android-related issues.
Product-related questions? Contact Our Support Team to Get Quick Solution >
