6 Ways to Record Part of Screen Windows 10/11 and Mac
Want to record part of your screen on Windows 10/11 and Mac? Explore 6 tools for easy and seamless screen-capturing moments.
Screenify – Record Part of Screen as You Want
Download Screenify record part of the screen on Windows or Mac. You can also record a lock window if you want. Whether full-screen or partial-screen recording, recording with sound or with camera, Screenify can do it with ease.
100% Clean & Safe
Want to capture only a part of your screen but don’t know how? Maybe you are a gamer who wants to share great moments or a professional trying to show essential details for work slides. Or perhaps you’re making fast tutorial videos. You have found the right place!
We’ll be guiding you through six easy and simple tools to record part of your screen on Windows 10/11 and Mac. After reading, you will know which way is best for you and how to start recording like an expert! So, what are you waiting for? Let’s jump right in!
Record Part of Screen on Windows/Mac in Clicks
Introducing Screenify, a new and exciting tool for easy screen recording on Windows and Mac computers. It offers a simple-to-use experience with many features designed for different recording purposes.
Key Features of Screenify:
- Free HD Recording: Screenify gives high-definition recording features for no money, letting users easily capture sharp and clear pictures.
- No Watermark: Unlike many free recording tools, Screenify ensures your recordings do not have watermarks, keeping a professional appearance for your content.
- Flexible Recording Choices: Screenify provides various recording options, whether you need to capture specific windows, the whole screen, or even add a webcam and audio inputs.
- Editing and Sharing: Screenify can give some simple editing tools or work with other software for more detailed adjustments after you finish recording.
- Support and Updates: Keep watching for updates and new features as Screenify keeps growing and adding more functions.
With these features at your fingertips, you can easily record part of your screen on Windows/Mac.
Free Download * 100% Clean & Safe
Record Part of Screen on Windows with Xbox Game Bar
Ready to capture part of your screen using Xbox Game Bar on Windows 10/11? Let’s begin!
Step 1: Open Xbox Game Bar. Press Win + G to open the Xbox Game Bar.
If nothing happens when you do this, it may need to be turned on first. Go to the Start > Settings > Gaming > Xbox Game Bar. Toggle the switch to enable it.
Step 2: Look for and click on the “Capture” tool; it looks like a camera.
Step 3: Select the Recording Area. Usually, the Xbox Game Bar records your whole screen. If you want to concentrate on a specific section, make the window smaller or adjust it so only that part is visible for recording.
Step 4: Click the “Start Recording” button (the circle icon) or press Win + Alt + R to start.
Step 5: Once you are done, click the “Stop Recording” button or press Win + Alt + R again.
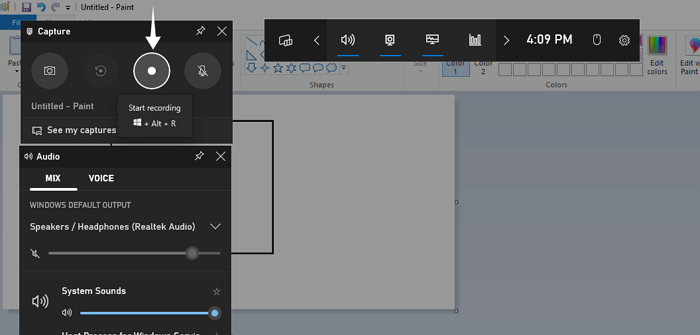
Start recording with Xbox Game Bar
If this doesn’t work, then you can try with the Snipping tool.
Record Part of Screen Windows 10 with Snipping Tool
If you want to capture a specific part of your screen on Windows 10, the Snipping Tool is an excellent built-in choice. Let’s learn how to use it well!
Step 1: Type “Snipping Tool” in the search bar and click on it.
Step 2: Choose Your Snip Type from the top left corner. Click on the “Mode” dropdown and pick your snip type:
- Free-form Snip: Draw a free-form shape around the area you want to capture.
- Rectangular Snip: Click and drag to form a rectangle around the desired area.
- Window Snip: Capture a specific window.
- Full-screen Snip: Capture the entire screen.
Step 3: Choose “Rectangular Snip,” then click and pull to mark the area you wish to capture.
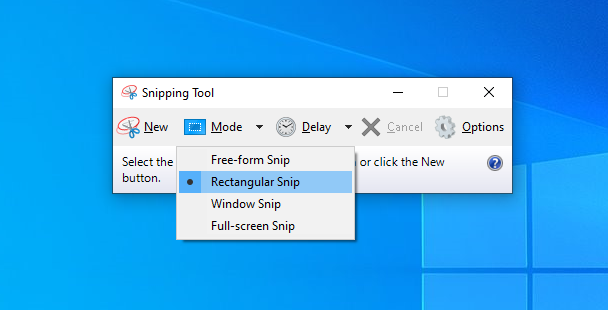
Selecting the Mode in the Snipping Tool
Step 4: After you pick your area, the Snipping Tool will take a capture right away.
A new window comes up showing what you snipped. Here, you can make minor edits using the pen, highlighter, or eraser tools.
Step 5: Click on the floppy disk icon in the top right corner to open the save dialog. Choose your desired file format (PNG, JPEG, GIF, or HTML). Select the save location and click “Save.”
Moving on, you can also use the OBS Studio to record your screen.
How to Record Part of Screen on Windows 10/11 [OBS]
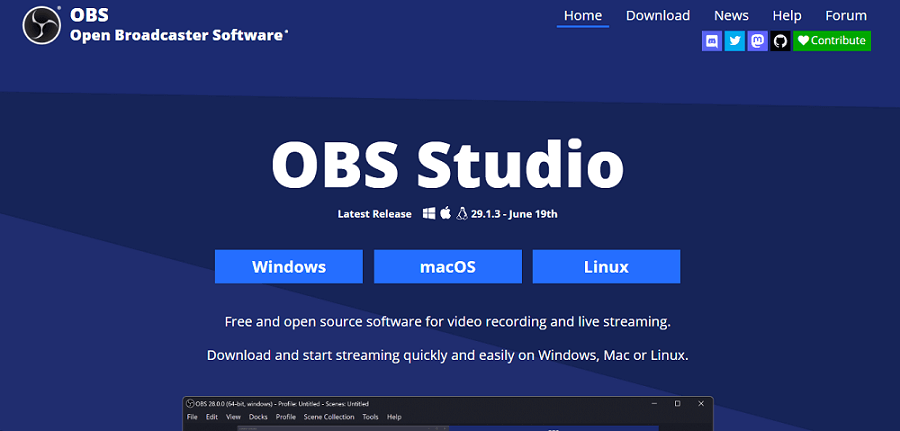
OBS Studio is a good option for people wanting a strong and flexible screen recording tool. This open-source software is used for streaming as well as for recording. Let’s go step by step to use OBS to record part of your screen on Windows 10/11.
Step 1: Go to the official OBS Studio site and download the Windows installer there. Run the installer and follow the on-screen instructions to complete the installation.
Screen Record with OBS
Step 2: By default, a new scene should be created, but if not, click the “+” button in the “Scenes” box. Name your scene and click “OK.”
Step 3: In the “Sources” box in the bottom left, click the “+” button. Select “Display Capture” and click “OK.” Name your source if you want, then click “OK” again.
Step 4: In the properties window, choose the display to capture and click “OK” to add the source. Right-click “Display Capture,” choose “Transform” > “Edit Transform.” Adjust the “Crop” values as needed.
Step 5: Click the “Start Recording” button in the bottom-right corner of OBS Studio. Your recording will start immediately, capturing only the specified part of your screen.
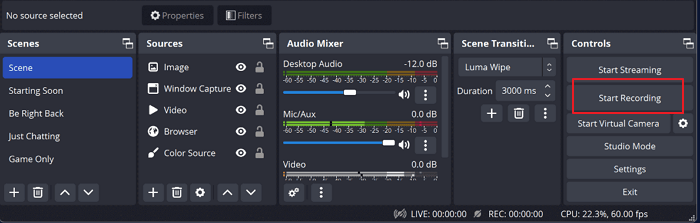
Start Recording in OBS
Step 6: Click the “Stop Recording” button in OBS Studio.
Your video will automatically be kept in the default place to save (usually, this is the Videos folder).
How to Record Part of Screen with PowerPoint
If you know how to use PowerPoint, it can also capture a part of your screen. This makes PowerPoint very useful for creating presentations and tutorials. Here is what you need to do:
Step 1: Open Microsoft PowerPoint on your Windows computer. Then, choose to start a new presentation or select an existing one where you would like to include the screen recording.
Step 2: Go to the slide where you want to insert the screen recording.
Step 3: Click on the “Insert” tab at the top of the PowerPoint window. In the “Media” group, click on “Screen Recording.”
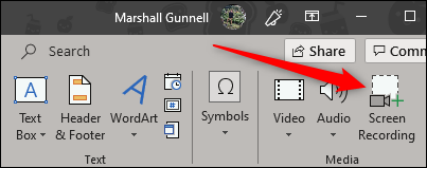
Find Screen Recording Option in the Toolbar
Step 4: After clicking “Screen Recording,” your cursor will turn into a crosshair. Here, you can drag to select the area of your screen you want to record. Or click once anywhere on the screen to record the entire screen.
Step 5: Click the “Record” button in the recording toolbar that appears. PowerPoint will start recording your screen activity immediately.
Step 6: Once you have recorded your screen, click the “Stop” button in the recording toolbar.
How to Record Part of Screen on Mac with QuickTime
People who use Macs already have a powerful tool on their computer for recording what is on the screen. This tool is called QuickTime Player. It is effortless to operate and great for capturing only certain areas of your screen. Here’s how you can do it:
Step 1: Open QuickTime Player. You can find it in your Applications folder or use Spotlight to search for it.
Step 2: Select “New Screen Recording” from the dropdown menu.
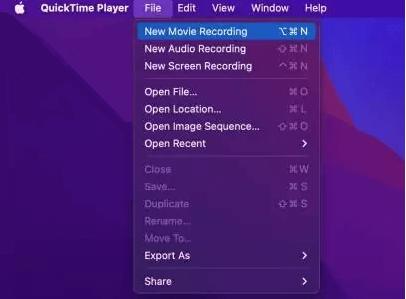
Select New Screen Recording
Step 3: To record part of your screen, click the small arrow next to the record button. After selecting “New Screen Recording,” a small recording window will appear on your screen. Here, you can record the whole screen or just a desired section.
Step 4: Click the “Record” button to start recording your selected screen area. If you make a record part of the screen, you drag the mouse to select the area you want to capture.
Step 5: Click the stop button in the menu bar or press Cmd + Ctrl + Esc.
Step 6: Click “File”> “Save” to save your recording to your desired location.
Frequently Asked Questions
We’ve got you covered with answers to some common questions:
Why do you need to record part of the screen?
Recording a portion of your screen is not just for showing software features or capturing gaming moments, but also for creating unique and engaging tutorials. This feature allows you the creative freedom to present your content in a way that suits your style.
How do I record my screen and audio in Windows?
For high-definition recordings without watermarks, Screenify is excellent for screen clips and webcam videos. Alternatively, Xbox Game Bar and OBS Studio offer built-in options for easy and advanced recording, respectively.
Final Thoughts
Exploring how to record part of your screens on Windows and Mac is very exciting! Tools above offer many opportunities to show creativity. Whether you want to show off gaming victories, give tech advice, or help others with step-by-step guides, these tools will be helpful, too.
So go ahead and try out different choices until you find the one that suits your needs best. Prepare to make exciting videos that show your abilities and understanding. Let your imagination run free and begin capturing your screen journeys now!
Free Download * 100% Clean & Safe

Senior writer of the iMobie team as well as an Apple fan, love to help more users solve various types of iOS & Android-related issues.
Product-related questions? Contact Our Support Team to Get Quick Solution >
