How to Record Audio from PC
Do you want to know how you can record audio from pc? This article allows you to use built-in recorders or third-party programs. We’ve also given a detailed step-by-step guide on operating these programs to record audio from pc.
You may wish to record the audio from an online Zoom, Google Meet, or Teams meeting. Or maybe you want to record your favorite music or a podcast. There are many circumstances where you need to know how to record audio from pc.
And that’s what we are going to cover here!!!
This article provides an in-depth guide on recording the audio of your choice from your pc. You can use built-in programs like Voice Recorder or explore various third-party apps.
But before that, let’s start with the basics. Can you record audio from your PC? Here we go with the answer.
Can You Record Audio from PC?
Yes! You can easily record audio from your PC. And the capability is built into most modern computers. Whether you’re capturing system sounds, voice-overs, or audio playing on your computer, there’s a way to record it.
But before we move towards how to record audio, here are some prerequisites for you.
- A PC with a sound card
Most modern computers come equipped with one.
- Built-in or external microphone
You require a microphone to record your voice or external sounds. An external microphone is preferred to ensure the high quality of your audio.
- Recording software
A recording software is also required. There are both free and paid options available.
- Check volume levels
Before recording, make sure all sources are audible and balanced.
Got everything?
Now let’s see how to record the audio.
How Do I Record Audio on My Windows Computer?
There are many methods to record audio from PC. You can use third-party tools like Screenify. Or, you can opt for the in-built recorders of Windows and Mac.
Windows Computers come with a built-in app called Voice Recorder. But it’s only available in Windows 10 or 11.
On the other hand, Mac users can use a software called QuickTime to play video files and record as they like. QuickTime also comes pre-installed on Mac and is quite versatile in features.
Now that we know which apps are available for audio recording let’s go in depth. We’ll now show you the step-by-step guide for each of these apps.
Starting with the awesome Screenify.
How to Record Audio from PC via Screenify
Screenify can record your system’s internal and external sounds. It is not your average screen recording program but an all-inclusive service that meets your present-day recording requirements.
Screenify offers customers unparalleled clarity in audio and video recording without any time limits or watermarks. Specifically designed for iMobie users, it promises a valuable experience with its versatile features.
Moreover, this program is 100% free and easy to record audio on a PC.
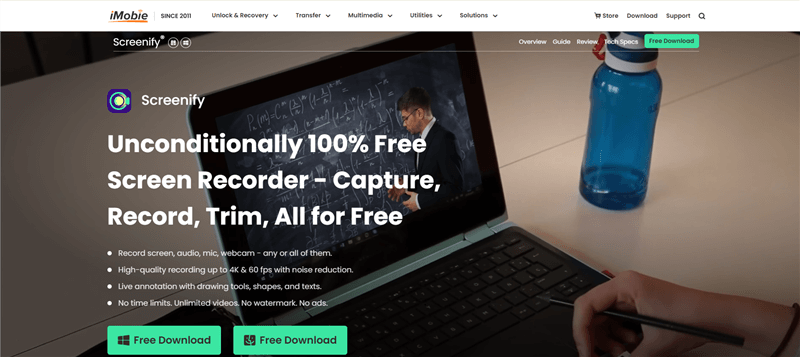
Screenify Website Interface
Key Features
Key features of this program include:
- Webcam and screen recording with or without audio
- Available for both windows and mac
- High-quality video recordings of even 4K resolution
- Record audio/video without any time limit or watermark.
- One-click save function.
Now let us look at the guide on using Screenify for recording audios of your choice.
Steps to Record Audio from PC via Screenify
Here are the steps to record audio from PC with Screenify.
Step 1. Download and Install Screenify on Computer.
Step 2. Launch Screenify on your computer, and select Record screen mode.
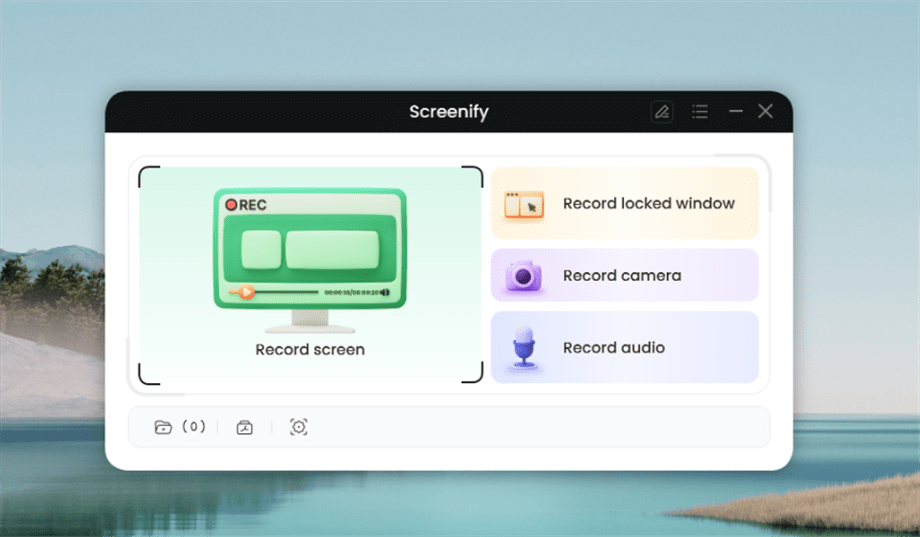
Select Record Screen Mode
Step 3. Configure Recording Settings aims to configure settings like system audio before recording.
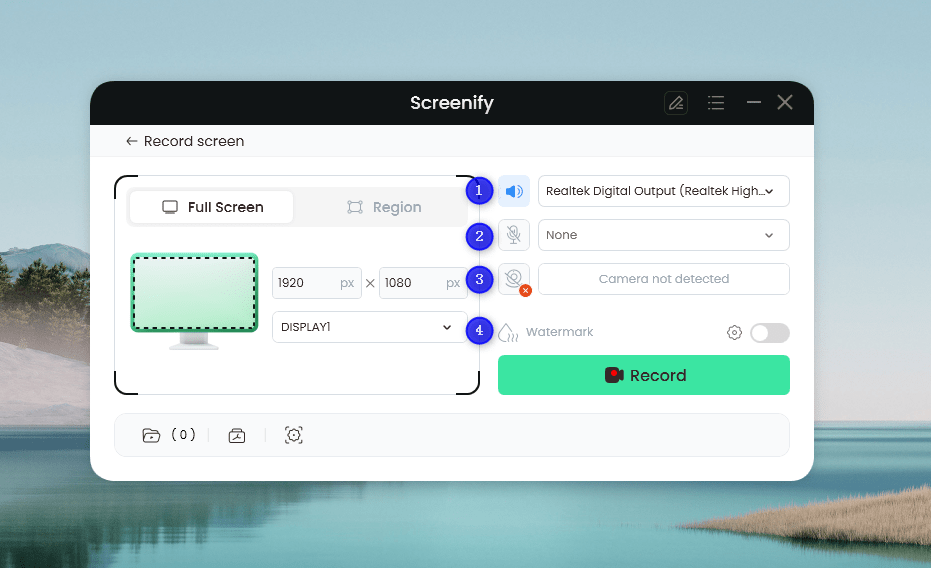
Set Configure Recording Settings
In this setting menu, you can:
1 Choose the System audio.
2 Choose the Microphone you want to record.
3 Choose the Camera you want to use.
4 Choose whether to add a watermark.
Step 4. Select Recording Screen.
Option 1. Full Screen Record
Please select Full Screen mode and choose the display you need to record. Hit Record button to initiate recording.
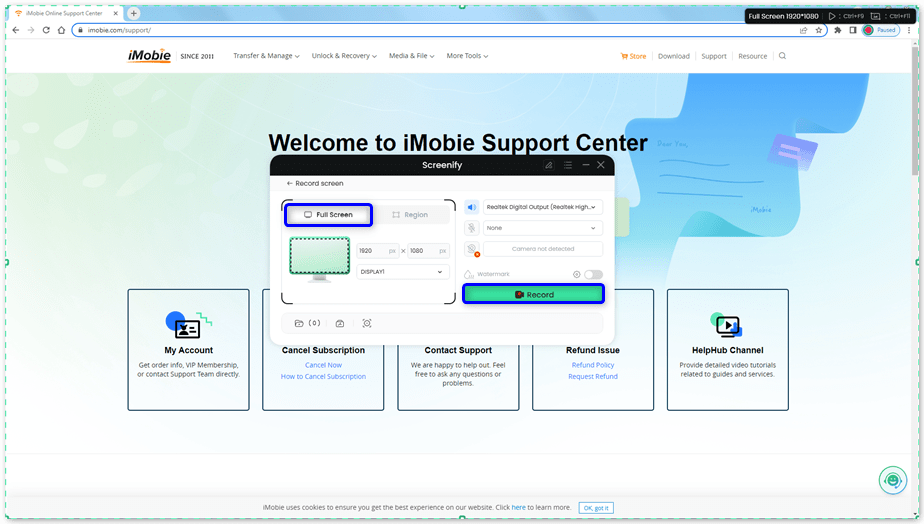
Select Full Screen
Option 2. Region Record
To record region, you need to manually select the recording area. After selection, you can still adjust the selected area. It supports customize selection, full screen, and proportional selection based on common social media dimensions.
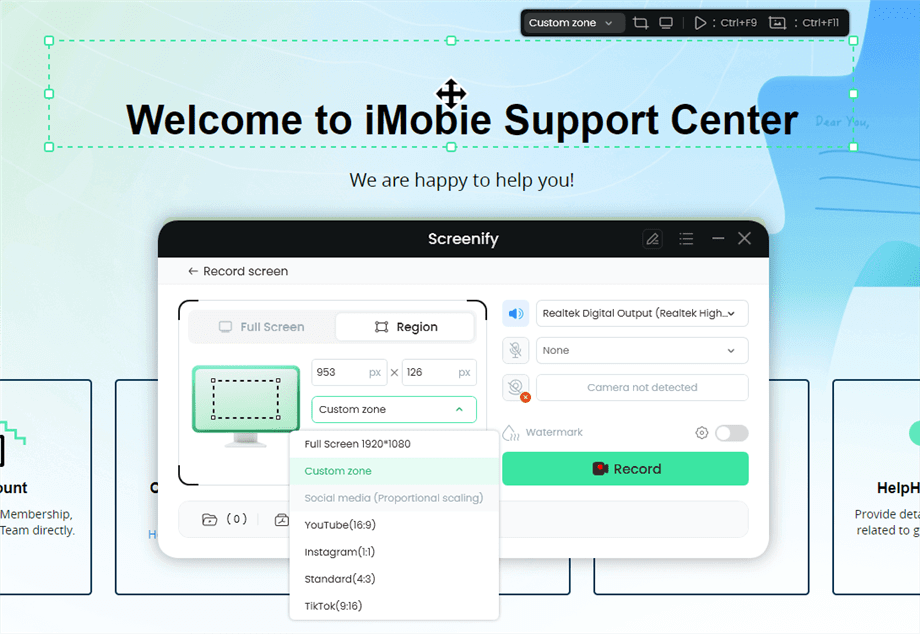
Record Region
Step 5. Wait for the Recording Countdown.
There is a 3-second countdown to help you prepare the recording after you are ready to start recording.
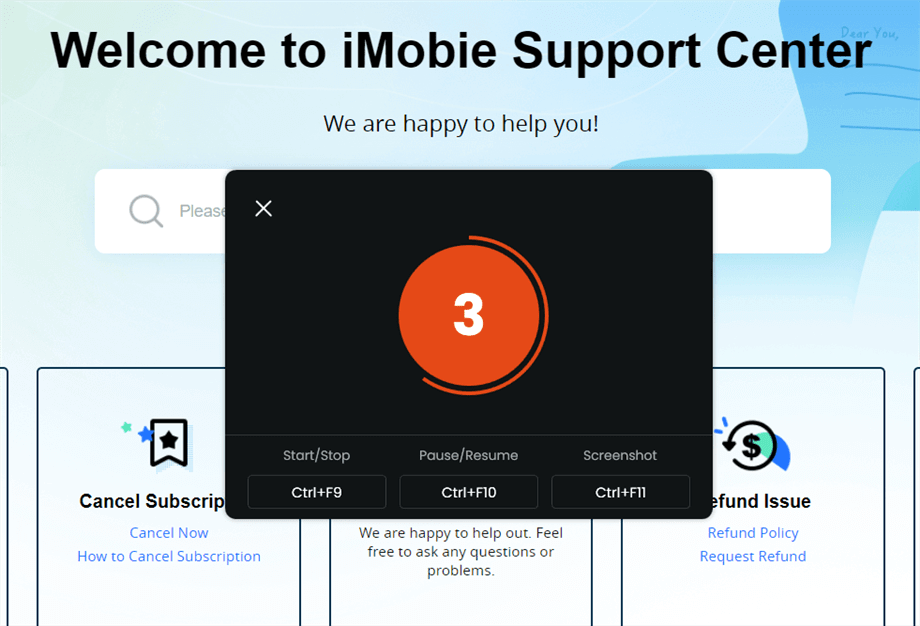
Wait for the Recording Countdown
If you would like to see a recording countdown before your recording starts, you can enable the countdown option. Or you can tap it off. View this post to know how to set the countdown option.
Step 6. Start Recording.
The recording will begin after a 3-second countdown. You can make annotations on the recording interface during the recording.
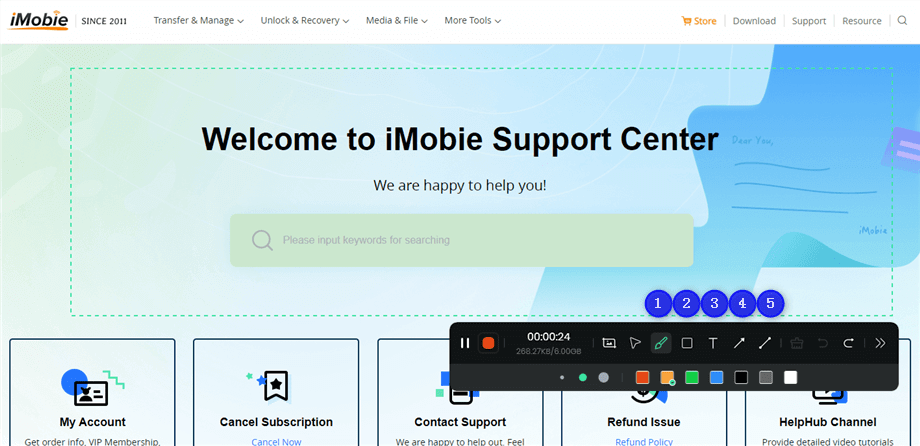
Annotate the Screen during Recording
With the toolbar, you can add the annotation in the screen:
1 Brush: Draw freehand on the screen recording interface to highlight or illustrate specific areas during the recording.
2 Rectangle: Draw rectangular shapes on the screen recording interface.
3 Text: Add written notes or labels directly onto the screen recording interface.
4 Arrow: Draw arrows on the screen recording interface to point out and emphasize specific areas.
5 Line: Draw straight lines on the screen recording interface to underline or connect specific points.
Step 7. Record Screen Process Completed.
When the recording is completed, you can click the red Stop button to end the recording. Your recorded files will be displayed. From here, you can preview and manage the recorded content as needed.
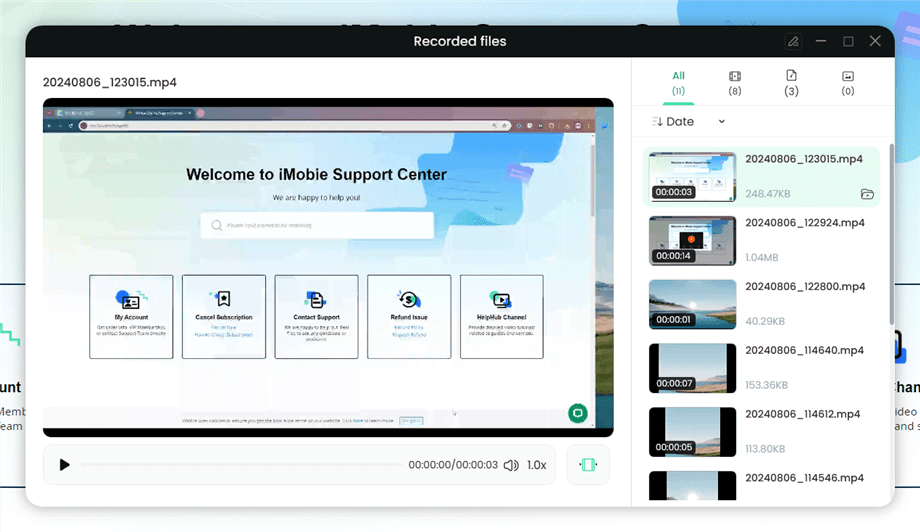
Preview the Recording
You may also want to know: How to screen record protected videos
Screenify provides a free and simple way to record audio from a PC easily. However, you can still explore the built-in apps if you do not want to use a third-party app to record your requisite audio.
Let us see how to do that further in this article.
How to Record Audio from PC with QuickTime
Quicktime is a pre-installed software available for Mac users. This program comes with features that go far beyond mere video playback. Some of the features include the following:
- Play and edit videos.
- Record videos.
- Record audio.
- Extract sound from a video.
Now, let’s look at the steps to record audio from pc with this program.
Steps to Record Audio from PC via QuickTime
The various steps of recording audio with Quicktime have been described below:
Step 1. Launch QuickTime Player by going to the Applications folder on your PC.
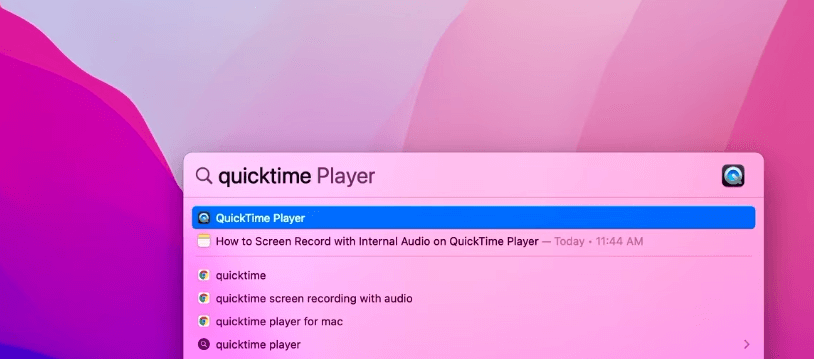
Launch QuickTime
Step 2. Now click on the file on the left side of the menu bar and click on the “New Screen Recording” option.
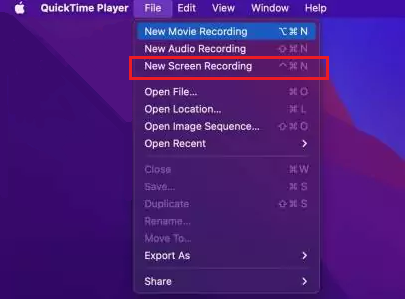
Choose New Screen Recording
Step 3. A recording window with a bar at the bottom will be visible on your screen. Here you can choose whether to record the entire screen or a part of it. Now, click on “Options” to select the audio source.

Click Options
Step 4. Here, you need to click on the “built-in microphone” to record external audio or any other external audio source of your choice. Here you can also choose whether you want to show your mouse clicks.

Select Audio Source
Step 5. Finally, hit the “Record” button on the bottom right to start recording.
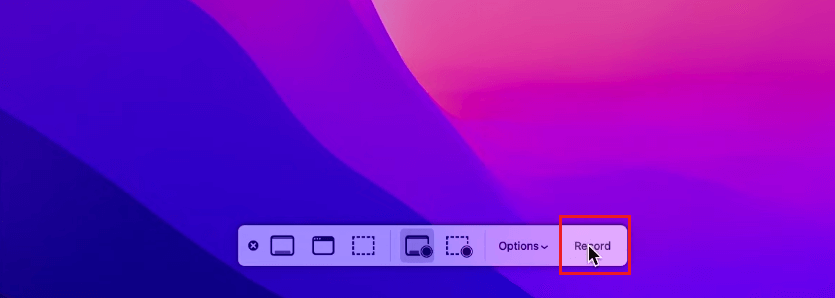
Start Recording
So that is how you record audio from the Mac PC.
Now let’s not forget about Windows users. They can also use a built-in app to record audio from PC.
How to Record Audio from PC with Voice Recorder
Voice Recorder is a built-in program in Windows computers. It was added with Windows 10 and is now available on Windows 11.
This program has the following features:
- Trimming and exporting the tracks.
- Available only for Windows 10 and 11.
- No download is required.
Now, let’s look at the steps to record audio from pc with this program.
- Steps to Record Audio from PC with Voice Recorder on Windows
Follow the steps described below to record audio from PC with Voice Recorder.
Step 1. In the Windows search bar, type Voice Recorder to find the app and open it.
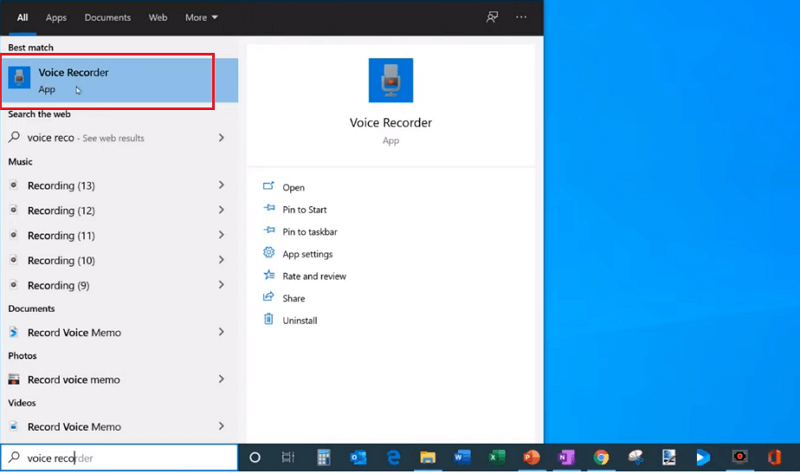
Open Voice Recorder
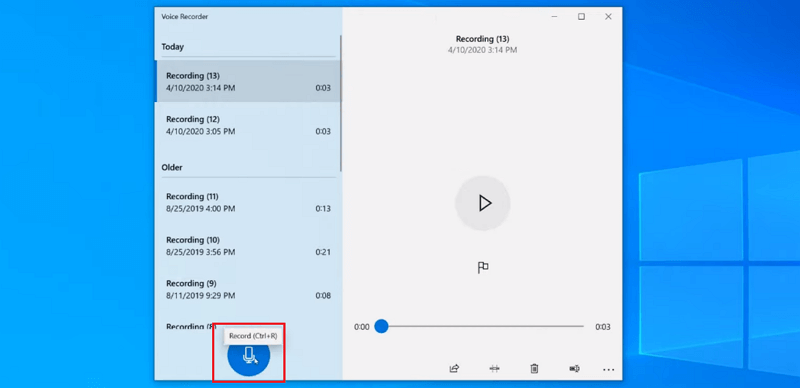
Step 2. Click on the blue microphone button to start your recording.
Start Recording
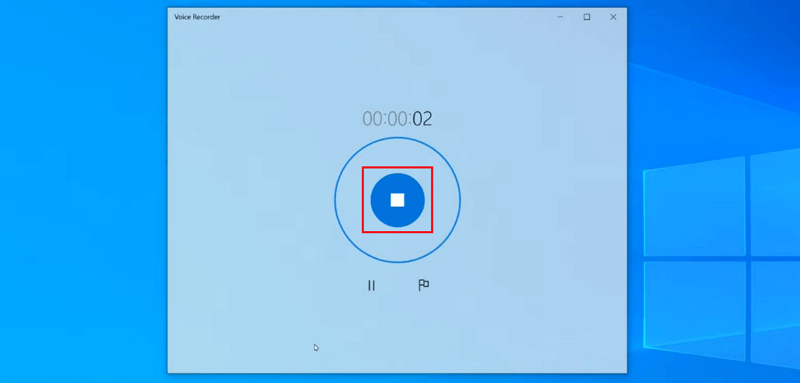
Step 3. When done recording, click the blue stop button to stop & save your recording.
Finish Recording
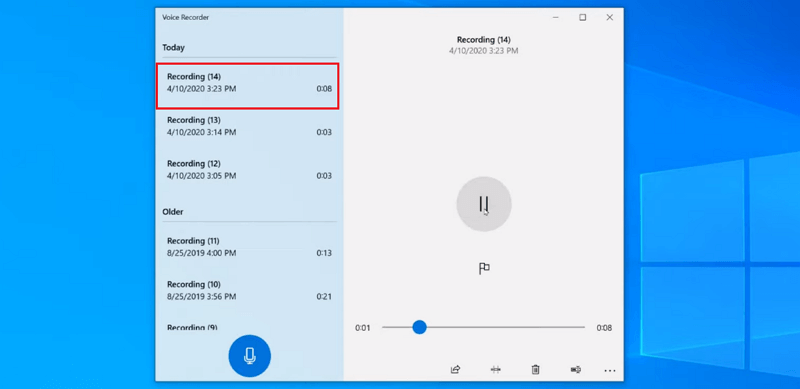
Step 4. Now, you can see the recorded file on the top left side of the recorder. Here you can rename or share the file.
Save Recording
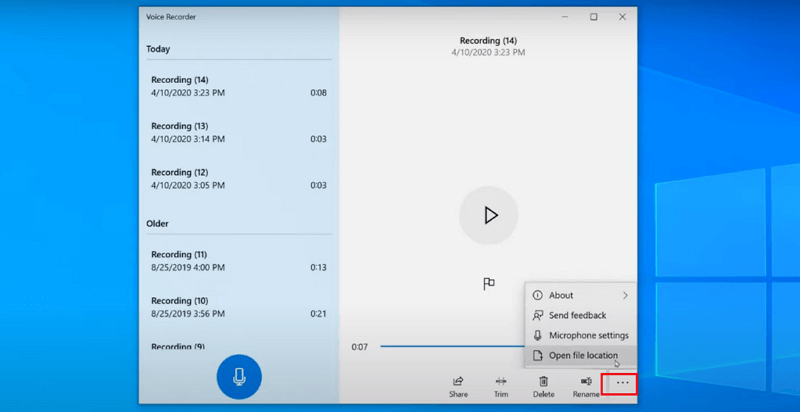
Step 5. You can click on the three dots in the bottom right corner of the recorder to access the location of your recording on the PC.
Access File Location
These were the simple steps for recording audio on a Windows computer.
Now before moving on to the conclusion, let’s take a look at the FAQs about how to record audio from PC.
FAQs
1. Can you record internal audio on PC?
Yes! You can record internal audio on a PC with the help of built-in apps like Voice Recorder for Windows and QuickTime for Mac. You can also use free third-party apps like Screenify. These apps let you record not only the audio from your microphone but the system sounds as well.
2. How do I record audio on my computer Windows 10?
Recording audio on a Windows 10 computer is quite effortless. And you don’t need to download additional software for it.
Windows 10 comes with a pre-installed app called Voice Recorder. You can access it by clicking the start button and typing “voice recorder” in the search bar. In the app, record by clicking on the blue record button.
3. How can I record internal audio without external audio?
You can record internal audio and not external audio by choosing the correct output sound source.
For example, in Voice Recorder app for Windows, you can enable system sound as the source of sound to record only the internal sound.
Conclusion
So, that was how you can record audio from PC. Either with the help of built-in apps like Voice Recorder & Quicktime or free third-party apps such as Screenify. There are various options to choose from.
If you are a user of an older version of Windows or are not content with your built-in apps, you can always choose Screenify. It offers a variety of features and is not complicated to use. So, be it for an interview or a podcast, feel free to record audio of your choice.
Free Download * 100% Clean & Safe
Product-related questions? Contact Our Support Team to Get Quick Solution >

