How to Use QuickTime Player with Audio on Mac
Whether you’re a business owner or a technical support manager who wants to create instructional videos for employees, you might need to record your Mac’s screen. There are multiple tools for recording screens on Mac, but they are not as simple and reliable as QuickTime player! QuickTime player lets you watch movies, trim and edit video clips, and screen record your Mac screen effortlessly.
Knowing how to use QuickTime Player on Mac enables users to capture webinars, meetings, online classes, and even important video calls for future reference. Want to know how to screen record on Mac with audio using QuickTime Player? This detailed guide will explore all the ways of QuickTime screen recordings with audio and its best alternative, Screenify, to help users make an informed decision. Let’s delve into further details!

QuickTime Screen Recording
Also Read: Best screen recorders for Mac
Part 1. Is QuickTime Player Free to Use?
Yes! QuickTime Player is completely free to use. This player comes pre-installed on all the MacOS and serves as an all-in-one tool to play, trim, and rotate the video files. However, QuickTime Player has been limited in its features since the launch of MacOS 10.5. Currently, it still comes as a built-in video player on Mac and can extract audio from video and screen record Mac apart from basic trimming and rotating video clips.
Part 2. How to Record Screen with QuickTime Player
Want to record your gameplay sessions or presentation lectures? Record the Mac screen with high-quality visuals to help viewers understand and relish what’s happening on the screen. Multiple options are available when it comes to recording Mac screens but using QuickTime player is reliable, fast, and efficient.
Key Features
- QuickTime player is a built-in video player and screen recorder tool- no need to install third-party tools.
- QuickTime Player allows you to edit videos, trim video clips, and rearrange them effortlessly.
- Record screen on Mac in high quality alongside microphone audio.
- Record Mac screen with system audio using an extension.
- Record screen in 4K quality at 60 FPS.
Steps to Record Mac Screen via QuickTime Player
Here’s a complete guide to screen recording Mac using the QuickTime Player:
Step 1. Launch QuickTime Player on Mac.
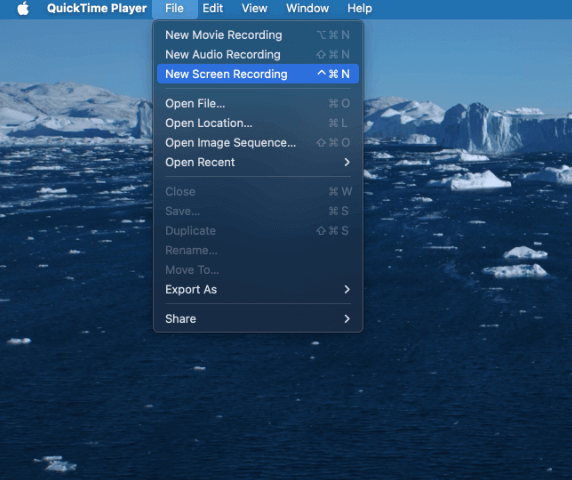
Step 2. Click on File and choose “New Screen Recording” from the drop-down menu.

New Screen Recording in QuickTime
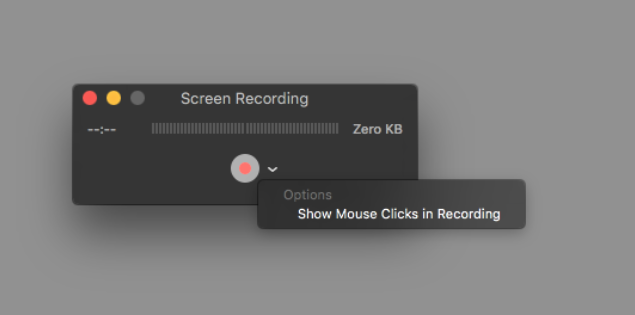
On MacOS Mojave and below: A Screen Recording window will appear on the Mac screen. Click the down arrow and select “Show Mouse Click in Recordings” to display the cursor or mouse movements.

Record Mouse Clicks in QuickTime Recording
On MacOS Catalina and Higher: Choose “Record Entire Screen” or “Record a Portion.”

Choose Recording Mode in QuickTime
Step 4. Click the “Record” button (Red) to start the screen recording process.
Step 5. Once the recording has been completed, click on “File > Export As” and then choose a quality. You can choose from 480p to 4K resolution.

Export Recorded Video in QuickTime
That’s how to screen record on Mac using the built-in QuickTime player tool.
Part 3. QuickTime Screen Recording with Internal Audio
Recording the screen alongside audio lets users understand the video better and comprehend what’s happening in front of their eyes. However, Mac’s privacy guidelines do not allow users to record system audio alongside screen recording via QuickTime player. You can still easily screen record Mac audio alongside microphone audio. Let’s find out how to perform QuickTime screen recording with internal audio:
Steps to Record Mac Screen with Microphone Sound
Here are the detailed instructions to record the screen with Microphone sound via QuickTime Player:
Step 1. Launch QuickTime Player on Mac. Navigate to File > New Screen Recording.
Step 2. Click on the down arrow and choose Microphone audio source. Press the “Record” button to initiate the recording process with Microphone sound.

Record Microphone in QuickTime
Steps to Record Mac Screen with System Audio
Want to record your gameplay sound or other system audio via QuickTime Player? Here’s how to do it:
Step 1. Install the Soundflower (2ch/64ch) extension on your Mac. Navigate to “System Preferences” and then “Sound”.
Step 2. Choose “Soundflower (2ch/64ch)” as the output audio source.

Choose Internal Speakers in QuickTime
Step 3. Open QuickTime Player. Navigate to File > New Screen Recording. Choose “Soundflower (2ch)” from the down arrow.

Choose Internal Speaker in New Recording
Part 4. Best Alternative to QuickTime Player on Mac
Although QuickTime Player is a built-in tool for recording screens on your Mac, it has some limitations, such as a lack of advanced features like noise reduction and complications while recording system audio. Worry no more! We recommend using Screenify – a professional screen recording tool for Mac- that allows users to record screens effortlessly with system audio, microphone, or both.
Screenify has no time limit for recording—record as much as you can! Moreover, you can screen record on Mac for free without any watermark. One of the most brilliant features is its multiple-screen recording modes, such as an entire screen or a region. Additionally, no need to worry about the lags and poor-quality screen recording as Screenify allows users to screen record Mac in 4K resolution at 60 FPS.
Key Features
- Record screen on Mac with webcam alongside system audio, microphone, or both.
- You can always set whether to have a watermark or not.
- You can trim, adjust the speed volume, and even reduce the noise at the end.
- You can export screen recordings in various formats.
- The tool is completely free to use.
Conclusion
Screen recording Mac is beneficial for a variety of purposes, such as capturing a step-by-step instructional video, recording a presentation lecture, software demonstration, or product development video. You can utilize the QuickTime Player— a built-in screen recorder tool for Mac— that allows users to record screen effortlessly. However, screen recording on Macs with system audio has always been an issue with the QuickTime player.
We recommend using Screenify as an alternative to QuickTime Player for screen recording on Mac. Screenify allows 4K quality recording at 60 FPS with no watermarks, unlimited time limit, and basic editing functionalities such as trimming, noise reduction, and more.

Joy Taylor


Senior writer of the iMobie team as well as an Apple fan, love to help more users solve various types of iOS & Android-related issues.
Screenify
AnyEnhancer
FocuSee
Vozard
AnyMiro
AnyMirror


