Troubleshooting Guide: OBS Virtual Camera Not Showing up
OBS Virtual Camera not showing up on the screen can interrupt the screen recording process. This guide will explore the 6 best ways to resolve the issues— from updating OBS to adjusting the misconfigured settings. Read to learn more!
Part 1:Introduction
OBS Studio is a software application that records and streams your PC’s screen. You can record Windows content, applications, games, and cameras on third-party software such as Zoom, Skype, Discord, and more. OBS Studio’s virtual camera option integrates the OBS scenes with other third-party tools, enabling users to record their actions on a webcam.
Sometimes, the OBS virtual camera might not work. There can be various culprits to this problem, including faulty system settings, outdated OBS version, permissions denial, resolution issues, and more. No matter the cause, we have got you covered with a solution. This detailed guide will cover the most common causes of OBS virtual camera not showing up and its solutions. Let’s delve into further details!
Part 2. Why Is the Virtual Camera Option Not Showing in OBS?
The first step in solving the problem of the virtual camera not showing in OBS is to find the root cause. There can be several reasons for this issue— from output settings to outdated versions. When the virtual camera disappears from third-party applications, you cannot record the webcam using that software. Let’s explore the common causes of OBS virtual camera not showing:
- Outdated or Obsolete OBS Version
One of the primary reasons why the OBS virtual camera is not showing up is the outdated version. The outdated OBS version will not be equipped with the necessary patches or configurations to work smoothly with the virtual camera.
- Permissions Denial
Permission denial is another cause of the OBS virtual camera not operating properly. The permission barrier can hinder the virtual camera from appearing.
- Faulty Settings
Misconfigured or faulty OBS settings can also ruin the normal functioning of OBS Studio, causing the virtual camera to disappear.
- Conflicting Software
Sometimes, other third-party screen recording tools can interfere with the regular operation of OBS Studio. Therefore, it is suggested that the other tools or applications be forced to close or uninstall.
Whatever the cause, the OBS Studio virtual camera glitch can hinder the smooth operation of the recording tool and prevent users from capturing the webcam in third-party apps such as Skype, Discord, or Zoom. Once you have figured out the error, you can try the below-mentioned solutions to fix the OBS virtual camera not showing the issue:
Part 3:Fix OBS Virtual Camera Not Showing Up
If you have trouble seeing the virtual camera on your screen, a step-by-step approach is needed to resolve the issue. We have compiled all the methods to fix the virtual camera not showing up— from restarting OBS Studio to changing output settings. Let’s explore:
Way 1: Restarting OBS
The first and foremost solution to fix the virtual screen not showing up is to restart the OBS Studio. Restarting OBS Studio can fix most issues, such as misconfigured settings, system resources not loading, etc. Restarting OBS Studio can also help you get a fresh start, which can resolve multiple issues on its own, such as a black screen or more, apart from the virtual camera not showing up. Here’s how to restart OBS Studio:
Step 1. Close the OBS Studio application. Alternatively, you can force-close it via the task manager.
Press the Ctrl + Shift + Esc to open the task manager. Select OBS Studio from the list and click on “End Task.”
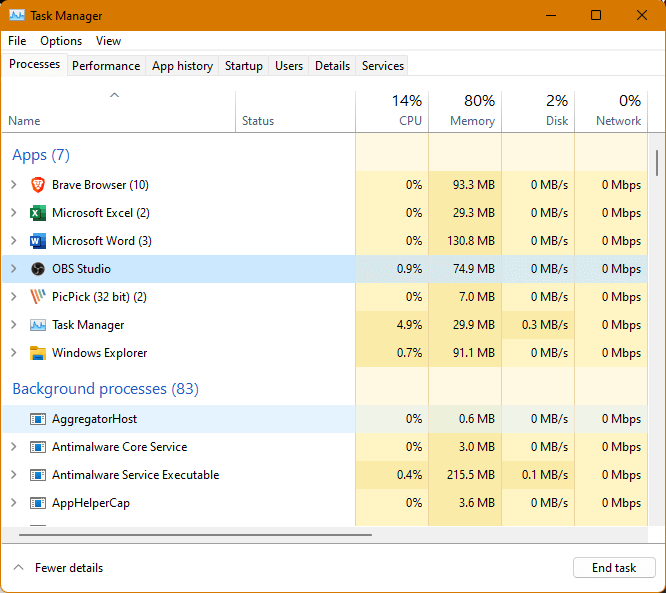
End Task
Step 2. Relaunch OBS Studio on your PC.
Way 2: Recheck Virtual Camera
If the virtual camera is crossed, showing a black screen, or entirely invisible, you can recheck the settings of OBS Studio’s Virtual Camera. Ensure all the virtual camera settings are configured and activated from the interface. Moreover, OBS Studio allows you to create and manage the scenes and source from the settings, and you can adjust the camera output accordingly. Check if the camera settings will enable you to show the OBS Virtual Camera.
Follow the step-by-step guide below to set camera output to OBS Virtual Camera and enable it from the settings.
Step 1. Launch OBS Studio on your PC.
Step 2. Click “Start Virtual Camera” from the Controls section on the right pane.
Step 3. Navigate to “Settings” by clicking the gear icon and adjusting the Output Type and Output Selection.
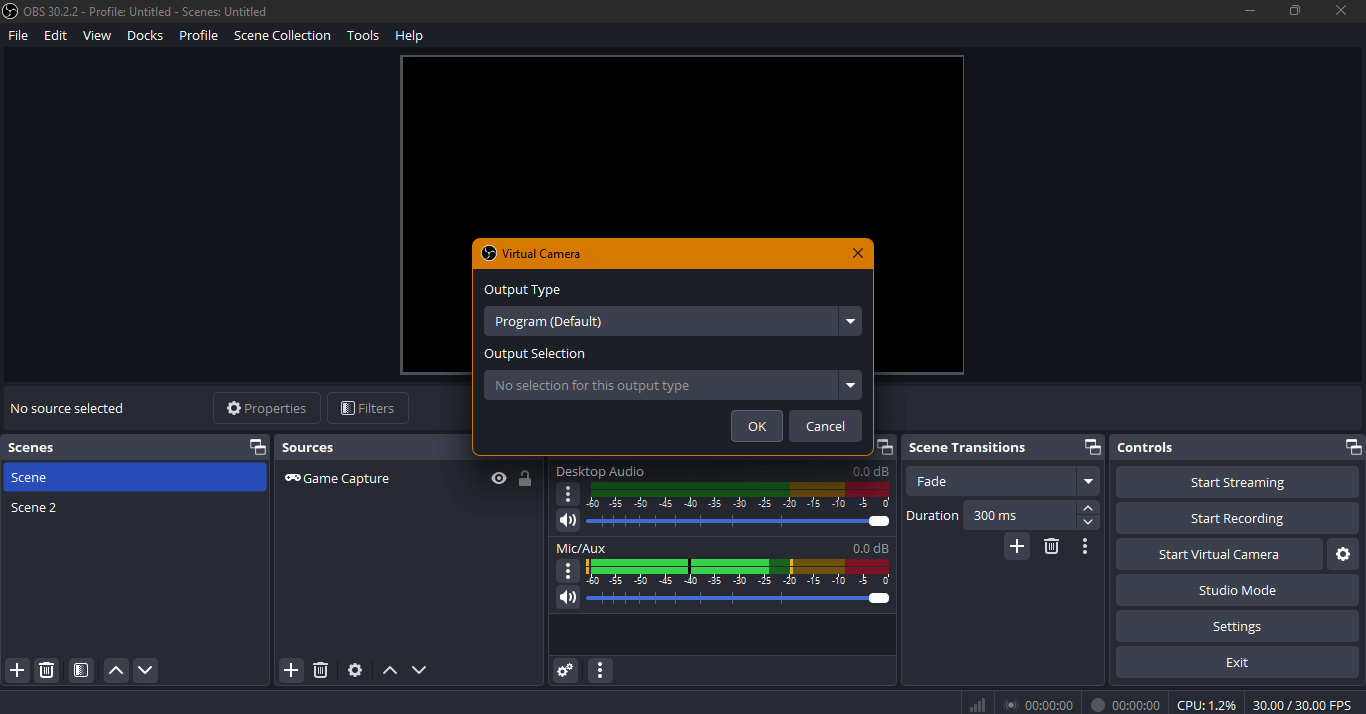
Adjust Settings
Way 3: Change OBS Studio Output Settings
Sometimes, the output settings of OBS Studio are not in synchronization with the system, which can cause issues with the virtual camera. For example, the video bitrate, audio bitrate, or encoder settings you might have adjusted are not supported by your system’s specifications. Moreover, you might have set up the default parameters via the auto-configuration wizard while installing the software on your PC. Customize these output parameters and then check if the virtual camera is now showing up or not.
To adjust the OBS Studio output settings, follow the step-by-step instructions:
Step 1. Navigate to “File > Settings” on your OBS Studio on your PC.
Step 2. Click on “Output” and adjust the parameters.
Step 3. You can adjust the Video Bitrate, Audio Bitrate, Video Encoder, Encoder Preset, and more to resolve the virtual camera not showing up.
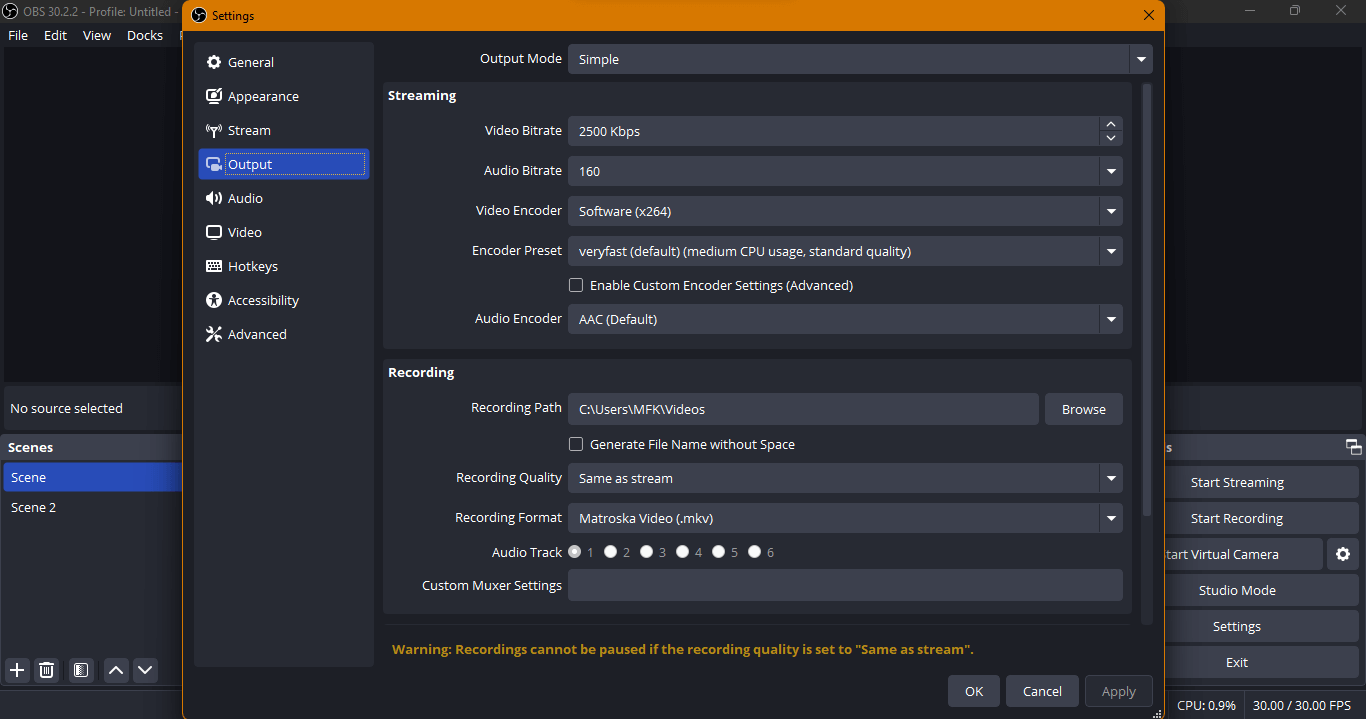
Adjust Output Settings
Way 4: Try a Different Resolution or FPS
It is recommended that the OBS Studio’s resolution and FPS be set as per your system’s specifications. Most of the time, incorrect resolution or frame rate can be the reason your virtual camera is not showing up. Checking and adjusting the output resolution, frame rate, and other settings that match your system’s specifications can resolve the problem.
Step 1. Navigate to “File > Settings” on your OBS Studio on your PC.
Step 2. Click on “Video” and adjust the parameters.
Step 3. You can adjust the Base (Canvas) Resolution, Output (Scaled) Resolution, and common FPS Values.
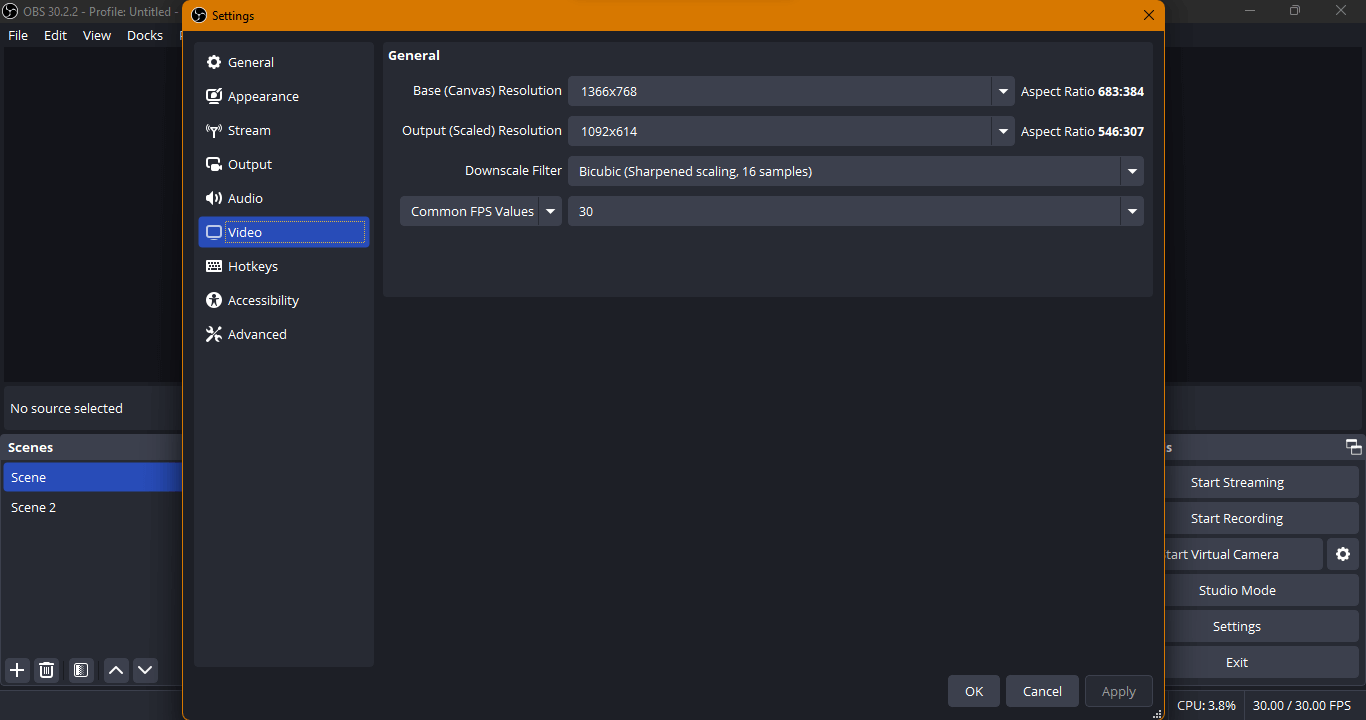
Adjust Video Settings
Way 5: Enable OBS Studio Camera Permissions
Permission denial is another reason virtual cameras do not appear on third-party applications such as Zoom, Discord, etc. When OBS Studio does not have hardware-related access, such as a webcam or microphone, it will not be able to record or access. Therefore, granting permission to OBS Studio for a microphone and camera enables Windows to access both and resolve the issue of the virtual camera.
Here is the step-by-step guide to enable OBS Studio Camera Permissions:
Step 1. Navigate to Windows’s Settings.
Step 2. Choose “Privacy & Security” and then access the “Camera.”
Step 3. Enable “Let desktop apps access your camera” and check if the OBS Studio is in the list on Windows 11.
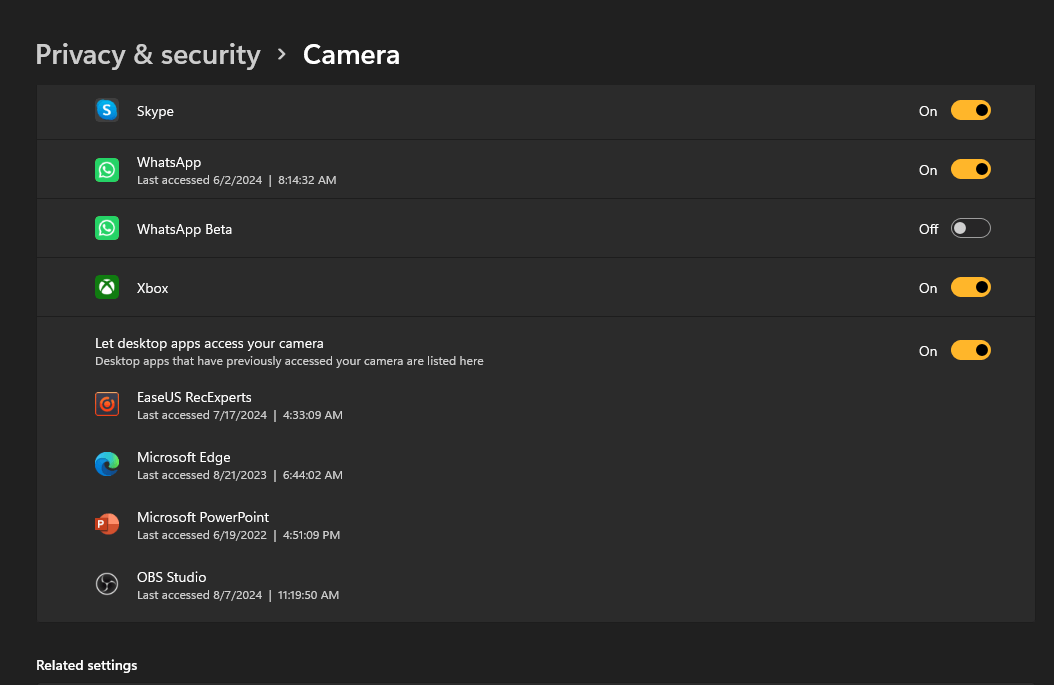
Check OBS
Way 6: Update OBS
The outdated version of OBS Studio can cause virtual cameras to not show up on the screen. The outdated version will not have proper settings configured, or there might be any bugs and issues with that version, causing issues with the virtual camera. Therefore, the developers always try to offer updates and resolve the issues.
Here’s how to update OBS Studio on your PC:
Step 1. Launch OBS Studio on your PC.
Step 2. Navigate to “Help > Check for Updates.”
Updating OBS Studio’s version can resolve the virtual camera not showing up or any issues with plugins or codecs.
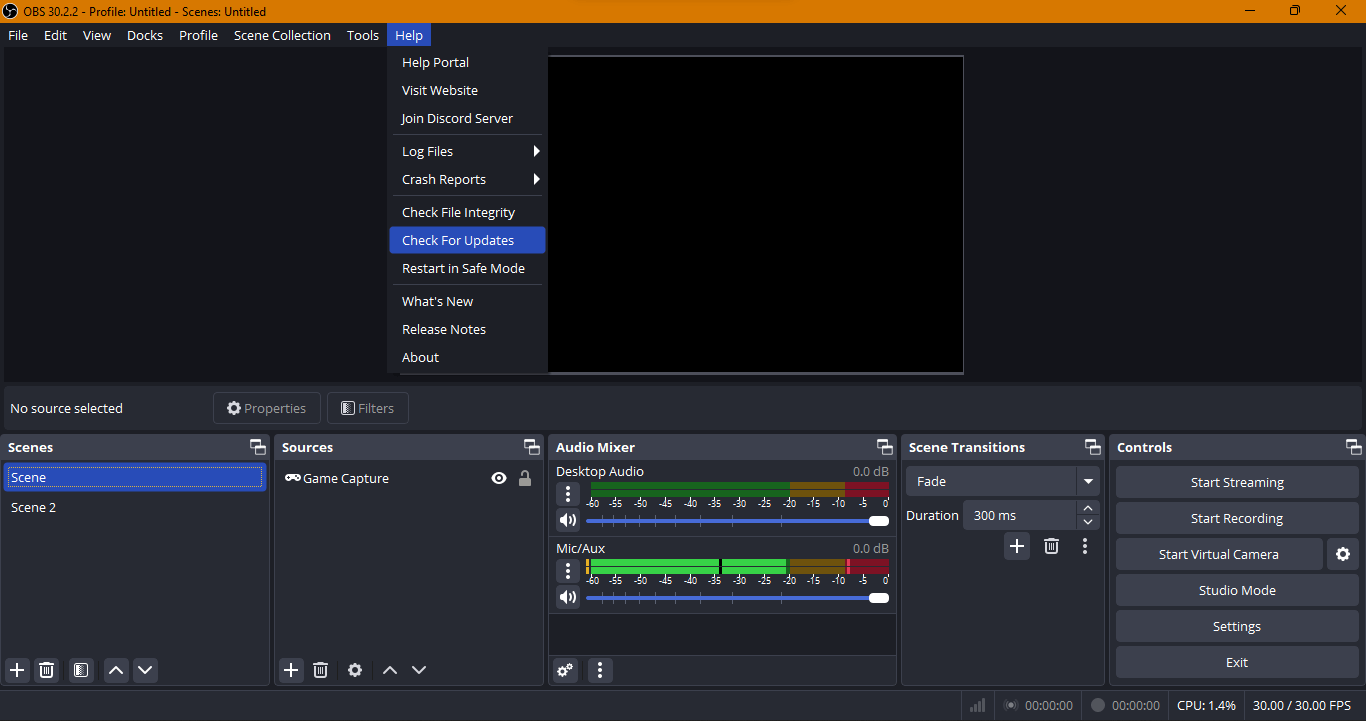
Check for Update
Part 4. Bonus Tip: Record via Free Screen Recording Software—Screenify
If you cannot record the virtual camera on your PC— you can always find third-party software to record the webcam and screen. We recommend using Screenify— a free 4K screen recording tool with multiple recording modes. You can record the entire screen or a region, depending on your preferences. Whether you want to record course, instructional, or tutorial videos, you can utilize the 4K resolution at 60 FPS settings to capture webcams and screens.
This recording tool offers a lock screen window option for both Windows and Mac. It enables you to capture content from the currently opened application or window. Like the virtual camera, you can also record the webcam alongside a desktop/laptop screen. Screenify also enables users to record audio from the system and microphone. The best part is that you can adjust the volume of both audio input sources to make a perfect blend.
Free Download * 100% Clean & Safe
| Key Features | Pros | Cons |
| You can capture audio from both sources, i.e., microphone and system audio. | Good recording quality (4K, 60 FPS) | Lock window recording does not support camera recording |
| Record your screen in outstanding 4K quality at 60 frames per second (FPS) with no lags and distortion. | Multiple screen recording modes | |
| Minimize the noise level with a noise reduction feature to avoid background disturbances. | Both system and microphone sound recording | |
| Advanced editing features such as noise reduction, video trimming, and marking tools offer convenience. | Noise reduction |
Part 5. Conclusion
The video camera feature on OBS Studio can help professional or content creators capture the webcam in third-party apps like Skype, Discord, or more. OBS virtual camera not showing up on the screen can prevent users from recording presentation-based lectures, conferences, and meetings. Sometimes, issues with a virtual camera can ruin the recording process. Try the solutions mentioned above to fix the virtual camera not showing up on the screen. We recommend using Screenify— a 4k screen recording tool that allows users to capture 60 FPS without lags.
Product-related questions? Contact Our Support Team to Get Quick Solution >

