Best Ways to Fix OBS Encoding Overloaded
In this article, we are going to learn about encoding overloaded OBS fix. We will explore why OBS encoding gets overloaded and what needs to be done in this situation. You will get the best ways to reduce the encoding overload. Also, discover some tricks to optimize your PC for better performance.
Are you a content creator striving to deliver seamless live streams to your audience using OBS? No doubt, OBS has become a popular streaming software because of its amazing features. It has a user-friendly interface, compatibility with social platforms, and video editing tools. However, OBS users face different errors, like OBS dropping frames or OBS encoding overloaded errors while streaming/recording your screen.

OBS Encoding Overloaded
In this article, we are going to explore the 5 best ways to fix encoding overloaded! We will also walk through their step-by-step guide.
Why Does OBS Encoding Overloaded?
Before we jump to the solutions, we need to find out why this error occurs. As you can see, streaming is not just about hitting the “Start streaming” button and hoping for the best.
Behind the scenes, your system works hard to capture your screen, audio, and other sources you have set. Then it compresses and encodes all the digital content to be presentable to the audience. This can cause the OBS system to collapse, showing the Encoding Overloaded error.
Causes of OBS Encoding Overloaded error
Some other causes may include the following:
- Your CPU is not capable of processing the usage of OBS software.
- The disk storage is not sufficient for the recording.
- The screen resolution is higher than how it should be.
- There are chances that third-party streaming apps can also affect the OBS performance.
Now that we have understood the causes of this error let’s move to the solutions.
5 Best Ways to Fix OBS Encoding Overloaded
We have explored various methods for Encoding overloaded OBS fix. However, we have picked five effective and reliable solutions. You can go through each of them and decide what works for you.
Method 1. Consider Turning Down Video Settings
The first thing you can try is turning down the video settings. The CPU usage depends upon the output of resolution. The high the video resolution you choose to encode the stream, the more CPU will be used. Therefore, you can reduce the resolution of your video so that your CPU won’t take any pressure.
To turn down video settings, reduce the video resolution:
Step 1: Open the OBS Software and click Settings at the bottom right of the interface.
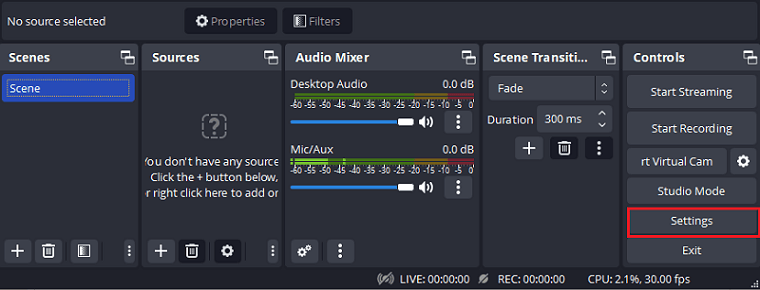
Open the Settings Menu in the OBS App
Step 2: Click Vides > Output (Scaled) Resolution on the left pane and select the lower resolution parameter from the drop-down list.
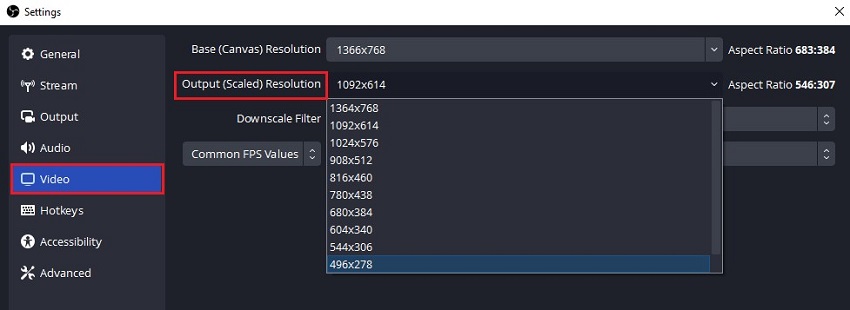
Change the Output Resolution
Step 3: Click Apply > Ok to save the changes.
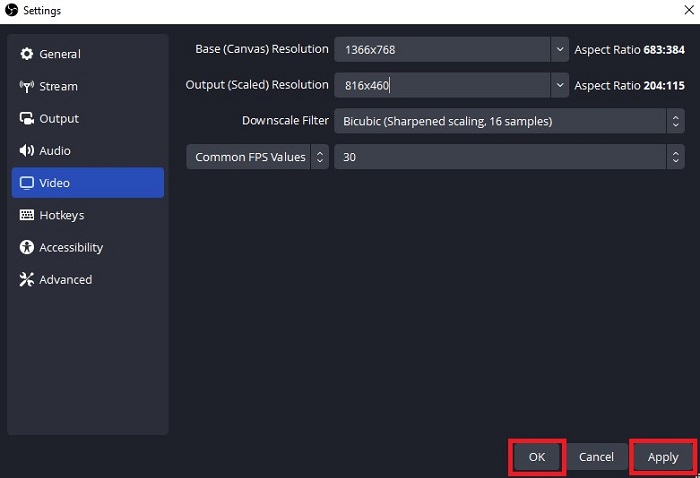
Apply Video Settings
After saving the changes, restart your computer, do live streaming, and see if the error occurs again. If it does, you can try using the next trick.
Method 2. Lower the CPU Usage
The frame rate basically controls the number of frames captured per second from the original game video. It affects the usage of the CPU. So, if you capture the higher frame rate, your CPU wont be able to capture the video game you are streaming.
Reducing the frame rate to 30 or lower than that won’t affect the video. But it will provide the encoder enough room to manage the video.
Steps to tower the CPU usage
Step 1: Open the OBS Software and navigate to the Settings menu.
Step 2: Click Video > Common FPS Values. Then, select 30 or more less from the listed values.
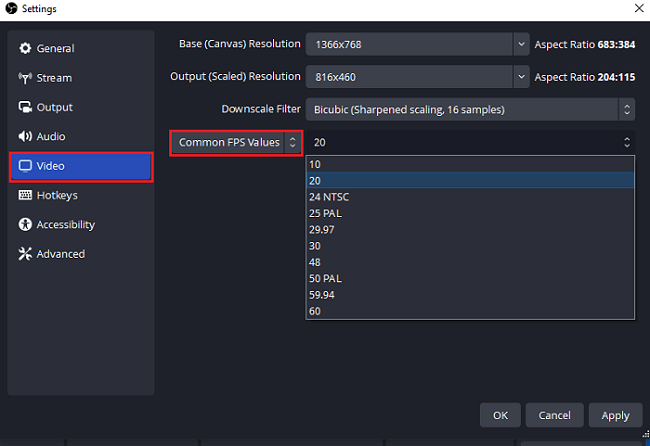
Select the Lower FPS Value
Step 3: Click Apply > Ok to save the changes.
Restart your PC and check if you see the error again. If yes, then you can try the next method.
Method 3. Change Preset to Reduce CPU Cycles
There are different presets available in the OBS. You can set any available preset to balance the CPU usage and video quality. Whereas the default video encodes that OBS use is x264. This preset is fast and balances the CPU usage in most cases.
The preset is the running speed of the encoder. If you use the faster preset, there will be less CPU usage and, ultimately, low video quality.
Follow the below steps to change the preset:
Step 1: Open the OBS app and navigate to the Settings menu. Click Output in the left pane.
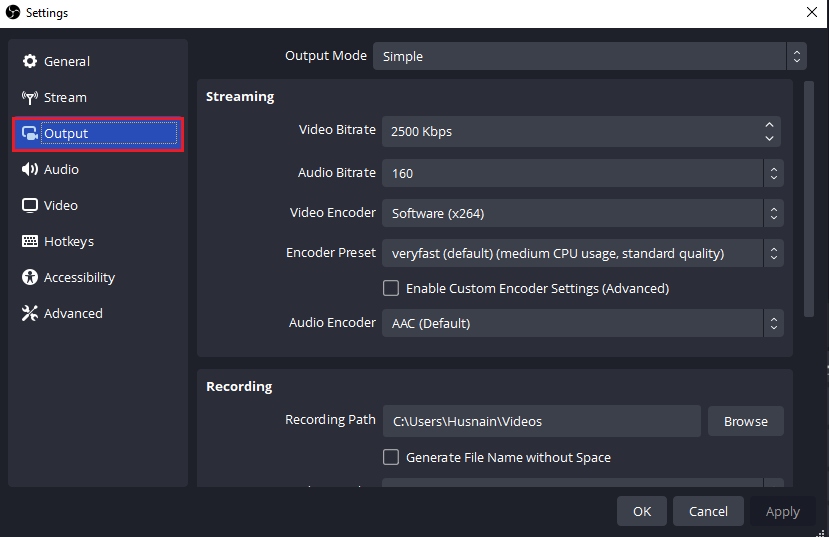
Open OBS Output Menu
Step 2: In the Streaming section, click Encoder preset. You can select Superfast or Ultrafast to reduce CPU usage.
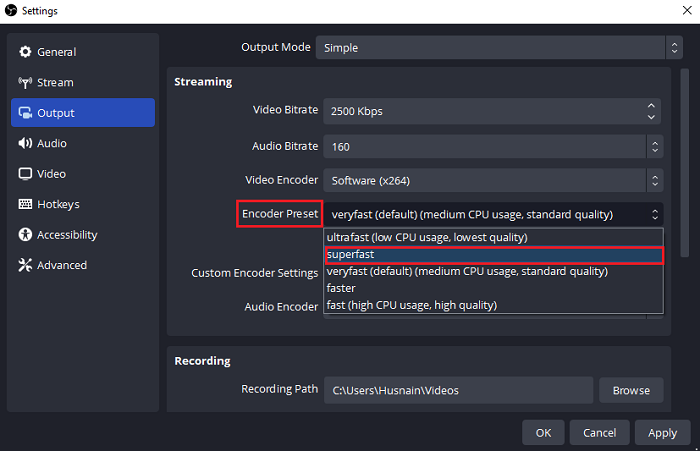
Select Another Encoder Preset
Step 3: Click Apply > Ok to save the changes.
You can try using different presets and see if the issue is resolved. If it doesn’t, then you can try the next method.
Method 4. Use Hardware Encoding as an Alternative
There is one more way to reduce CPU usage, and it is hardware encoding. OBS allows you to use alternate encoders like NVENC, AMF, and Quicksync.
They require less CPU usage, reducing the chances of encoding overloaded OBS fix issues. However, these hardware encoders deliver low-quality videos than x264 encoders.
Steps to use hardware encoders to reduce CPU usage:
Step 1: Go to the Settings menu in OBS and click the Output tab.
Step 2: In the Output menu, click Output Mode and select Advanced.
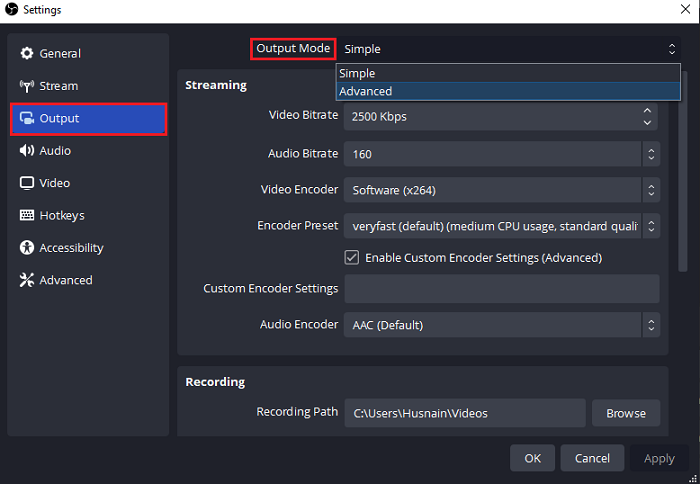
Advanced Output Mode
Step 3: Then in the Advanced section, click Recording to open the menu. Click Video Encoder drop-down menu and select Quicksync H.264. Click OK and Apply.
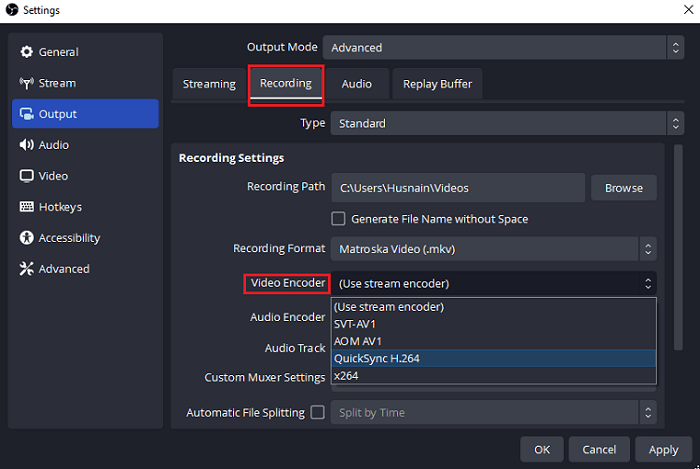
Select Quicksync H.264 as an Alternate
If you don’t see any hardware encoder, it means your Integrated Graphics is not activated in your BIOS. Make sure to activate it first.
However, if you are unable to perform this method, you can try the next one.
Method 5. Change Process Priority
Sometimes you need to optimize your computer to avoid OBS overloaded issues. You can do it by changing the task priorities. The CPU processor works on the basis of priorities. If the OBS is on low priority, it won’t get enough processing power to perform. Therefore, changing the priority will give more CPU use for the OBS process.
Steps to change the priority of tasks
Follow the instructions given below to set the priority of OBS:
Step 1: Press Ctrl + Atl + Del and open the Task Manager from the list.
Step 2: In the Processors tab, locate the OBS app and right-click on it. Now click Go to details in the list.
Step 3: Right-click OBS from the list. Click Set priority and change it from Normal to Above normal.
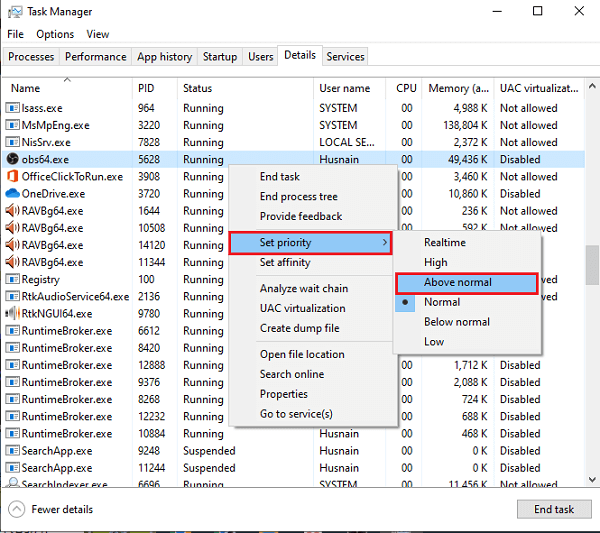
Set the Priority as Above Normal
After changing the priority, you can open OBS and continue with your streaming. We hope it will resolve the Encoder overloaded issue.
Optimize PC for Better OBS Quality or Performance
If you have tried all the above methods and still need an encoding overloaded OBS fix, the issue can be in your PC. It is possible that your PC cannot support gaming and streaming together. You can optimize it and make it suitable for gaming.
Let’s see what you can do to make it happen!
Close Additional Software in the Background
Sometimes third-party Software may conflict with the OBS, slow it down, and cause the error. Hence, try not to use other programs while using OBS. Or, you can close the running programs in the background to avoid encoding overloaded OBS fix.
Steps to close the background programs
Here is how you can close additional running apps in the background:
- Right-click on the Windows logo and open the Task Manager.
- Select the program you want to close. Right-click on it and then click End task. The program will be closed.
If you see any unnecessary Software, you can uninstall it to improve the OBS performance. If this method doesn’t work and you still face the error, you can try another trick.
Turn Off the Game Mode
Being a game, you must have enabled the Game Mode for the best gaming experience. However, the CPU might channel all its resources to the game, not OBS. This can lead to OBS encoding overloaded fix issues. Therefore, you need to turn off this mode to fix the issue.
Steps to Turn Off the Gaming Mode
You can follow the below instructions to turn off Gaming Mode:
- Press Windows + I keys to open the Settings menu of Windows.
- Click Gaming > Game Mode and turn off the Toggle.
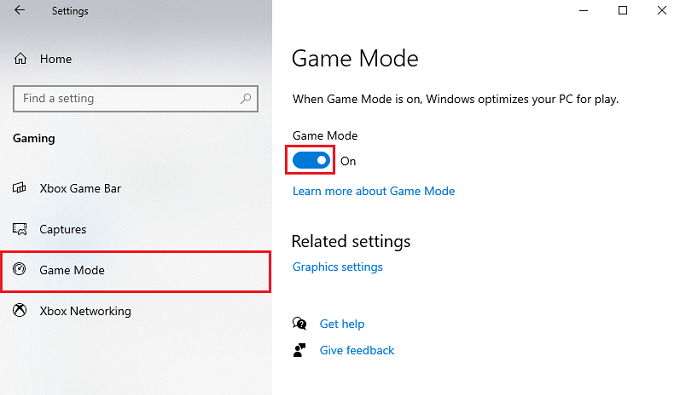
Turn Off Game Mode
Clean Drive to Free Up the Space
Another reason for OBS encoding overloaded is that you don’t have enough space in your drive. OBS requires free space in the hard drive to perform its operations. If it doesn’t get the required space, it stops video streaming.
Steps to clean drive
Here are the steps you can follow to clean your hard drive:
- Open File Explorer/My Computer folder on your PC.
- Right-click on the drive you want to clean. Then, click Properties. It will open a new window.
- Open the General tab and click Disk Cleanup. Then, follow the on-screen instruction to clean up the hard drive.
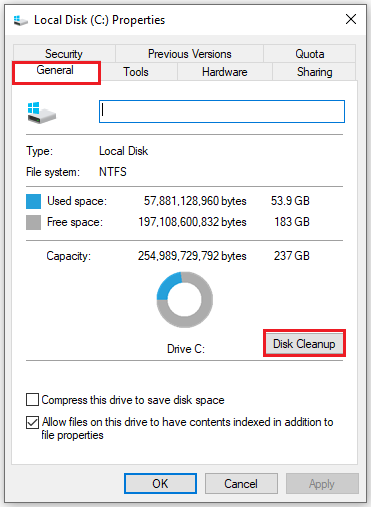
Click Disk Cleanup to Free Hard Drive Space
Free Alternative to OBS — Screenify
Screenify is a free and easy-to-use screen recording tool designed to provide an alternative for users who are unwilling to bear the complex configuration or cost of OBS. It provides a user-friendly interface and basic recording functions, suitable for those who need efficient recording and simple operation. Compared with OBS, Screenify has attracted many users with its simplicity and no cost.
Product Features:
- Free to use: completely free, no subscription or purchase required.
- Easy to use: intuitive operation interface, lowering the threshold of use.
- Multiple recording options: support full-screen recording, window recording and custom area recording to meet different recording needs.
- High-quality recording: can record clear video to ensure the quality of recorded content.
- Basic editing functions: provides simple clipping and annotation tools for easy post-processing.
In general, Screenify is an ideal free alternative tool, especially for those who need a simple and fast recording solution. Although it is not as good as OBS in terms of functions and customization, Screenify provides a practical and economical choice for most basic needs.
You just need to follow the steps below:
Step 1.Download and Install Screenify on Computer.
Step 2.Launch Screenify on your computer, and select Record screen mode.
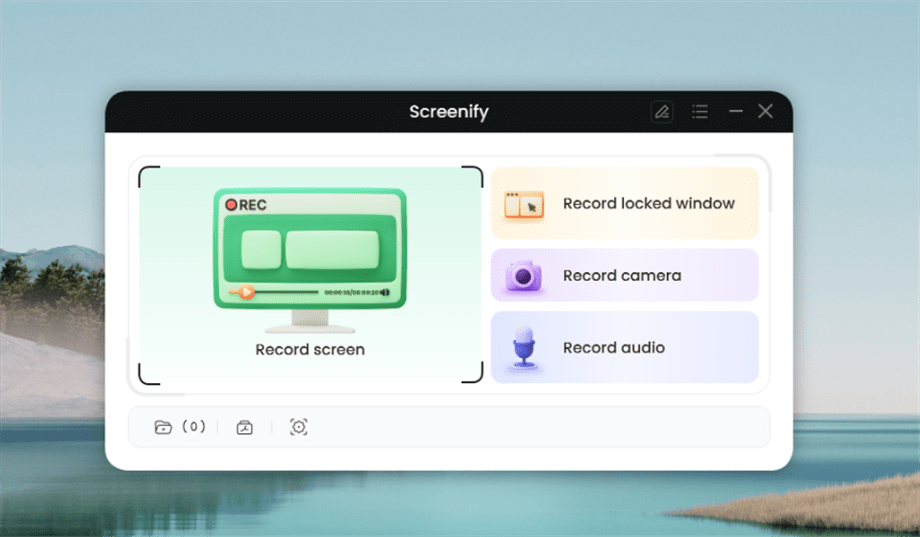
Select Record Screen Mode
Step 3.Configure Recording Settings aims to configure settings like system audio before recording.
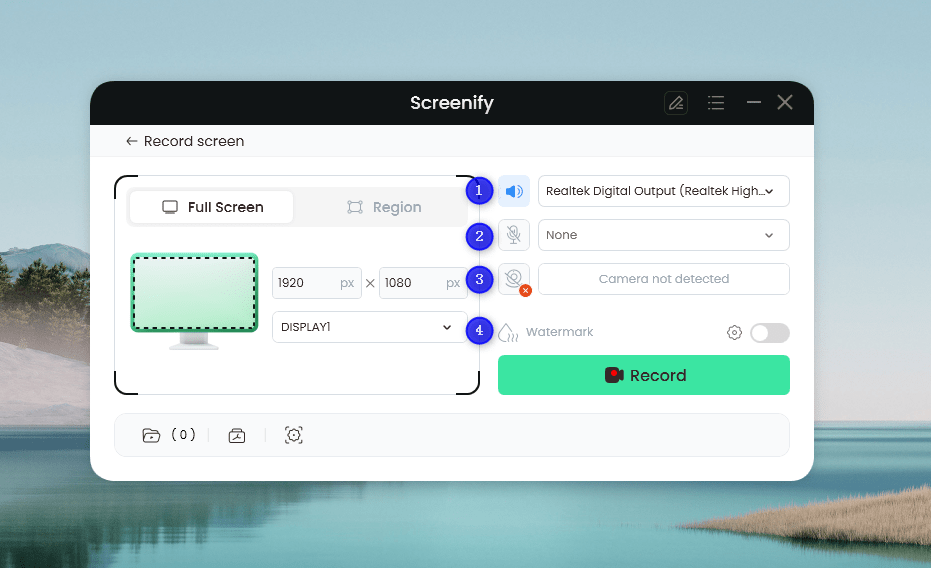
Set Configure Recording Settings
In this setting menu, you can:
1 Choose the System audio.
2 Choose the Microphone you want to record.
3 Choose the Camera you want to use.
4 Choose whether to add a watermark.
Step 4.Select Recording Screen.
Option 1. Full Screen Record
Please select Full Screen mode and choose the display you need to record. Hit Record button to initiate recording.
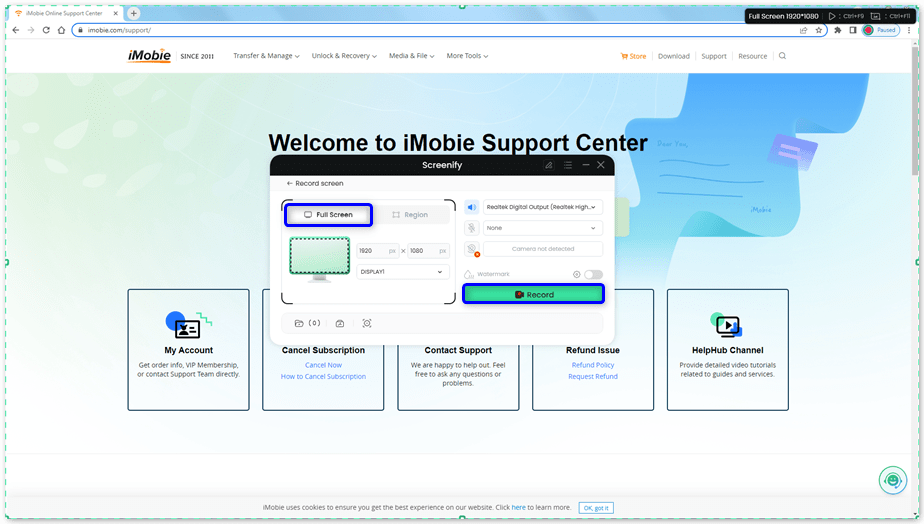
Select Full Screen
Option 2. Region Record
To record region, you need to manually select the recording area. After selection, you can still adjust the selected area. It supports customize selection, full screen, and proportional selection based on common social media dimensions.
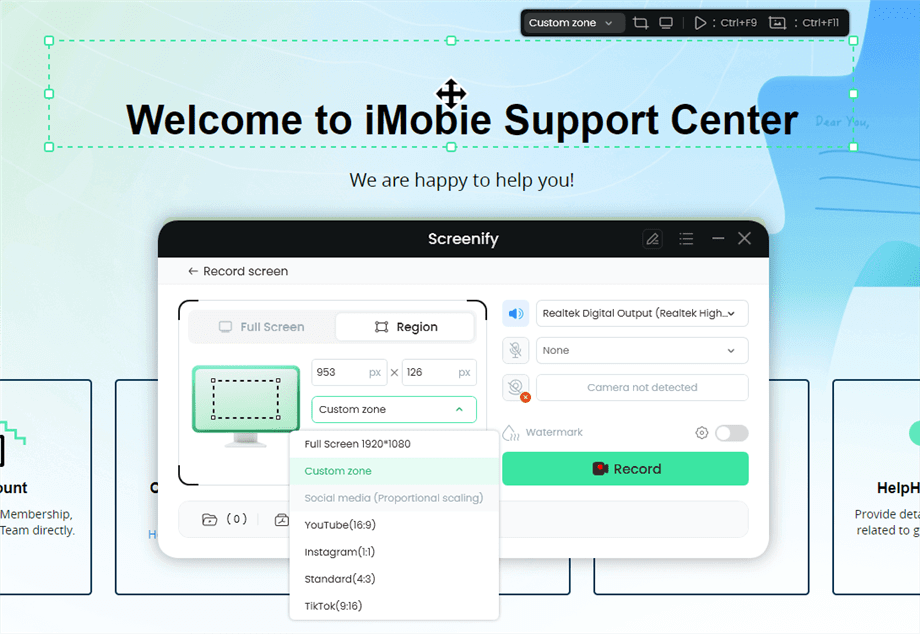
Record Region
Step 5.Wait for the Recording Countdown.
There is a 3-second countdown to help you prepare the recording after you are ready to start recording.
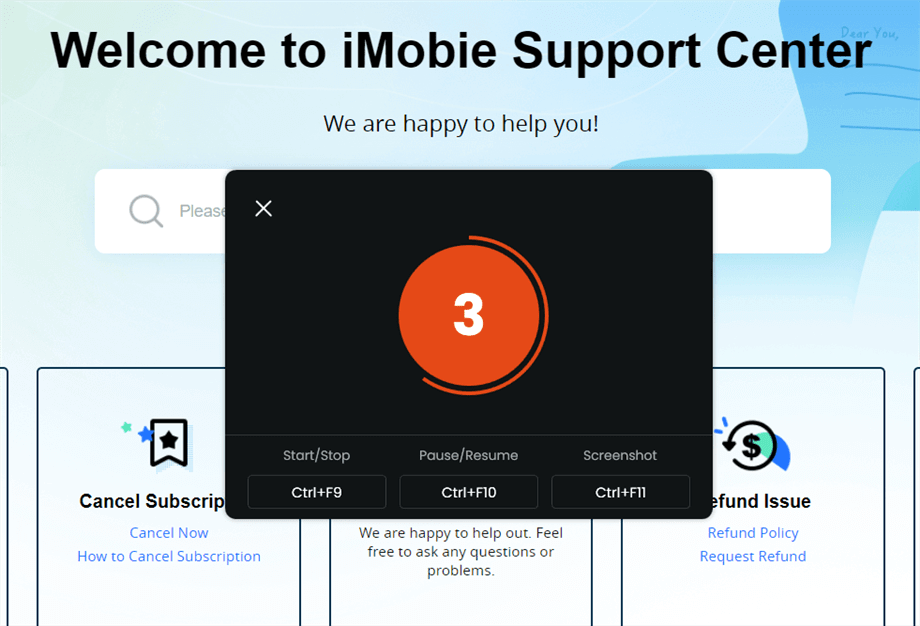
Wait for the Recording Countdown
If you would like to see a recording countdown before your recording starts, you can enable the countdown option. Or you can tap it off. View this post to know how to set the countdown option.
Step 6.Start Recording.
The recording will begin after a 3-second countdown. You can make annotations on the recording interface during the recording.
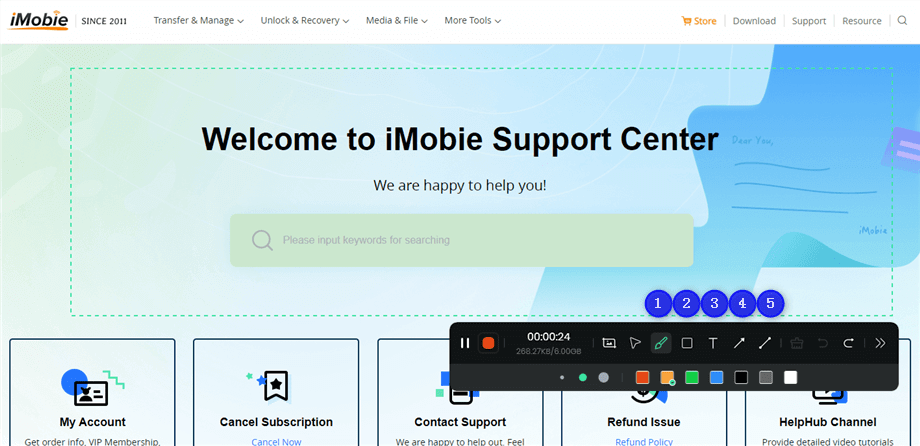
Annotate the Screen during Recording
With the toolbar, you can add the annotation in the screen:
1 Brush: Draw freehand on the screen recording interface to highlight or illustrate specific areas during the recording.
2 Rectangle: Draw rectangular shapes on the screen recording interface.
3 Text: Add written notes or labels directly onto the screen recording interface.
4 Arrow: Draw arrows on the screen recording interface to point out and emphasize specific areas.
5 Line: Draw straight lines on the screen recording interface to underline or connect specific points.
Step 7.Record Screen Process Completed.
When the recording is completed, you can click the red Stop button to end the recording. Your recorded files will be displayed. From here, you can preview and manage the recorded content as needed.
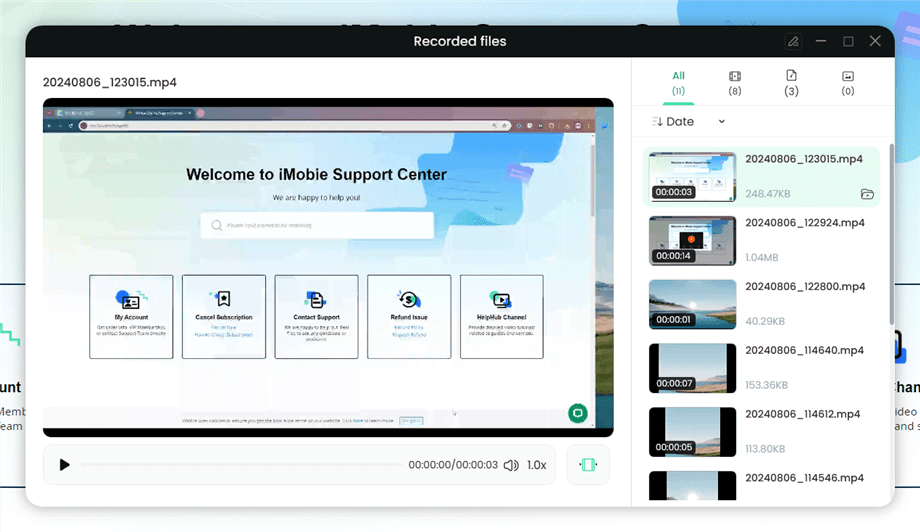
Preview the Recording
You may also want to know: How to record video from website
Hopefully, after trying these tricks, you will get rid of OBS encoding overloaded fix issue. You can explore the FAQs in the next section.
What should my encoder be for OBS?
The choice of encoder depends upon your hardware. However, we recommend you use Intel’s Quick Sync Video. It is a good option if you have an intel CPU and want to reduce CPU load for encoding. This encoder will reduce the chances of OBS encoding overloaded fix issues.
Why does OBS use so much CPU?
OBS uses a lot of CPU because it’s doing a complex job. It captures, encodes, and streams or records your content in real-time. If your PC is not very powerful or you have many sources and effects in your scenes, OBS needs more CPU power to handle everything smoothly. Therefore, a good balance of settings and hardware can help OBS run more efficiently.
Conclusion
You now have the know-how to beat the Encoding Overloaded issue in OBS. Just follow the above methods and see how encoding overloaded OBS fix. You can adjust your settings and choose the right encoder for a smooth streaming experience. You are supposed to balance performance and quality. Don’t be afraid to try different things until you get it right. So go ahead and enjoy streaming like a pro!
Product-related questions? Contact Our Support Team to Get Quick Solution >

