Proven 4 Ways to Solve ‘OBS Crashing’ Error
In this article, we are going to explore all about OBS crashing errors. We will discuss what could be the reasons that can cause this error to occur. Then, we will explore the four common ways to fix this issue. Furthermore, we will discover the best alternative to help you record your computer screens without any fuss.
“OBS Crashing” is a situation that occurs when OBS Studio ceases to work. This could happen due to various factors, such as software conflicts, outdated drivers, or problems with the system’s hardware. Just think about it: you are about to start a broadcast or set up everything to record your screen, and then OBS Studio stops working. This is a common issue that bothers users as it interrupts their workflow.
No matter why OBS crashes, we are here to help you. In this article, we will explore four simple ways to fix this error. Let’s dive in!
Why Does OBS Crashing Happen?
OBS crashing can happen for several reasons. One common cause is software conflicts. If OBS clashes with other programs running on your computer, it might crash. Another reason could be outdated drivers. If your graphics card or other drivers are not up to date, OBS might struggle to function properly.
Sometimes, hardware issues can also lead to crashes. If your computer doesn’t have enough specs, like RAM or CPU power, OBS might freeze or shut down. Finally, incorrect settings in OBS can also cause problems. If your settings are too complex for your system, OBS might crash. Before we get to fix the issue, we need to understand these causes.
How to Fix OBS Crashing Error?
In this section, we will explore five methods to fix the OBS crashing issue. We have already explored the causes. If you understand them, you can imagine what ways we are going to try. You can follow the steps given for each way and check if the issue is fixed.
Way 1. Update the Graphic Driver to Fix The OBS Crashing Error
An outdated graphic driver could be the reason for OBS crashing, and it is the most common one. Your graphic driver controls the way your computer’s graphics card interacts with OBS. If it’s outdated, OBS might not run smoothly and could crash. By updating the graphic driver, you can often solve this problem quickly and easily.
Here are the steps to update the graphic driver of your system:
Step 1: Right-click the start button and select “Device Manager” from the list. You can also type it in the search bar.
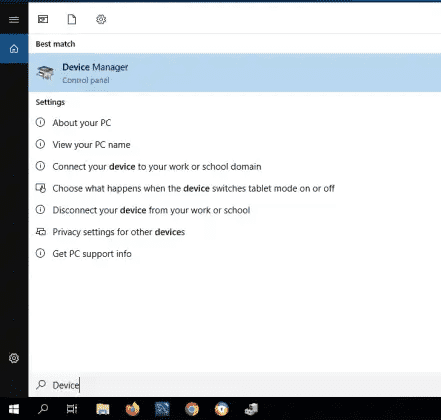
Open Device Manager
Step 2: Click the “Display adaptors” to expand the option. Then, select your graphic card, and a new window will appear.
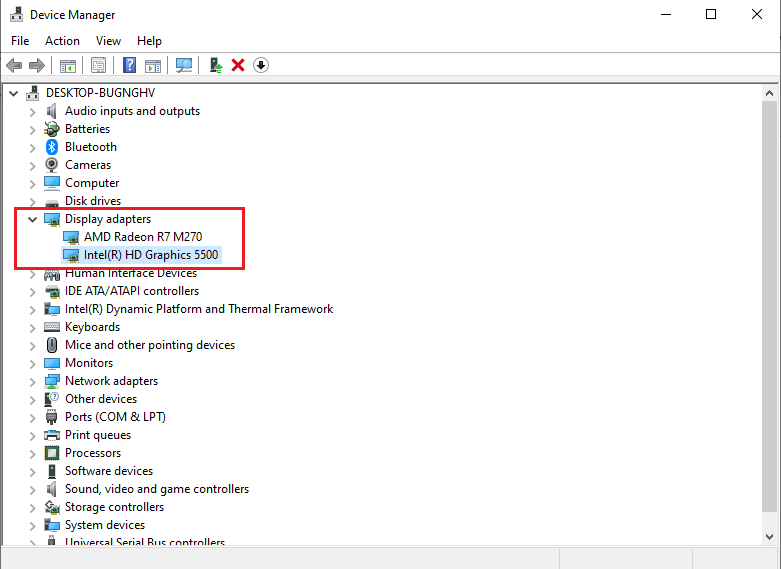
Choose Display Adapters
Step 3: Next, go to “Driver” from the top menu and click “Update Driver” from the options.
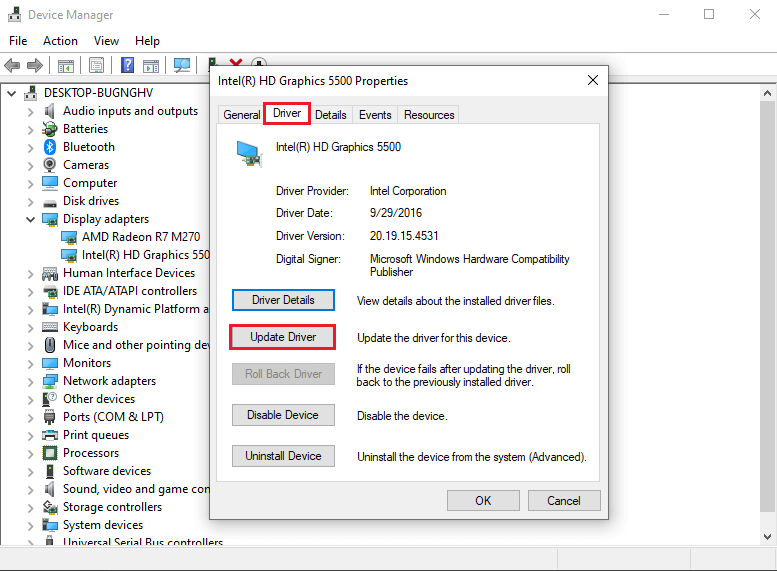
Choose Update Drivers
Step 4: After clicking update driver, select “Search automatically for drivers.” Let your computer find and install the latest driver.
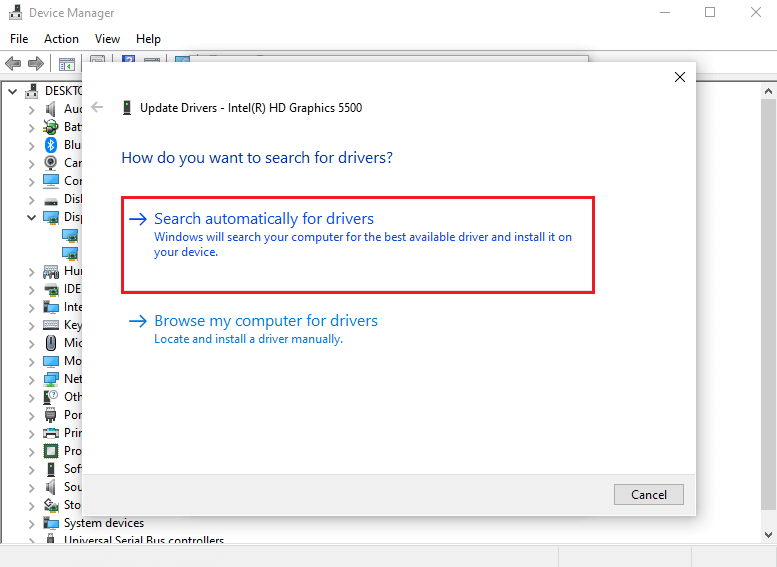
Select Search Automatically for Drivers
Step 5: After the update, restart your computer to apply the changes.
Hope this will resolve the OBS crashing issue. If it doesn’t, you can try the next method.
Way 2. Adjust the Compatibility Settings to Fix the OBS Crashing
Sometimes, OBS may crash because of compatibility issues with your OS. Running OBS in compatibility mode can help resolve these issues. This method forces OBS to operate as if it’s on an older version of Windows, which can prevent crashes and improve stability.
Here is how you can adjust the compatibility settings of OBS Studio:
Step 1: Right-click the OBS Studio shortcut or .exe file and select “Properties” from the list.
Step 2: Click the “Compatibility” option. Then check mark “Run this program in compatibility mode for” and select “Windows 7/8.”
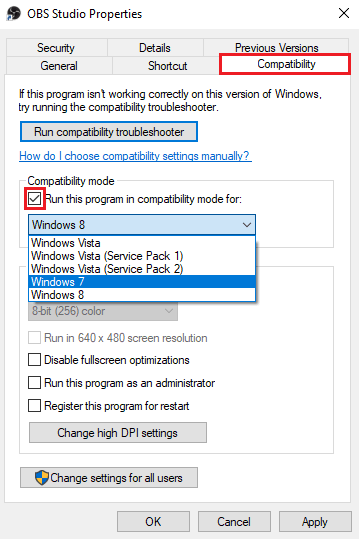
Tick the Run This Program Box and Select Relevant Windows
Step 3: Next, select and tick mark “Run this program as an administrator.” Then click the “OK” button to save the changes.
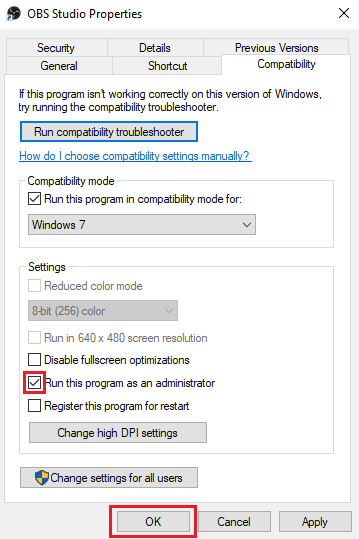
Select Run This Program as Admin and Click OK
After applying the new compatibility settings, test your OBS Studio again. If you still face the OBS crashing issue, try another method.
Way 3. Turn Off the Windows Firewall to Fix OBS Crashing issue
Your Windows firewall can sometimes be the cause of this issue. It can interfere with the OBS Studio and cause it to crash unexpectedly. The Windows firewall does its job and may block OBS from accessing the internet or any certain system resources. But you can turn it off if you notice that it is the reason for the OBS crashing issue.
Here are the steps to turn off the Windows firewall:
Step 1: Go to the Windows search bar and type “Windows Defender Firewall.” You will see the exact option. Click and open it.
Step 2: In the left panel, select “Allow an app or feature through Windows Defender Firewall.”
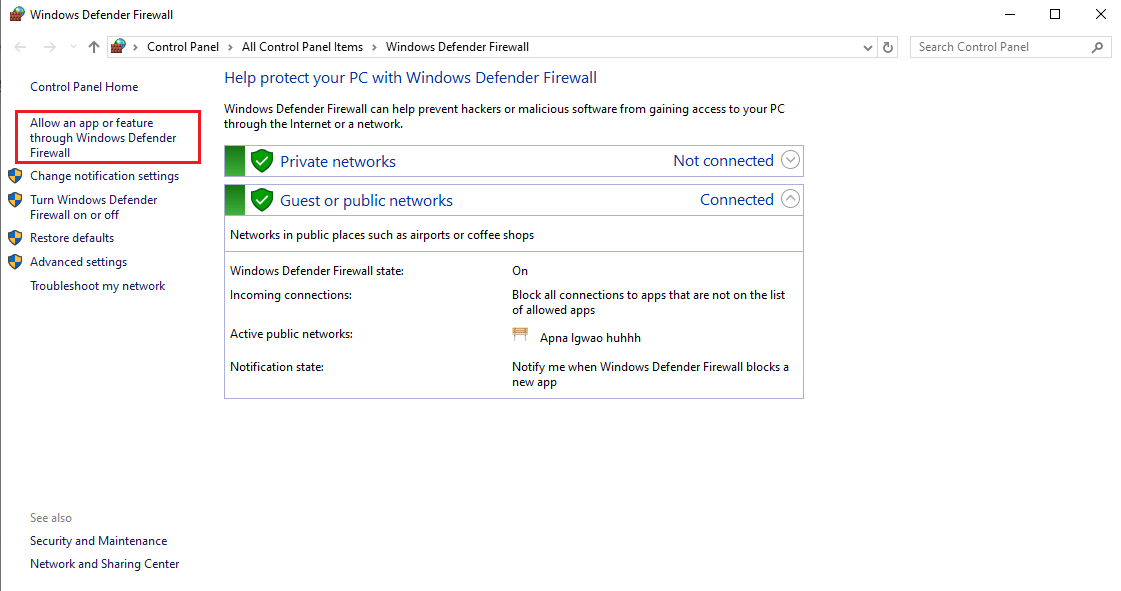
Select Allow App or Features Through Windows Defender Firewall
Step 3: In the next window, click “Change Settings.” Then, scroll the list and find the OBS Studio app. Once you see it, check the box under the “Private” and “Public” tab.
If you don’t find the OBS Studio option, click the “Add another app…” button and add the OBS Studio.
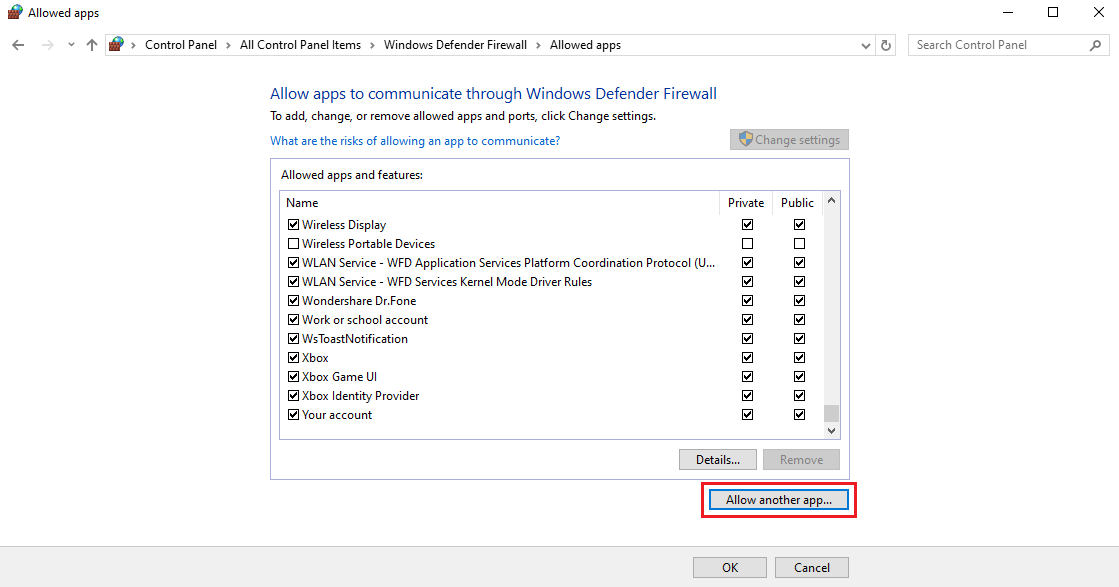
Click Add Another App
After checking the private and public box next to OBS Studio, click “Ok” and save the changes. Now open the OBS Studio and test if the OBS crashing issue has been resolved. If it still exists, go for the following method.
Way 4. Delete Third-Party Plugins to Fix OBS Crashing issue
Where third-party apps enhance OBD, they can also cause it to crash. It usually happens if you are using plugins that are either outdated or incompatible with your OBS version. In that case, you can remove the plugin to make OBS work again without crashing.
Here is how you can delete third-party plugins to fix OBS crashing issue:
Step 1: First, make sure that the OBS app is totally closed.
Step 2: Open “My Computer” and go to the OBS installation directory. You can go to “Drive C” > “Program files” > “obs-studio” > “obs plugins” > “64bit.”
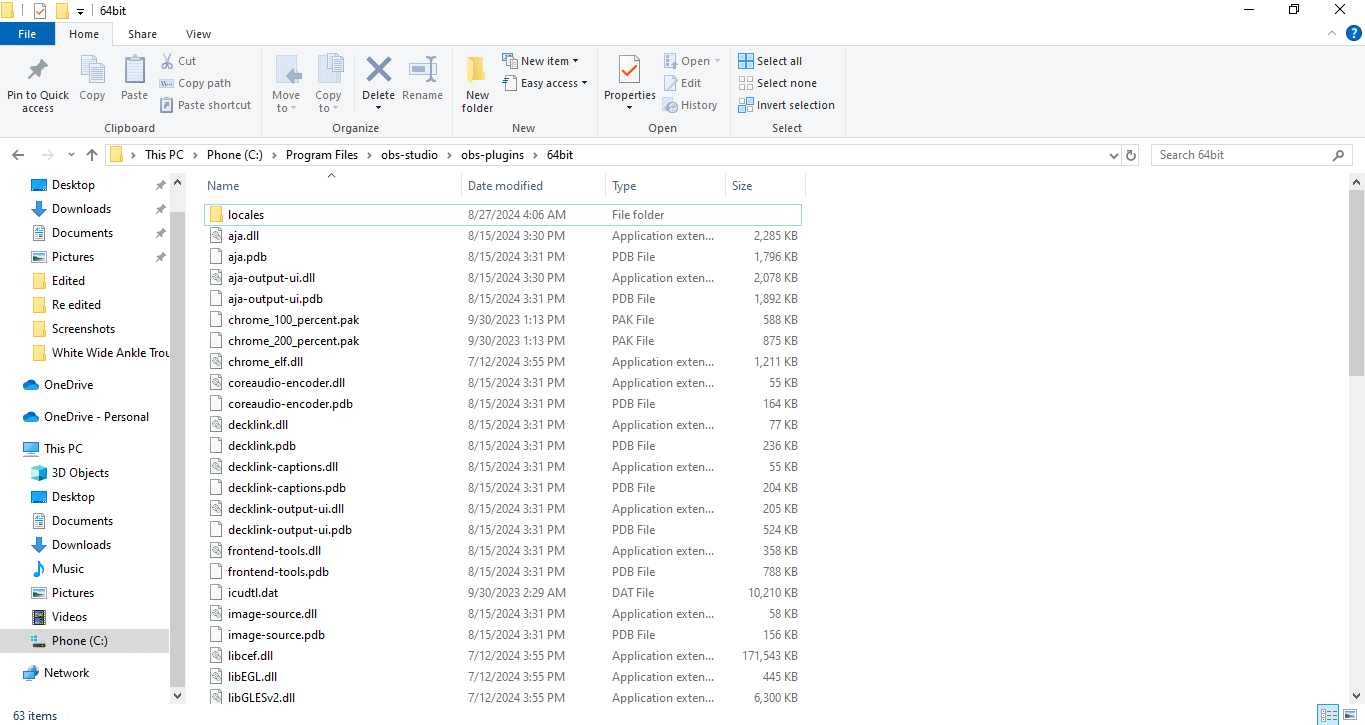
Open OBS Studio Directory
Step 3: Here, identify and delete the third-party plugins you suspect are causing the issue. Be careful not to delete any default OBS plugins.
Once done, open the OBS Studio again and see if the issue is resolved. These methods are the most common ones, and they should fix your OBS crashing issue.
However, if you are still facing the same problem, we recommend that you try another screen recording. Let’s move forward and explore a better alternative to OBS Studio.
Part 4: Best Alternative: Screen Record via Screenify
If you are done with the OBS crashing issue, let us introduce the best alternative: Screenify. The aim of developing this software is to ease the process of screen recording without much struggle. The good thing is it is free to use and provides high-quality recordings that you can save easily. No matter what operating system you use, Screenify is compatible with both Windows and Mac.
That’s not all! Another great feature you will appreciate with this great screen recorder is its interface. To sum it up, even if you are a beginner at using screen recording, you will not have any difficulty using it.
Key Features of Screenify
- High Quality: Enjoy free, high-resolution screen recording that captures every detail.
- No Watermarks: Produce clean videos without any distracting watermarks.
- Screen Options: Record your entire screen or just a selected portion, giving you full control.
- Multiple Audio Sources: Easily record your voice, system sounds, or other audio sources.
- Compatibility: Screenify works flawlessly on both Mac and Windows operating systems.
Screenify’s impressive features will make it your favorite screen recording tool. Then following I will share how to record screen via Screenify!
Step 1. Begin by downloading and installing Screenify on your computer.
Step 2. Launch Screenify and select the “Record screen” option.
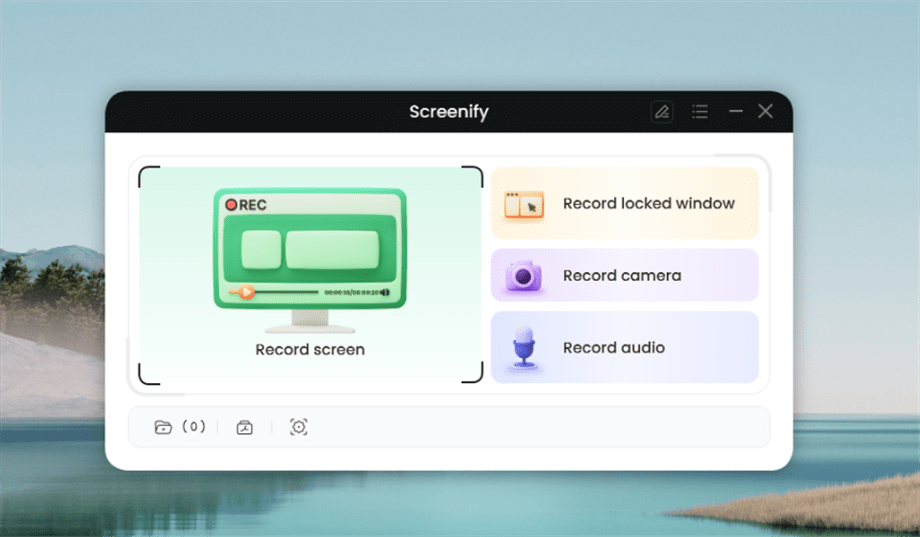
Select Record Screen Mode
Step 3. Set up your recording preferences, including system audio, before you start.
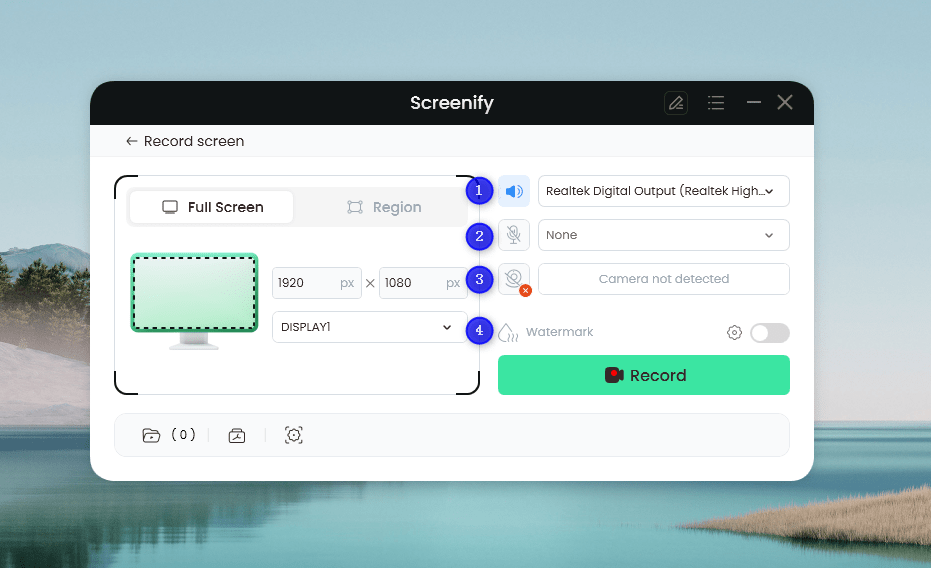
Set Configure Recording Settings
Step 4. Choose the recording area. Click “Full Screen” for a complete screen capture, or manually select a specific region. After that, click “Record.” You can adjust the selection to match social media sizes if needed.
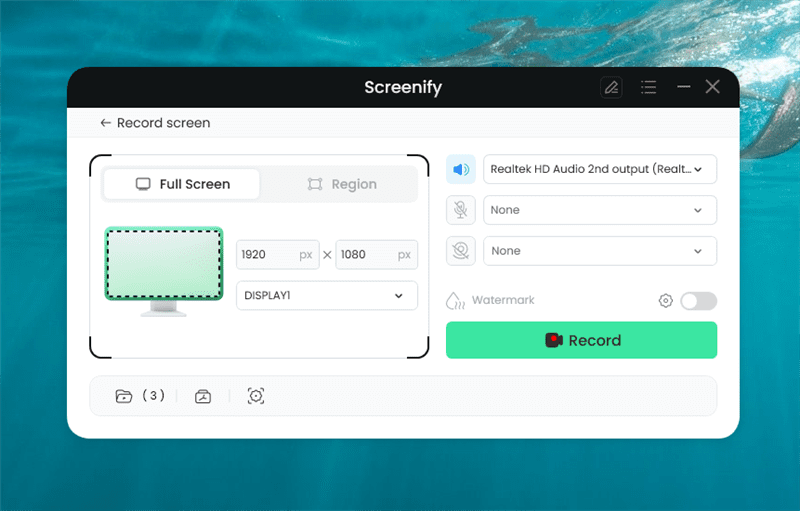
Screenify Full Screen Record
Step 5. Wait for the 3-second countdown to prepare for recording.

Wait for the Recording Countdown
Step 6. Recording will begin after the countdown. You can add annotations during the recording if you like.
Part 5: Conclusion
Dealing with OBS crashing can be frustrating. It can be troublesome, especially when you rely on it for streaming or screen recording. But luckily, several ways are available to fix this issue. We have explored the most common ones in this article.
Each method can help you get OBS back to running smoothly. But if the problem persists, consider trying an alternative like Screenify. This new tool offers a user-friendly experience with high-quality recordings and no watermarks.

Joy Taylor


Senior writer of the iMobie team as well as an Apple fan, love to help more users solve various types of iOS & Android-related issues.
Screenify
AnyEnhancer
FocuSee
Vozard
AnyMiro
AnyMirror


