Stepwise Guide to Record with NVIDIA Screen Recorder
Gaming movies in 8K resolution at 40 frames per second or 4K resolution at 60 frames per second can be reliably recorded or captured with NVIDIA Screen Recorder. Nevertheless, this GeForce screen recorder is exclusive to NVIDIA users; alternatively, you can use Screenify, an open-source 4K screen recorder without watermarks or time limits.
Screenify – All-in-One Screen Recorder
Try Screenify for free to record screen on Windows or Mac. Whether full-screen or partial-screen recording, recording with sound or with camera, Screenify can do it with ease.
100% Clean & Safe
Thanks to the ability to record and share gameplay sessions on paid streaming services, gaming has grown from a mere hobby to a billion-dollar industry. Let’s say you just pulled off a brilliant trick or made a terrible mistake while playing your favorite game, you may want to tell your friends, family, or internet audience about it. Tools for screen recording are essential in each of the aforementioned situations.
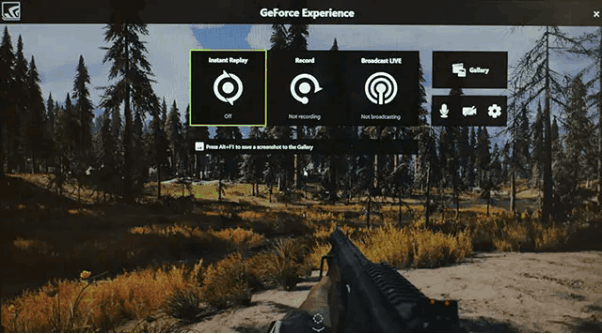
NVIDIA ShadowPlay Interface
Screen recording has never been easier, but NVIDIA’s GPUs have made it seamless for its users! NVIDIA’s built-in GeForce Experience has got you covered. Not only can you record and share gameplay videos via NVIDIA screen recorder, but can also capture screenshots and livestream with your friends and colleagues. Explore the NVIDIA ShadowPlay Screen Recorder and its advanced functionalities to enjoy the best game recording experience!
Does NVIDIA Have Recording Software?
Yes! NVIDIA has GeForce Experience™ technology that enables users to capture, record, and share gameplay videos.
GeForce Experience does everything for you—from keeping the game drivers ready and updated to recording and sharing game clips. NVIDIA ShadowPlay is available in the GeForce application, a hardware-accelerated screen recorder tool. The ShadowPlay screen recorder also allows users to record games and desktop applications. Here below are some points of Nvidia ShadowPlay:
Key Features
- NVIDIA ShadowPlay can record gameplay videos in either 8K HDR resolution at 30 FPS or 4K resolution at 60 FPS.
- You can capture 15-second GIFs and 8K screenshots apart from the screen recording.
- The GeForce Experience has hardware-accelerated ShadowPlay, which doesn’t affect the gaming experience while recording.
- With ShadowPlay, you share or broadcast screen recordings to various social media platforms.
System Requirements
You can also check the system requirements before installing the application, which are as follows:
| Operating System | Windows 10 and 11 |
| Random Access Memory (RAM) | 2 GB |
| Storage | 1 GB |
| CPU | Intel Pentium G Series, Core i3, i5, i7, or higher AMD FX, Ryzen 3, 5, 7, Threadripper or higher. |
How to Record Video with Nvidia ShadowPlay (2 Methods)
Recording games with NVIDIA ShadowPlay is easier; even beginners can benefit from this tool. There are two ways to record video with an NVIDIA screen recorder. Let’s explore each one in detail!
Method 1. Record Screen with NVIDIA ShadowPlay
Step 1. Download, install, and launch the GeForce Experience application on your PC. You can download the application from the official GeForce Experience website.
Step 2. Go to “Settings” to turn on the “In-Game Overlay” toggle. By enabling it, you can easily see the menu to record the screen while you’re in the game.
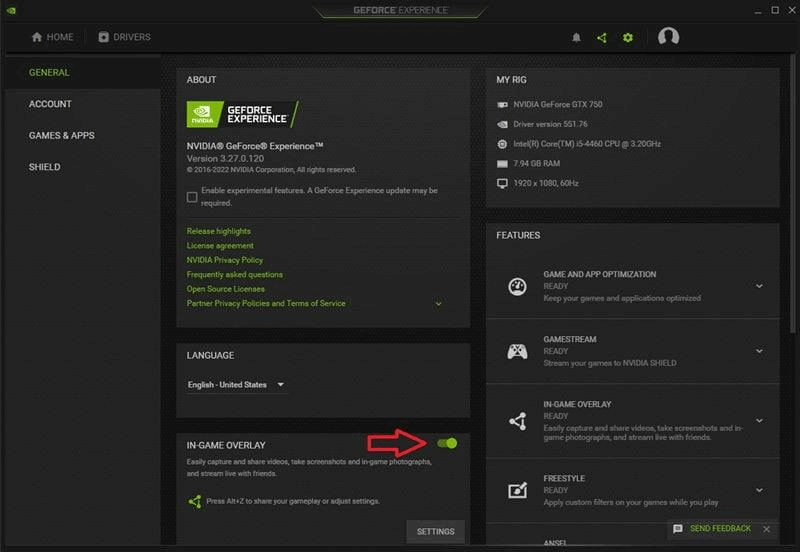
Turn On In-Game Overplay
Step 3. Adjust the parameters by clicking the “Settings” button from the “IN-GAME OVERLAY” section. Here, you can adjust the settings for streaming service accounts, HUD Layout, Video capturing quality, Keyboard shortcuts, and more.
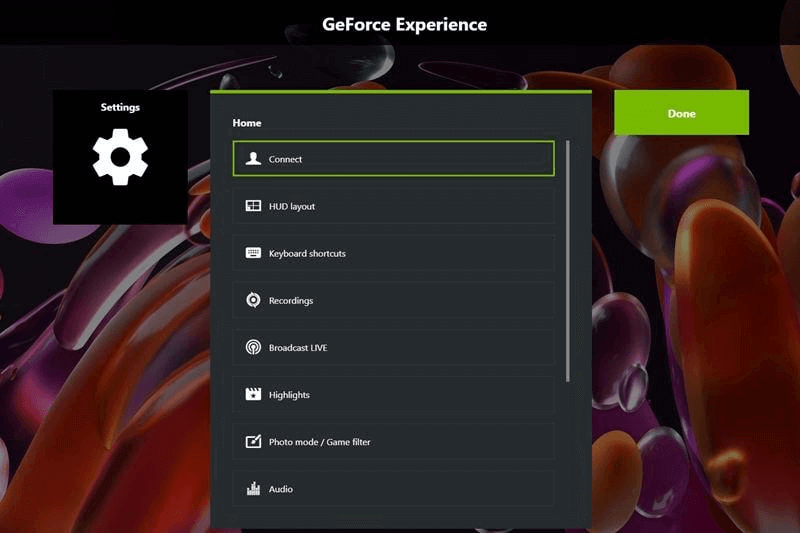
Click Connect
Step 4. Press the Alt + Z keys on the keyboard to open the overlay for NVIDIA GeForce.
Step 5. In the “Record” section, press the “Start” button to initiate the screen recording. You can also press the Alt + F9 button to start the recording process directly.
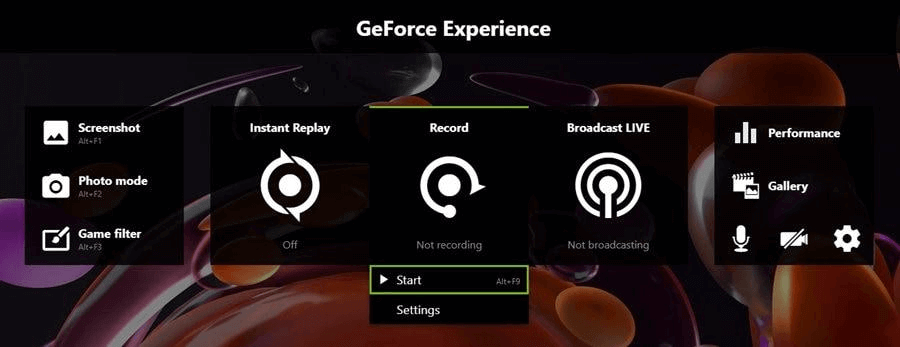
Click Start
Method 2: Record Instant Replays with NVIDIA ShadowPlay
Another way is to capture the instant replays using the NVIDIA screen recorder. This feature automatically lets users record gameplay footage for the last 20 minutes (depending on the settings). It should be mentioned that the program will constantly use system resources and run in the background if the option is activated. The past 20 minutes of gaming will be automatically recorded and stored when the shortcut keys are hit. The procedures listed below can be used to enable NVIDIA ShadowPlay’s Instant Replay mode:
Step 1. Launch your game on your PC. Press the Alt + Z on your keyboard to open the NVIDIA ShadowPlay panel.
Step 2. Click the “Instant Replay” button and press “Turn ON”.
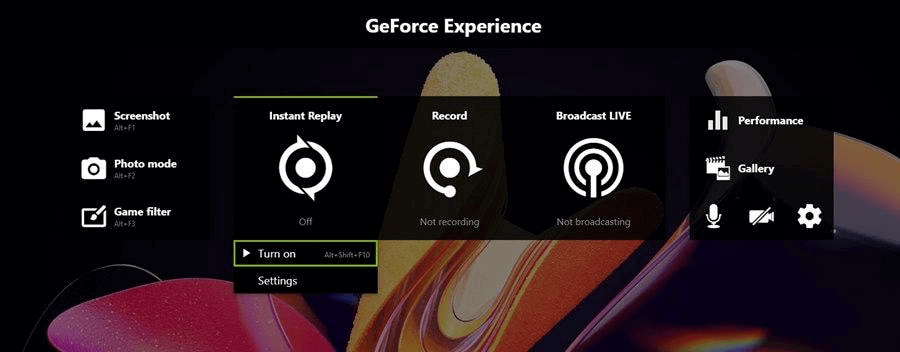
Click Turn On
Note: To enable the Instant Replay feature, press the Alt + Shift + F10 keys simultaneously.
Step 3. You can always press the “Save” button or Alt + F10 keys to save the last few minutes.
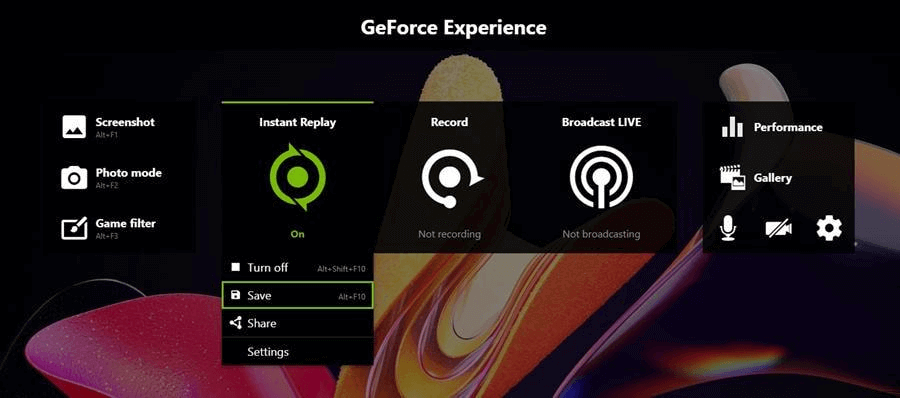
Click Save
Free Alternative: Screenify to Record Screen Effortlessly
Despite the advanced capabilities of GeForce Experience and NVIDIA ShadowPlay, there are a few disadvantages, and some of these are as follows: NVIDIA ShadowPlay is only available for NVIDIA GPU users, with few supported games. Apart from this, the Instant Replay option can get laggy sometimes or might not be able to save the progress of the last few minutes. The last drawback is that you cannot utilize ShadowPlay apart from Windows operating systems.
Worry not! We have an alternative solution to cover all these drawbacks. Screenify is a free, open-source screen recorder available for Windows and Mac operating systems. Its intuitive and straightforward interface allows users to record gameplay sessions seamlessly with just a few clicks. Unlike most screen recorders, where you might need to compromise on the time limit when recording at high resolution, i.e., 4K resolution, Screenify is free to use without any time restrictions.
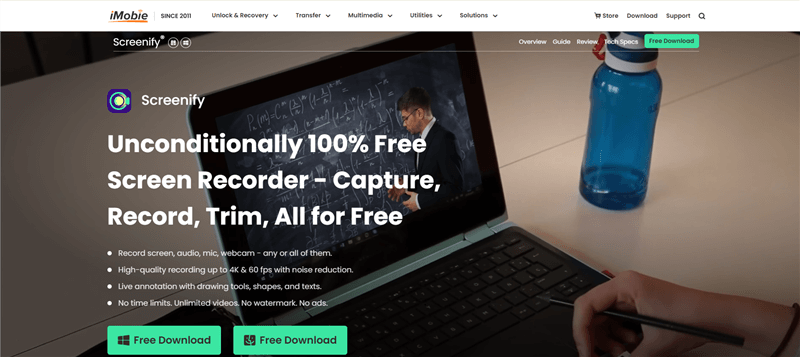
Screenify Website Interface
Besides the 4K resolution, Screenify can capture anything on the screen at 60 frames per second (FPS), eliminating the lag and distortions. For an immersive game recording experience, users can simultaneously record system audio and microphones. Adjust the volume and minimize the noise with noise reduction features.
Free Download * 100% Clean & Safe
Key Features
- Screenify helps you record games, tutorials, guides, or online meetings on your PC screen with 4K quality at 60 FPS without lags.
- It offers multiple screen recording modes, such as full window recording or region.
- Export screen recording videos in multiple formats for extended compatibility.
- Users can utilize the Lock Window Recording feature to ensure that only the active window content or currently opened application is being recorded.
Stepwise Guide to record screen with Screenify:
Step 1. Download and install Screenify on your computer. Open Screenify and choose the “Record Screen” option.
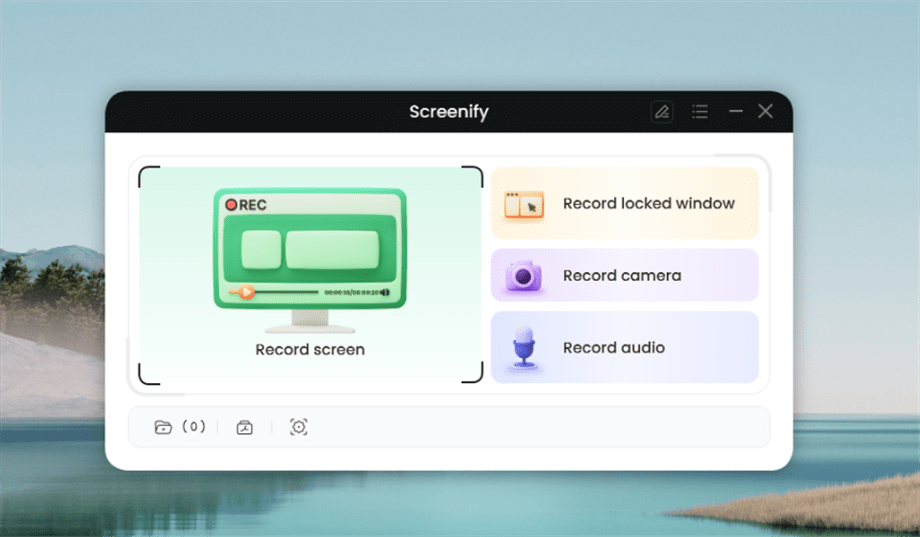
Select Record Screen Mode
Step 2. Adjust your recording settings, such as system audio, before starting.
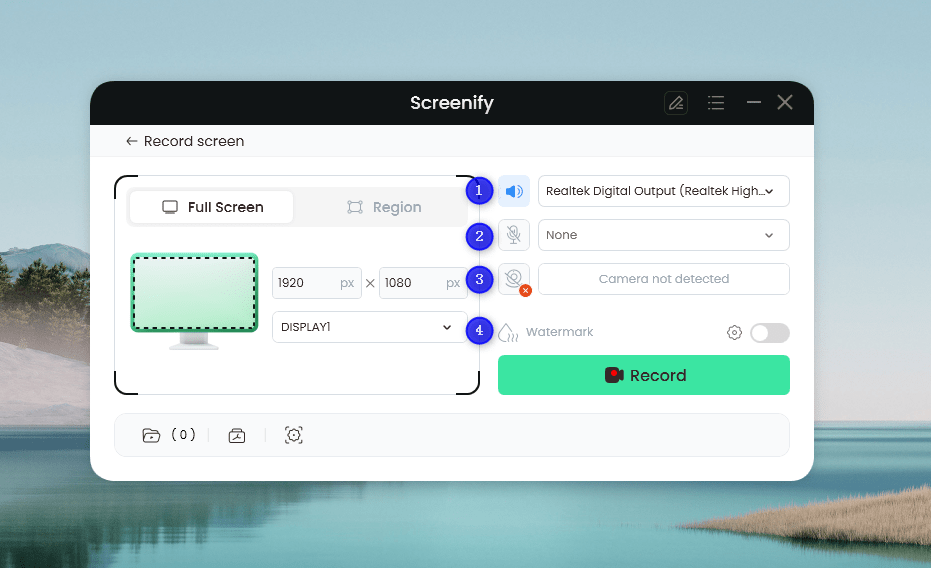
Set Configure Recording Settings
Step 3. Select the recording area—choose “Full Screen” or highlight a specific region. Click “Record” to begin. You can also adjust the area for social media sizes if needed.
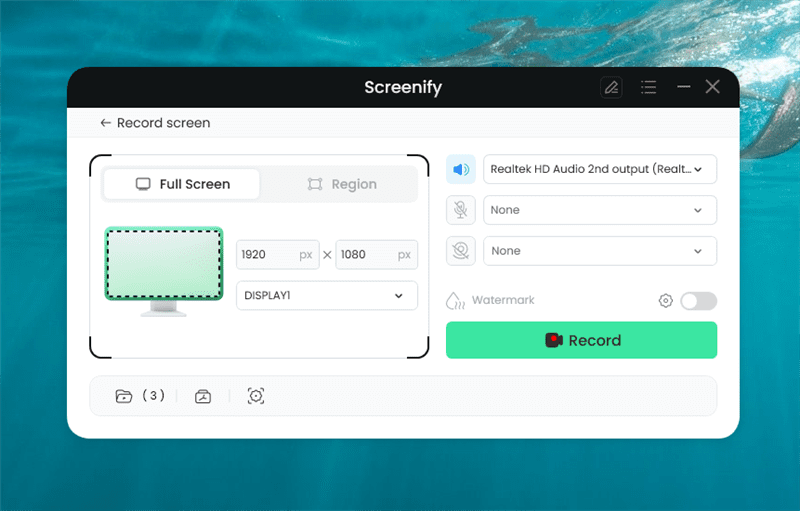
Screenify Full Screen Record
Step 4. Wait for the 3-second countdown to get ready. Recording will start after the countdown. You can add annotations during the capture if you wish.
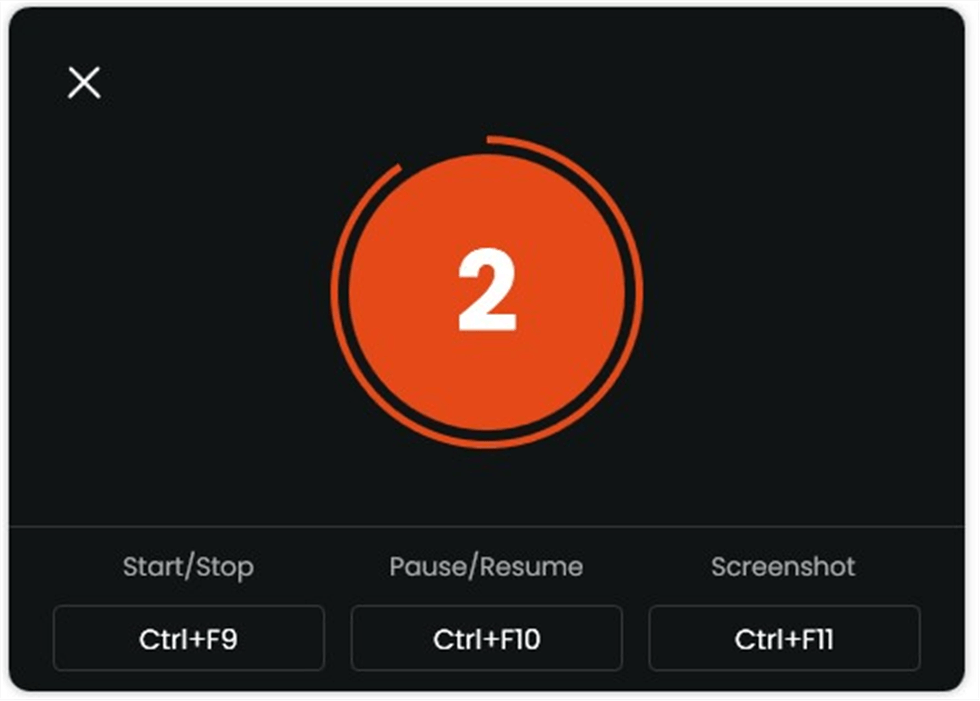
Start recording countdown
Step 5. Click the red “Stop” button to finish. Preview and manage your recorded videos afterward.
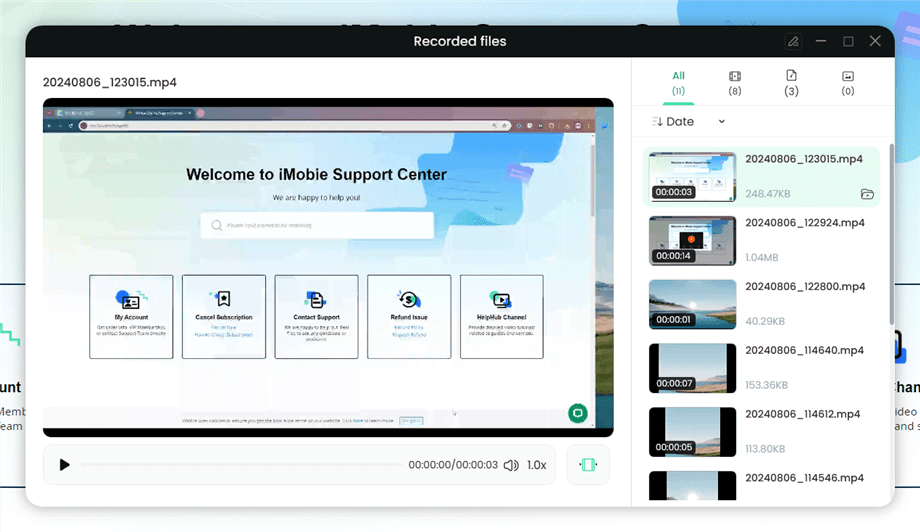
Preview the Recording
Bonus: How to Broadcast Live in Nvidia Shadowplay
Among ShadowPlay’s many sophisticated features is the DVR-style Instant Replay Mode, which may automatically record your winning or losing moments in games.
NVIDIA ShadowPlay has another exciting feature named NVIDIA Highlights. This option enables users to record or capture memorable moments such as clutch kills, winning or losing moments, best shots, or anything that can be added to highlight video. Besides recording capabilities, NVIDIA ShadowPlay never misses any opportunity to impress broadcasters. You can broadcast your gameplay on social sites such as Facebook Live, Twitch, or YouTube in a seamless way.
Step 1. Open GeForce Experience with Alt + Z to enter Nvidia Shadowplay. In the overlay, select Broadcast Live > Settings. You will be presented with various settings that are exclusive to this section of Shadowplay.
Step 2: Then you can choose the exact platform you are going to stream on, then configure the video quality, resolution, frame rate, and bit rate.
Step 3: Select the custom overlays, such as something to cover your in-game chat.
Step 4: Check whether the ingest server is correct for your current location.
Step 5: When you are ready to start streaming, go back to the Nvidia Shadowplay overlay, select Broadcast Live, and then Start. This will produce a smaller window with a few options for you to fill out.
- Choose the platform you’ll be streaming on.
- Log on to your platform of choice via the overlay.
- Name your video: up to a maximum of 140 characters.
- Choose the target location and audience you’ll be streaming to.
Step 6: When you’re done setting up, simply press Broadcast in order to start streaming or use the Alt + F8 keyboard shortcut. Stop streaming the exact same way.
Conclusion
Are you an NVIDIA GPU user who loves playing games and sharing gameplay videos with loved ones? NVIDIA GeForce Experience and its integrated NVIDIA ShadowPlay screen recorder serve the purpose at its best! You can use screen recording, Instant Replay mode, or shortcut keys to record gameplay videos without hassle. Screenify is the most outstanding substitute for the GeForce screen recorder, as the NVIDIA screen recorder is limited to NVIDIA GPU users. With Screenify, you can record films at 60 frames per second in 4K quality without any time restrictions or watermarks.
How to Manage Video Easily
Toplists
- All the Details about Screen Record on iPhone 13 [2024 Updated]
- Best Ways to Record Anything on YouTube TV
- Top 7 Screen Recorders for 1080p Resolution
- Top 9 Audio Recording Software Tools for Mac and Windows
- [Reviews] 7 Best Screen Recorders for Mac
- Top 9 Screen Recorder with Facecam and Audio
- What App Do YouTubers Use to Record Audio
- Best Screen Recorder for Chromebook
- 2024 Best Screen Recorder for Low End PC Review
- 11 Best Screen Recorders for PC with Audio
- Screen Recorder No Watermark: Top 10 Picks [2024 Updated]
- 7 Best Screen Recorders for Windows
- Ways to Fix Screen Recording No Sound on Top Platforms
- All Things to Know About What is Screen Recording
How-to Guide
- How to Play MOV Files on Windows PC
- How to Record Discord Audio on PC or Phone
- How to Record Google Meet on Computer or Phone [Solved]
- Full Guide on How to Record YouTube Videos [PC & Phone]
- How to Record Zoom Meeting without Permisson [Windows/Mac/Phone]
- How to Screenshot Video on PC/iPhone/Android
- How to Stop Screen Record on Mac
- 5 Ways to Record Audio on Mac
- How to Record FaceTime Call with Audio on Mac/iPhone/Android
- How to Record Screen on Mac with Internal Audio
- 4 Ways to Record on Snapchat without Holding the Button
- How to Record Streaming Video on PC
- How to Screen Record on Chromebook
- 10 Ways to Screen Record on HP Laptop
- 3 Easy Ways to Screen Record on Windows with Audio
- How to Screenshot on Samsung Laptop Easily
- How to Stream Netflix on Discord
- How to Record Screen Using VLC
Product-related questions? Contact Our Support Team to Get Quick Solution >

