How to Stop Screen Record on Mac
It’s pretty easy to start screen recording on your PC using various apps. But, some may need more clear instructions on how to stop it. Therefore, in this article, we have discussed 4 ways how to stop screen record on Mac QuickTime.
To record your screen on your Mac, the Screenshot toolbar is available in macOS Mojave or later. Besides, the Quicktime player allows you to record. If you want to check how to turn off screen recording on Mac, here we will show you how to start and stop screen recording on Mac Quicktime.
How to Start Recording Mac
If you want to screen-record on your Mac for making a tutorial, gaming, or sharing a presentation with an audience, you can do it using various apps. In this section, we will talk about how to start screen recording Mac using QuickTime and the Screenshot Toolbar.
1. Record Mac with QuickTime Player
QuickTime is like an all-in-one media player and framework brought to us by Apple Inc. It’s perfect for watching videos, listening to music, and working with different types of media files. With its easy-to-use interface and support for various formats, it’s a go-to option for enjoying and creating multimedia content.
Steps to Start Recording Mac using QuickTime
Here’s a step-by-step tutorial on how to start recording Mac using QuickTime:
Step 1. Launch QuickTime Player on your Mac and go to “File > Start New Recording.”
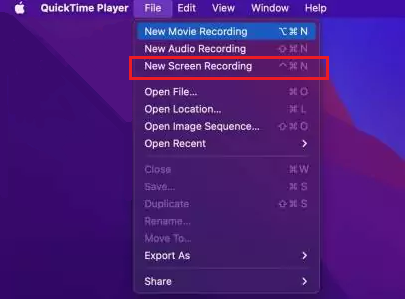
Choose New Screen Recording
Step 2. A pop-up window will appear with the screen recording options. Click on the arrow next to the “Record” button and select your microphone from the available options.
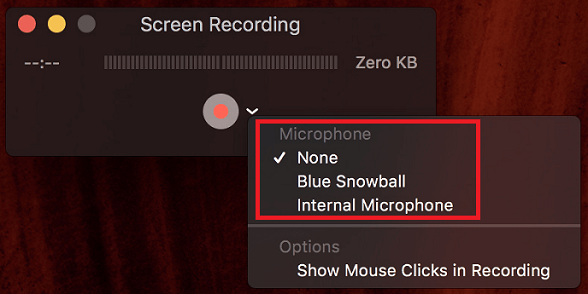
Select Microphone for Audio Recording
Step 3. Click the “Record” button and select the area of the screen you want to record. Or simply click on the screen to record the full screen.
Step 4. Click “Start Recording” to initiate the screen recording process.
Now that you know how to start screen recording on Mac using QuickTime, let’s have a look at the second option on our list.
2. Record Screen via Screenshot Toolbar
The Sreenshot Toolbar on Mac is a feature introduced in macOS Mojave and later versions. It provides users with convenient and powerful options for capturing screenshots and screen recordings.
After taking a screenshot or screen recording, you can also edit and annotate the captured content before saving it. You can add shapes, lines, text, arrows, and other annotations to the screenshot or trim the recorded video.
Steps to use the Screenshot Toolbar to start screen recording on Mac:
Step 1. Open the window or app you want to screen record, and press “Shift + Command + 5” to launch the Screenshot Toolbar. It will appear at the bottom of the screen.

Launch Screenshot Toolbar
Step 2. Now select “Record Entire Screen” indicated by a solid line or “Record a Portion of the Screen” with the dotted line icon.
Step 3. A screen recording pop-up will appear on the screen. Click “Record” to start recording.
And that’s how you start screen recording on your Mac.
As we mentioned earlier, starting screen recording on Mac is one thing, while you can stop screen recording in more than one way. Let’s have a look at how to stop QuickTime screen recording.
How to Stop Screen Record on Mac QuickTime
In this section, we have discussed 4 ways how to stop screen record on Mac when recording with QuickTime.
1. Force Quit QuickTime Screen Recording
One way to stop QuickTime screen recording on Mac is by force quitting the app. But we don’t recommend this method if the app is working normally. The only time you may need to force stop the app is in the following instances:
- When QuickTime freezes or stops responding.
- If the playback is stuck.
- When certain media files cause the app to hang or show errors.
- If QuickTime causes your Mac to slow down.
- If QuickTime extensions malfunction.
- When the app faces compatibility issues with your Mac after an update.
If you encounter these or similar issues, you can force quit QuickTime to stop screen recording.
Steps to Force Quit QuickTime
Here’s how to force quit QuickTime screen recording in 2 ways:
Method 1: From Apple Menu
- Click on the Apple Menu and select “Force Stop.”
- Select QuickTime from the listed apps and click “Force Quit.”
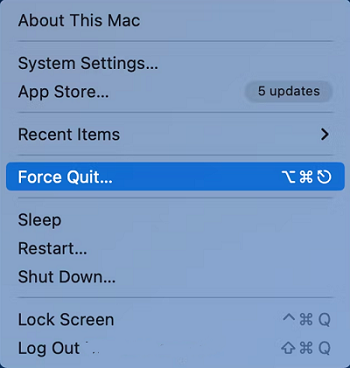
Stop QuickTime Screen Recording from Apple Menu
Method 2: From Dock
- Right-click on QuickTime’s icon on the screen and select “Force Quit” from the dock menu.
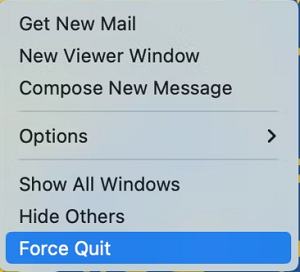
Stop QuickTime Screen Recording from Dock
However, you can also stop QuickTime recording via the Activity Monitor on your Mac.
2. Stop QuickTime Recording with Activity Monitor
On macOS, there is a utility called “Activity Monitor,” which is the Mac equivalent of the Task Manager on Windows.
The Activity Monitor provides a detailed view of all the processes and applications running on your Mac. However, you can also use it to quit a running app.
Steps to Quit QuickTime using Activity Monitor
Here are the steps on how to stop screen record on Mac with the Activity Monitor:
Step 1. Launch Activity Monitor on Mac
On your Mac, go to “Finder > Applications > Utilities > Activity Monitor.”
Step 2. Quit QuickTime Player
Select QuickTime from the list and click “Quit.”
As this method ends the function of an app abruptly, your recordings won’t be saved.
3. Use Hotkeys
Another easy way how to stop QuickTime screen recording is by using the hotkeys or keyboard shortcuts.
Steps to Quit QuickTime Using Hotkeys
To stop QuickTime using keyboard shortcuts, here’s what to do:
- Press “Command + Option + Esc” on your Mac keyboard.
- A dialogue box will appear. Click “QuickTime > Force Quit.”
4. Click the Stop Button to End the Recording
And obviously, there’s always the regular way of stopping a screen recording: By clicking the “Stop Recording” button.
Steps to End Recording on QuickTime Using the Stop Button
To stop QuickTime screen recording, follow these steps:
Step 1. Click on the “Stop” button from the screen recording menu bar at the top of the screen.
Click the Stop Button to End QuickTime
Step 2. You will see your recording on QuickTime’s main interface. Click “File > Save” to save your screen recording to your Mac for later use.
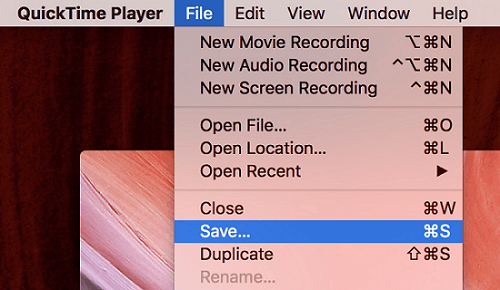
Save Your Screen Recording
And that’s how to stop screen record on Mac when using QuickTime.
If you’re still with us, we have a special bonus tip for you!
Tip: How to Stop Screen Recording on iPhone
If you are screen recording on your iPhone and want to end it, here’s how to go about it:
Step 1. When you start screen recording on your iPhone, a red bar will appear on top of your screen, indicating that the screen recording is on. To stop screen recording, tap on that red status bar.
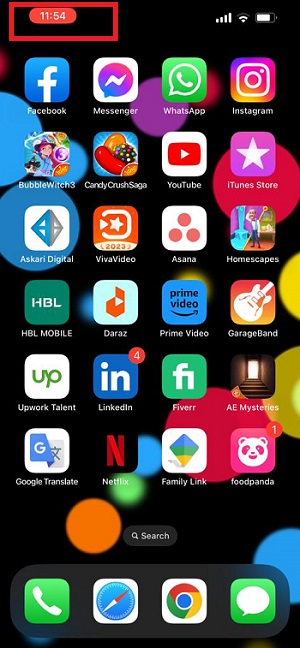
Tap the Red Status Bar to Stop Recording
Step 2. Tap “Stop” on the pop-up that appears to confirm your selection. This will end the recording and save it to the Photos on your iPhone.
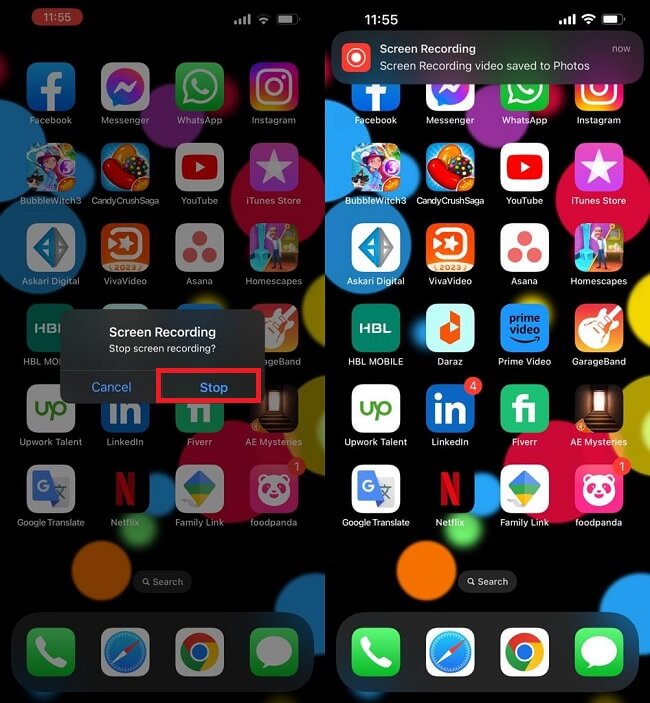
Tap Stop to Stop Recording
Best Screen Recording Tool Recommendation – Screenify
If you are looking for a powerful and completely free screen recording software, then Screenify is definitely the best choice. This tool for Windows and macOS can meet your various recording needs.
Main Features:
- Completely free: enjoy all features without paying.
- Support Win and Mac: cross-platform support to meet the needs of different users.
- Unlimited recording time: unlimited recording time, suitable for long-term content creation.
- Custom watermark: you can freely set text watermarks to protect the copyright of your work.
- UHD recording: supports 4K 60FPS video recording, presenting delicate picture quality.
- Multiple recording modes: full screen recording, area selection recording, locked window recording are up to you.
Record Mac/Win with Screenify
Step 1.Download and Install Screenify on Computer.
Step 2.Launch Screenify on your computer, and select Record screen mode.
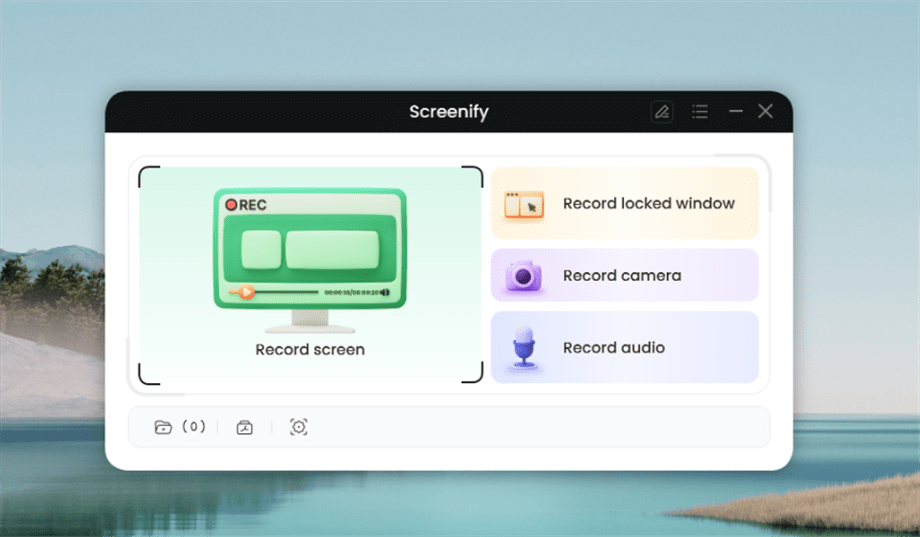
Select Record Screen Mode
Step 3.Configure Recording Settings aims to configure settings like system audio before recording.
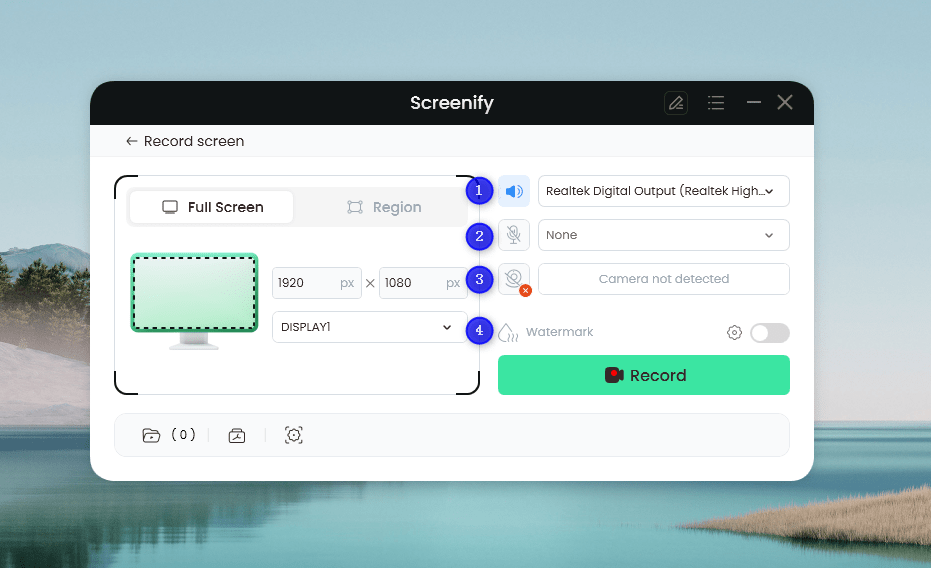
Set Configure Recording Settings
In this setting menu, you can:
1 Choose the System audio.
2 Choose the Microphone you want to record.
3 Choose the Camera you want to use.
4 Choose whether to add a watermark.
Step 4.Select Recording Screen.
Option 1. Full Screen Record
Please select Full Screen mode and choose the display you need to record. Hit Record button to initiate recording.
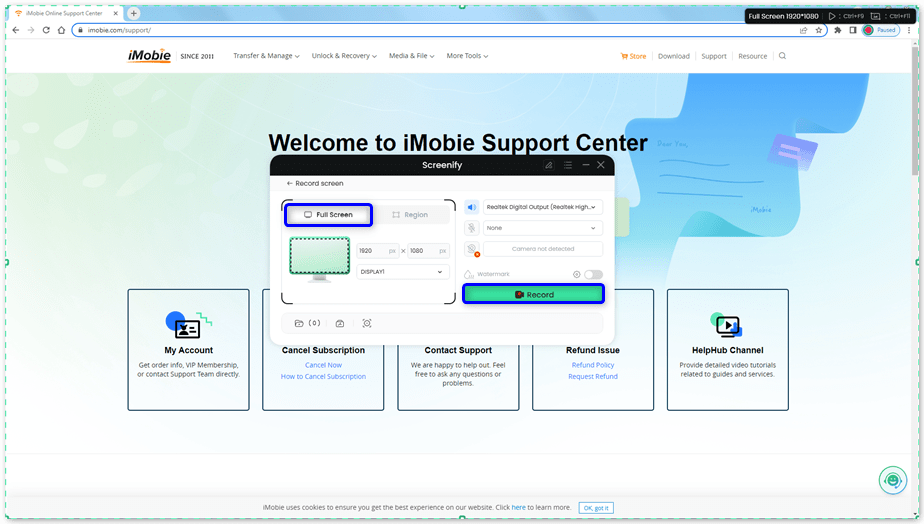
Select Full Screen
Option 2. Region Record
To record region, you need to manually select the recording area. After selection, you can still adjust the selected area. It supports customize selection, full screen, and proportional selection based on common social media dimensions.
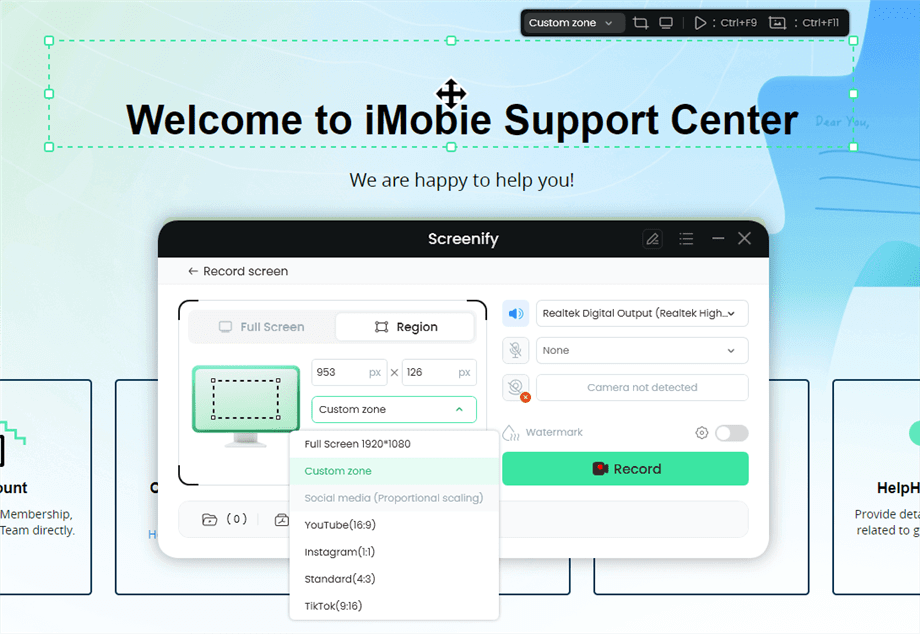
Record Region
Step 5.Wait for the Recording Countdown.
There is a 3-second countdown to help you prepare the recording after you are ready to start recording.
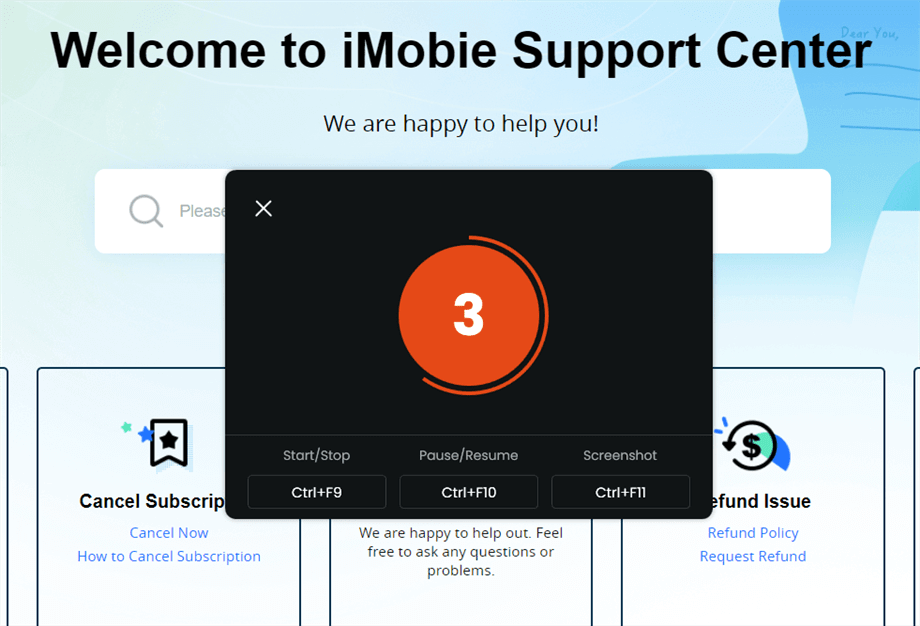
Wait for the Recording Countdown
If you would like to see a recording countdown before your recording starts, you can enable the countdown option. Or you can tap it off. View this post to know how to set the countdown option.
Step 6.Start Recording.
The recording will begin after a 3-second countdown. You can make annotations on the recording interface during the recording.
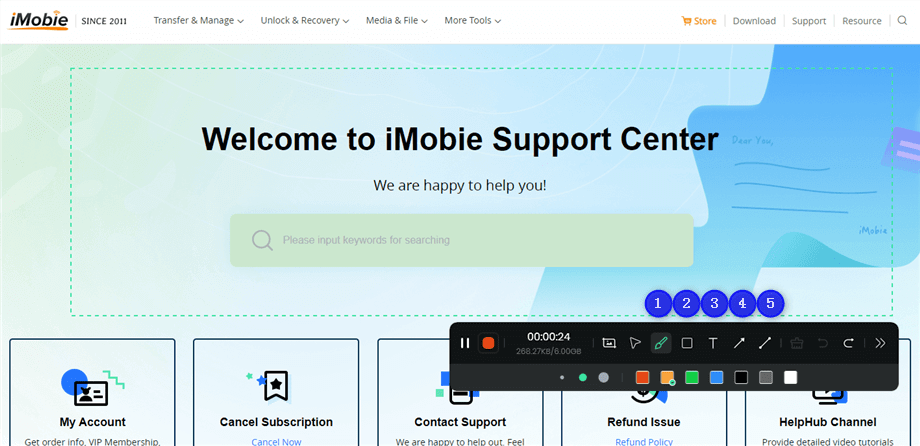
Annotate the Screen during Recording
With the toolbar, you can add the annotation in the screen:
1 Brush: Draw freehand on the screen recording interface to highlight or illustrate specific areas during the recording.
2 Rectangle: Draw rectangular shapes on the screen recording interface.
3 Text: Add written notes or labels directly onto the screen recording interface.
4 Arrow: Draw arrows on the screen recording interface to point out and emphasize specific areas.
5 Line: Draw straight lines on the screen recording interface to underline or connect specific points.
Step 7.Record Screen Process Completed.
When the recording is completed, you can click the red Stop button to end the recording. Your recorded files will be displayed. From here, you can preview and manage the recorded content as needed.
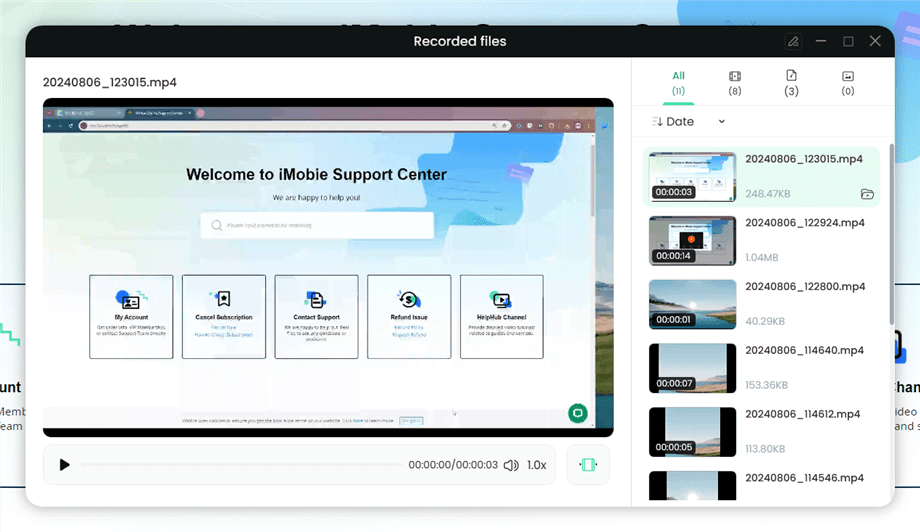
Preview the Recording
Whether you are a teacher, technical support staff, or content creator, Screenify is your ideal choice. Download Screenify now to experience a simple, efficient and professional screen recording tool!
Free Download * 100% Clean & Safe
Product-related questions? Contact Our Support Team to Get Quick Solution >

