How to Screen Record on Asus Laptop with 7 Easy Ways [2025]
This article will show how to screen record on an Asus laptop with step-by-step instructions. We will share seven easy solutions using integrated tools and specialized software. Whether you want to record your gameplay or instructional content, we’ve got you!
Are you an Asus user looking to record an intense gaming session? Or do you want to capture a walk-through tutorial or presentation for an online meeting? In any scenario, knowing how to screen record on an Asus laptop is essential. There are several solutions for it. However, finding a suitable method for hassle-free recording is not so easy.
But don’t worry! If you don’t know the best way to record your screen, we can help! This article will provide a complete guide to screen recording on an Asus laptop. We will share seven solutions using tools that boost productivity and let you capture content effortlessly. Are you ready for it? Let’s go!
Is There a Built-in Screen Recorder on an Asus Laptop?
Asus is known for its high-performance and innovative laptops. However, the company does not specifically offer a built-in screen recorder for these devices. But, don’t worry! You can use a Windows-integrated screen recorder if your laptop runs on Windows 10 or 11. It’s called the Xbox Game Bar!
The Game Bar offers basic yet high-quality screen recording capabilities for Asus laptops. It can capture content from specific windows, such as browsers, desktop apps, and more.
Ready to find out how to screen record on an Asus laptop? Let’s explore how to do it!
How to Screen Record on Asus Laptop with Windows 10/11
The Xbox Game Bar is the most convenient way to record on Asus. It seamlessly integrates into the Windows system. You can use it to capture the currently opened window on your device. Here are the steps to record your screen using it.
Step 1. Press the “Windows+G” keys on your keyboard to launch the Xbox Game Bar.
Step 2. Click “Settings” from the top. Go to “Widgets” and select the “Game” option.
Step 3. Go to the “Audio” widget and select the “Mix” tab. Choose your “Speakers / Headphones” source from here.
Step 4. Go to the “Voice” tab and select your “Microphone” under the “Windows Default Input” option.
Step 5. Click the “Start Recording” button from the top left to initiate the screen recording.
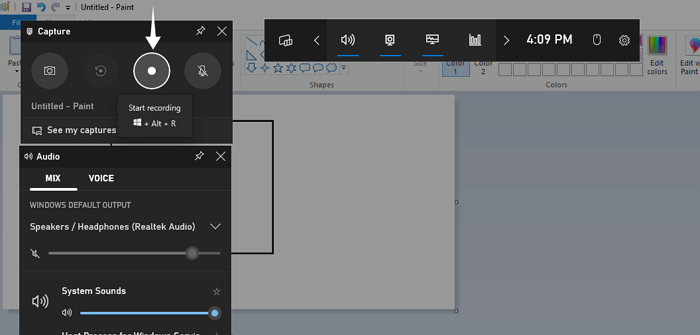
Start recording with Xbox Game Bar
Step 6. A popup with the capture status will appear. Click “Stop” from here once the recording is complete.
And that’s how to screen record on Asus using the Game Bar! Let’s move ahead now and explore another way to do it!
How to Screen Record on Asus Laptop via OBS Studio
OBS Studio offers a free and versatile screen recording solution for Asus laptops. Whether you use a Windows, Mac, or Linux operating system, you can use it to capture your device’s screen.
Let’s see how to use it to screen record on Asus.
Step 1. Open OBS on your computer and configure it using the “Auto Configuration Wizard.”
Step 2. Once OBS is set up, go to “File” from the top left corner and click “Settings” from the list.
Step 3. Select “Hotkeys” from the left panel. Assign keys for “Start Recording” and “Stop Recording” and click “Apply.”

Start Recording in OBS
Step 4. Click “+” under the “Sources” section. Select “Display Capture” from the list and rename it. Click “OK” once done.
Step 5. A new window will appear. From here, you can customize the display resolution and recording method, or leave them as default. Then click “OK.”
Step 6. Resize the recording frame. Then press the hotkey or “Start Recording” on the button right to begin screen recording.
And that’s how to screen record on an Asus laptop using OBS! Now, let’s move forward and explore another handy solution for it.
How to Screen Record on Asus with VLC
VLC is an open-source multimedia player that supports all the major platforms. Beyond just playing videos, it lets you capture your screen with your chosen frame rate. Here is how to use VLC to screen record on Asus.
Step 1. Download and install VLC Media Player. Open it and go to the “View” tab. Select “Advanced Controls” from the list to add a toolbar with the record button on the bottom left.
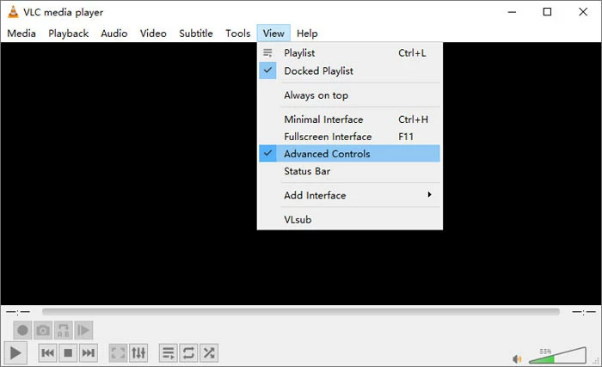
Select Advanced Controls
Step 2. Go to the “Media” tab from the top menu and select “Convert/Save” from the list.
Step 3. Select the “Capture Device” tab. Choose “Desktop” from the Capture mode dropdown. Then, select the frame rate for the capture.
Step 4. Select the video format in the Profile section and click “Browse” to choose the video location. Click “Start” once done.
Step 5. VLC will start recording your screen. Once you are done, click the “Stop” button to save the recording.
And that’s how to screen record on an Asus laptop using VLC Media Player! But we’re not done. Keep reading for another easy way to capture your screen!
How to Screen Record on Asus with PowerPoint
PowerPoint is a versatile presentation tool that lets you create engaging slideshows. Beyond this key feature, it lets you capture your screen in a few clicks.
Here are the steps to screen record with PowerPoint on an Asus laptop.
Step 1. Open PowerPoint. Go to the “New” tab and select “Blank Presentation.”
Step 2. Go to the “Insert” tab and click the “Screen Recording” button from the top right.
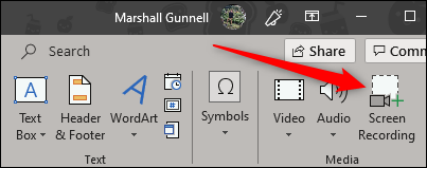
Find Screen Recording Option in the Toolbar
Step 3. A toolbar will appear at the top. Select the region for recording and click the “Record” button.
Step 4. Your screen recording will now start. Click “Audio” in the toolbar to mute or unmute your mic. Once you are done recording, click “Stop.”
Step 5. PowerPoint will add your recording to the slide. Click the “Play” button to watch it or use the editing tools in the “Format” tab to crop your video, add corrections, etc.
Step 6. Once you have edited your video, click “File” from the top menu. Go to “Export” and select “Create a Video.”
Step 7. Click the “Presentation Quality” dropdown and choose your desired video resolution. Then, click “Create Video.”
And that’s how to screen record on an Asus laptop using PowerPoint! Let’s move forward and explore another solution to capture your laptop’s screen!
How to Screen Record on Asus with ScreenRec
ScreenRec is a lightweight screen recorder that is compatible with Asus laptops. It allows you to easily record high-quality videos suitable for gameplay, presentations, or walk-throughs.
Here’s how to use it to record videos on Asus.
Step 1. Download and install ScreenRec on your laptop. Press “Alt+S” to launch it. A prompt to select a region for recording will appear.
Step 2. Select the area you want to record. Then, click the “Start Recording” button from the toolbar at the bottom.
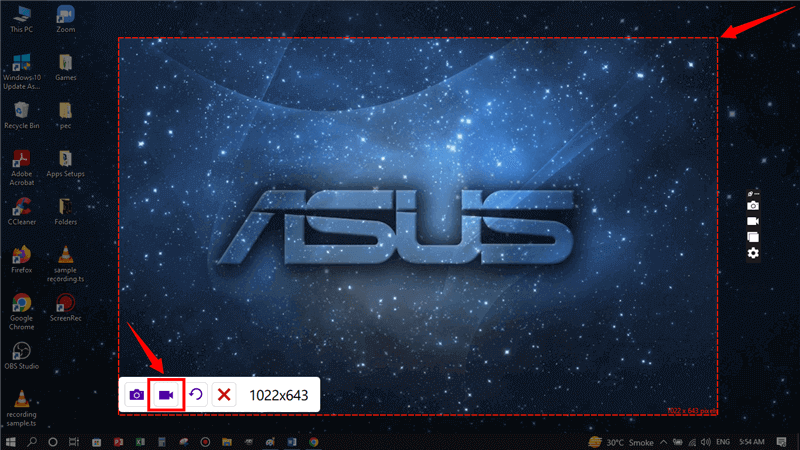
Select the Capture Area and Start Recording
Step 3. A delay timer for the video will begin. Your recording will start once the timer reaches zero.
Step 4. You can click the “Mic” and “Volume” icons in the bottom toolbar to turn them on or off. Click the “Stop” button once you’re done recording.
Step 5. Your video will appear on your screen. Click the “Play” button to preview it. Then click “Download” to save it. You can also click the link to share or trash can to delete the video.
That’s all about how to capture your screen using ScreenRec.
How to Screen Record on Asus Laptop with CamStudio
CamStudio offers a high-quality screen recording solution for Asus users looking to capture their screens with great detail. It also lets you save videos in various formats.
Let’s look at how to use it to screen record on Asus!
Step 1. Download and install CamStudio. Then, launch it. Go to “Options” and select “Video Options.”
Step 2. Choose a codec from the “Compressor” dropdown. Then, go to the “Framerates” section. Set the capture and playback rate and click “OK.”
Step 3. Click “Options” and select “Record audio from microphone” to enable it. You can also turn on the “Record audio from speakers” option.
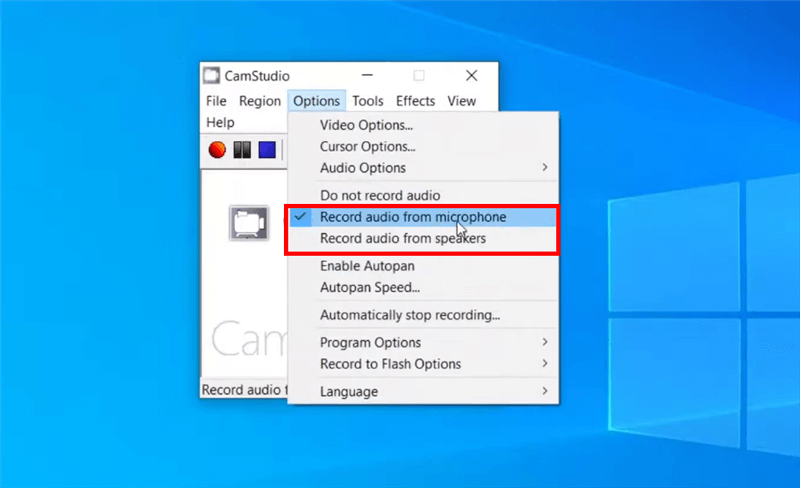
Enable Microphone or Speakers Recording
Step 4. Click “Options” once more and hover over “Audio Options.” Then click “Audio Options for Microphone” to select your audio input device.
Step 5. Click the “Audio Capture Device” dropdown and select your microphone from the list. Then, click “OK” to close the window.
Step 6. Go to the “Region” tab in CamStudio and choose your recording mode. You can select a specific window, region, or full screen.
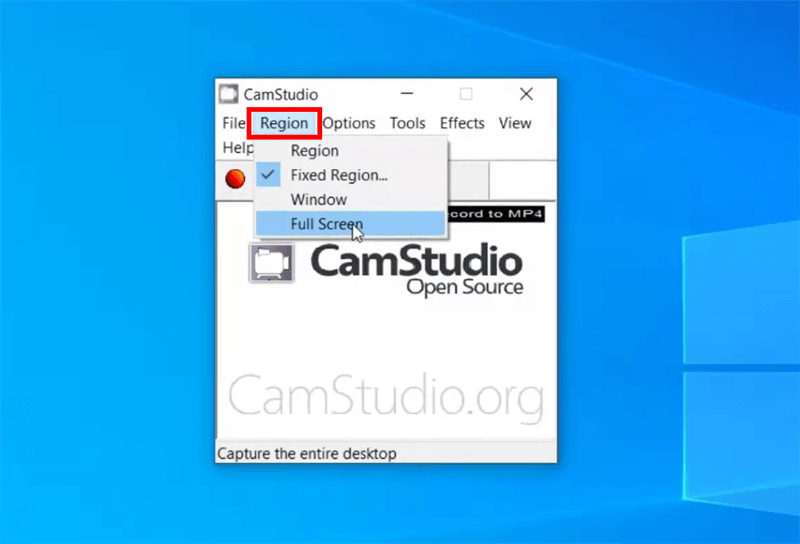
Choose the Capture Mode
Step 7. Click the “Record” button from the toolbar or the “F8” key to start your screen recording.
Step 8. Now, you can capture any screen on your laptop using CamStudio, whether a window, app, or game. Once done, press the “Stop” button to save your recording.
Let’s keep our pace and explore another screen recording solution for Asus.
How to Screen Record on Asus Laptop with Screenify
Screenify offers the best free solution for recording high-quality videos on Asus laptops. Its ability to capture ultra-HD videos makes it ideal for recording intense gameplay, complex software demos, and more without lags!
Apart from quality, Screenify offers flexibility! You can capture your screen, specific windows, camera, and audio all under one roof. But the best part is that it is entirely free! Plus, you can decide whether to watermark your videos or not.
Key Features of Screenify
- 100% Free – Screenify is entirely free software. You don’t need to pay for any feature.
- 4K Recording – It lets you screen record your laptop with 4K UHD and up to 60 FPS for lag-free video creation.
- Multiple Recording Modes – You can record full or partial displays, specific windows, camera, and specific size ratios for social media platforms.
- Record and Adjust Audio – Screenify lets you record your microphone and system audio. You can also adjust the volume, add noise reduction, and more.
- Platforms Supported – You can use Screenify on Windows and Mac operating systems.
Free Download * 100% Clean & Safe
Final Thought
That’s all about how to screen record on an Asus laptop! Various solutions are at your disposal, from built-in tools to third-party programs. You can use simple and easy tools like the Game Bar, VLC, and Powerpoint. You can also opt for specialized software like OBS, ScreenRec, CamStudio, and Sceenify. So, what are you waiting for? Go ahead and select the tool that fits your needs, and use our complete guide to start recording hassle-free!
Product-related questions? Contact Our Support Team to Get Quick Solution >

