How to Record Yourself Playing Video Games on Windows/Mac [5 Ways]
This article will provide a complete guide on how to record yourself playing video games with five powerful tools. We will share step-by-step guides on using these tools to record your game videos on Windows and Mac.
Screenify – Record Yourself Playing Video Games
Download Screenify to record yourself playing video games on Windows or Mac. 100% Free to use. No recording time limits.
100% Clean & Safe
Do you want to capture yourself gaming and share it on social media? Are you looking for ways to record your gameplay and your reactions at the same time? We get it! Videos that include both the gameplay and the players’ reactions are more fun to watch. They let viewers relate to your content and feel more connected throughout the video.
If you’re wondering how to record yourself playing video games, don’t worry! This article will tell you all about it! We will share five easy ways to capture yourself playing games with step-by-step guides. Whether you’re using Windows or Mac, you’ll find solutions that work on your platform. Ready for it? Let’s go!
When Do You Need to Record Yourself Playing Video Games
There are various scenarios when you want to capture yourself playing games. Let’s break these down below.
- Content Creation: You can capture yourself gaming to create videos for online platforms like YouTube. You can also stream your videos live on sites like Twitch and Discord.
- Educational Reasons: As a professional gamer, you can record gaming tutorials with your reactions to guide beginners. You can provide them with helpful tips to reach specific targets in the game.
- Sharing Highlights: Gaming is fun, but sharing your achievements and triumphs with live reactions can further enhance the experience.
- Reviewing Updates: You may want to capture your live reactions when trying out new releases in the game. Recording yourself during the process can build trust with your subscribers.
Now that we’ve noted the reasons, let’s see how you can record yourself gaming!
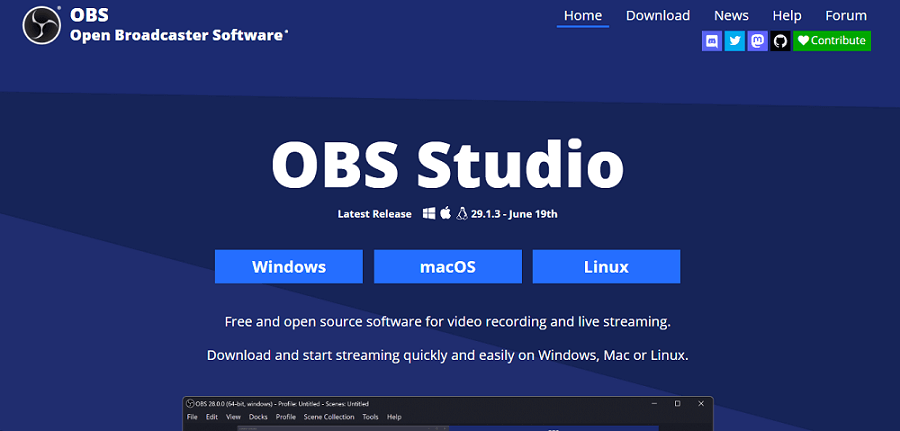
How to Record Yourself Playing Video Games with OBS Studio
OBS Studio offers a free solution to capture videos on all desktop platforms. These include Windows, Mac, and Linux. It is feature-packed and provides advanced solutions for professional video recording.
The best part? You can capture games and your webcam at the same time! It also offers flexible recording options, such as capturing specific game windows, full displays, etc.
Want to know how to record yourself while playing a game using it? Let’s find out below!
Download and install OBS on your platform. Then, use the steps below to start recording your games!
Step 1. Open OBS on your device. A popup for “Auto Configuration Wizard” will appear. Use it to configure OBS. Select one of the three options for Usage Information and click “Next.”
How to Screen Record Discord Audio with OBS
Step 2. Specify the video settings. Click the dropdown next to “Base (Canvas) Resolution” and choose your desired video dimensions. Similarly, select the “FPS” and click “Next.”
Step 3. Once OBS is set up, go to “File > Settings.” Select “Hotkeys” from the left and assign hotkeys for “Start Recording” and “Stop Recording” options. Click “Apply” once done.
Open Phone Screen Capture on OBS
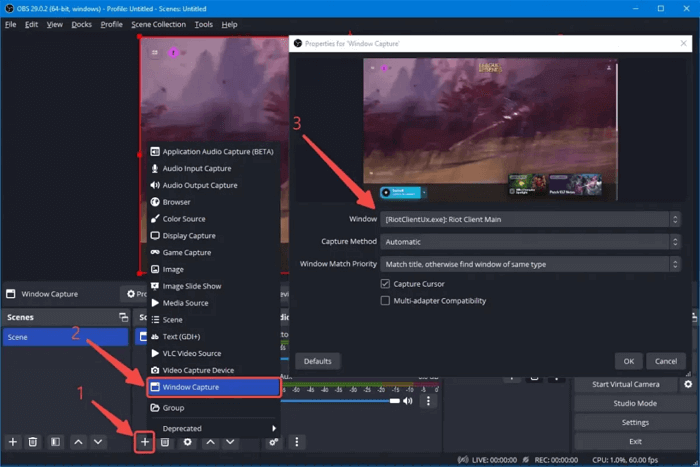
Step 4. Now, you need to specify which game you want to record. To do this, click “+” under the sources section and select “Game Capture.” Rename the source and click “OK.”
Step 5. Open the game you want to record. Return to OBS and select “Capture specific window” as the recording mode. Then, choose the name of the game window and click “OK.”
Step 6. To record your face, click the “+” icon under sources and select “Video Capture Device.” Write a name for the source and press “OK.”
Step 7. Configure the webcam settings. Then click and drag the edge of the webcam window to adjust it over the game. Press the hotkey or click “Start Recording” to capture yourself playing games.
And that’s how to record yourself playing video games using OBS Studio! Let’s move ahead now and explore another free recording solution.
How to Record Yourself While Playing a Game via QuickTime Player
QuickTime Player is a built-in video player, editor, and recorder for Mac. This small but powerful tool lets you screen capture videos, snaps, and even audio.
The cool thing about Quicktime Player is that it is effortless to use. In a few steps, you can record yourself and your game screen. You can also perform minor edits such as trimming, splitting, and rotating your videos.
Want to know how to record yourself playing video games using it? Let’s find out!
Here are the steps to record your games and webcam using QuickTime Player.
Step 1. Click “Command+Space” to open the spotlight search. Write “Quicktime Player” in the search box and open it.
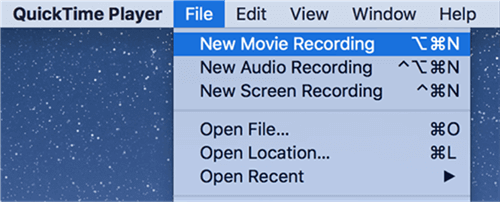
Step 2. Go to the “File” tab and select “New Movie Recording” to film your face while gaming.
Start New Movie Recording in QuickTime Player
Step 3. A window with your webcam recording will open. Adjust its size and position. Then, click “View” and choose “Float on Top.” This will fix the webcam window over your game recording.
Step 4. Go to the “File” tab from the top left. Select “New Screen Recording” from the list.
Step 5. A toolbar will appear on your screen. Click “Options” to configure the recording settings. You can choose the location, timer, microphone for game capture, and more.
Step 6. Open the game you want to capture. Then, choose the recording mode. You can select “Record Entire Screen” or “Record Selected Portion.” Click “Record” once done.
Step 7. Your screen recording will now begin. Once you are finished playing the game, go to the top right and click “Stop” to export the recording to your device.
That’s all about how to record yourself while playing a game with QuickTime Player. Let’s move forward now and explore another easy solution for it!
How Do You Film Yourself Playing a Video Game via Xbox Game Bar
Xbox Game Bar is the built-in screen capture and recorder for Windows users. It lets you record your gaming window with your live audio. You can also record speakers and system sounds, allowing you to capture your game sounds while playing.
But, how do you film yourself playing a video game using it? Keep reading to find out!
Open the game you want to capture and press the “Windows+G” keys to launch the Game Bar. Then, use the steps below to capture the gameplay.
Step 1. Click the “Settings” icon from the top toolbar. Go to “Widgets” from the left and select the “Game” option under the “Audio record” section.
Step 2. Go to the “Audio” widget and select your “Speakers / Headphones” and “System Sounds” under the “Mix” tab.
Step 3. Select the “Voice” tab from the audio widget and choose your “Microphone” from the dropdown list.
Step 4. Click the “Start recording” button from the top left to start recording your game.
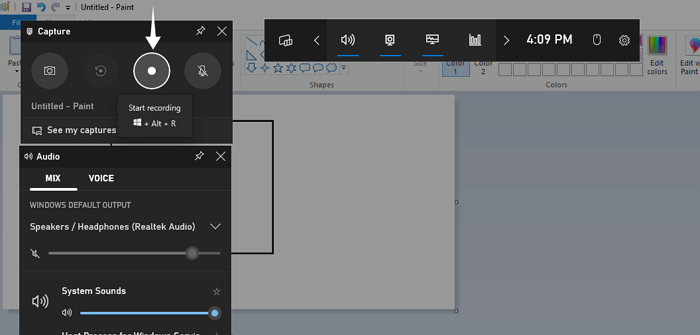
Start recording with Xbox Game Bar
Step 5. A popup showing the capture status will appear on the top right. Click the “Stop” button from here once you’re done recording.
That’s it! Now you know how to film yourself playing a video game using Xbox Game Bar! Let’s keep our pace and explore another tool that helps you do it!
How to Record Yourself Playing Video Games with Bandicam
Bandicam offers another easy solution for creating gaming videos. It offers different screen recording modes as well as audio and webcam recording tools. You can use its game mode to record a specific game window using hotkeys and capture snaps during the process.
Let’s find out how to capture yourself gaming using this tool.
Download and install Bandicam on your PC. Then, use the following instructions to capture your game and webcam.
Step 1. Open Bandicam on your PC and select the “Game” mode from the top menu.
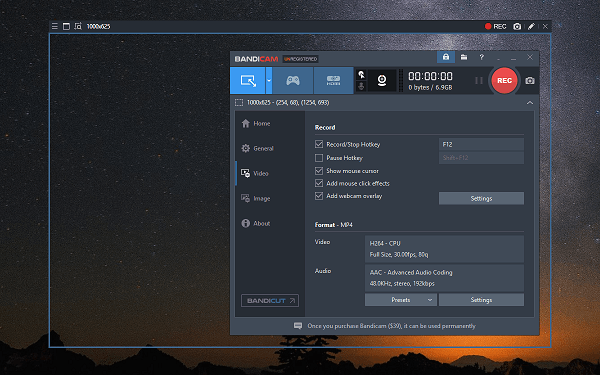
Game Recorder Software Bandicam
Step 2. Click “Add webcam overlay” to record yourself playing games. Checkmark the “Add webcam overlay to video” option and click “OK.”
Step 3. Press the “Add microphone” button to configure the audio input. Click the dropdown for “Microphone” and select an audio source. Click “OK” once done.
Step 4. Open the game you want to record and click “F12” to start the recording. The numbers on the top left will turn red, indicating that the recording has started.
Now let’s explore the easiest solution to record your game sessions!
How to Record Yourself Playing Video Games with Screenify
Do you want a powerful yet easy solution for recording yourself playing games? Let us introduce you to Screenify, the ultimate solution for capturing gaming videos on Windows and Mac devices.
With its versatile recording modes, Screenify allows you to capture your gameplay in various ways. Whether you need to record a specific game window, fullscreen display, camera, or audio, Screenify makes it possible.
The best part? It is free to use, and you can record without watermarks! You can also carry out basic editing tasks using it.
Let’s find out how Screenify can facilitate your game recordings!
Key Features of Screenify
Here are the standout features Screenify offers to record your gaming sessions.
- Free to Use – Despite its advanced recording solutions, Screenify is entirely free to use. You don’t have to worry about any recording limits.
- High-Quality Recordings – Screenify allows you to record HD videos of your games. You can create up to 4K resolution and 60 FPS recordings.
- Flexible Recording Modes – It offers several recording modes, including full or partial screen, window-specific, camera, and audio recording.
- Easy Video Editing – You can do simple video editing, such as trimming your recordings and denoizing audio and video files for a cleaner output.
- Platform Compatibility – Screenify is equally available for both Windows and Mac devices.
Free Download * 100% Clean & Safe
Now, let’s look at some questions you might have before calling it a wrap-up!
Frequently Asked Questions
Q1. How do YouTubers record their gameplay?
YouTubers use video recording tools like OBS, Quicktime Player, or Screenify to capture gaming sessions. These allow them to create high-resolution videos from game and webcam recordings.
Q2. How to stream yourself playing video games?
You’ll need a tool that can capture the audio and video on your PC and broadcast them. One such tool is OBS Studio, which is free to use. You can also use the Twitch app to stream yourself playing games.
Final Thought
That’s all about how to record yourself playing video games! We have shared five easy solutions with step-by-step guides. These tools are accessible and provide a hassle-free way to capture your gaming sessions on Windows and Mac.
But if you’re looking for a more robust solution to create your game recordings, Screenify is a great option! With flexible recording modes and full HD resolution, you can create quality content for any platform!
Free Download * 100% Clean & Safe

Senior writer of the iMobie team as well as an Apple fan, love to help more users solve various types of iOS & Android-related issues.
Product-related questions? Contact Our Support Team to Get Quick Solution >
