How to Record Video Lectures on Laptop (Free & Paid)
No matter if you want to record class lectures as a student or pre-record presentations to demonstrate concepts as a professor— you must know how to record video lectures on a laptop for free. This detailed guide will explore the best screen recorders for laptops that’ll help you achieve that.
Screenify – Record Video Lectures on Laptop
Free download Screenify to record your screen on Windows or Mac. Supports recording full screen, specific screen, audio, camera, etc. Just record as you like!
Being able to record class lectures is beneficial in a variety of ways. The screen-recorded lectures will help students review the concepts later and make detailed revisions. On the other hand, professors can save a lot of time and effort by providing a pre-recorded presentation lecture to students for additional help. In both these scenarios, you must know and understand how to record a video lecture on laptop for free?
We have compiled a list of the best screen recorders that’ll help you record video lectures on a laptop (both free and paid). Our detailed guide will focus not only on the key features, pros, and cons but also offer additional tips to improve the quality of video lecture recordings. Let’s delve into further details.
Part 1. How to Record Video Lectures on Laptop (Free)
Below are the top 3 free video lecture recorders on Laptops that offer a seamless way to capture screen:
Screenify— 100% Free Video Lecture Recorder
Recording lectures has become popular since COVID-19, and everyone is looking for ways how to record video lectures on the laptop for free! Screenify has filled the gap with its top-notch recording quality and advanced features that are entirely free. Record your online classes or presentation lectures at 4K resolution at 60 FPS to avoid any blurriness and interference. Moreover, there is no time limit for the screen recording, and you can record an online class or video lecture for as long as you want without any worry.
With its multiple recording modes, students and professors can keep their privacy intact while recording the screen. You can either record full-screen content or even a region/part of it. Additionally, the Lock Screen Window option enables users to record only a specific window that is currently opened. Apart from this, professors can also record their webcam alongside screen recording.
Free Download * 100% Clean & Safe
Key Features
- Record video lectures with dual audio, i.e., system audio and microphone, both to add a narration.
- You can screen-record video lectures at high-quality 4K resolution and 60 FPS to avoid blurry presentations.
- Utilize the noise reduction features to minimize the noise level.
- There are no watermarks and time limit constraints for recording video lectures.
- Screenify is not only completely free but compatible with Windows and Mac.
Pros
- Support exporting files in various formats
- Freely set text watermarks
- Multiple recording modes
Cons
- Window recording does not support camera recording
Steps to Record Video Lectures on Laptop
Step 1.Download and Install Screenify on Computer.
Step 2.Launch Screenify on your computer, and select Record screen mode.
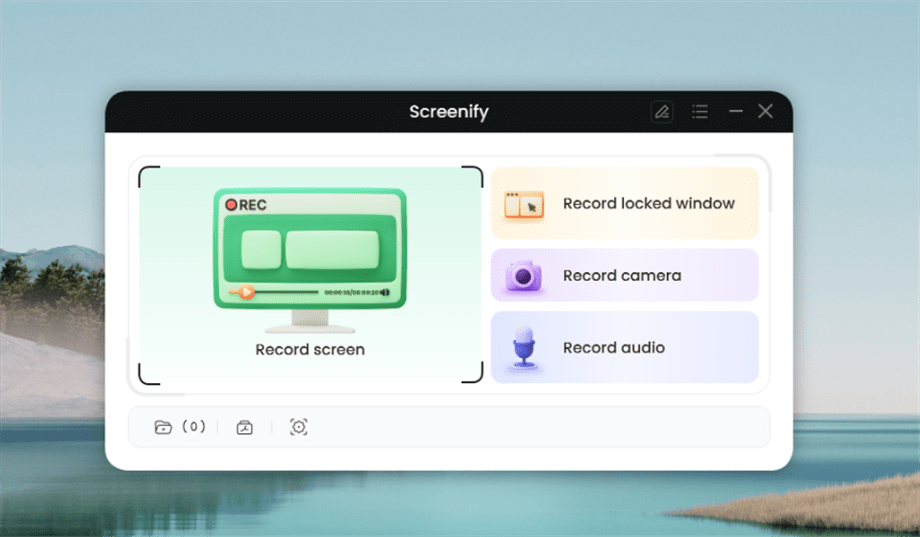
Select Record Screen Mode
Step 3.Configure Recording Settings aims to configure settings like system audio before recording.
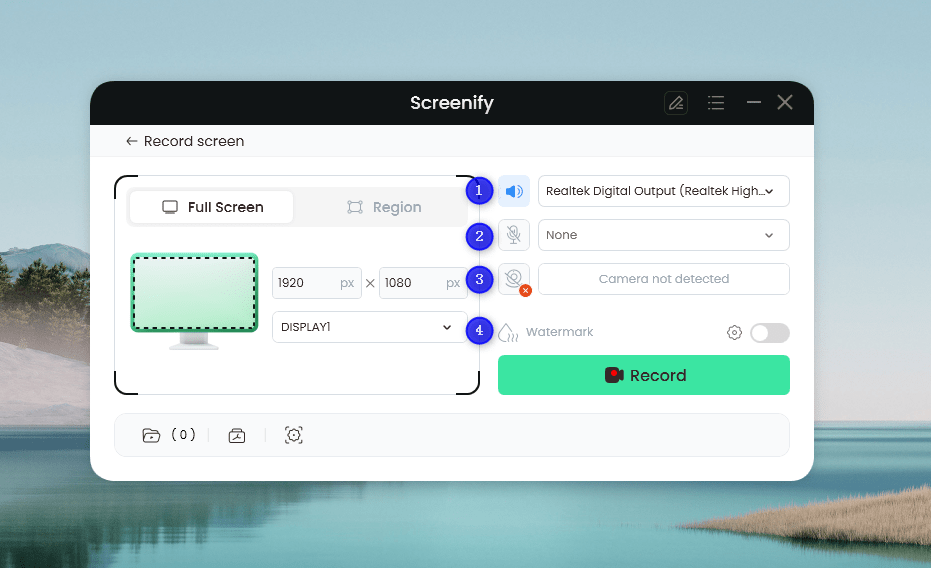
Set Configure Recording Settings
Step 4.Select Recording Screen.
Option 1. Full Screen Record
Please select Full Screen mode and choose the display you need to record. Hit Record button to initiate recording.
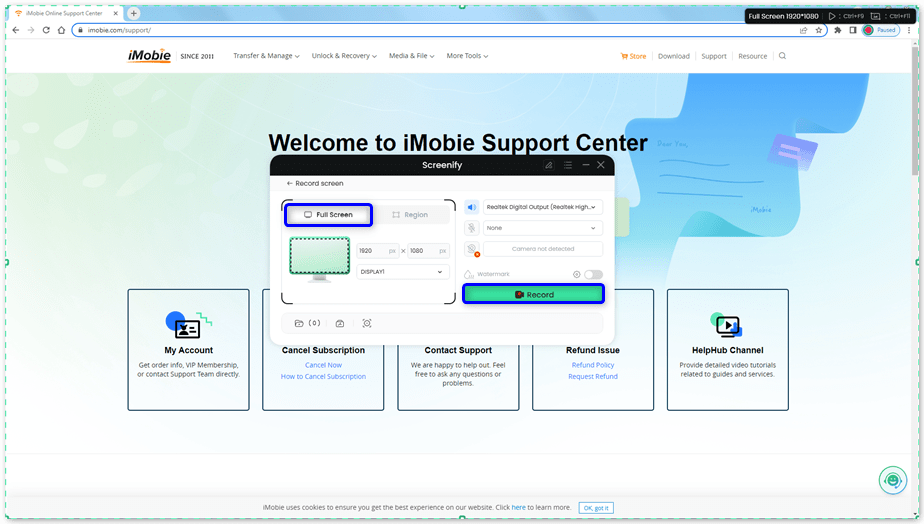
Select Full Screen
Option 2. Region Record
To record region, you need to manually select the recording area. After selection, you can still adjust the selected area. It supports customize selection, full screen, and proportional selection based on common social media dimensions.
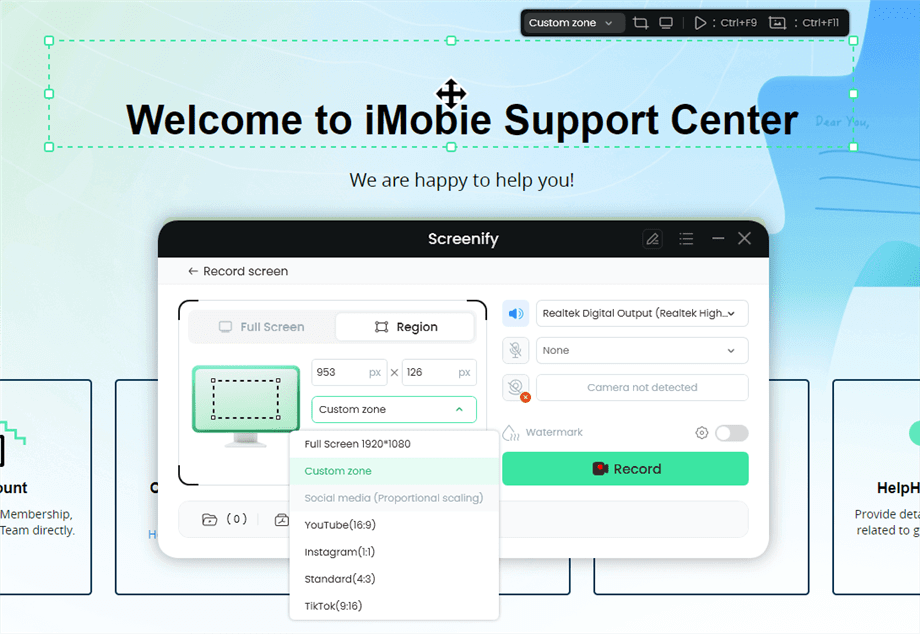
Record Region
Step 5.Wait for the Recording Countdown.
There is a 3-second countdown to help you prepare the recording after you are ready to start recording.
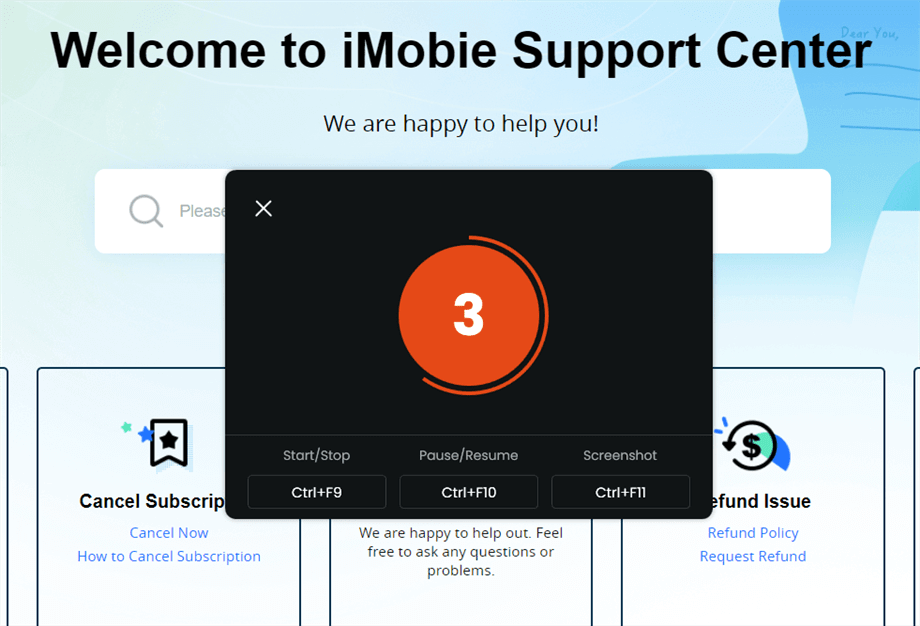
Wait for the Recording Countdown
If you would like to see a recording countdown before your recording starts, you can enable the countdown option. Or you can tap it off. View this post to know how to set the countdown option.
Step 6.Start Recording.
The recording will begin after a 3-second countdown. You can make annotations on the recording interface during the recording.
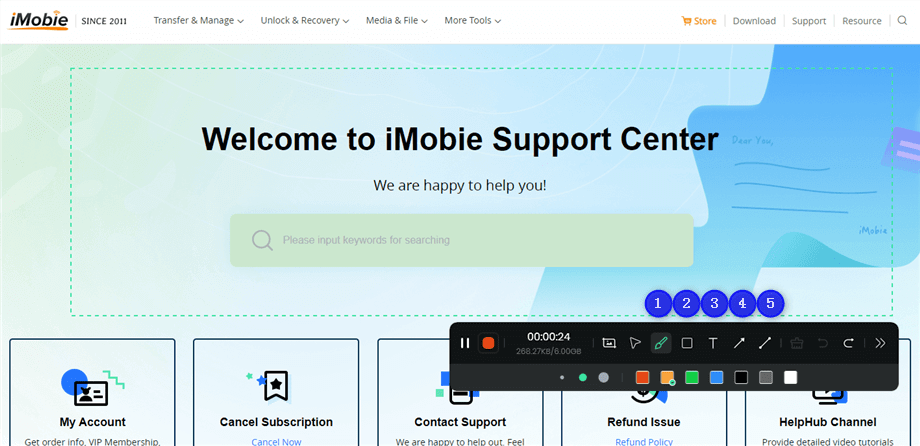
Annotate the Screen during Recording
Step 7.Record Screen Process Completed.
When the recording is completed, you can click the red Stop button to end the recording. Your recorded files will be displayed. From here, you can preview and manage the recorded content as needed.
QuickTime Player (Mac)
Many of you might find it hard to install a third-party tool on Mac to record class lectures. Wondering how to record video lectures on the laptop for free then? No worries! QuickTime Player is a built-in screen recorder for Mac that can capture presentations, lectures, online classes, and more in 4K resolution at 120 FPS. This higher frame rate makes it feasible to record and watch any animations played during the lectures without any lags.
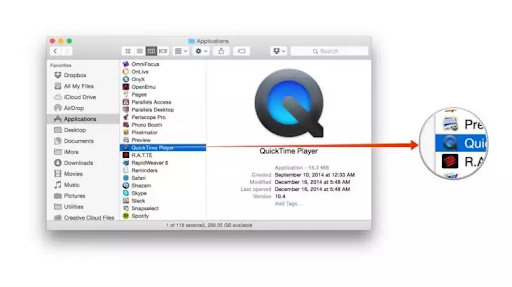
QuickTime Player App
Whether you’re a student or a professor, QuickTime Player offers functionalities to cater to the needs of both. You can split, trim, and even rearrange the recorded lectures at the end with its basic editing tools. One of the drawbacks of QuickTime Player is that you cannot record the internal audio by default and need to install an additional plugin for the audio input source.
Key Features
- Utilize the basic editing features such as video trimming, splitting, and rearranging to improve the quality of lectures.
- Record any videos or animations played during lectures without any lags with its 4K screen recording at 60 FPS.
- You can select/deselect to display the cursor movements during video lecture recording.
- Built-in tool for Mac and requires no installation.
Pros
- Easy to use
- Customizable audio source input
- 4K screen recording at 120 FPS
Cons
- Additional plugin for internal audio
Steps to Record Class Lectures using QuickTime Player
Here’s a step-by-step guide to record class lectures QuickTime Player:
Step 1. Launch QuickTime player on your Mac. Click on “File > New Screen Recording.”
Step 2. Click on the down arrow to select the audio input, such as “Internal Microphone.”
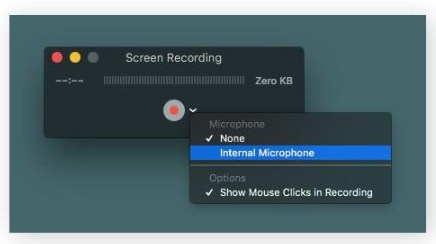
select the audio input
Step 3. Click the “Record” button to start the screen and audio recording on your Mac.
Part 2. How to Record Video Lectures on Laptop (Paid)
Now, we’ll cover the best paid screen recorders for Laptop to record online lectures:
Camtasia
Camtasia is a top choice in paid screen recorders that is suitable for both beginners and advanced-level creators. No matter if you’re a student or a university professor, you’ll find comfort and convenience while recording lectures with Camtasia. By default, Camtasia is set to record the entire laptop screen, but you can customize the settings, such as selecting a region of the screen to record. It can record video lectures at 1080p resolution and 60 FPS. The frame rates can be adjusted from 5 to 60, keeping in mind the quality you need.

Camtasia screen recorder
You can also select to record the webcam, system audio, and microphone audio as per your needs. The audio cleanup feature is available in Camtasia Create (paid plan). Camtasia is also famous for its editing tools, in addition to quality screen recording. Some of these include the multi-track timeline, versatile layouts, and AI-assisted background removal. Moreover, you can enjoy the AI-translated scripts, captions, and description features in the Camtasia Pro version.
Key Features
- TechSmith Camtasia offers brilliant 1080p screen recording and sharp audio recording capabilities.
- Record online lectures at 60 FPS without any lags or blurriness.
- You can even edit and polish your recorded lecture videos with its advanced editing tools.
- Intuitive interface helps students, trainers, and professors to utilize this tool to its full potential.
Pros
- All-in-one screen recorder and editor
- Customizable controls
- Simple and easy to use
Cons
- Use a lot of resources when running
Pricing Plans
- Camtasia Essentials— $179.88/year
- Camtasia Create— $249/year
- Camtasia Pro— $499/year
Steps to Record Class Lectures using Camtasia
Step 1. Download, install, and launch the Camtasia screen recorder. Choose the recording mode, such as a microphone, system audio, screen, or webcam.
Step 2. Customize the audio settings, such as audio input sources.
Step 3. Click the “Record” button to initiate the screen recording.
Wondershare DemoCreator
Wondershare DemoCreator is an advanced screen recorder that lets you record video lectures seamlessly and even makes post-production editing a breeze. The tools record and arrange the video, system audio, and microphone audio separately so that cutting, merging, and splitting becomes easier! Additionally, to make your video lectures more engaging or understandable, DemoCreator offers multiple editing tools such as annotations, animations, cursor effects, layout templates, and more.
Wondershare DemoCreator has also integrated multiple AI functionalities such as AI Teleprompter, background remover, beauty filter, text-to-speech, and more.
Key Features
- Record video lectures in 4K or 8K at 120 FPS for a brilliant screen recording quality.
- Polish your recorded video lectures with stickers, layouts, or animations.
- Virtual assets such as music, texts, and GIFs can enhance engagement and understanding.
Pros
- Record webcam and screen simultaneously
- Separate tracks for screen and webcam recording
- Advanced editing tools
- AI integrations
Cons
- The free version has a watermark
Pricing Plans
- Cross-Platform Monthly— $15
- Cross-Platform Yearly— $59.99
- Perpetual Plan— $75
Steps to Record Class Lectures using DemoCreator
Step 1. Download, install, and launch Wondershare DemoCreator on PC. Set the recording area, microphone, and webcam inputs.
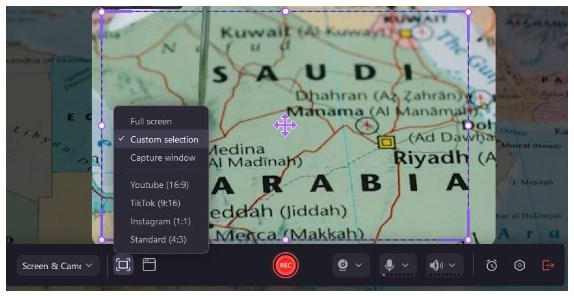
Wondershare DemoCreator
Step 2. Click on the “Record” button to initiate the screen recording process.
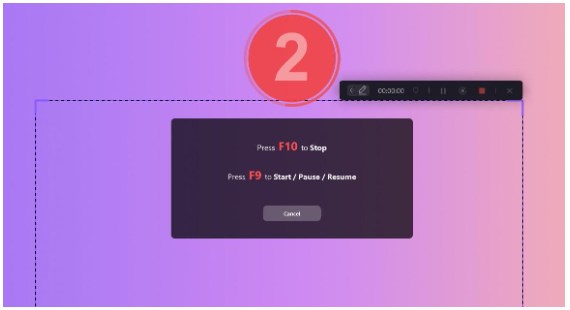
Click on the “Record” button
Part 3. Tips for High-quality Video Lecture Recording
Do you want to record online video lectures for a flexible schedule? No worries! We have compiled some tips and tricks to record high-quality video lectures on PC:
- Choose an Advanced Screen Recorder
Students must research and select an advanced video recorder tool that supports high-quality screen recording in either 4K or 1080p for clear visuals. Moreover, a higher frame rate is preferred as it enables seamless recording of animations or videos being played during the lectures without any lags. Moreover, make sure that the tool is flexible enough to customize the recording area.
We recommend using Screenify to record video lectures as it fulfills all the criteria, such as 4K recording at 60 FPS, crisp audio quality, and multiple recording modes.
- Schedule Option is a Plus!
Check whether the screen recorder has an automatic scheduler feature that allows you to record video lectures automatically. It is quite helpful if you cannot show physical presence in front of a PC.
- Editing Capabilities
The video lecture recorder should have advanced editing capabilities to trim, split, mute, and add narration, visual elements, or other engaging materials to recorded lectures for better comprehension.
Part 4. Frequently Asked Questions
1. What is the best free software to record video lectures on a laptop?
Various tools are available to record video lectures. We recommend using Screenify, a 100% free 4K screen recorder that allows customized recording area and crisp audio recording from dual sources.
2. Is there any recording option on laptop?
Yes, you can record on a built-in screen recorder known as Xbox Game Bar on your Windows laptop. If you have a MacBook, you can utilize QuickTime Player.
3. How can I ensure good audio quality for my video lectures?
Make sure you’re in a quiet environment before recording a video lecture. Invest in a good-quality microphone or other audio input sources. Choose a good quality screen recorder that offers noise reduction features such as Screenify.
Conclusion
There might be some instances where you cannot attend some of the online lectures, or you might want to record them for future revisions. In all these scenarios, choosing a reliable video lecture recorder is a must. Wondering how to record video lecture on laptop for free? We have compiled the top video lecture recording software for this guide. However, our top choice is Screenify— a reliable and 100% free video recorder with 4K resolution at 60 FPS and no time limit constraints.
Free Download * 100% Clean & Safe
Product-related questions? Contact Our Support Team to Get Quick Solution >

