How to Screen Record on Mac with Audio [2024]
Learn how to record screen and audio on Mac using built-in tools and third-party apps. Find the best method for your needs. Also, discover an amazing tool that is launching soon.

Screenify – Record Screen with Audio on Mac
Try Screenify for free to record screen with audio on Mac. Whether full-screen or partial-screen recording, recording with sound or with camera, Screenify can do it with ease.
100% Clean & Safe
Do you want to record your Mac screen with audio? Maybe its a gameplay, a helpful tutorial that you want to share, or a video call? Well, screen recording with audio on a Mac can be super helpful for these tasks and more. But how do you do it? Is it complicated?
Don’t worry! It’s actually quite easy. This guide will walk you through how to screen record on Mac with audio. Whether you want to record your entire screen or just a specific window, we will cover all the steps to get you started.
Can You Record Screen and Audio on Mac?
Yes, you can definitely record screen and audio on Mac. It has built-in tools like QuickTime and Screenshot toolbar that allows you to record your screen with audio. These tools also gives you the option whether you want to record the whole screen or a specific part of it.
But that’s not it! If you want more than that, you can use third party tools like Bandicam and OBS Studio. They come with more advanced features that can help you record the screen as per your requirements. However, you just need to choose the right tool and should know how to use it.
And for that, our guide will be enough! Let’s move forward and explore various methods to learn how to record screen and audio on mac!
How to Record Screen and Audio on Mac via QuickTime
Recording your screen and audio on a Mac using QuickTime is simple and efficient. Earlier, QuickTime Player was a preinstalled built-in app on Mac. However, Apple discontinued this multimedia software and replaced it with AV Foundation. You can still download it and use it to capture your screen with audio from your microphone.
Here is how to screen record on Mac with audio using QuickTime:
Step 1: Find and open QuickTime Player in the Applications folder of your Mac. You can also search for it using Spotlight.
Step 2: Go to the top menu bar, click “File,” and select “New Screen Recording.” This will bring up a small recording window on your screen.
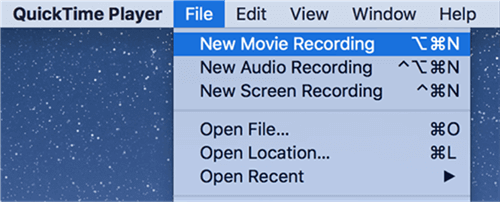
Start New Recording in QuickTime Player
Step 3: Next, click “Options” right next to the Record button. You can then choose a microphone source (either your internal microphone or an external one).
Step 4: By default, QuickTime records your entire screen. However, you can use the options to capture only a specific window or program.
Step 5: Once you are done with the customizations, click the “Record” button and start recording your Mac screen.
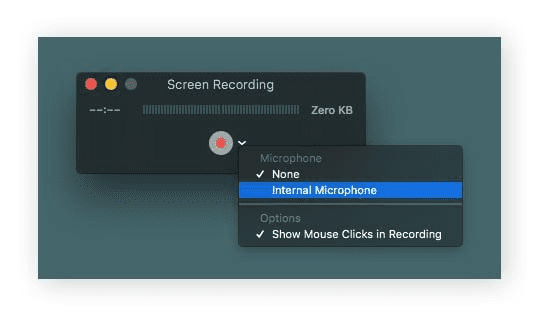
QuickTime Screen Recorder
Step 6: When you’re finished, click the stop button in the menu bar to stop the recording. You can also use the shortcut keys “Command + Ctrl + Esc” to exit the recording.
After you stop the recording, QuickTime will automatically launch it. You can review and ensure everything is right before saving the recording on your Mac. Although this method is simple, it has limitations. You can also try the next method!
How to Record Screen and Audio on Mac with Screenshot Toolbar
Your Mac also has a built-in Screenshot Toolbar for fast screen captures. You can use it to record your screen with audio, too. It’s a quick and easy way to capture what’s happening on your screen and your voice at the same time. This approach is similar to the QuickTime Player, but you don’t have to open any app.
Let’s see how to screen record on Mac with audio using the Screenshot Toolbar:
Step 1: Press these shortcut keys, “Shift + Command + 5,” on your keyboard to open the screenshot toolbar.

Launch Screenshot Toolbar
Step 2: The toolbar will open at the bottom of your screen. Select whether you want to record the whole screen or just a specific part.
Step 3: Then, click “Options” in the toolbar and choose your microphone source under “Microphone” to record the audio too.
Step 4: Once you are done with screen and microphone settings, click the “Record” button to start recording.
Step 5: To finish your recording, click the stop button in the menu bar or press “Command + Ctrl + Esc” again. Your recording will be saved and shown in the corner of your desktop.
This is how to record screen and audio on Mac using the Screenshot Toolbar. If this method is not suitable for your task, you can try the next one!
How to Screen Record on Mac with Audio via OBS
OBS (Open Broadcaster Software) is a free tool that lets you record your Mac screen with audio. It offers more customization options than Mac OS built-in tools. Therefore, OBS can be a good option if you need precise control over your recordings.
Here is how to screen record on Mac with audio using OBS:
Step 1: Visit the official website of OBS and download the latest version for Mac. Then, launch the OBS app and click the “Plus” button to create a new scene for your recording.
Step 2: Click the plus button under “Sources” again, but choose “Display Capture.” This will let you select which screen to record.
Step 3: Click “Settings” in the bottom-right corner to adjust output settings, video quality, and audio preferences as per your needs.
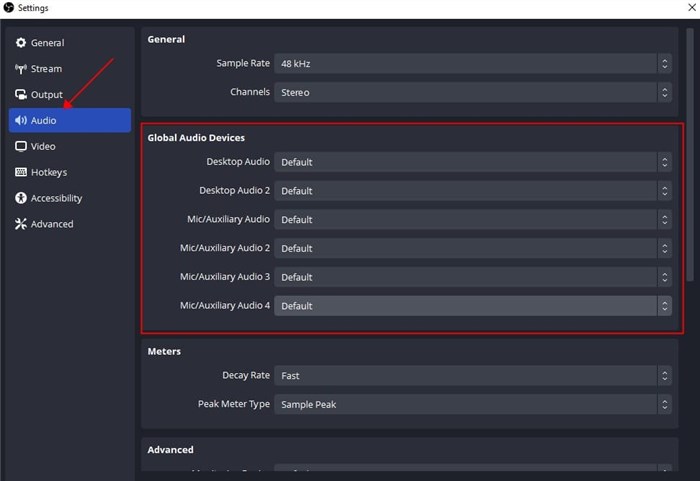
OBS Audio Recording Settings
Step 4: Once you have configured every setting according to you, click “Start Recording” in the bottom-right corner. OBS will begin recording your screen and audio.
Step 5: When you’re done, click “Stop Recording.” Your video will be saved to the location specified in your OBS settings.
So, this is how to screen record on Mac with audio using OBS studio. We have explored other tools as well and they might be helpful. However, if you want a reliable and efficient screen recorder, let us introduce to “Screenify.” You can learn more about it in the next part.
How to Record Screen and Audio on Mac via Screenify
Screenify is a new screen recording software set to launch soon. This amazing tool will make screen recording on Mac and Windows OS easier than ever. It is designed with user convenience in mind and offers many promising features.
Key Features of Screenify
- High Quality: Get crystal-clear screen recordings without spending a penny.
- No Watermarks: Enjoy watermark-free videos that look clean and professional.
- Screen Options: Easily record your entire screen or just the part you want to show.
- Multiple Audio Sources: Record your voice or any other sound from your PC easily.
- Compatibility: Use it on your Mac or Windows PC – it’s compatible with both.
Download Screenify to record screen and audio on your Mac now!
Let’s move forward and answer some of your queries about how to record screen and audio on Mac!
Frequently Asked Questions
Q1. How do I record my screen and voiceover on my Macbook?
Recording screen and voiceover on a Macbook is very easy. You can use QuickTime or Screenshot toolbar to do it. We discussed these methods in parts 2 and 3 of this article. However, don’t forget to set your audio source as a “Microphone.” Then, hit the record button, and you’re good to go!
Q2. Where do screen recordings go on Mac?
Your Mac usually saves screen recordings on your desktop. When you finish recording, you’ll see a little picture of the recording in the bottom right corner of your screen. You can click it to view or edit the recording. On the other hand, you can also find this file on your desktop with the date and time of the recording.
Final Thought
Wrapping it up! This article has explored how to screen record on Mac with audio. There are various tools to choose from. These apps have lots of fancy features, but they might be a bit trickier to use. They’re great for recording professional-looking videos. The good news is that the new tool – Screenify, is coming soon. It is easy to use and will make screen recording even better. Happy recording!
Free Download * 100% Clean & Safe

Senior writer of the iMobie team as well as an Apple fan, love to help more users solve various types of iOS & Android-related issues.
Product-related questions? Contact Our Support Team to Get Quick Solution >
