How to Record Lectures Online – Check the Best Ways Here
With the right tools and tips, recording online lectures can be a hassle-free experience. In this article, we’ve shown you how to record lectures effectively using various software. We’ve also provided step-by-step instructions for each method.
Online lectures have become more common in the educational sector. They provide a convenient way for students to learn from the comfort of their homes.
As this trend continues, there’s also a growing interest in recording these sessions for study. Recording can be beneficial for both students & educators.
In this article, we’ll show you how to record lectures on a PC with a step-by-step guide. We’ll look at different software options, hardware requirements, and useful tips.
But first, let’s answer a simple question.
Is It Possible to Record Lectures on PC?
Yes, recording lectures on a PC is possible and can be accomplished in various ways. The process can be as simple or as complex as you need it to be. It depends on your specific requirements.
You can download software like Screenify for recording online lectures. It offers the ability to record both your screen & audio. Screenify is particularly useful if the lecture includes slides, images, or demonstrations.
But if you’re looking for an online recording tool, then you can use Rev Online Voice Recorder. It allows you to capture audio without installing any software. So Rev Online Recorder might be sufficient if the lecture is primarily spoken content without visual aids.
Before we go into the details of these tools, let’s have a brief look at why we should record lectures on PC.
Why Should I Record My Lectures?
There are multiple reasons why recording your lectures could be beneficial to your education. It’s not just about having a safety net in case you miss a class. The advantages go beyond that.
Recording lectures can:
- Boost Focus
When you’re not in a hurry to note down every word, you can pay better attention to the lecture itself.
- Optimize Learning Process
Having a recorded lecture means you can revisit it multiple times. Moreover, you can also learn at your own pace with the pause, rewind, and fast-forward features.
- Share Knowledge
Recorded lectures can be easily shared with classmates who may have missed the session.
- Reference for Future Use
Keeping a library of recorded lectures can serve as a valuable resource. It can help in future projects or job tasks that require the same knowledge base.
- Flexibility
Sometimes, you might have an emergency or another commitment during the lecture time. A recorded lecture ensures you won’t miss out on any essential information.
Do you also want to record your lectures now?
Don’t worry. We’ll show you how to do it in a while. Let’s first see what things we need to record lectures on a PC.
What Should I Prepare Before Recording Lectures?
Before starting the recording process, it’s crucial to have all the necessary tools and settings in place. A bit of preparation can make your recording process simple and efficient.
Here are the things you need to record lectures on PC.
- Screen Recording Apps: Choose a reliable software that meets your recording needs.
- Smooth Wi-Fi Network: A stable internet connection is essential for capturing online lectures without glitches.
- Adequate Storage Space: Make sure your PC has enough storage space to save the recorded files.
- Test Audio and Video: Run a quick test to make sure both audio and video are functioning.
- Quiet Environment: Choose a setting free from background noise to ensure clear audio quality.
Are you already prepared? Good!
Now, let’s see how Screenify can record lectures on PC.
Record Online Lectures with Screenify [Recommended]
There are multiple tools available for downloading on a PC to record lectures. But Screenify stands out as a highly recommended option. This software is particularly user-friendly and offers a complete set of features for recording lectures on a PC. It’s a 100% free tool for iMobie users and is compatible with both Windows and Mac computers. Moreover, Screenify doesn’t place any watermark on your recordings.
Key Features of Screenify
Here are the unique features of Screenify.
High-Quality Recording: Capture screen, webcam, and audio in resolutions up to 4K.
No Watermark, No Time Limit: Enjoy unlimited recording time without a watermark and any restrictions.
Customization: Apply various filters and virtual backgrounds during recording.
One-Click Save: Easily save all your recordings locally with just one tap.
Secure and Reliable: Built with robust security features to ensure a malware-free experience.
Steps to Record Lectures with Screenify
Follow these steps to record lectures on PC with Screenify.
Step 1. Download, install, and launch Screenify on your computer.
Free Download * 100% Clean & Safe
Step 2. Now choose the mode you want to use in your recording.
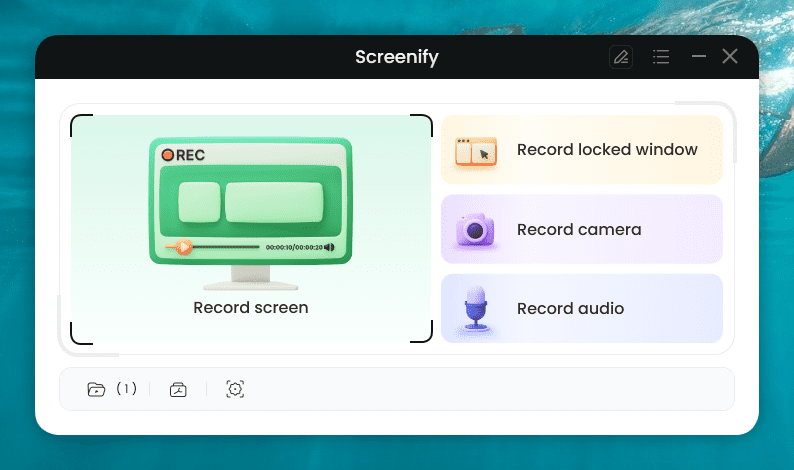
Choose the Mode You want to use
Step 3. Configure the settings before recording. Then, choose the recording screen. It has two options: either record full screen or a specific region. Select your preferred mode and hit “Record.” Then, there will be a three-second timer. After this countdown, the recording will start.
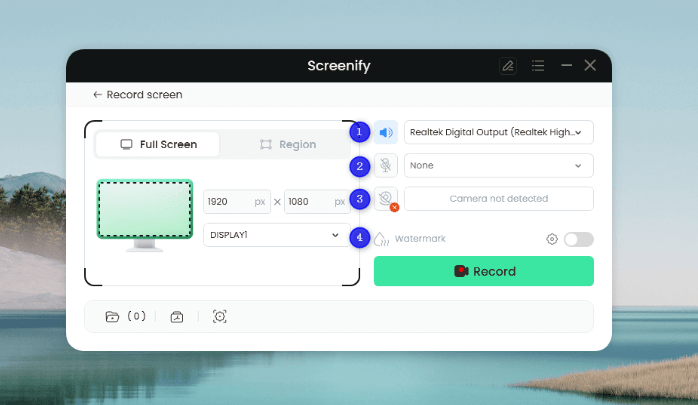
Configure the Settings and Hit the Record Button
Step 4. You can add annotations while recording the screen. You have brush, shape, text, arrow, and line options here.
Step 5. After you have finished recording, click on the Red “Stop” button. Your video will be displayed, and now you can preview and edit it.
That’s it! You have learned how to record lectures with ease. Screenify can help you in recording both your screen and audio.
But if you just want to record the audio from your lecture, there’s a simpler tool for it. Let’s have a look at it.
Record Lectures with Rev Online Voice Recorder
There are also web-based tools that can assist you in recording lectures. One such tool is Rev Online Voice Recorder. It provides a simple and secure way to capture audio content.
Rev Online Voice Recorder is compatible with various browsers like Google Chrome and Safari. Moreover, it allows users to download recordings in MP3 format. Best of all, it’s completely free. But if you take the paid version, then you can even transcribe your recordings if you wish.
Steps to Record Lectures with Rec Online Voice Recorder
Here are the steps to record lectures with Rev Online Voice Recorder.
Step 1. Go to Rev Online Voice Recorder and click the “Record” button to start recording audio.
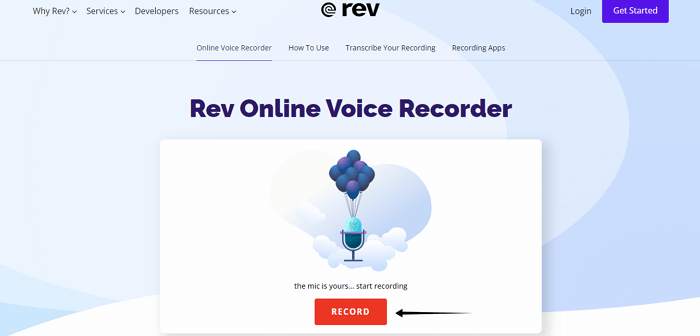
Click on the “Record” button
Step 2. A prompt will appear to ask for microphone permission. Click on the “Allow” option. The recording will then automatically start.
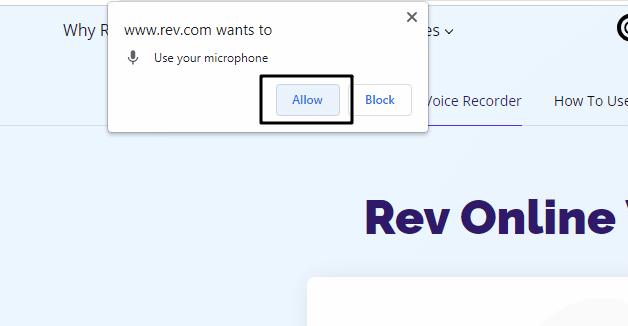
Allow for the microphone use
Step 3. If you are using an external microphone, place it near the speaker of your PC. Click the “Pause” button if you need to halt the recording at any point.
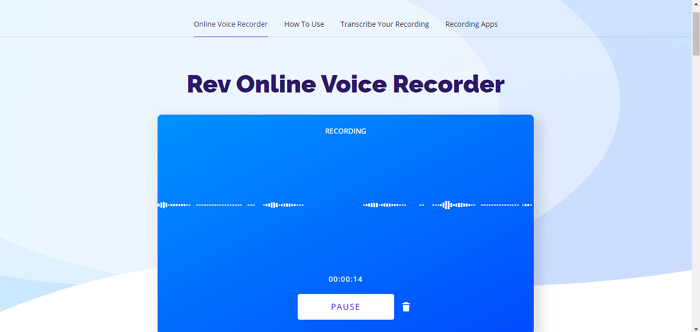
Rev Online Voice Recorder in action
Step 4. After that, click on “Preview” to review your audio. Here, you have options to fast-forward, rewind, and trim the recording to your liking.
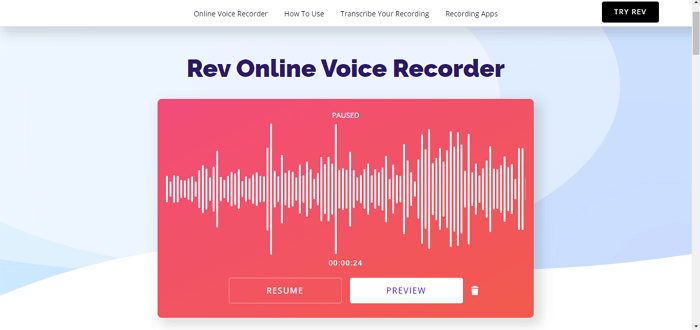
Preview your recorded lecture
Step 5. Finally, you can either download the recording as an MP3 file. You can click “Transcribe” to get a textual version of your recording in a paid version.
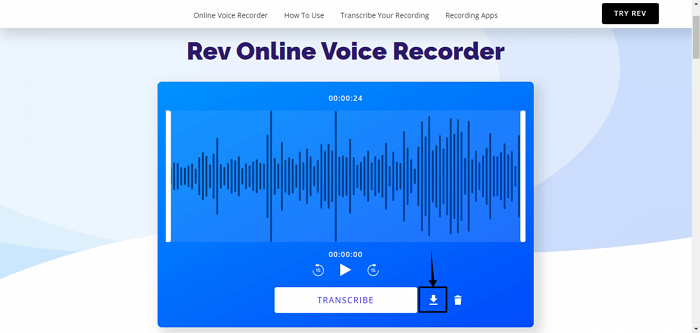
Download your recorded lecture
Now, let’s move on and see the third tool that can record lectures on a PC.
Record Online Lectures with EaseUS RecExperts
EaseUS RecExperts is another tool that provides more than just basic recording capabilities. It allows users to capture any region of their computer screen, along with audio or webcam footage.
EaseUS RecExperts boasts of its advanced features. They include AI-powered noise removal and automatic recording schedules. The software also allows for real-time editing and provides a built-in screenshot function.
Steps to Record Lectures with EaseUS RecExperts
Here’s a stepwise guide to record lectures with EaseUS RecExperts.
Step 1. Open EaseUS RecExperts and select the recording area. Set any other capture settings as needed.
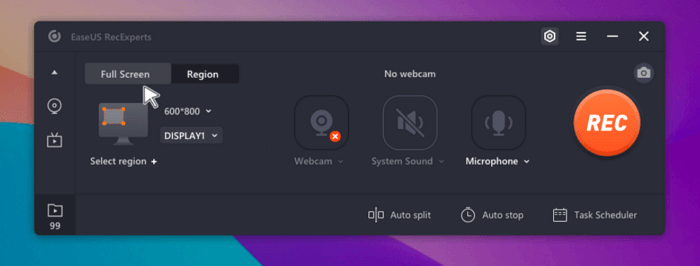
Select the recording area
Step 2. Press the REC button to start the recording. No further actions are required to keep the recording going.
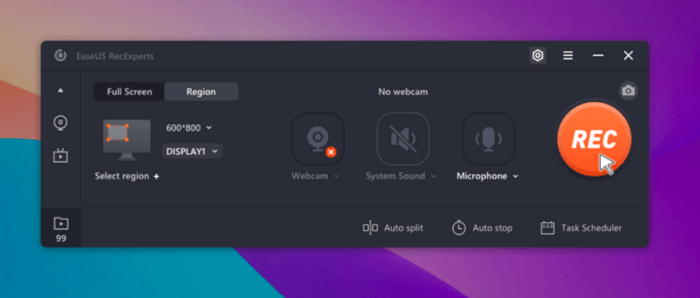
Click on the “Rec” button
Step 3. Now, start your lecture. You can also make live edits to the video during the recording process.
Step 4. Once the recording is finished, play it back to review. You can make further edits before saving the recording in your desired format.
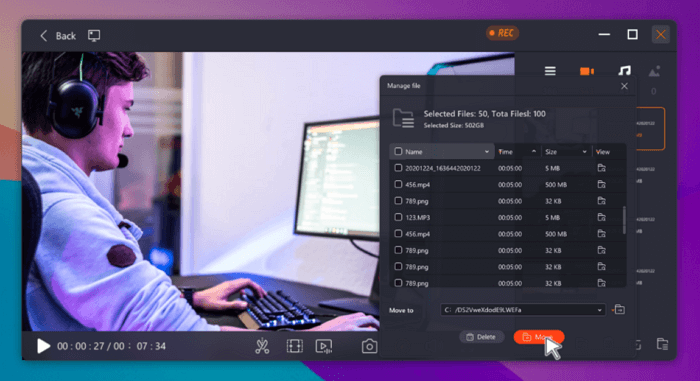
Make edits and save your recording
Before we end our article, let’s have a look at some FAQs about recording lectures.
Frequently Asked Questions
1. How do I record online classes with audio?
To record online classes with audio, you need a tool that captures both screen and sound. Screenify provides this function for free. But make sure that your system audio & microphone are enabled in the settings before you start recording. Then, you can capture both the lecture and any interactions you may have during the class.
2. What do I need to do to record my lectures?
To record your lectures, you’ll need built-in recording software on your computer or a specialized recording tool. When your recording tool is ready, set your microphone & camera settings correctly. Then, select the area of the screen or window where the lecture is being played. Once done, start recording your lecture.
Some tools also allow for scheduled recordings. It can be useful for classes that occur regularly.
3. How much storage space will I need for my recordings?
Storage requirements can vary depending on the length & quality of your recordings. It’s a good idea to check storage availability before starting a lengthy recording.
Final Words
Today, recording online lectures is a valuable skill for both teachers and students. Teachers can record lectures with the webcam overlay. In contrast, students can save online lectures for future reference.
In this article, we’ve provided you with a step-by-step guide to recording lectures on a PC. If you are looking for a high-resolution recording, use Screenify to record lectures. And if you want to record only audio, then Rev Online Voice Recorder can help you.
Free Download * 100% Clean & Safe
Product-related questions? Contact Our Support Team to Get Quick Solution >

