How to Record Games on OBS | Quick & Easy
OBS Studio is open-source, high-performance software that can capture gameplay, tutorials, and instructional videos. Are you wondering how to record games on OBS? No worries! We have compiled everything— from configuring OBS parameters to recording gameplays— in detail. You can also try Screenify as an OBS alternative, a more user-friendly and reliable option!
Want to amaze your friends, colleagues, or social media audience with brilliant gaming skills or showcase your talent to the world? Whatever the purpose is, recording gameplay sessions is the first step in the process! However, no one would like to watch gameplay videos with lags, interferences, and a poor frame rate per second. You can use the OBS Studio- a professional-grade game recorder to record the gameplay sessions in high-quality resolution with crystal clear audio.
No doubt, OBS Studio serves the purpose of recording gaming visuals in brilliant quality with smooth transitions. Still, a drawback is that it has a complex user interface that might be difficult to understand. However, worry no more! Here’s a detailed guide on how to record games on OBS and configure the settings on this game recorder. Let’s explore the process of adjusting optimal settings and recording games with OBS Studio!
Part 1: How to Record Games on OBS: Settings
OBS Studio is most popular among streamers and gamers due to its advanced capabilities and seamless integration with other platforms. This screen recorder allows you to create scenes, which helps record screens from multiple sources such as Windows, images, text, browser, webcam, and more.
The nicest aspect of OBS Studio is that you can configure an endless number of scenes that can be swapped easily using custom transitions. Aside from that, OBS Studio has a 1920×1080 screen recording resolution at 30 FPS, which results in lag-free films with no time restriction.
Wondering how to capture gameplay on OBS? Here’s the step-by-step guide to follow!
Step 1. Click the “Windows” button to download OBS Studio for Windows PC from the official website. Once downloaded, install the software by following the on-screen instructions.
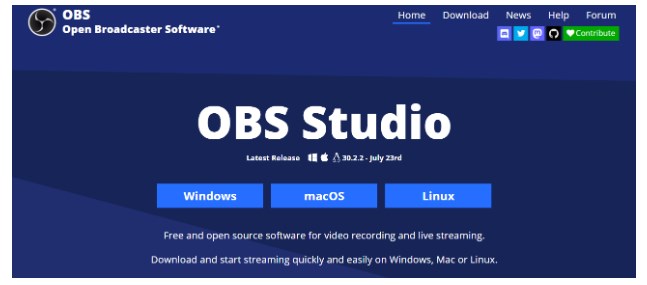
downloaded obs
Step 2. Click “File” and “Settings” from the drop-down menu. Here, you can adjust the basic video, audio, and streaming settings in OBS Studio.
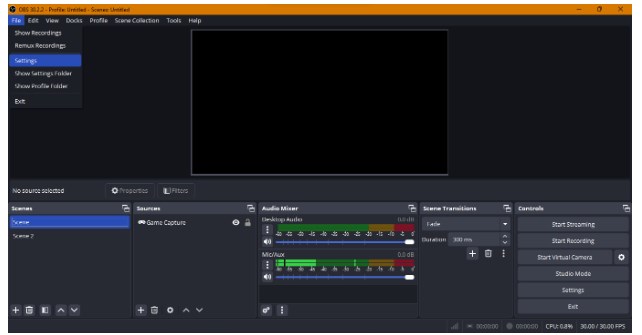
adjust the basic settings
Step 3. Configure “Video” settings in OBS Studio, such as Resolution, Aspect Ratio, Downscale Filter, and common FPS Values.
Note: For a regular monitor or laptop you’re using, it is advised to set the 1920×1080 resolution at 30 FPS for optimal recording quality. You can also change the settings to 60 FPS for a higher frame rate per second for fast-paced or action gameplay.
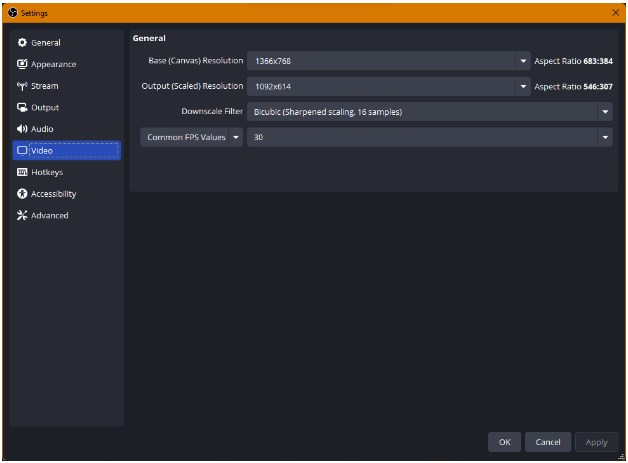
Configure “Video” settings
Step 4. Configure the basic Audio settings in OBS Studio to record the crystal-clear sound. Adjust the sample rate to 48 kHz for a clearer sound. You can also set the “Channels” to Stereo and Mono based on your preference. Choose the recording/ audio input source from the “Desktop Audio” and “Mic/Auxiliary Audio” settings.
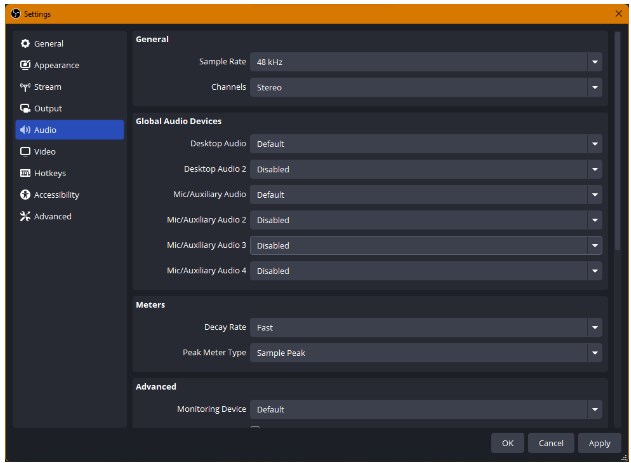
Configure the basic Audio settings
Part 2. How to Record Games on OBS: Configuration for Optimal Performance
It’s time to tweak the parameters for best results after completing the basic setup. You need to tweak the encoder settings, video bitrate, audio bitrate, recording quality, format, and several other sophisticated aspects in order to record the games correctly with crisp images and rich sounds. Let’s go on to configuring OBS Studio for best performance:
Step 1. From the Output tab, choose the “Output” mode and keep it “Simple.” If you’re a professional and can handle the advanced parameters, you can switch to “Advanced” mode.
Step 2. Adjust the “Video Bitrate” and “Audio Bitrate” from the settings. You can choose the maximum settings, but it depends on how high-end your PC is.
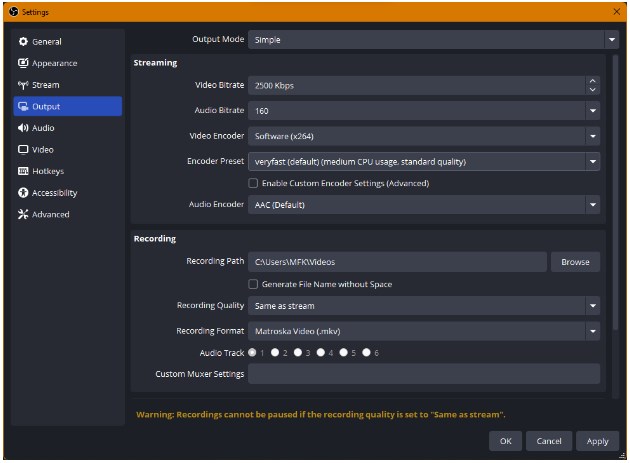
adjust the “video bitrate” and “audio bitrate
Step 3. Click on the “Advanced” tab from the left-side pane. Here, you can adjust the advanced video parameters like Renderer, Color Format, Color Space, and more. You can also adjust Network settings from this tab. Enable hardware acceleration for improved performance.
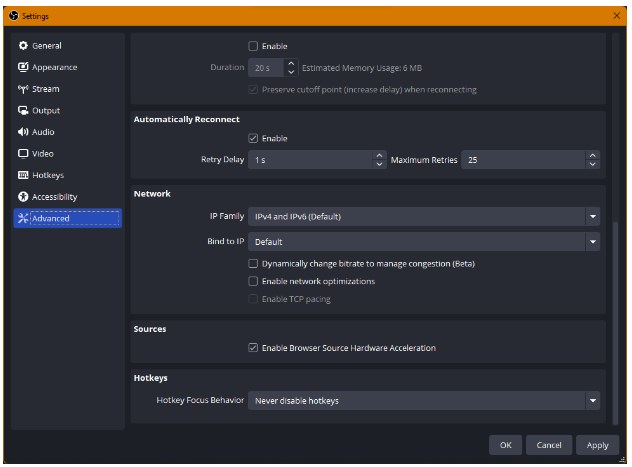
adjust the advanced video parameters
Part 3: How to Record Games on OBS: Record Your Gameplay
Now that you’ve configured all of the parameters and optimized the settings, it’s time to record the gameplay. Game Capture and Display Capture are the two basic techniques to capture gameplay sessions.
Method 1. Via Game Capture
Game Capture is a special option in OBS Studio for recording games. It has completely upgraded settings and 3D recording capabilities so you can capture action in excellent clarity. Let’s examine the detailed instructions:
Step 1. Launch the OBS Studio on your PC and navigate to the “Sources” section.
Step 2. Click the “+” sign and then “Game Capture” from the options.
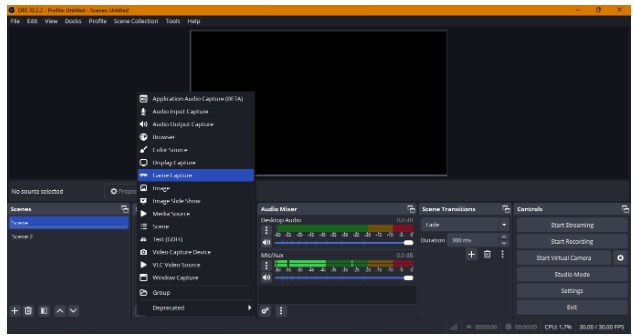
Click the “+” sign and then “Game Capture
Step 3. Adjust the properties of Game Capture and choose whether to capture full screen or a specific window. Click OK to confirm the settings.
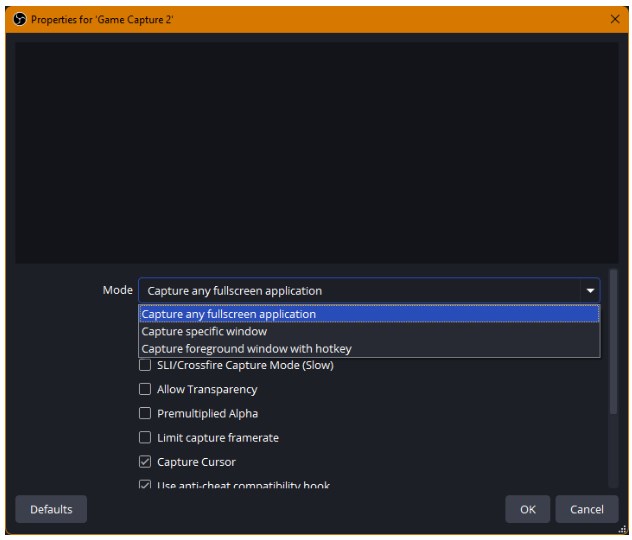
capture full screen or a specific window
Step 4. Click on “Start Recording” from the right side to initiate the recording process.
Method 2. Via Display Capture
Capturing the entire display on your PC’s screen can be another option while recording gameplays. Therefore, OBS Studio’s Display Capture can capture your winning or losing moments seamlessly.
Step 1. Launch the OBS Studio on your PC and navigate to the “Sources” section.
Step 2. Click the “+” sign and then “Display Capture” from the options.
Step 3. Adjust the properties for Display Capture, such as “Capture Method” and “Display“.
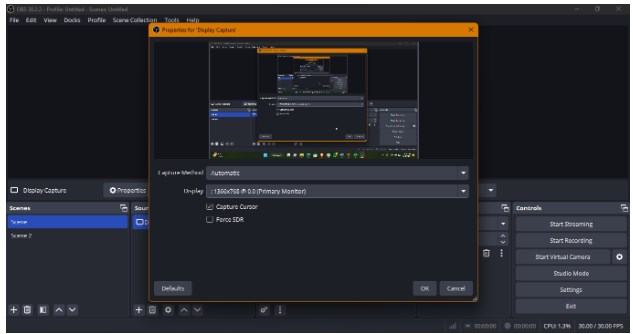
adjust the properties for display capture
Part 4: How to Make OBS Record only Game Audio
While recording gameplay, many users have reported that the OBS Studio captures audio from the system, such as games and other applications. If you wish to record the game audio only, follow these instructions:
Step 1. Launch the OBS Studio on your PC and navigate to the “Sources” section.
Step 2. Click on the “+” sign and then “Application Audio Capture (Beta)” from the options.
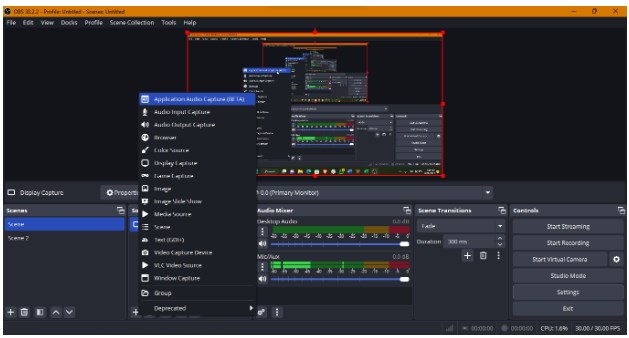
application audio capture
Step 3. Mute all other audio sources except the newly created audio source.
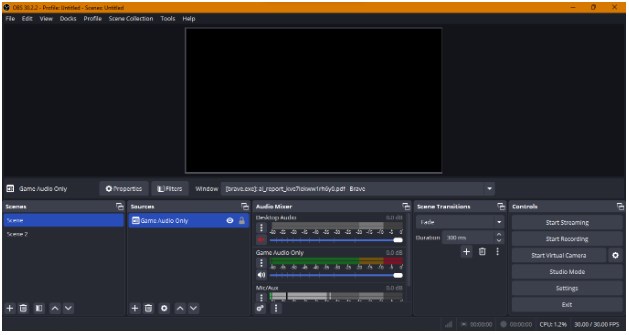
Mute all other audio sources except the newly created audio source
Step 4. Click on three dots for “Game Audio Only” and then “Advanced Settings” from the Audio Mixer section. Choose Track 1 only for this audio source.
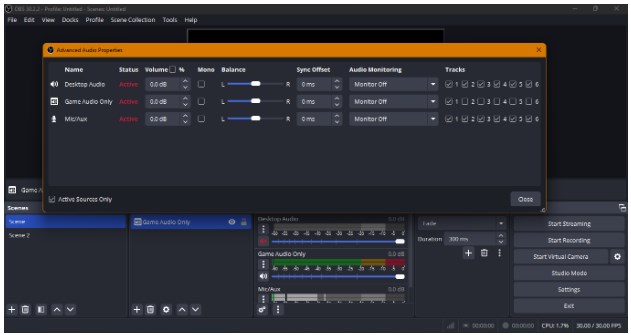
click-on-three-dots
Step 5. Navigate to “Settings > Output” and set to “Advanced” mode. Then, click the “Recording” tab and set Audio Track to 1. Now, OBS Studio will only record the game’s audio from track 1.
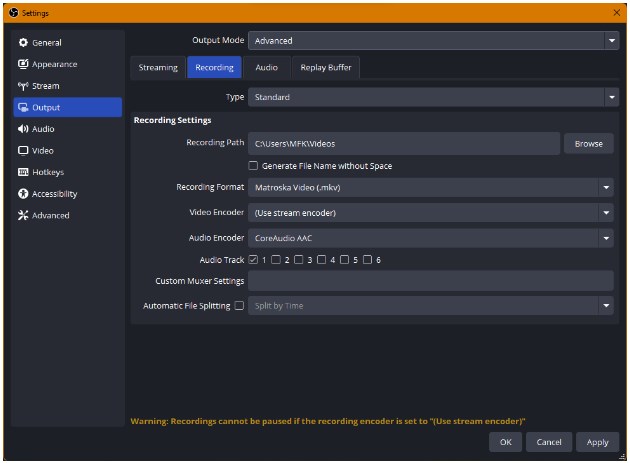
set-audio-track
Part 5: Common Challenges and Disadvantages of Using OBS
There are plenty of benefits to using OBS Studio, but it also comes with certain drawbacks.
- Difficult to Use— OBS Studio is high-grade software, but it can be difficult for most users to understand. Users with basic knowledge will be unable to handle the advanced video and audio settings.
- System Lag— Since OBS Studio uses more system resources, the system might feel laggy sometimes.
- Shuttering— OBS Studio shuttering while recording is a common issue many users have experienced. It occurs when the system resources get overloaded due to excessive use of GPU or encoding lag.
Part 6: Simplify Game Recording with Screenify
Don’t want to lose your precious gaming moments due to OBS Studio’s black screen, crash, shuttering, or laggy issues? No worries! We have a perfect OBS Studio alternative to record gameplay. Screenify— an all-in-one 4K game recorder— offers a seamless and lag-fee experience to share your gameplay sessions with your friends and colleagues. Screenify offers unlimited screen recording time for Windows and Mac, so you don’t miss any details. Additionally, you can even record both game audio and microphone at the same time.
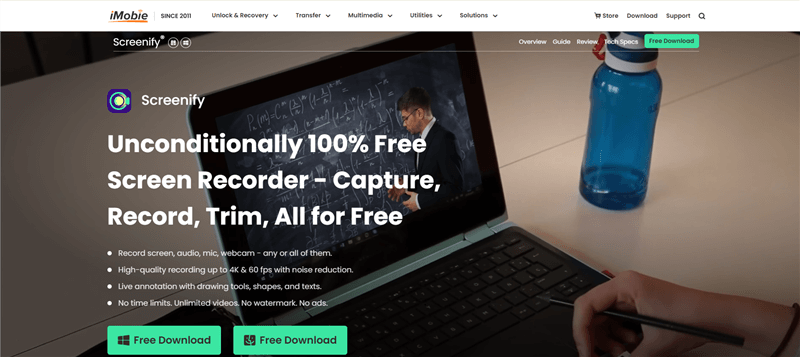
Screenify Website Interface
Want to get rid of noise in your background? Screenify has a brilliant noise reduction feature that helps minimize excessive noise and disturbances in the background. The best part is that you can adjust the volume of both audio input sources to make a perfect blend. The Lock Window Recording option prevents your personal details from getting leaked in the screen recording of your games.
Key Features and Advantages
- Screenify helps you record fast-paced games in 4K quality at 60 FPS with no lags.
- You can record desktop screens and webcams simultaneously for better engagement.
- Screenify is free to use with no watermark and dual recording modes such as full screen or region.
- It has an intuitive interface and uses less system resources for optimal gaming experience.
Steps to record games using Screenify
Step 1.Download and Install Screenify on Computer.
Step 2.Launch Screenify on your computer, and select Record screen mode.
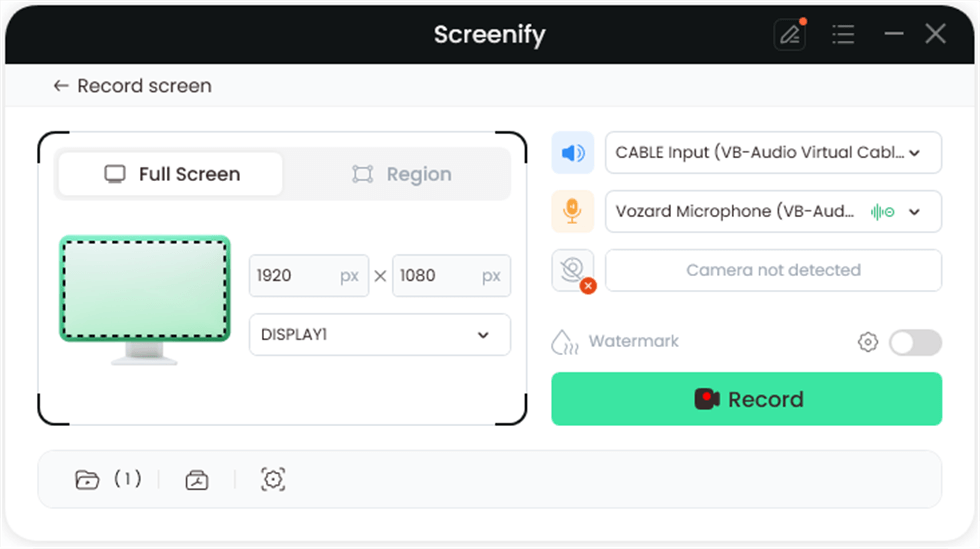
Select Record Screen Mode
Step 3.Configure Recording Settings aims to configure settings like system audio before recording.
In this setting menu, you can:
1 Choose the System audio.
2 Choose the Microphone you want to record.
3 Choose the Camera you want to use.
4 Choose whether to add a watermark.
Step 4.Select Recording Screen.
The screen mode offers two recording options: you can either record the entire screen or select a specific region to record.
Option 1. Full Screen Record
Please select Full Screen mode and choose the display you need to record. Hit Record button to initiate recording.
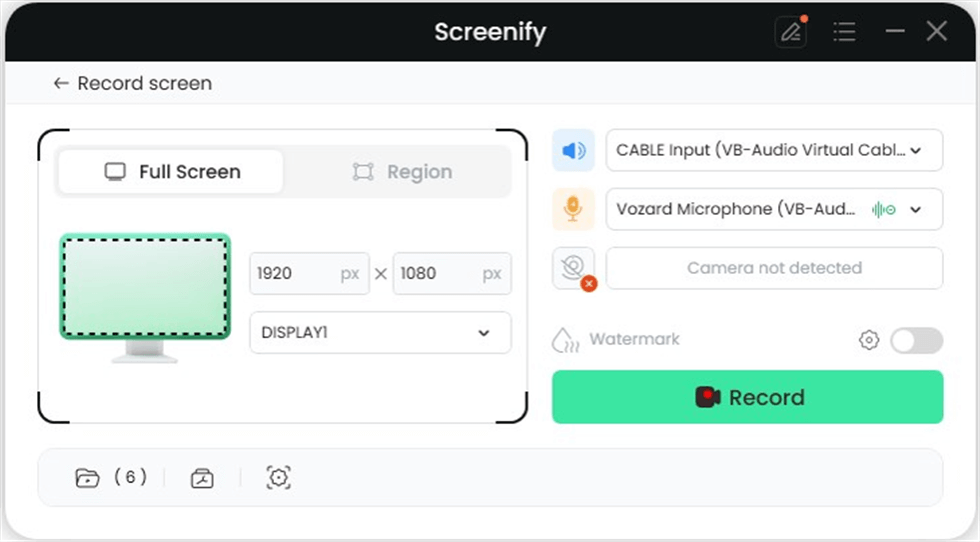
Full Screen
Option 2. Region Record
To record region, you need to manually select the recording area. After selection, you can still adjust the selected area. It supports customize selection, full screen, and proportional selection based on common social media dimensions.
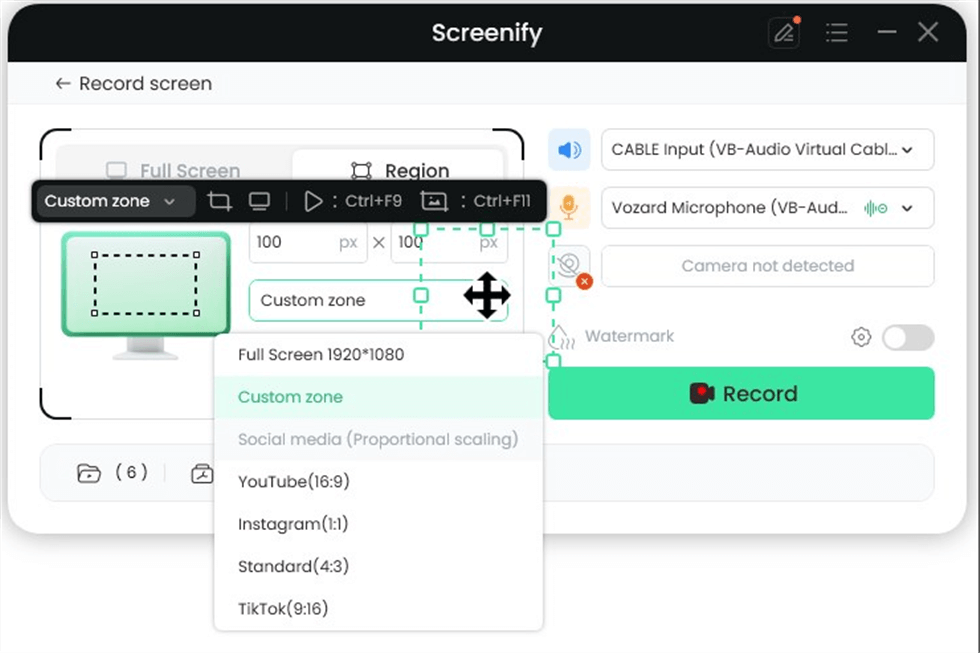
Record Region
Step 5.Wait for the Recording Countdown.
There is a 3-second countdown to help you prepare the recording after you are ready to start recording.
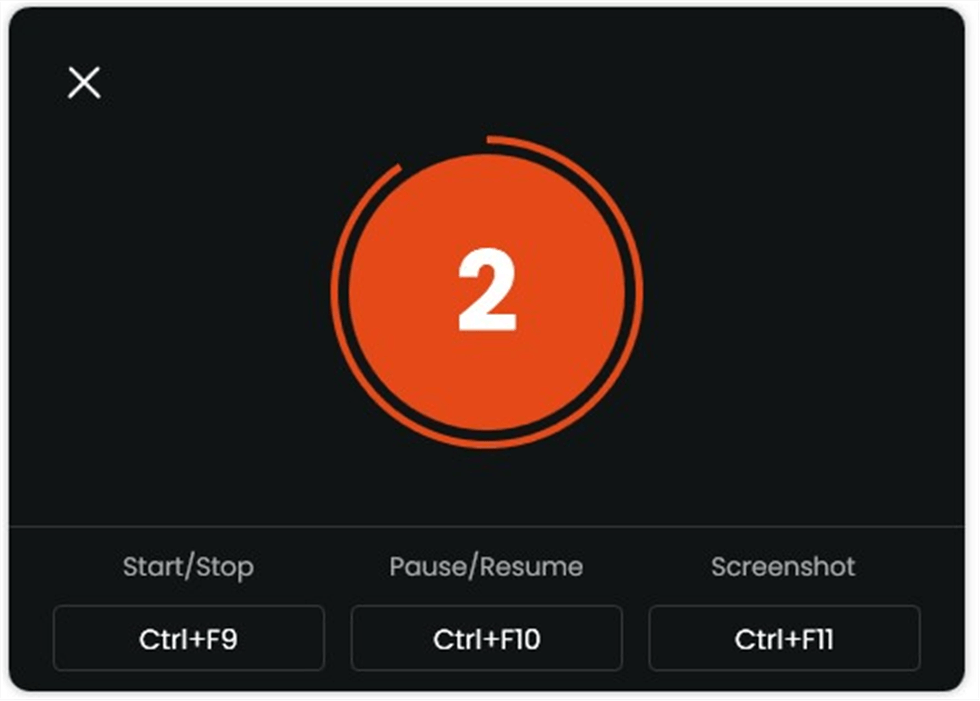
Start recording countdown
If you would like to see a recording countdown before your recording starts, you can enable the countdown option. Or you can tap it off. View this post to know how to set the countdown option.
Step 6.Start Recording.
The recording will begin after a 3-second countdown. You can make annotations on the recording interface during the recording.
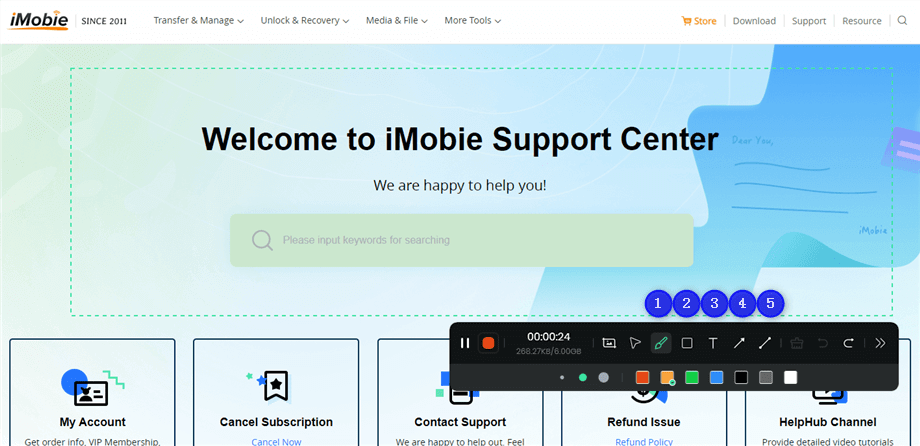
Annotate the Screen during Recording
With the toolbar, you can add the annotation in the screen:
1 Brush: Draw freehand on the screen recording interface to highlight or illustrate specific areas during the recording.
2 Rectangle: Draw rectangular shapes on the screen recording interface.
3 Text: Add written notes or labels directly onto the screen recording interface.
4 Arrow: Draw arrows on the screen recording interface to point out and emphasize specific areas.
5 Line: Draw straight lines on the screen recording interface to underline or connect specific points.
The toolbar can be expanded or collapsed. This feature allows you to access various tools and options when needed, and hide them to keep the workspace uncluttered when they are not in use.
Step 7.Record Screen Process Completed.
When the recording is completed, you can click the red Stop button to end the recording. Your recorded files will be displayed. From here, you can preview and manage the recorded content as needed.
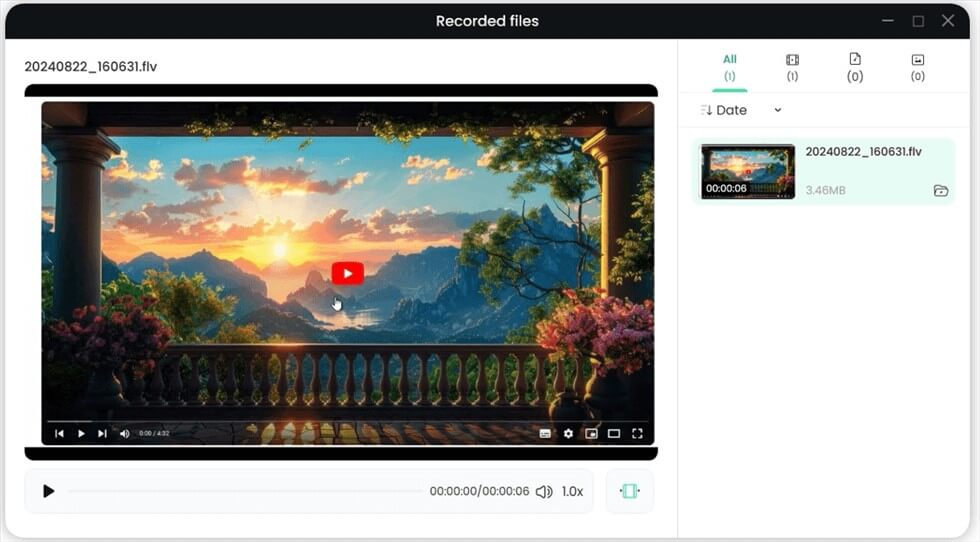
Record Screen Process Completed
How to Record Games on OBS FAQs
1. Is OBS better for game recording than Screenify?
Screenify serves the purpose better as it offers 4K resolution at 60 FPS without any lags. Moreover, it uses fewer system resources to eliminate shuttering issues.
2. Can I record high resolution with Screenify?
Yes! Screenify offers a 4K resolution for recording gameplay at 60 frames per second.
3. How can I solve the lag problem when recording with OBS?
You can try several solutions, such as lowering the video’s bitrate, switching to a stable internet connection, updating video drivers, and more.
4. Can I edit my recordings in Screenify?
Yes! Screenify offers basic editing features such as video trimming, adjusting the speed and volume of video during playback, noise reduction options, and markup tools such as text, brush, rectangle, and more.
Conclusion
OBS Studio can record and share gameplay with your friends or colleagues. This open-source software has multiple advanced parameters that can be configured to improve the quality of your recorded clips. However, many users have difficulty handling the advanced settings and complex user interface. We recommend using Screenify— a 4K screen recorder for Windows and Mac with a simple UI and brilliant 4K recording ability. You can record your games for unlimited time without any watermarks now! Try Screenify for a hassle-free recording experience and achieve high-quality game recordings easily.
How to Manage Video Easily
Troubleshooting Error Issue

Joy Taylor


Senior writer of the iMobie team as well as an Apple fan, love to help more users solve various types of iOS & Android-related issues.
Screenify
AnyEnhancer
FocuSee
Vozard
AnyMiro
AnyMirror


