How to Record Audio on Chromebook [Full Guide]
In this article, we’ve discussed how to record audio on a Chromebook with various specialized tools for different needs. Whether you’re a student, musician, or remote worker, the article provides practical solutions. Additionally, we’ve also highlighted Screenify. It’s a screen and audio recording tool for Windows & Mac users.
Recording audio on a Chromebook is handy in a variety of situations. You should record a secret message to share with a friend later. Or, you could create an audio lesson for remote teaching.
But no matter the situation, recording audio on a Chromebook is a simple process that anyone can master. There’s no need for fancy equipment or specialized software. You just need to follow a few simple steps, and you’ll be recording in no time.
In this article, we’ll show you how to record audio on a Chromebook step by step. As a special addition, we’ve also discussed a tool that works well on Windows & Mac computers. But before we get into the details, let’s start by answering a simple question.
Also Read: 10 Best Free Chromecast Apps You Need >
Can you Record Audio on a Chromebook?
Yes, you can record audio on a Chromebook. Chromebooks might not have the same range of software options as Windows and Mac computers and laptops. However, there are still various methods to capture sound. Some dedicated tools are specifically designed for Chromebook users. Online audio recorders are another great choice. They allow you to record sound directly from your web browser without installation. There are so many options that you might get confused while selecting one. Let’s see how to record audio on Chromebook with the five best methods.
How to Record Audio on Chromebook
We will now explore five different methods to record audio on your Chromebook. We’ve handpicked the best of both downloadable software and online tools. First, we’ll briefly describe the tool and then give a step-by-step guide.
Mic Note
The top-ranked on our list is Mic Note. It’s a versatile tool that goes beyond just audio recording. Mic Note also acts as a notepad. It’s especially useful for lectures, meetings, or interviews where you might want to make notes while capturing audio. Additionally, Mic Note is available on multiple platforms, including Chrome, Windows, Mac, and Linux.
Key Features
- Sync notes with audio recordings and automatically insert timestamps.
- Edit your audio clips after recording. There are options like deleting, trimming, inserting, and extracting sections.
- Transcription tools are included to convert audio to text easily.
- Share your notes and audio via shareable links.
- Sync your notes and recordings across devices and platforms for easy access.
Record Audio on Chromebook with Mic Note:
Step 1. Download and install Mic Note from the Chrome Web Store or use its online version.
Step 2. Open the tool and click on the “Record” button to capture audio. If you want to take notes simultaneously, use the notepad area.
Step 3. Once done, you can export or edit the audio file within the application.
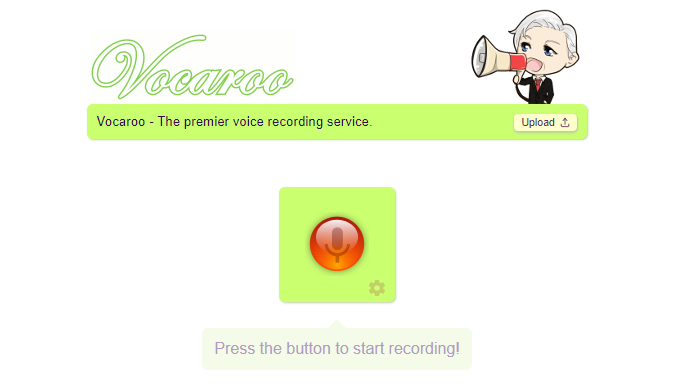
Vocaroo
The second audio recorder on our list is Vocaroo. It’s an online audio recording tool that’s simple to use and doesn’t require an account. Vocaroo is particularly useful for educational settings like podcasting, digital storytelling, or providing feedback. It offers options to download or even share your recordings via QR code. You can easily access Vocaroo through a browser. But remember, it’s a Flash-based tool. So, mobile access might be limited.
Vocaroo Official Webpage
Key Features
- No login is required, and the interface is easy to use.
- The audio files can be downloaded in multiple formats like MP3, Ogg, and WAV.
- Recordings can be shared easily through links or embedded into websites with a widget.
- The recordings are typically available for up to three months.
Record Audio on Chromebook with Vocaroo:
Step 1. Open your web browser and go to the Vocaroo official website.
Step 2. Click on the red Record Button to start capturing audio. Make sure you’ve allowed access to your microphone when prompted.
Step 3. After completing the recording, you can listen, redo, save, or share your audio file. Choose the preferred format if you wish to download it.
Cloud Audio Recorder
Cloud Audio Recorder is another free online tool for capturing voice through your microphone. This tool supports multiple browsers for use. You can also save the recordings in different formats. Moreover, you can also directly upload them to Google Drive. Another advantage is its lack of a recording time limit.
Key Features
- Easy to use with a simple interface.
- Save recordings in MP3 or WAV formats.
- Supports multiple browsers, including Chrome, Firefox, IE10+, and Safari.
- There is no time limit for recordings.
Record Audio on Chromebook with Cloud Audio Recorder:
Step 1. Go to the Cloud Audio Recorder website using your preferred browser.
Step 2. Click the “Start” button to initiate the audio capture. Allow the website access to your microphone when prompted.
Step 3. Once you’ve completed your recording, click on “Stop.” Now, you’ll have the option to save it either to your computer or directly to Google Drive.
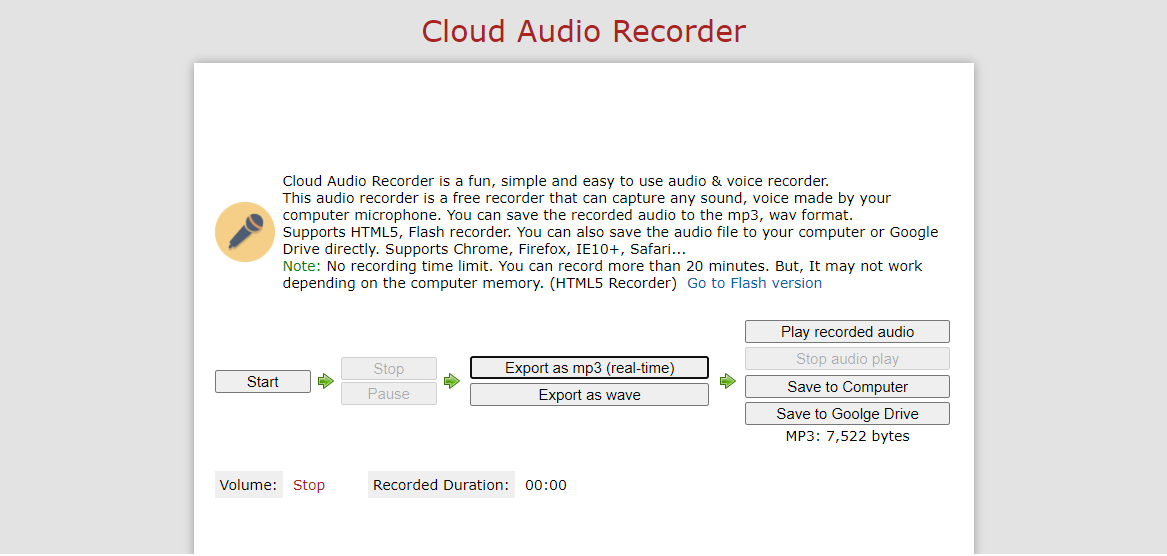
Recorded Audio with Cloud Audio Recorder
Audacity
The next tool on our list is Audacity. It’s another free and open-source audio editor and recorder. Audacity is available for multiple operating systems. Moreover, it offers a range of features like live audio recording and editing sound files. The download process of Audacity is also easy. In short, it’s an ideal choice for those who require advanced functionalities and various export options.
Key Features
- Available on multiple OS like Windows, macOS, and GNU/Linux.
- Supports multiple Audio file formats for import and export.
- Advanced editing capabilities, including Cut, Copy, Paste, and Delete.
- Offers a range of plugins and real-time effect previews.
- Keyboard shortcuts and accessibility features for streamlined editing.
Record Audio on Chromebook with Audacity:
Step 1. Download and install Audacity from their official website.
Step 2. Open Audacity and select the “Record” button to start capturing audio. A red circle in the top toolbar represents this button. Ensure your microphone is connected and set up properly.
Step 3. After finishing your recording, you can use the editing features to improve your audio. Once done, go to the “File” menu to save or export your audio in your preferred format.\
Virtual Speech Online Voice Recorder
The last tool on our list is Virtual Speech Online Voice Recorder. It is an easy-to-use, web-based audio recording tool. Users can record their voice or other audio via a microphone. After recording, they can listen to it in the browser or download it in the required file formats. What’s distinguishing about this tool is that it strongly emphasizes user privacy. Your recordings are not stored on external servers.
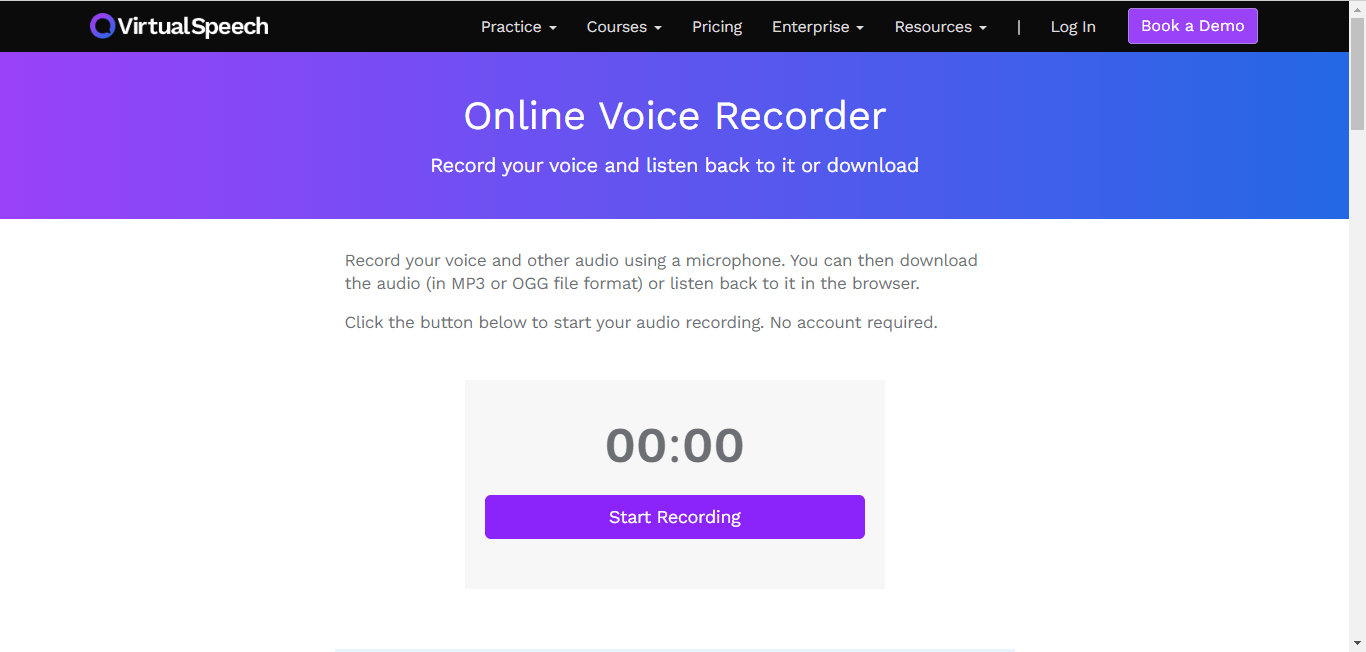
Virtual Speech Online Voice Recorder
Key Features
- A web-based tool that requires no account or external software.
- Secure environment for audio recording with SSL encryption.
- Options to save recordings as MP3 or OGG files.
- The audio is only accessible to the user.
- There are no limitations on how often you can use the service.
Record Audio on Chromebook with Online Voice Recorder:
Step 1. Open the Virtual Speech Online Voice Recorder website on your browser. Press the “Start Recording” button and your audio recording will be started.
Step 2. After finishing your recording, you can listen to it directly in the browser. You can also download it in MP3 or OGG format per your requirements.
These were the best options for recording audio on Chromebooks. Try every single one and see which one fits for you. Now, didn’t we say something about a bonus tip?
That’s right! We’ve got a special tip for all Windows and Mac users. We’ll now show you how to record audio on Windows and Mac.
Bonus Tip: How to Record Audio on Windows/Mac Computer
Windows and Mac computers also offer various options for capturing audio. Both operating systems have built-in voice recording apps. It’s Voice Recorder for Windows and QuickTime for Mac. However, some users may want an all-in-one audio and video recording tool. This is where Screenify comes into play.
Screenify is a free recording tool for Windows and Mac users. It lets you easily capture screen activity, webcam footage, and audio. The tool offers high-definition recording options. What’s more, there are no watermarks or time restrictions.
Key Features
- High-Definition Recording: Capture screen, webcam, and audio in 1080p HD/4K.
- No Limitations: Record without watermarks or time restrictions.
- Save Easily: One-click local saving of recordings.
- Customizable Filters: Modify your webcam feed with various filters and virtual backgrounds.
How to Record Audio with Screenify
Step 1. Download and Install Screenify on Computer.
Step 2. Launch Screenify on your computer, and select Record screen mode.
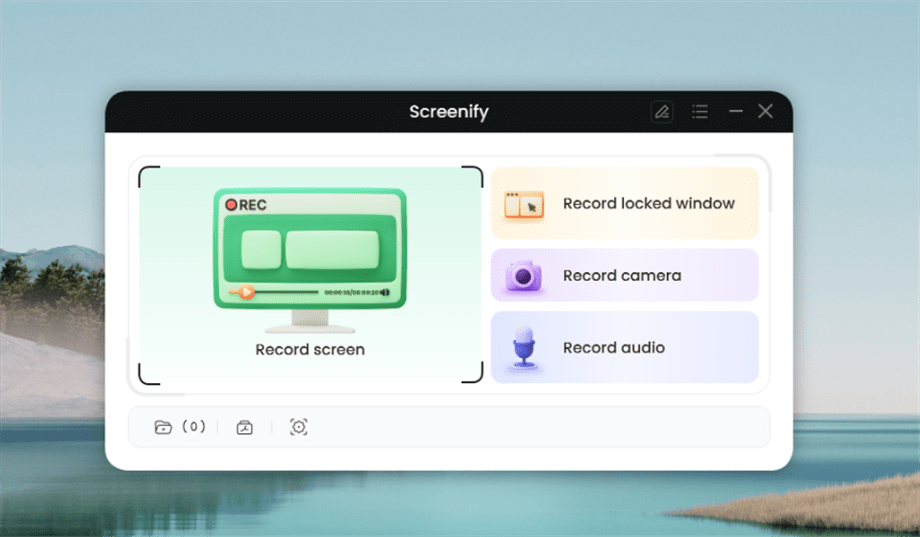
Select Record Screen Mode
Step 3. Configure Recording Settings aims to configure settings like system audio before recording.
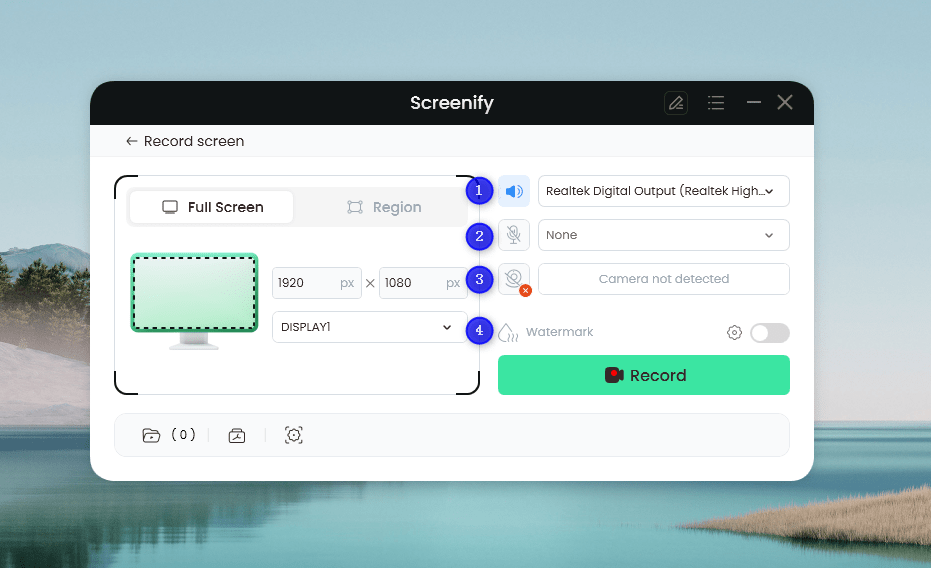
Set Configure Recording Settings
In this setting menu, you can:
1 Choose the System audio.
2 Choose the Microphone you want to record.
3 Choose the Camera you want to use.
4 Choose whether to add a watermark.
Step 4. Select Recording Screen.
The screen mode offers two recording options: you can either record the entire screen or select a specific region to record.
Option 1. Full Screen Record
Please select Full Screen mode and choose the display you need to record. Hit Record button to initiate recording.
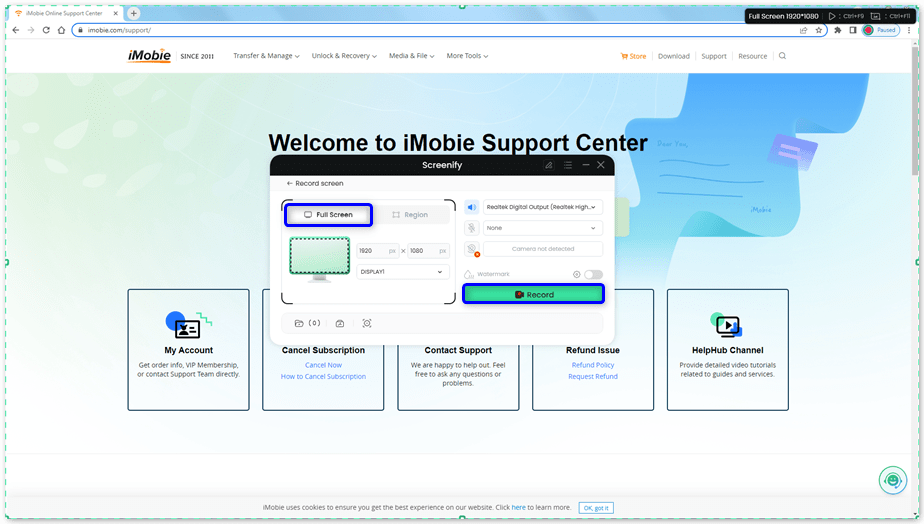
Select Full Screen
Option 2. Region Record
To record region, you need to manually select the recording area. After selection, you can still adjust the selected area. It supports customize selection, full screen, and proportional selection based on common social media dimensions.
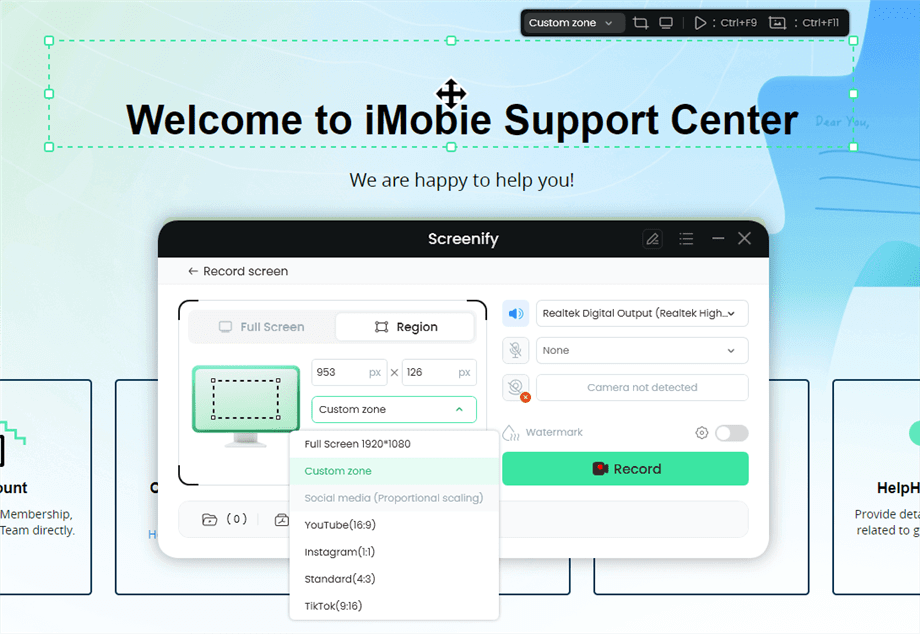
Record Region
Step 5. Wait for the Recording Countdown.
There is a 3-second countdown to help you prepare the recording after you are ready to start recording.
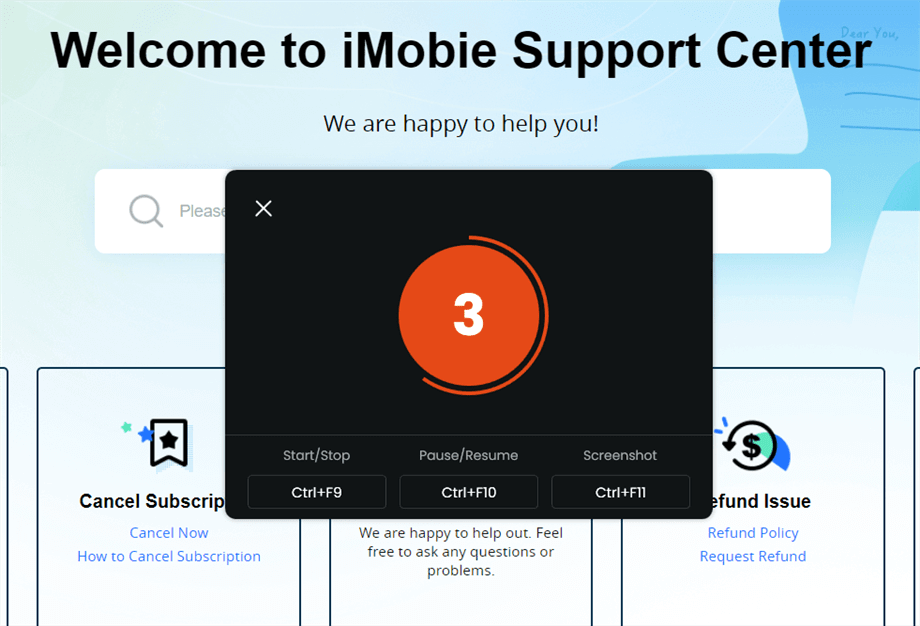
Wait for the Recording Countdown
If you would like to see a recording countdown before your recording starts, you can enable the countdown option. Or you can tap it off. View this post to know how to set the countdown option.
Step 6. Start Recording.
The recording will begin after a 3-second countdown. You can make annotations on the recording interface during the recording.
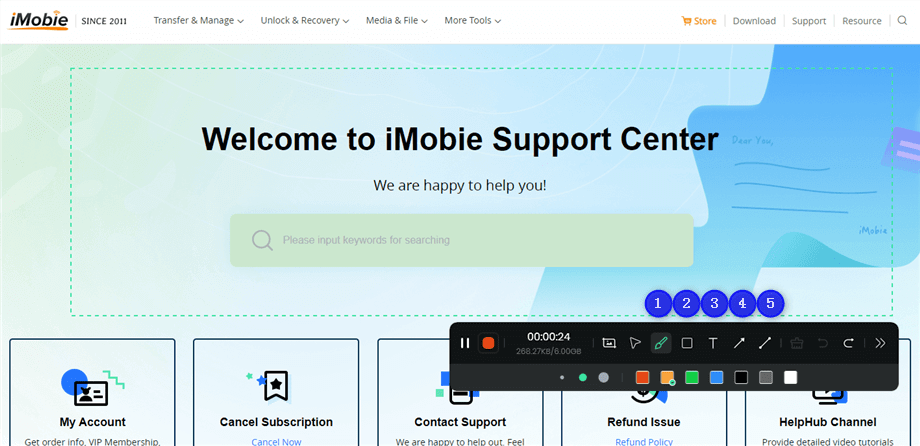
Annotate the Screen during Recording
With the toolbar, you can add the annotation in the screen:
1 Brush: Draw freehand on the screen recording interface to highlight or illustrate specific areas during the recording.
2 Rectangle: Draw rectangular shapes on the screen recording interface.
3 Text: Add written notes or labels directly onto the screen recording interface.
4 Arrow: Draw arrows on the screen recording interface to point out and emphasize specific areas.
5 Line: Draw straight lines on the screen recording interface to underline or connect specific points.
The toolbar can be expanded or collapsed. This feature allows you to access various tools and options when needed, and hide them to keep the workspace uncluttered when they are not in use.
Step 7. Record Screen Process Completed.
When the recording is completed, you can click the red Stop button to end the recording. Your recorded files will be displayed. From here, you can preview and manage the recorded content as needed.
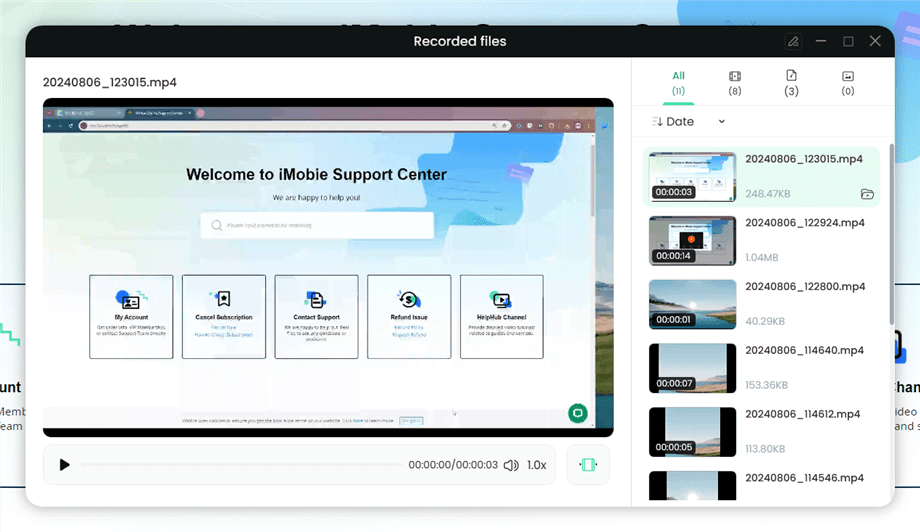
Preview the Recording
You may also want to know: How to screen record protected videos
Before we end our article, let’s look at some FAQs about how to record audio on Chromebook.
Frequently Asked Questions
-
How to Record Music on a Chromebook?
Chromebook does not provide in-built voice recording tools for audio recording. However, there are many third-party tools available for such purposes. Another simple option is to use an online audio recorder we discussed in this article. You must open the website, choose your input settings, and hit the record button. Once done, you can save the recording as an audio file on your device.
-
How to Screen Record on Chromebook?
You can use the built-in Screen Capture tool with a Chromebook with OS 89 or above. Press Ctrl + Shift + Show Windows keys simultaneously to open the tool. Then, select the portion of the screen you wish to record. Hit the record button and save the file once finished. But if you use an older version, online software like Screencastify can help you.
Final Words
Capturing sound is now as important as capturing moments. So, knowing how to record audio on Chromebooks is crucial for every user. In this brief guide, we’ve shown you how to record audio on Chromebooks. We’ve explored various tools for the task. And if you’re looking for a Windows or Mac audio recording tool, Screenify might be the answer. It’s a complete tool for all your recording needs on Windows and Mac.

Joy Taylor


Senior writer of the iMobie team as well as an Apple fan, love to help more users solve various types of iOS & Android-related issues.
 Screenify
 AnyEnhancer
 FocuSee
 Vozard
 AnyMiro
 AnyMirror