How to Record a Zoom Presentation
In this article, we’ve discussed the definitive methods to record a Zoom meeting effectively. You can use Zoom’s native capabilities or leverage the robust features of Screenify . Our step-by-step guide ensures that you capture every pivotal moment with ease. Then you can make revisits or share this recording with others.
Since Covid-19, the world has acknowledged the use of Zoom meetings. And with the increasing usage of Zoom, a question keeps echoing in everyone’s mind.
It’s “How to record a Zoom meeting?”
And that’s not a surprise! Whether it’s an academic lecture or a team discussion, having a recording means no single detail is overlooked.
So, in this article, we have solved this query! We’ll show you step-by-step how to record a Zoom meeting. We’ll cover both the in-built recorder of Zoom and other popular alternatives.
But first things first. Can you record a Zoom presentation?
Can You Record a Zoom Presentation?
Yes, recording a Zoom presentation is both possible and practical.
Zoom understands the importance of saving digital interactions. So it has integrated features for hosts to record meetings. These recordings can be shared with those who might have missed the live session.
There are two primary methods to record a Zoom presentation:
- Local Recording
Save your recording directly on your computer. This feature is available to both free and paid Zoom subscribers.
- Cloud Recording
This option is reserved for paid subscribers and stores the recording on Zoom’s cloud.
Steps to Record a Zoom Meeting as a Host Using the Inbuilt Recorder
Here is a stepwise guide on how to record a Zoom meeting with the in-built recorder.
Step 1. Set up and start your Zoom meeting first. Then you’ll see a toolbar at the bottom of the Zoom window.
Step 2. Located on the toolbar, click the “Record” button anytime during the meeting.
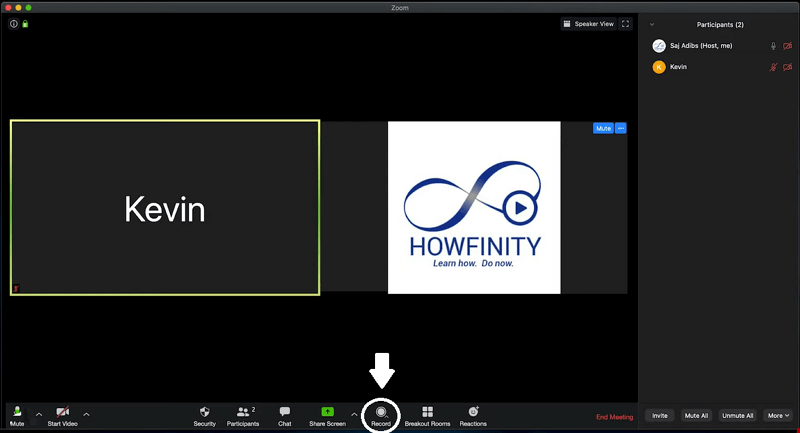
Click on the “Record” button to start the recording
Step 3. Two options will appear if you’re a paid subscriber and have set up cloud recording. Zoom will ask if you want to record to your local device or the cloud. Select as per your preference.
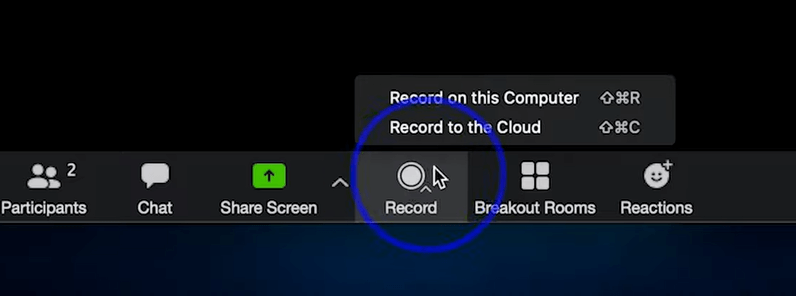
Record on computer or cloud
Step 4. Once your meeting is over or when you want to finish recording, click the “Stop Recording” option.
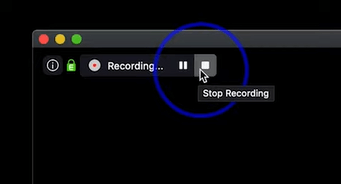
Click on the “Stop” button to stop the recording
Step 5. Now for local recordings, Zoom will convert them after the meeting ends. And it will save them to a specified folder on your computer.
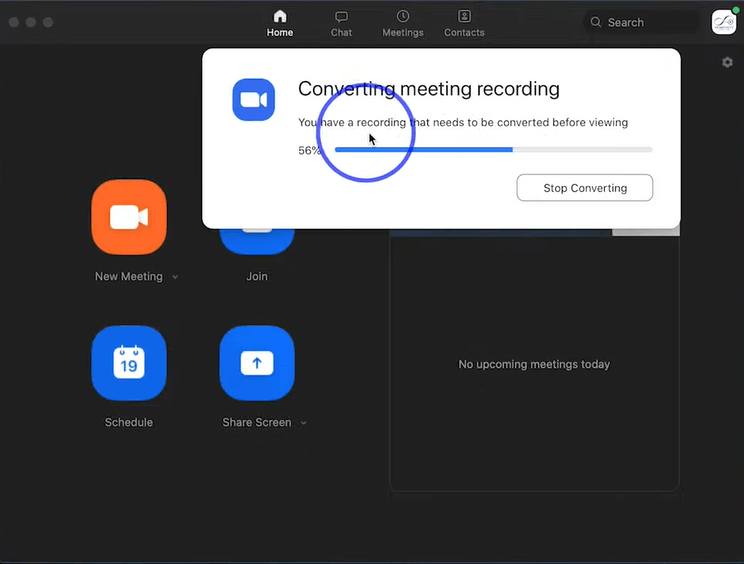
Converting the meeting recording
You’ll receive an email with the link once it’s available for cloud recordings. You can also access it from your Zoom account’s recording section.
Now that’s as far as the host is concerned.
But can you also record a Zoom meeting even if you are not the host?
Can You Record a Zoom Presentation if You are not the Host
The short answer is YES. But this ability is firmly under the control of the host. By default, only the host has the automatic right to record. Participants, on the other hand, need permission from the host to do so. This mechanism is put in place to ensure privacy and consent.
However, this means that the participants can’t record without authorization. They can potentially miss out on crucial content. Moreover, the native Zoom recorder doesn’t provide live editing tools while recording.
That’s why there’s a need for an alternative like Screenify to record a Zoom meeting.
How to Record a Zoom Presentation via Screenify
Screenify is not just any ordinary screen recording software. It’s a comprehensive tool designed specifically to cater to modern-day recording needs.
Screenify offers a seamless way to record your screen, webcam, and audio with unparalleled clarity. As a special offer for iMobie users, it promises a high-definition recording experience with no watermark.
And you can download this versatile screen recorder for free.
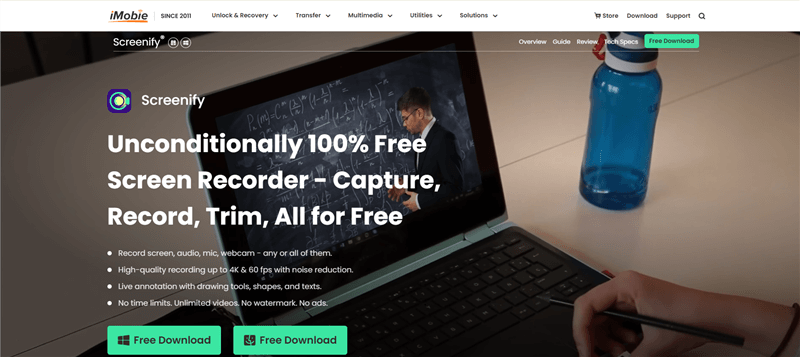
Screenify Website Interface
Now let’s look at the key features and the stepwise guide to using Screenify.
Key Features
Here are the key features of Screenify.
- Versatile Recording: Record screen, webcam, and audio.
- High Definition Recording: Capture 4K/1080p/720p videos without hassle.
- No Watermarks: Ensures your recordings are clean and professional.
- No Time Limit: You can record without interruptions as long as you want.
- Customizable Filters & Background: You can enhance your videos with various filters and virtual backgrounds.
- One-click Save: Instantly save recordings to your Windows/Mac device.
- Safe & Secure: No malware threats to ensure safe use.
Steps to Use Screenify to Record a Zoom Meeting
Here is a stepwise guide to record a Zoom meeting with Screenify.
Step 1. Download and Install Screenify on Computer.
Step 2. Launch Screenify on your computer, and select Record screen mode.
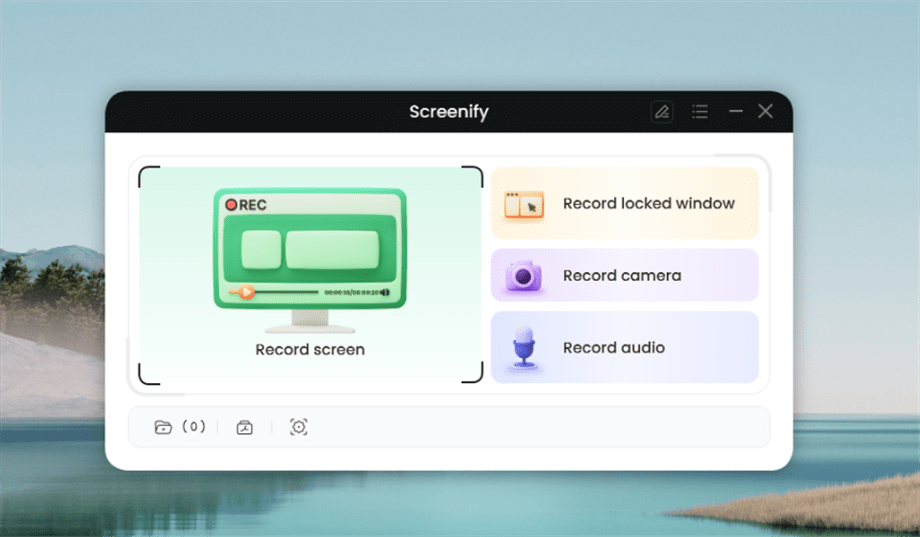
Select Record Screen Mode
Step 3. Configure Recording Settings aims to configure settings like system audio before recording.
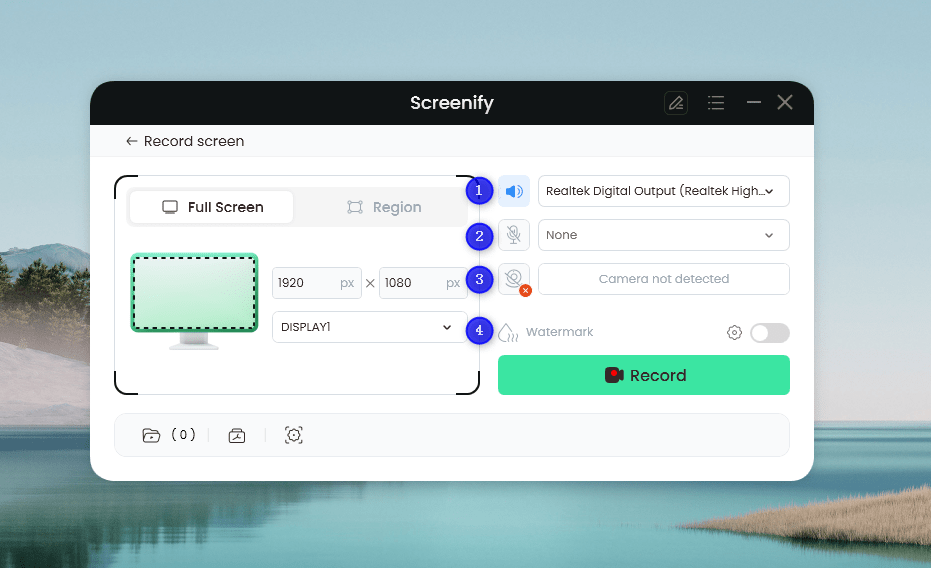
Set Configure Recording Settings
In this setting menu, you can:
1 Choose the System audio.
2 Choose the Microphone you want to record.
3 Choose the Camera you want to use.
4 Choose whether to add a watermark.
Step 4. Select Recording Screen.
Option 1. Full Screen Record
Please select Full Screen mode and choose the display you need to record. Hit Record button to initiate recording.
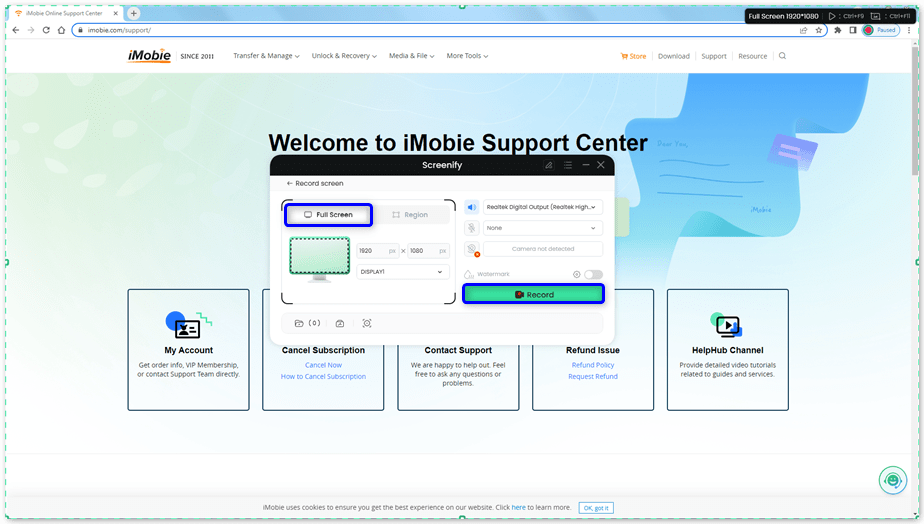
Select Full Screen
Option 2. Region Record
To record region, you need to manually select the recording area. After selection, you can still adjust the selected area. It supports customize selection, full screen, and proportional selection based on common social media dimensions.
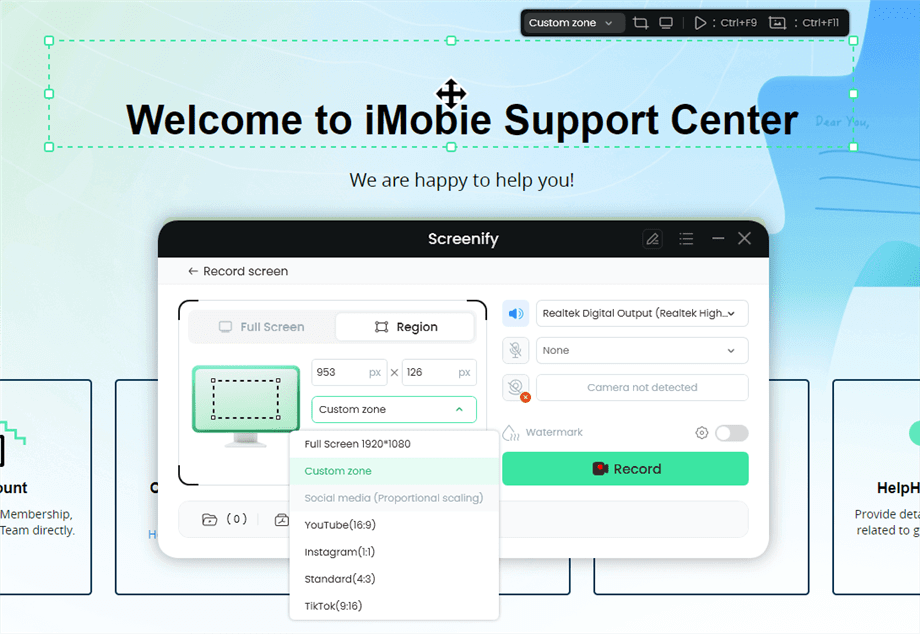
Record Region
Step 5. Wait for the Recording Countdown.
There is a 3-second countdown to help you prepare the recording after you are ready to start recording.
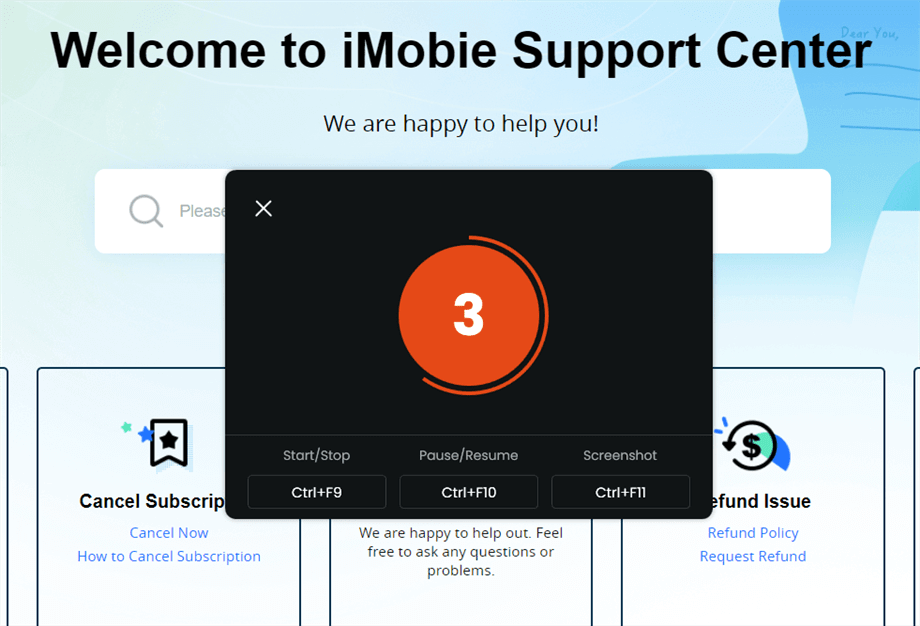
Wait for the Recording Countdown
If you would like to see a recording countdown before your recording starts, you can enable the countdown option. Or you can tap it off. View this post to know how to set the countdown option.
Step 6. Start Recording.
The recording will begin after a 3-second countdown. You can make annotations on the recording interface during the recording.
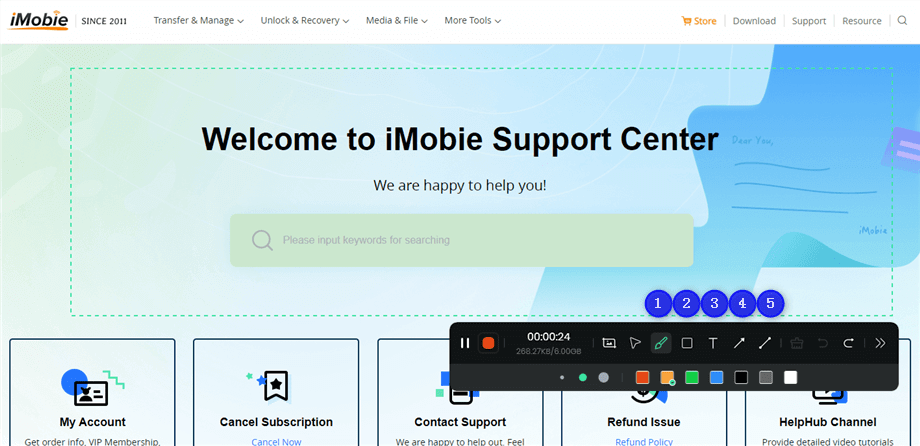
Annotate the Screen during Recording
With the toolbar, you can add the annotation in the screen:
1 Brush: Draw freehand on the screen recording interface to highlight or illustrate specific areas during the recording.
2 Rectangle: Draw rectangular shapes on the screen recording interface.
3 Text: Add written notes or labels directly onto the screen recording interface.
4 Arrow: Draw arrows on the screen recording interface to point out and emphasize specific areas.
5 Line: Draw straight lines on the screen recording interface to underline or connect specific points.
Step 7. Record Screen Process Completed.
When the recording is completed, you can click the red Stop button to end the recording. Your recorded files will be displayed. From here, you can preview and manage the recorded content as needed.
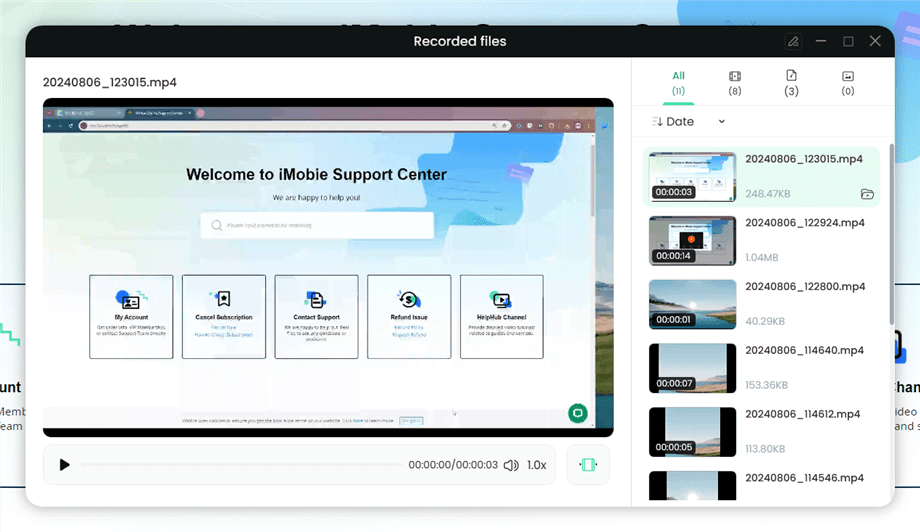
Preview the Recording
You may also want to know: How to screen record protected videos
So our Zoom recording is done! Easy, right? But if you want to simplify things, there’s another way to record a Zoom meeting. And it’s to use the in-built screen recorders of Windows and Mac.
Now let’s explore them in detail.
How to Record a Zoom Presentation via Screen Recorder
Many users do not need to look beyond their own operating system. You can find an in-built screen recording tool in your OS.
Windows, in particular, has steadily improved its in-built utilities with the growing needs of its user base. One of these utilities is the Xbox Game Bar. This feature was originally designed for gaming sessions. But it’s versatile enough to capture Zoom presentations or any on-screen activity.
Since the Xbox Game Bar is part of the Windows OS, it’s extremely easy to use, even for new users. But you must ensure you’re running Windows 10 October 2018 update or later. The Xbox Game Bar is only available in the latest versions of Windows OS.
Steps to Use Xbox Game Bar for Zoom Presentations
Let’s explore how to use the Xbox Game Bar for Zoom meetings.
Step 1. Start your Zoom meeting. Now press the Windows + G keys simultaneously. This will bring up the Xbox Game Bar overlay.
Step 2. On the top menu of the Game Bar, click on the settings icon. Here, you can adjust recording length, audio settings, and more.
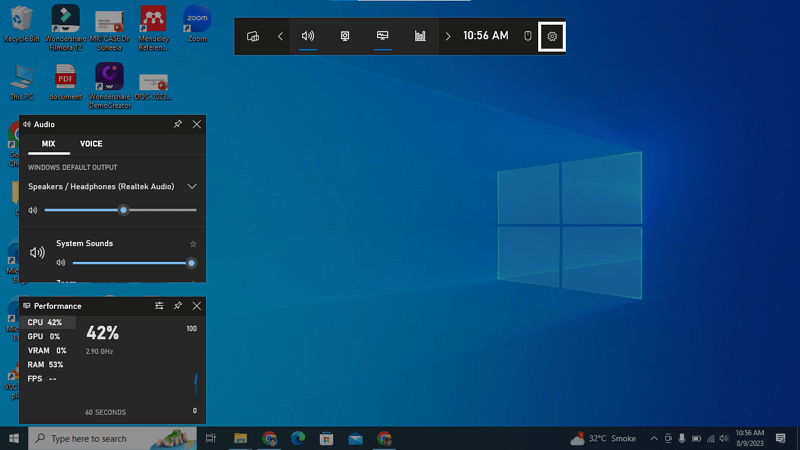
You can change the settings of your recording
Step 3. Click on the recording icon or press Windows + Alt + R to start recording. You’ll notice a small recording timer on the top right.
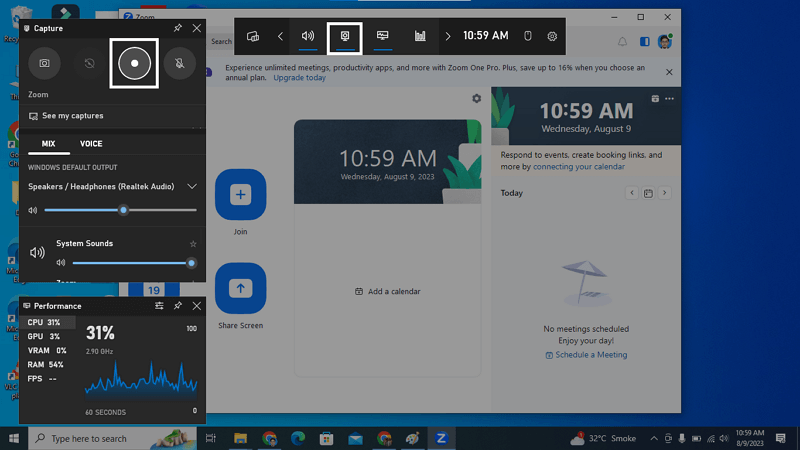
Select the “Record” button from the “Capture” section
Step 4. Click on the “Stop Recording” icon to finish your recording.
Step 5. Once finished, recordings are automatically saved in the “Captures” folder inside the “Videos” library. You can access this folder through File Explorer.
While Xbox Game Bar doesn’t have an inbuilt editor, Windows does offer the “Video Editor” tool. You can trim, add effects, or merge videos in this video editor.
So using this Xbox Game Bar, Windows users can easily record a Zoom meeting. They also get the dual benefits of ease of use and the reliability of a native application.
Now let’s don’t forget the Mac users.
They can also use a screen recorder to record a Zoom meeting. Let’s explore it now.
How to Record a Zoom Presentation via QuickTime
While Windows users have the Xbox Game Bar, Mac users can rely on a powerful native tool. This in-built screen recorder of a macOS device is called QuickTime Player.
Not only does QuickTime function as a media player, but its built-in recording abilities also make it an invaluable tool. So it provides a smooth and reliable recording of Zoom presentations without needing third-party software.
Steps to Use QuickTime for Zoom Presentations
Here’s how to use QuickTime for capturing your Zoom sessions.
Step 1. Open QuickTime Player from your Applications folder. Once it’s open, navigate to the “File” menu at the top-left corner.
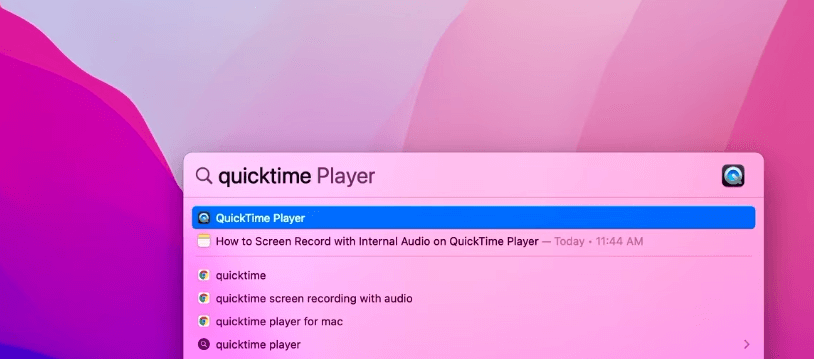
Launch QuickTime
Step 2. Select “New Screen Recording” from the drop-down menu. This will open the screen recording tool.
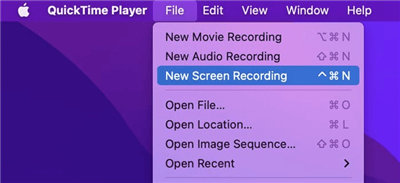
Select New Screen Recording
Step 3. Before starting the recording, click on the small arrow next to the record button. Now you can choose the microphone and decide whether to show mouse clicks in the recording.

Change the settings of your recording
Step 4. Click the red record button. You’ll be given the option to record the entire screen or just a portion.
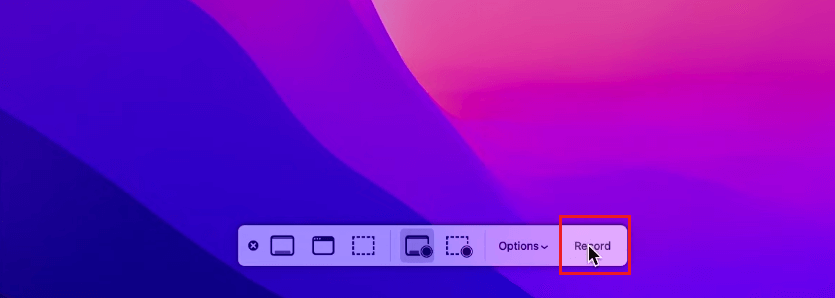
Start Recording
Note: For Zoom meetings, choose the full screen to capture everything.
Step 5. Once you’ve made your selection, the recording will begin. Your Zoom presentation will now be recorded in real-time.
Step 6. To conclude your recording, click the stop button in the menu bar at the top of your screen or press “Command + Control + Esc.”
After stopping, QuickTime will automatically open the recording for review. QuickTime’s intuitive design and macOS integration make it a top choice for Mac users.
Now before we conclude, let’s see some frequently asked questions about how to record a Zoom meeting.
FAQ
1. How Do I Record My Screen and Audio on My Laptop?
The recording of your screen and audio varies based on your operating system.
For Windows users, the Xbox Game Bar provides a handy solution. You can access the bar by pressing the Windows + G keys simultaneously. From there, activate the “Capture” widget and tap the “Record” button.
On the other hand, Mac users can rely on the QuickTime Player. From the “File” menu, choose “New Screen Recording.” Before initiating the recording, select your microphone through the small arrow beside the record button to ensure audio capture.
And if you want a free third-party tool, Screenify provides a useful solution for iMobie users.
2. Why Can’t I Record my Zoom Meeting?
Multiple factors might hinder your ability to record a Zoom meeting. One of the primary reasons is the host’s settings. The host has the power to turn off recording capabilities for participants. So you should seek the host’s permission if the recording is crucial.
Furthermore, device storage might be another concern. So it’s also essential to ensure adequate storage space on your device as Zoom recordings. Finally, remember that the free versions of Zoom might impose restrictions on continuous recording.
To bypass these limitations, consider upgrading your Zoom account or exploring tools like Screenify.
3. How do I record Zoom with screen share and participants?
Recording a Zoom meeting that includes both the screen share & the participant feed requires a bit of setup.
Firstly, join your Zoom meeting and ascertain that you possess the necessary permissions to initiate recording. Begin by activating the “Share Screen” button. While sharing the screen, remember to open the participant panel to view all meeting attendees.
Hit the “Record” button on the Zoom toolbar to start recording. It’s noteworthy to set your Zoom display to “Side-by-side mode.” This ensures that you capture both the shared content and the participants simultaneously.
Conclusion
The ability to record Zoom meetings has become imperative for many users. By recording a Zoom meeting, students can revisit their lectures anytime. While business discussions can be shared with other members with a Zoom recording.
In this guide, we’ve discussed various methods to record a Zoom meeting. A standout amongst these is the Screenify. It is a tool specifically crafted for recording demands. For those seeking a seamless recording experience with zero compromises on quality, Screenify is an excellent choice.
Free Download * 100% Clean & Safe
Product-related questions? Contact Our Support Team to Get Quick Solution >

