Full Guide to Record a PowerPoint Presentation with Audio
This article provides a step-by-step guide on how to record a PowerPoint presentation with audio using PowerPoint and third-party tools. We will also share how to insert audio into your slides to make them more accessible.

Screenify – Record a PowerPoint Presentation with Audio
Try Screenify for free to record a PowerPoint with audio on Windows or Mac. 100% Free and easy to use.
100% Clean & Safe
Do you want to make your PowerPoint presentations more engaging? Are you looking for ways to create a video of a PowerPoint presentation in your voice? We get it! Recording PowerPoint slides has become essential with the rise in remote work and online education. Adding your voice to the recordings can make your presentations more informative. Moreover, these recordings are easily accessible, allowing the audience to watch them whenever they feel stuck!
But the question is: how do you record a presentation with your voice? This article will provide a complete guide on it! We will show you how to record a PowerPoint presentation with audio using simple and easy ways with stepwise instructions! Are you ready for it? Let’s go!
Can You Screen Record a PowerPoint Presentation with Audio?
Yes! You can record a PowerPoint presentation in your own voice. The platform itself offers an integrated recording tool to capture your voice alongwith your screen recording. You can also select which microphone you want to use directly within PowerPoint. Moreover, you can upload pre-recorded audio files from your PC or record one directly within the platform. Alternatively, third-party tools like Sceenify, OBS Studio, or Snagit offer a handy solution for recording presentations with sound.
Now, before we discuss how to record a PowerPoint presentation with audio using these tools, let’s find out why it is essential.
Why Is Audio in a PowerPoint Presentation Important?
PowerPoint slides usually have minimal text that serves as talking points for the presenter. Adding audio is essential to explaining the content of slides and making them informative.
Let’s break down the factors that call for using audio in your presentations.
- Clear Explanations: Narration helps to clarify complex ideas and concepts that are difficult to understand from slides alone.
- Increased Engagement: Using audio to explain and ask questions maintains the audience’s interest. You can keep them focused to the end!
- Flexibility for Viewers: Presentations with audio allow viewers to learn at their own pace. They can re-listen to the recording anytime to enhance understanding.
- Shows your Professionalism: Recording slides with voice shows your effort to create a polished experience for your audience. It portrays professionalism and expertise.
- Personal Connection: A human voice makes the presentation feel more relatable. Viewers can develop a trust to continue watching the content.
Noting these reasons, let’s move ahead and explore how to record a PowerPoint presentation with audio and video!
How to Record a PowerPoint Presentation with Audio Directly
The most convenient way to record your slides with audio is using the PowerPoint itself. It offers a handy recording tool to create a video of your slides from the start or the currently opened slide. You can also select your audio input source and overlay webcam recording.
Let’s look at how to record a presentation using it. Here are the instructions for capturing audio with your PPT presentation.
Step 1. Open the slides you want to present with PowerPoint. Then, click the “SlideShow” tab from the top.
Step 2. Click the arrow below the “Record” button and select the “From Current Slide” or “From Beginning” option as needed.
Step 3. You will be directed to the recording mode in PowerPoint. Here, click “Settings” and choose your Microphone and Camera.
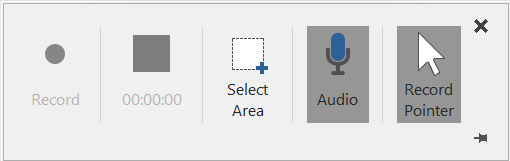
PowerPoint Screen Recording Settings
Step 4. Once you have customized the settings, click the red “Record” button in the top left.
Step 5. Powerpoint will start the recording. You can click the mic or camera icon below the slide to turn them on or off. Once you’re done recording, click “Stop” at the top left.
Step 6. Close the window to return to your slides. Then, click “Export to video” in the save section.
Select “Save as Show” if you want your recording to play as slides once exported.
Step 7. Select your desired video resolution from the list and click “Create Video” to save the file.
That’s all. You have successfully saved your presentation recording with audio! Let’s move forward now and explore how to use third-party programs for this purpose.
Record PowerPoint Presentation with OBS
OBS Studio offers an advanced solution to capture your PPT presentations with audio. It has powerful tools to personalize the recordings for a more engaging experience. Plus, you can capture everything from your screen and windows to your microphone, system sound, and camera.
Let’s see how to record a PowerPoint presentation with audio and video using this tool.
Download and install OBS Studio on your device. Then, use the following instructions to capture your presentation videos with audio.
Step 1. Open OBS on your computer. A popup for “Auto Configuration Wizard” will appear. Use the instructions on your screen to set up OBS automatically.
Step 2. Once you have configured OBS, go to “File” from the top left and click “Settings.”
Step 3. Select “Hotkeys” from the left panel. Assign hotkeys for “Start Recording” and “Stop Recording” and click “Apply.”
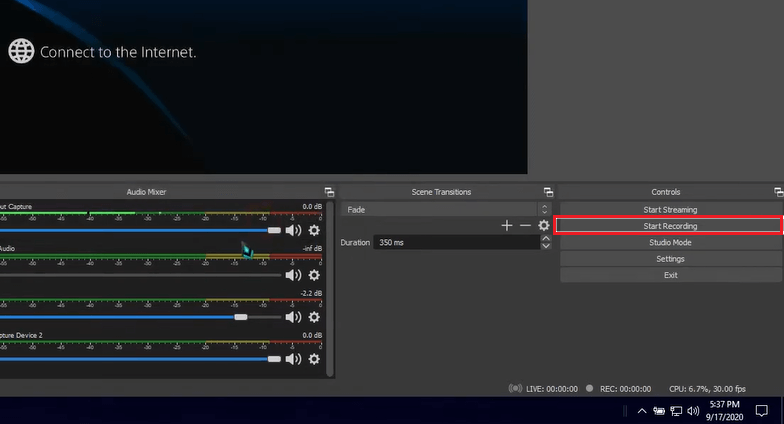
Click to Start Recording
Step 4. Open the PowerPoint slides you want to record. Go to “Sources” in OBS and click the “+” icon. Select “Window Capture” from the list. Rename it and click “OK.”
You can also add the “Video Capture Device” source to record your camera with the presentation.
Step 5. A window will appear to customize the window capture source. Select “Capture Cursor” from here and click “OK.”
Step 6. Resize the recording window to fit it to the screen. Then press the hotkey or “Start Recording” under the Controls section in OBS.
And that’s how to record a PowerPoint presentation with audio using OBS. Now, let’s explore another solution for it!
Record PowerPoint Presentation with Snagit
Snagit offers a simple and easy solution to capture PowerPoint presentations with audio. You can record any part of the screen and your camera to create professional-looking presentation videos. It also allows saving your recordings as MP4 or sharing them via a unique link.
Let’s see how to use it to create presentation videos with your voice. Download and install Snagit on your Windows or Mac computer. Then, use the instructions below to capture your presentation with audio.
Step 1. Open the PowerPoint presentation you want to record with audio. Then launch Snagit and select the “Video” mode.
Step 2. Choose “Region” from the Selection dropdown. Turn the toggle on for “Microphone” to enable audio recording.
Step 3. Click “Capture” or press “CTRL+P” on your keyboard to start the presentation recording.
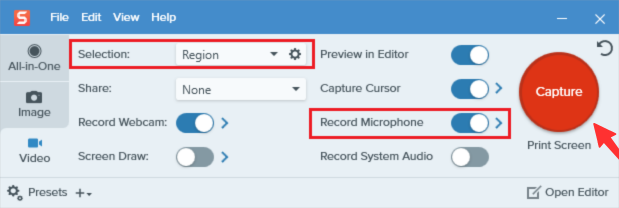
Adjust Video Settings and Cclick Capture
Step 4. Select the area you want to record. Then click the red “Record” button from the toolbar at the bottom.
Step 5. Wait for the countdown to finish. Then, start presenting your slides and click “Stop” once done.
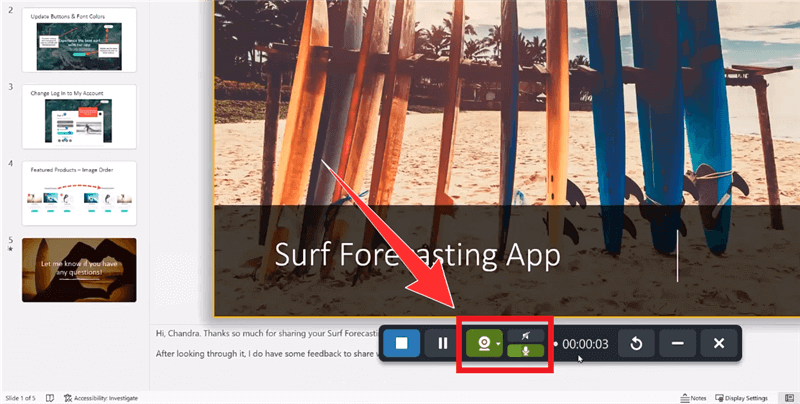
Click Stop Once Done
Step 6. Snagit will direct you to its video editor. Here, you can trim the video if necessary. Then click “Share” and select “File” to save the recording as MP4.
That’s all about using Snagit to record your PowerPoint slides with sound! But it’s not the end yet! Keep reading for another easy solution!
How to Record a PowerPoint Presentation with Audio via Screenify
Do you want a specialized solution to record your presentations with audio? Meet Screenify, the ultimate tool to create professional-level presentation videos without hassle! Screenify is a powerful screen recorder for Windows and Mac. With a wide range of recording modes, it allows you to capture a part of your slides or the full display.
You can also overlay your webcam recording to make your presentations more engaging. Moreover, it lets you capture your mic and system sound to record your presentation with audio. But that’s not all. The best part about Screenify is that it is entirely free to use! Plus, you can add text watermarks and record without limits.
Here are the standout features Screenify offers.
- Free to Use: Screenify is entirely free! You can use all of its features without paying for them.
- Record Audio: It lets you record your microphone and system sound. You can customize the audio volume and denoize for clean output.
- Flexible Recording Options: Record however you need to! You can capture the entire or partial screen, specific windows, camera, and audio.
- Add or Remove Watermarks: You can adjust watermark settings to add or remove text watermarks from recordings.
- Ultra HD Resolution: Capture presentations in high quality! You can record a lag-free video with 4K resolution and 60 FPS.
- Platform Compatibility: Screenify supports both Windows and Mac devices. You can access it on any of these platforms without compatibility issues.
Free Download * 100% Clean & Safe
How to Add Audio to a PowerPoint Presentation
Do you want to add separate audio to your PowerPoint slides? This can be helpful when you need to add explanations for the slides without recording the entire presentation. The good news is that PowerPoint lets you narrate slides by uploading or recording audio. You can insert these narrations into your slides and play them whenever needed. Ready to add audio to your presentations? Let’s find out how to do it!
Step 1. Open your presentation with PowerPoint and go to the “Insert” menu.
Step 2. Click “Audio” at the top right and select how to add the audio. Then click “Audio on My PC” to import the audio file from your computer.
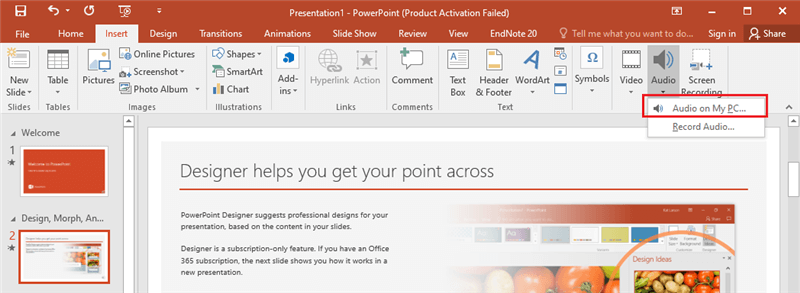
Sselect the Audio on My PC Option
Step 3. Once uploaded, the audio will be inserted on the selected slide. Repeat the process to add sound for all slides.
Step 4. If you don’t have pre-recorded audio, select the “Record Audio” option. A popup will appear. Click the “Start Recording” button.
Step 5. Your audio recording will start. Once you’re done, click “Stop” and press “OK” to add it to the slide.
That’s all. You’re done adding audio to your PowerPoint slides! That was easy, right? Now go ahead, save your presentation, and share it with your colleagues, students, or employees. The audio files will help them grasp the content of the presentation without hassle!
Final Thought
That’s all about how to record a PowerPoint presentation with audio! We have shared a complete guide with step-by-step instructions to make the process easier. You can record presentations with audio using PowerPoint or opt for third-party programs like OBS, Snagit, or Screenify for a dedicated screen recording solution. All the tools offer handy solutions. However, Screenify stands out as a feature-packed solution for recording presentations. Plus, the ability to record without limits makes it an excellent option to try. So, go ahead. Use our guide to create presentation videos that stand out professionally!
Free Download * 100% Clean & Safe

Senior writer of the iMobie team as well as an Apple fan, love to help more users solve various types of iOS & Android-related issues.
Product-related questions? Contact Our Support Team to Get Quick Solution >
