How to Fix Wireless Display Install Failed with 7 Ways
Have you come across the Wireless Display install failed in Windows 11? Don’t worry. This post summarizes 7 effective ways to fix the problem and introduces a best alternative to Wireless Display to mirror your Android or iOS screen to PC. Don’t miss it.

How to Fix Wireless Display Install Failed with 7 Ways
Screen mirroring iPhone/Android to computer with AnyMiro.
- Fast response time within 10 ms and 60fps frame rate.
- A stunning visual experience with no color difference.
- Lag-free screen mirroring and 4k resolution.
Available for both Win & Mac
In recent years, wireless display technology has become an indispensable part of digital life. Wireless Display refers to the use of wireless technology to project the screen content from devices such as computers, smartphones, and tablets onto another display screen, without the need for physical cables.
Although Wireless Display is a useful feature in Windows 11, it might encounter the issue of “wireless display install failed in Windows 11” under certain circumstances. In the following discussion, we will explore the reasons for installation failure and provide some possible solutions.
Table of ContentsHide
Why Did the Wireless Display Installation Fail?
The reasons for the wireless display install failed can be attributed to a variety of factors. Here are some common reasons why the installation might fail:
1. Driver Issues: Outdated or incompatible graphics or wireless drivers can hinder the installation process. Proper drivers are essential for communication between your device and the wireless display.
2. Compatibility Problems: Not all devices support wireless display technology. Your computer’s hardware and the wireless display device must be compatible for a successful installation.
3. Network Issues: Stable network connectivity is crucial for wireless display. If the network is unstable or experiencing disruptions, it can lead to installation failures.
4. Operating System Updates: Ensure that your Windows 11 operating system is up to date. Updates might contain bug fixes and improvements that can address installation issues.
How to Fix Wireless Display Install Failed (7 Ways)
Sometimes, when attempting to install a wireless display device, you might encounter issues, and the error message “wireless display install failed” can be quite frustrating. Here are seven methods to resolve this problem:
1. Check the Network Connection
Ensure a stable network connection. Connect both your computer and the wireless display device to a reliable network source, and minimize signal interference. Ensure that no other devices are consuming excessive bandwidth on the network.
2. Manually Install Wireless Display
Manually installing a wireless display on Windows 11 can be a helpful approach if the Wireless Display installation is stuck.
Step 1. Open the search bar, type “cmd,” then right-click on the “Command Prompt” window and select “Run as administrator.” In the User Account Control window that appears, click “Yes.”
Step 2. In the elevated Command Prompt window that appears, enter the following command and press Enter to manually install the Wireless Display on Windows 11. Alternatively, you can open an elevated PowerShell window and run the same command to install this feature.
Command:
“DISM/Online/Add-Capability/CapabilityName:App.WirelessDisplay.Connect~~~~0.0.1.0”

Fix Wireless Display Failed with cmd
3. Turn off the Metered Connection
If you encounter wireless display installation issues on Windows 11, disabling the “Metered Connection” network setting might help resolve the problem.
By going to Windows Settings > Network & Internet > Wi-Fi, and then unchecking “Set as metered connection,” you can switch to a non-metered network connection, which can aid in successfully completing the wireless display installation.

Turn off Metered Connection
4. Switching to a different DNS server
If you encounter issues with the Wireless Display install failing in Windows 11/10, you can try changing the DNS server.
Step 1. Open the Control Panel, change the “View by” option to “Category,” then navigate to “Network and Internet > Network and Sharing Center > Change adapter settings.”
Step 2. Right-click on the network currently connected, and select “Properties.”
Step 3. In the “Networking” tab, select “Internet Protocol Version 4 (TCP/IPv4),” then click on “Properties.”

Select Internet Protocol Version 4 (TCP/IPv4)
Step 4. Select the option “Use the following DNS server addresses,” set the “Preferred DNS server” to 8.8.8.8, and set the “Alternate DNS server” to 8.8.4.4. Once done, click “OK” to save the changes.

Change the DNS Server Addresses
5. Edit registry entries to install Wireless Display
The wireless display install failed error in Windows 11 can be resolved by editing registry entries. You can try the following steps:
Step 1. Press the Windows key + R to open the Run window.
Step 2. In the Run window, type “regedit” and press Enter to open the Registry Editor. Navigate to the following path:
HKEY_LOCAL_MACHINE\SOFTWARE\Policies\Microsoft\Windows\WindowsUpdate\AU
Step 3. In the right pane of the editor, locate the registry entry named “UseWUServer.” Double-click on it and change its value to 0.

Locate to Registry Entry Named UseWUServer and Edit
6. Update Windows 11
Updating the system might help resolve the issue of the Wireless Display installing stuck.
Step 1. Press Windows + I to open Windows Settings.
Step 2. Go to “Windows Update” from the left menu.
Step 3. Click on “Check for updates” and install any available updates for Windows 11.
7. Clear the cache
If you continue to encounter the “wireless display install failed” error, another potential solution is to clear the system cache.
Step 1. Open the Windows Terminal with administrative privileges.
Step 2. Enter the following commands one by one in the window that appears, pressing the Enter key after each command:
- net stop wuauserv
- net stop bits
- net stop cryptsvc
- rd /s /q c:WindowsSoftwareDistribution
- rd /s /q %temp%
- rd /s /q c:Windowstemp
- net start wuauserv
- sc config wuauserv start=auto
- net start bits
- sc config bits start=auto
- net start cryptsvc
- sc config cryptsvc start=auto
- exe
- DISM /Online /Cleanup-Image /RestoreHealth
Wireless Display Alternative: Mirror Android/iPhone to Windows PC
The wireless display requirements are complex. Maybe fixing the Wireless Display install failed can be quite difficult. Therefore, we recommend using third-party screen mirroring software as an alternative to wireless display.
AnyMiro is a good choice; it not only supports mirroring Android phone screens to your Windows computer but also enables wireless display from iPhone to PC without AirPlay. It offers both Wi-Fi and USB cable connections, providing easy usability. AnyMiro boasts high stability, maintaining connectivity for more than 10 hours, so you won’t need to worry about frequent disconnections during screen mirroring.
Here are the detailed steps of how to use AnyMiro to make wireless screen mirroring.
Step 1. You need to download AnyMiro first. You can click the button below to download it.
Free Download for all windows & 100% safe Free Download for all mac & 100% safe
Free Download100% Clean & Safe
Step 2. After the download is complete, open the main interface and choose whether your device is Android or iOS, then click Next. Here takes Android as an example.
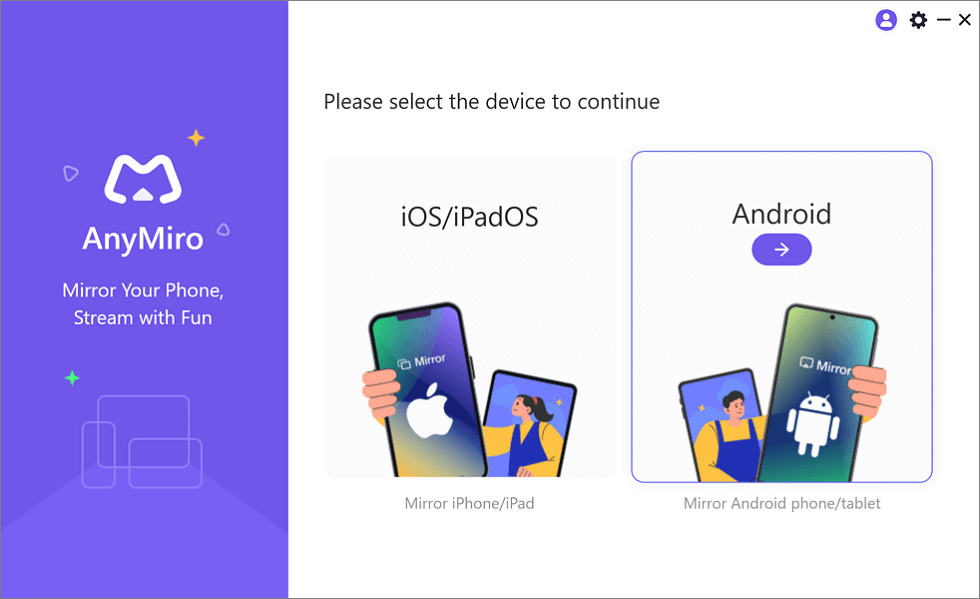
Mirror Android to Computer
Step 3. Then select the USB mode. Connect your Android device to the computer using a USB cable. After inserting the USB cable, enable USB debugging on your device and choose MTP mode.
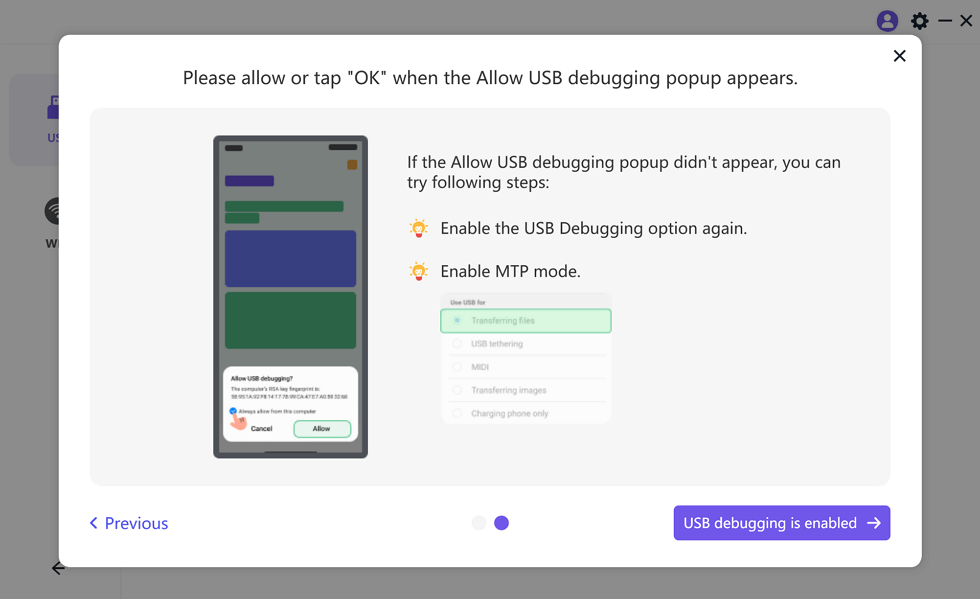
Enable USB Debugging and MTP Mode for a USB Connection
Step 4. Tap the USB connection on the AnyMiro app. Once successfully connected, you will be able to see your phone screen on the computer.
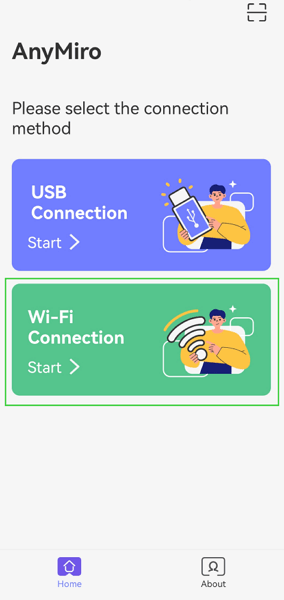
Select the Connection Method
FAQs About Wireless Display
1. How do I manually install a Wireless Display?
Press the Windows key + R to open the Windows Run dialog, then type “cmd” and press Enter to open the Command Prompt. Make sure to run it as an administrator by pressing Ctrl + Shift + Enter after typing “cmd.” Once in the Command Prompt window, enter the command:
“DISM/Online/Add-Capability/CapabilityName:App.WirelessDisplay.Connect~~~~0.0.1.0”
and press the Enter key on your keyboard.
2. Is Wireless Display the same as screen mirroring?
Wireless display and screen mirroring are related concepts but not entirely the same. Both involve wirelessly sharing the screen content of one device onto another, but wireless display typically allows for extending or duplicating an independent display on an external screen, while screen mirroring focuses more on precisely replicating the content of the source device on another device.
The Bottom Line
That’s all. If you also encounter issues with Wireless Display install failed you can refer to these 7 methods to resolve the problem. Additionally, we recommend using AnyMiro for screen mirroring. It supports wireless Wi-Fi screen casting and even offers USB connectivity for mirroring in case of unstable networks. The connection process is highly stable, with over 10 hours of sustained connectivity. We believe it won’t disappoint you.
AnyMiro – Real-Time Screen Mirroring Tool
Free download AnyMiro to enjoy a fast, stable, and smooth screen mirroring experience. You can mirror for better game playing, video watching, or live streaming mobile phone content.
Product-related questions? Contact Our Support Team to Get Quick Solution >
