4 Fixes of iTunes Original File Could Not Be Found
Have you encountered with iTunes original file could not be found the error? Refer to this guide as here we have mentioned probable solutions that you can try to fix this issue.
iTunes Tips & Issues
iTunes Basic Learning
iTunes Music Tips
iTunes Libary Tips
iTunes Connection Issues
Several users may found an exclamation sign next to some songs in Tunes they want to play and iTunes gives an error message saying “the song could not be used because the original file could not be found”. Might you are wondering why this happens? iTunes does not store music files in its program and when you try to play a song in iTunes, then iTunes look for a song on your hard drive. When it is unable to find the location of the song, it shows an exclamation sign next to the song.
However, whatever the reasons for iTunes original file could not be found issue. Here, in this guide, we have listed several solutions to fix it.
Also Read: Fixes to Solve iTunes Not Playing Music >
Solution 1: Try to Locate Song
If you are receiving this error on one or two songs then you can try out to locate songs manually in iTunes. Here, we have shown how you can do this:
Step 1. First of all, you need to double-click the song that has an exclamation sign. Now, it will give an error message “the original file could not be found”. Tap on “Locate” in the pop-up message.

How to Fix iTunes Original File Could Not Be Found via Try to Locate Song
Step 2. Next, you need to browse your system until you are able to locate where the song is.
Step 3. Once able to find out, again double-click the song to open it. Here, again message will be prompt and you need to tap on “Find Files”.
Step 4. Next, iTunes add more files or it will let you it can’t be possible. After that, move forward.
Step 5. Now, try to play a song and check if now everything is fine or not.
Solution 2: Consolidating iTunes Library
If you are receiving exclamation signs on many songs then you can consolidate your iTunes library rather than trying to locate every song. It will scan your system hard drive for songs and then, it will automatically move songs to their correct location, which is the iTunes music folder.
Here are simple steps on how you can do it:
Step 1. Open iTunes library on your system and then, tap on the “File” option from the menu bar.
Step 2. After that, click on the “Library” option and then, click on “Organize Library”.
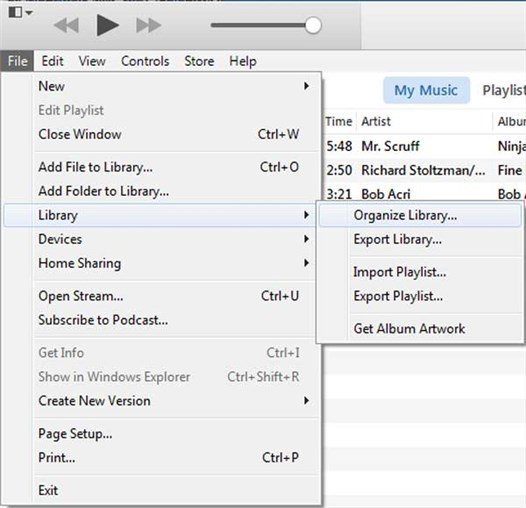
How to Fix iTunes Original File Could Not Be Found via Consolidating iTunes Library -Step 2
Step 3. Next, tap on “Consolidate Files” in Organize Library window. Finally, click on the “Ok” button to save changes.
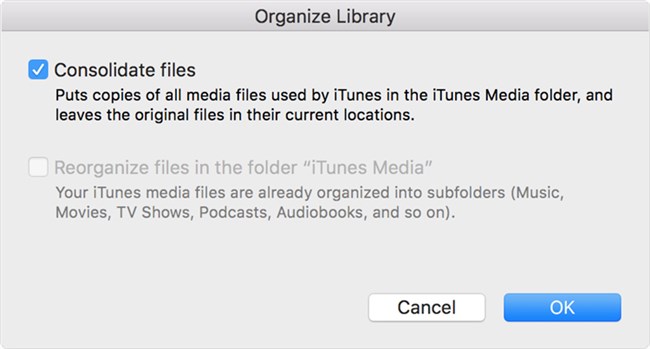
How to Fix iTunes Original File Could Not Be Found via Consolidating iTunes Library -Step 3
By following the above steps, you can again try to play a song and check if the issue “iTunes original file could not be found” get resolved or not.
Solution 3: Re-establish Link between iTunes and Music file Location
If your iTunes library is not on system hard drive, but on the external hard drive then it might be the case that link between iTunes and music file location is lost. Thus, in this case, you need to re-establish the link. Below are steps on how you can carry out:
Step 1. Open iTunes on your system. After that, click on “iTunes” tab (on Mac) or click on “Edit” tab (on Windows PC)
Step 2. Next, click on the “Preferences” option and after that, click on the “Advanced” tab.
Step 3. Here, you need to click on the “Change” button in the section “iTunes Media folder location”.
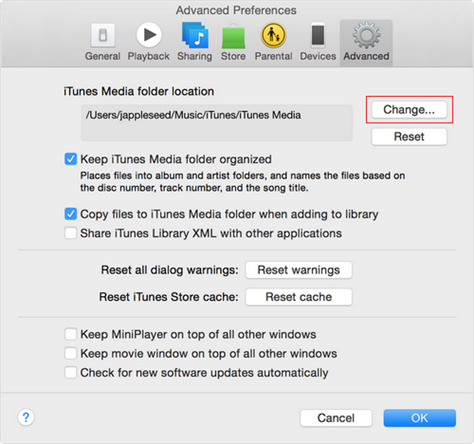
How to Fix iTunes Original File Could Not Be Found via Re-establish Link
Step 4. Now, you need to browse your system to locate the external hard drive and then, browse hard drive to locate “iTunes Media folder”. Once able to locate it, choose the media folder.
Step 5. Finally, open it and click on the “Ok” button.
Solution 4: Enable iTunes Media Folder Organized
If the problem you are facing get resolved then you can prevent yourself from facing the same problem again by checking iTunes Media Folder Organized option in iTunes.
Step 1. Open iTunes and then, tap on “iTunes” tab (on Mac) or tap on “Edit” menu (on Windows PC).
Step 2. Thereafter, tap on “Preferences” and then, select the “Advanced” tab.
Step 3. Here, check “Keep iTunes Media Folder Organized” box and finally, tap on “OK” button.
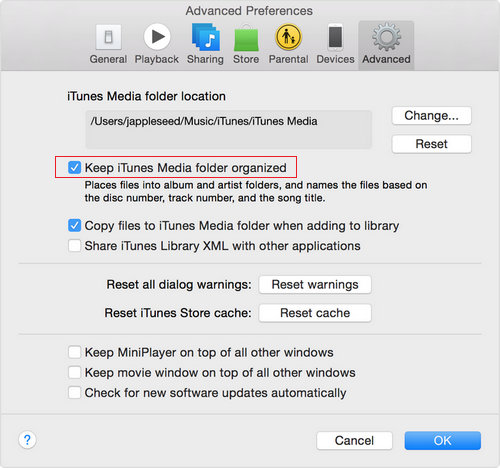
How to Fix iTunes Original File Could Not Be Found via iTunes Media Folder Organized
Solution 5: Try to Repair iTunes to Make it Back to Normal
Except for the above methods, here is a powerful iTunes repair tool that you can use to fix missing music files. This software is called AnyFix – iOS System Recovery, which is designed to fix various iOS/iPadOS/tvOS/iTunes issues in minutes. With AnyFix, you can fix 200+ complicated iTunes errors, including installation/download/update, connection/backup/restore, sync/CDB errors. Besides, if you’re facing iOS/iPadOS/tvOS system problems as iPhone stuck on issues, iPhone won’t start/charge/update, etc, AnyFix is capable of fixing that.
Then, just get AnyFix on your computer and follow the steps below to fix iTunes errors.
Step 1. After launching iTunes, you will see the main interface as below. Click iTunes Repair panel on it.
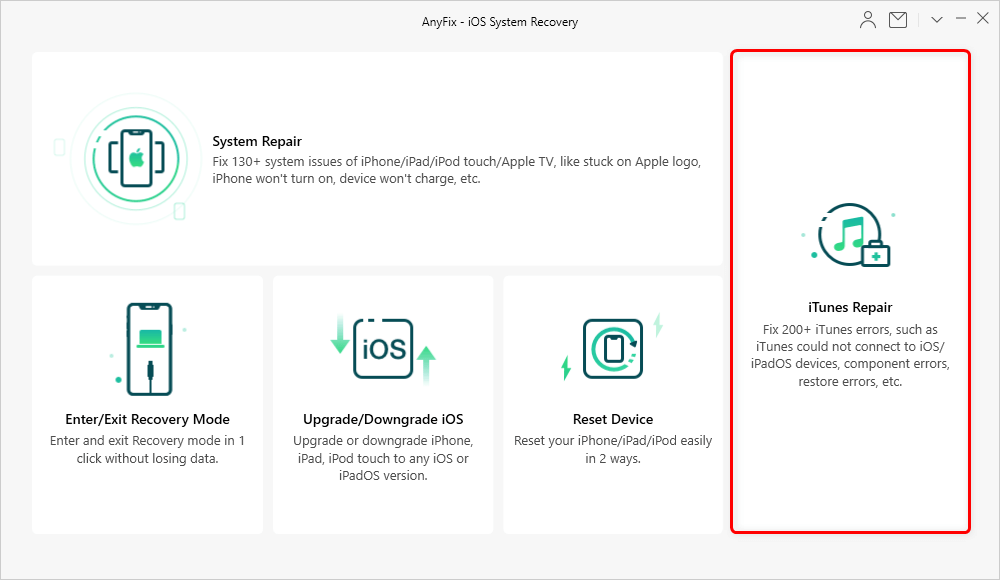
Tap on iTunes Repair from Homepage
Step 2. Then the 4 modes of iTunes Repair will be listed here, you can choose the situation that you’re facing. And head to Scan Now button.
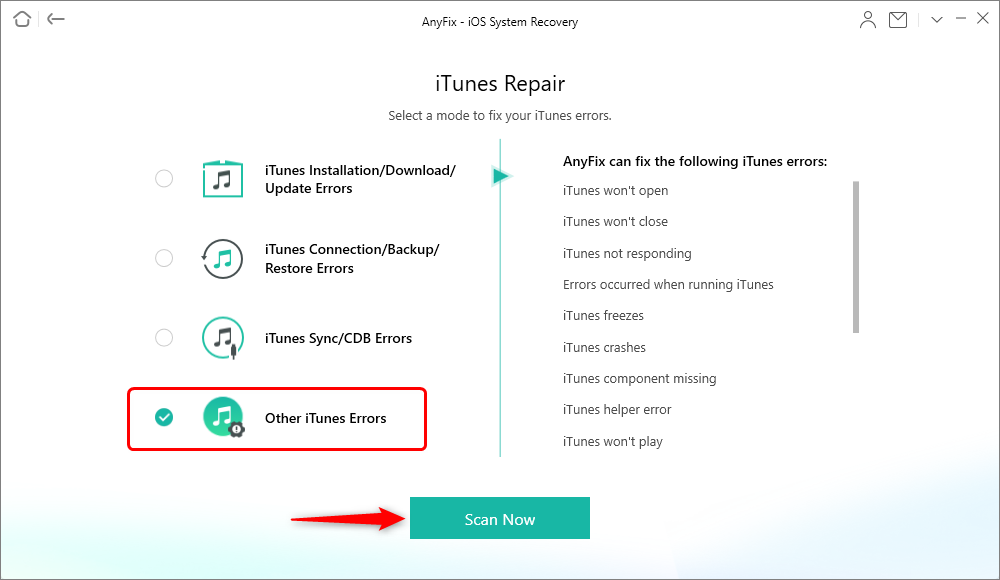
Choose Other iTunes Errors and Continue
Step 3. Next, AnyFix will scan the iTunes components errors. Once finished, click Fix Now button.
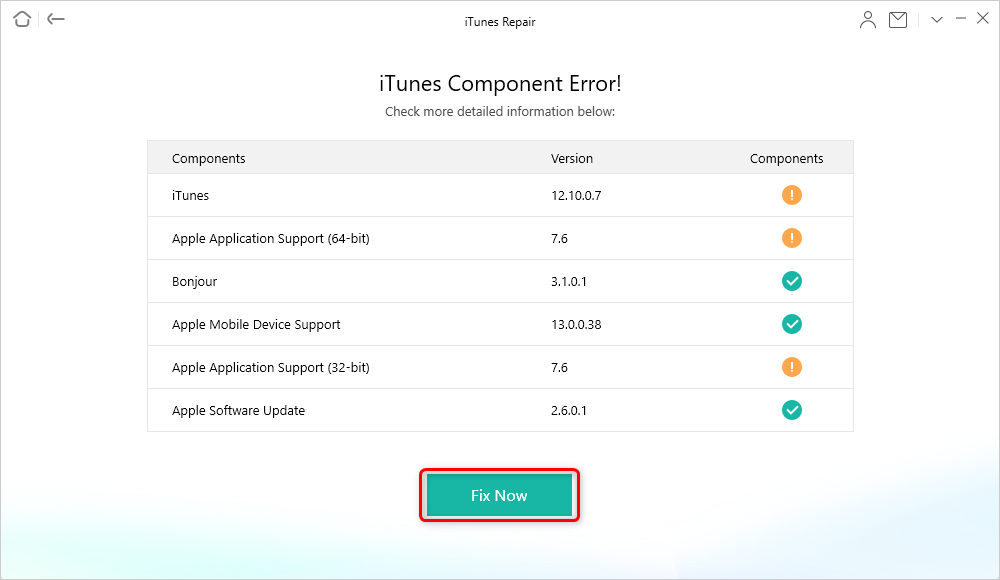
iTunes Component Errors will be Detected
Step 4. Your computer will prompt a message says “Do you want to allow this app to make changes to your device”. Just click Yes to give AnyFix authorization to help you.
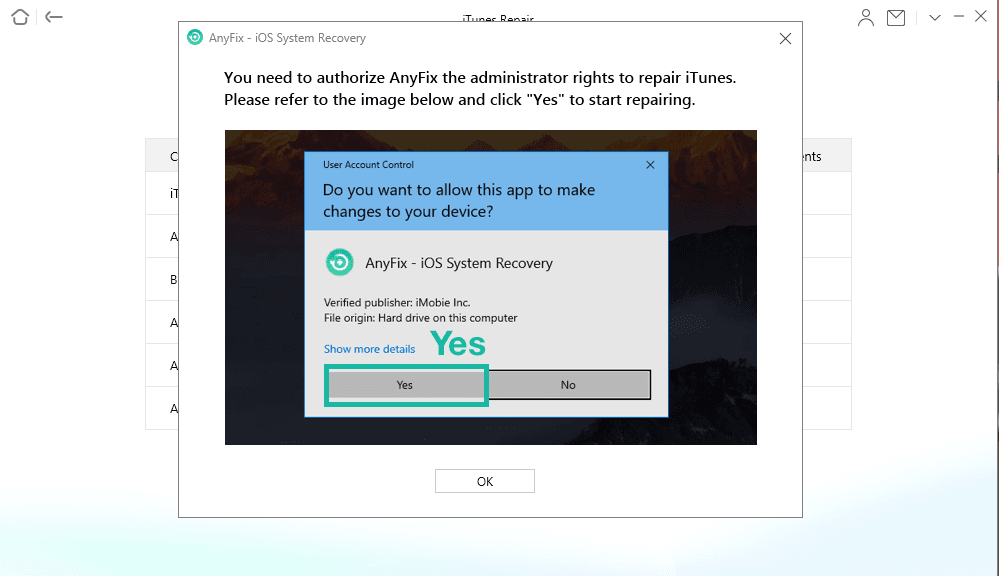
Give AnyFix Permission on your Computer
Step 5. Once AnyFix gets authorization, it will start the repairing process. Wait a minute and you will see Repair Completed page. Then you can click Open iTunes button to check if the problem is resolved. If not, you can choose Deep Repair mode to fix this problem. To go back to the main interface of AnyFix, please click Go Back button.
The Bottom Line
That’s all on how to fix iTunes original file could not be found. Here, we have covered every possible solution to resolve this issue. We hope that our guide helps you to come out of the issue and you will able to play songs in iTunes without any trouble.
Product-related questions? Contact Our Support Team to Get Quick Solution >

