How to Unlock iPhone with iTunes [Step-by-Step Guide]
You can use recovery or one-click mode when seeking to unlock your iPhone using iTunes. With this guide, we will assist you in discovering the method that is more suitable for your needs. It’s a lot easier than you’d expect! Plus, discover alternative methods for unlocking your iPhone without iTunes.
Your iPhone contains your cherished memories, work, and vital connections. However, an issue has arisen: You’ve forgotten your passcode, and your phone is now locked. We recognize that this situation can be quite frustrating, but there’s no need to fret. iTunes is here to rescue you.
In this article, we’ll embark on a comprehensive journey to guide you through unlocking your iPhone using iTunes. Whether you seek a swift one-click solution or are prepared to navigate recovery mode, rest assured that we’ve got you covered. So, let’s dive in and regain access to your beloved device.
How to Unlock an iPhone with iTunes
Unlocking your iPhone with iTunes is like using a trusted key to regain access to your digital kingdom. This method is most effective when you’ve previously synced your iPhone with iTunes. This method involves using an iTunes backup to restore your device once it’s unlocked. However, it’s important to note that this process comes with a trade-off. It may result in data loss, and you’ll probably need to reconfigure your device settings after successfully unlocking it.
Now, let’s proceed with unlocking your iPhone using iTunes. Here’s a step-by-step guide:
Step 1. Before you start, please update the latest version of iTunes installed. Once iTunes is up to date, launch it without hesitation.
Step 2. Retrieve your reliable lightning cable and establish a connection by plugging your iPhone into your computer.
Step 3. Look for the “Recently Added” in the iTunes interface at the top left corner. Click on it to select your iPhone.
Step 4. On the left sidebar click “Summary.” This will unveil a range of options, but your destination is the “Restore iPhone” button.
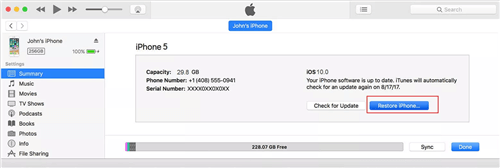
Click Restore iPhone
Step 5. Are you prepared to move forward? Click on “Restore iPhone,” and to be doubly sure, press the “Restore” button once more to confirm your choice.
Step 6. iTunes will wipe your device clean while installing the latest iOS version. This procedure will reset your iPhone to its original factory settings.
Step 7. With the restoration complete, your iPhone will restart. Follow the on-screen prompts, and in no time, your device will be up and running once again.
Unlocking your iPhone using iTunes may entail a certain degree of data sacrifice, but it’s a dependable method for regaining access to your device. Always make it a practice to back up your data whenever possible. This way, you’ll be well-prepared for any unlocking endeavor.
Let’s proceed to the next section, where we’ll introduce you to an even more streamlined unlocking process with a single click.
How to Unlock iPhone with iTunes in 1 Click
Imagine a tool capable of unlocking your device with just 3 straightforward steps – no technical wizardry needed! AnyUnlock – iPhone Password Unlocker is your go-to unlocking solution you can’t miss. As a one-stop iOS unlocker, it can unlock all iPhone/iPad screen locks, like numeric passcode, Face ID, etc. And there are no difficulties in using this tool because all you need to do is click the buttons. Whenever you encounter a lockout situation, AnyUnlock is your reliable companion, ready to help you regain control of your iPhone. Just learn more about AnyUnlock below.
Free Download * 100% Clean & Safe
- 1-click unlocking – You can unlock 4-digit/6-digit password, fingerprint, facial recognition, etc. with 1 click. Make unlocking as easy as possible.
- Only minutes – Just 3 minutes, you can successfully unlock and re-enter your device. No need to wait.
- More than screen lock – AnyUnlock can also help you unlock iCloud activation lock, remove MDM, unlock Apple ID, unlock SIM card, and more.
- Support multiple devices – AnyUnlock supports all iPhone and iPad models. It even supports the latest iPhone 15 and iOS 17.
Before you embark on this unlocking journey, free download AnyUnlock on your computer. Then follow the guide below to see how to unlock iPhone with iTune in 1 click.
Step 1. Launch AnyUnlock on your computer, and then choose the Unlock Screen Passcode mode.
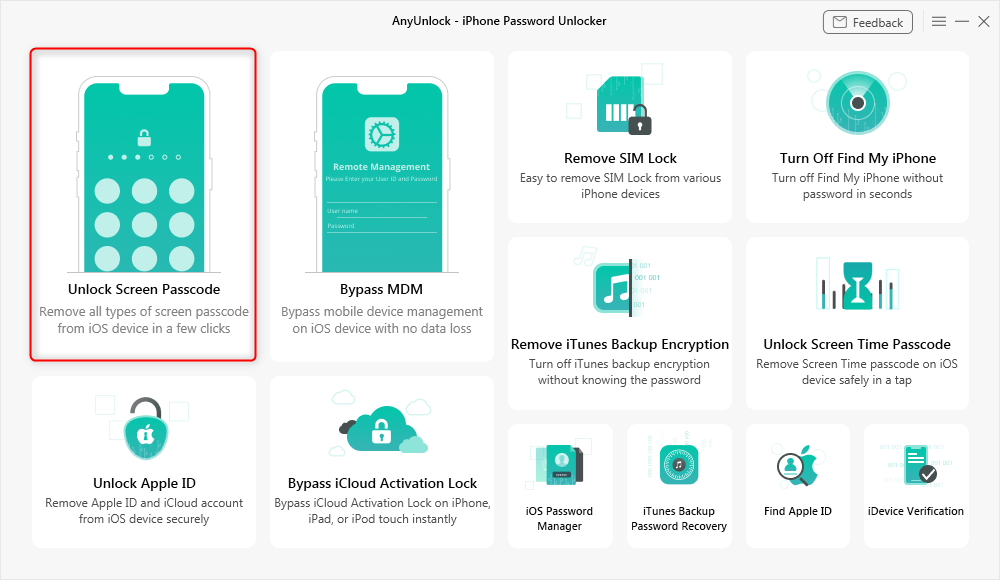
Choose Unlock Screen Passcode
Step 2. Connect your device to the computer and click on the Start Now button.
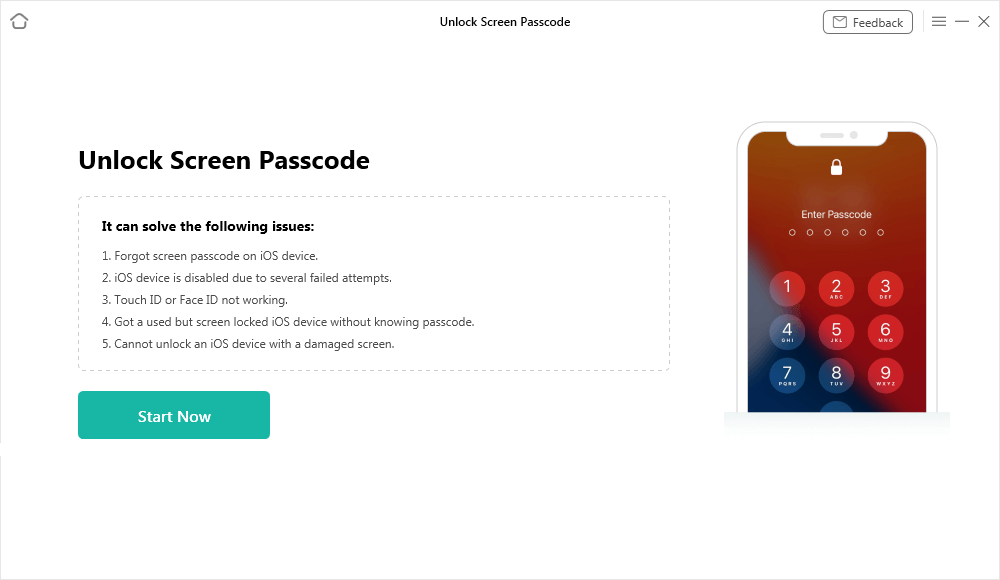
Click Start Now Button
Step 3. Choose the firmware version provided and click the Download button.
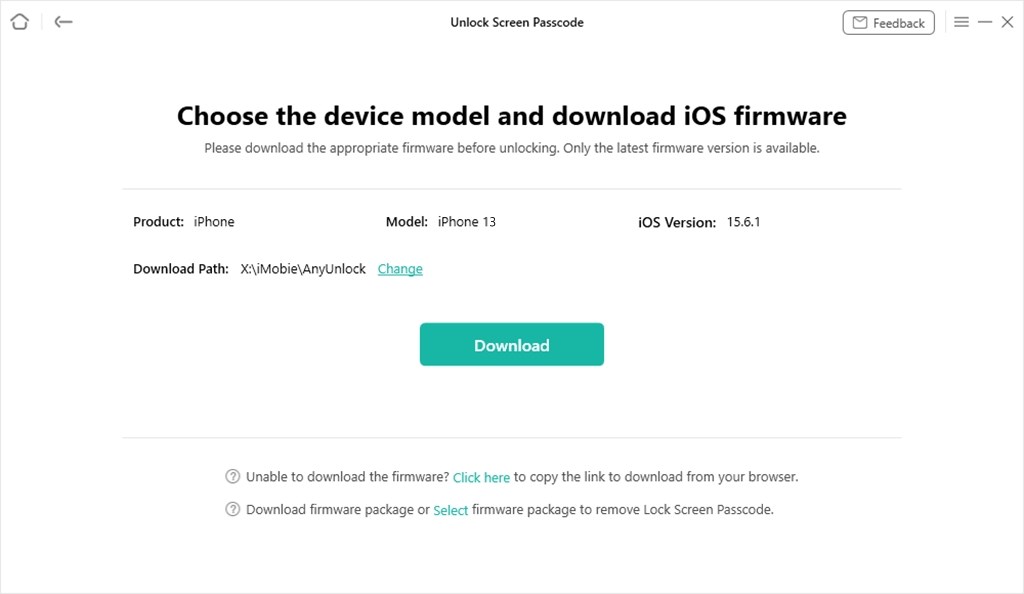
Get Matching Firmware for iPhone
Step 4. Select the Unlock Now option in AnyUnlock with the firmware package downloaded.
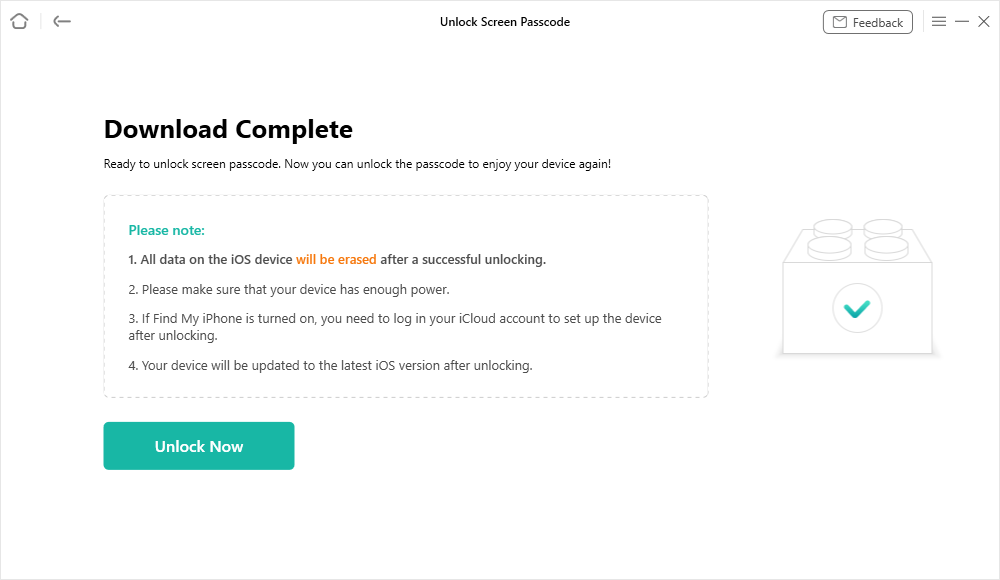
Tap on Unlock Now
Step 5. AnyUnlock will now take charge, automatically removing the screen passcode. Your screen passcode will be successfully removed from your device in a few minutes.
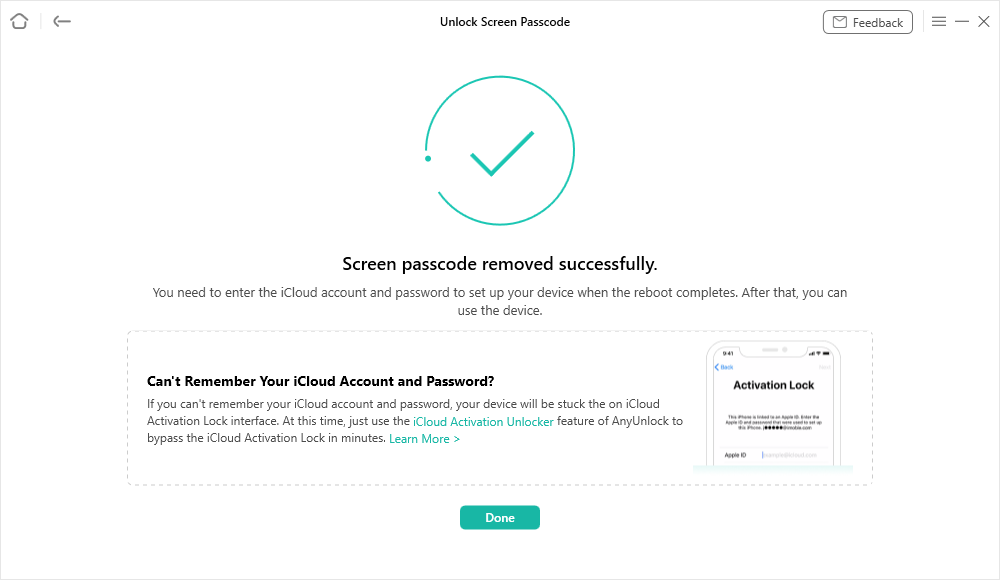
Screen Passcode Removed Successfully
Unlocking your iPhone screen passcode has never been more convenient. With AnyUnlock’s one-click solution, your iPhone will be back in action.
How to Unlock iPhone with iTunes in Recovery Mode
On occasion, unlocking your iPhone demands a more hands-on approach, and that’s where Recovery Mode becomes invaluable. Follow these detailed, step-by-step instructions to unlock your iPhone with iTunes using Recovery Mode. Here’s a step-by-step guide:
Step 1. Start by attaching your iPhone to your computer using its charging cable.
Step 2. For those on earlier macOS versions or Windows PCs, launch iTunes. If iTunes is already open, close it and open it again to ensure a fresh start.
Step 3. Begin by pressing the Volume Up button, releasing it, and then pressing and releasing the Volume Down button. Then, press and hold the Side button (the Power Button) until the Recovery Mode screen becomes visible.
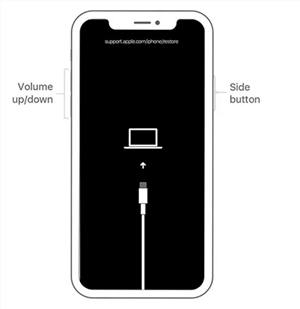
Put iPhone into Recovery Mode
Step 4. Once your device successfully enters Recovery Mode, a pop-up will appear, offering the options to either Update or Restore your device. Select the “Restore” option.
Step 5. After the restoration process, you can set up your iPhone as a brand-new device or restore it from a previous backup.
Unlocking your iPhone via Recovery Mode may require more effort, but it’s a highly effective method for regaining access to your device while safeguarding your valuable data. Follow these steps diligently, and your iPhone will be operational again soon.
How to Unlock iPhone without iTunes
If iTunes isn’t your preferred option, we’ve got you covered with alternative methods for unlocking your iPhone:
Way 1: Unlock iPhone without iTunes or Computer
Unlocking a disabled iPhone without iTunes or a computer is achievable through the Find iPhone service in iCloud. This service enables you to erase your iPhone without a computer. However, certain prerequisites must be met. Specifically, you must have previously activated Find My iPhone on the disabled iOS device, and the locked iPhone must currently have an active network connection. Follow these steps:
Step 1. Open a browser on any smartphone or tablet and navigate to iCloud.
Step 2. Sign in with the Apple ID account signed on the disabled iPhone. This ensures you have the necessary permissions to access and control the device.
Step 3. Once signed in, click “Find iPhone” and select your disabled iPhone from the list of devices associated with your Apple ID.
Step 4. In the Find iPhone service, locate and click the “Erase iPhone” option. This action initiates the process of resetting the disabled device.
Hit the Erase iPhone Icon
Step 5. A confirmation prompt will appear. Click “Erase” again to confirm your decision. This signals iCloud to begin the reset process on the disabled iPhone.
Way 2: Unlock iPhone without iTunes in iOS 15.2 and Later
Unlocking a locked iPhone without relying on iTunes, iCloud, or a computer has become remarkably straightforward in iOS 15.2 and later. Follow these steps to regain access to your device:
Step 1. Begin by repeatedly entering the wrong passcode on your iPhone until you encounter the message “iPhone Unavailable” or “Security Lockout.”
Step 2. Beneath the error message, you’ll encounter the “Erase iPhone” option. Tap on it to commence the unlocking process.
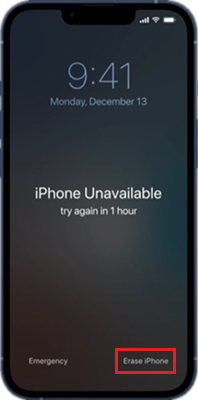
Click on Erase iPhone Option
Step 3. On the subsequent page, confirm your decision by tapping “Erase iPhone” once more.
Step 4. You’ll be prompted to enter your Apple ID credentials to verify your identity and authorize the erasure of the iPhone.
Step 5. Upon the completion of the erasure, your iPhone will automatically reboot. Now you can configure your device as if it were fresh out of the box.
Thanks to these recent iOS advancements, you can regain access to your device without needing iTunes or a computer, rendering the process considerably more convenient.
The Bottom Line
Unlocking your iPhone is no longer the daunting task it once was. We’ve explored various methods, from the trusted iTunes to the latest iOS innovations. Therefore, remember this guide for the next occasion when you discover yourself locked out of your iPhone. Armed with the appropriate tools and techniques, you can swiftly reclaim access to your digital realm. And if you want the easiest and fastest tool to unlock your device, just free download AnyUnlock to have a try!
Free Download * 100% Clean & Safe
iPhone Screen Lock Tips
Unlock iPhone Passcode-Normal Case
- How to Unlock iPhone 7 / 7 Plus without Passcode [100% Work]
- Full Guide to Fix Face ID Not Available [Updated]
- iPhone Security Lockout? 4 Proven Fixes Here
- How to Unlock iPhone 6/6s for Free [Full Guide]
- How to Unlock iPhone Security Lockout
- Locked Out of iPhone? 5 Proven Ways to Unlock It [Solved]
- How to Remove Passcode from iPhone
- How to Use iPhone Secret Codes to Unlock Any iPhone [Full Guide]
- How to Unlock Support Apple Com iPhone Passcode Screen
- How to Unlock iPhone 11/11 Pro(Max) without Passcode?
- [2024] 4 Ways to Unlock iPhone SE without Passcode
- How to Unlock iPhone without Apple ID [2024 New!]
- 4 Ways to Unlock iPhone 15 without Passcode or Face ID
- [Solved] How to Unlock iPhone without Swipe
Unlock iPhone Passcode in Differnent Situations
- How to Enable a Disabled iPhone without Losing Data [Proven Ways]
- How to Unlock iPhone with Emergency Call Screen [Guide]
- How to Fix iPhone 12 Disabled Connect to iTunes
- How to Fix iPhone Passcode Changed Itself [Solved]
- How to Unlock iPhone to Use USB Accessories?
- How to Unlock iPhone with Voice
- How to Unlock iPhone with Apple Watch?
- How to Unlock iPhone with iTunes [Step-by-Step Guide]
- Proven Ways to Unlock Refurbished iPhone [2024]
- All You Need to Know about Lockdown Mode on iOS 17
- What to Do If Your Passcode Is Required When iPhone Restarts
- iPhone Requires Your Passcode after Restarting [2024 Solved]
- Face ID Not Working ‘Move iPhone Lower’? How to Fix>
Unock iPad
- How to Factory Reset iPad Mini without Passcode
- iPad Won’t Accept Correct Passcode? How to Fix
- How to Factory Reset iPad without Passcode When Locked Out [Solved]
- How to Unlock iPad without Password If Forgot [5 Ways]
- 6 Proven Ways to Unlock Macbook Pro without Password or Apple ID
- How to Remove Passcode from iPad When Forgotten [2024 Solved]
Product-related questions? Contact Our Support Team to Get Quick Solution >

