How to Send iMessage from PC/Mac
If you are a regular iMessage user and want to send iMessage from your computer, the following guide shows how you can do so on both Windows and Mac. The guide has multiple methods for you to send iMessage from PC/Mac.
iMessage Tips & Issues
iMessage Recovery Tips
iMessage Management Tips
iMessage Trouble Shootings
AnyTrans
Transfer, backup and manage iOS content in a smart way
- Transfer photos, music, videos and more to computer, and vice versa
- Backup iPhone flexibly: Full Backup, Incremental Backup, and Air Backup
- Free download videos and music from 1000+ sites include YouTube
Available for both Win & Mac
iMessage is a messaging service provided by Apple that is primarily designed for Apple users to communicate with each other. As long as you have an iPhone or an iPad, you can get access to the service and send and receive messages from your dear ones. However, you may encounter iMessage not saying delivered issue sometimes. Also, in other cases, you may need to send iMessage on your Windows 10 or other computers.
Normally, you are not allowed to send iMessage from Windows 10 since the feature is officially only available for Apple devices. However, there are still some tools to help you use iMessage on PC. In the following guide, you are going to learn how to send iMessage from your PC or Mac computer, with 3 different methods.
Method 1. How to Send iMessage from PC
If you have a Windows-based computer and you would like to access the iMessage feature, this section will help you do it. Basically, what you are going to do in this method is you are going to use a remote access tool to connect to an iMessage-enabled Mac from your Windows PC to send and receive an iMessage.
The following are the steps on how you can send iMessage from your computer:
- Head over to the TeamViewer website, download and install the app on both your Windows PC and Mac machines.
- Click on Launchpad in your Dock.
- Search for and click on TeamViewer. It will launch the newly installed app on your Mac.
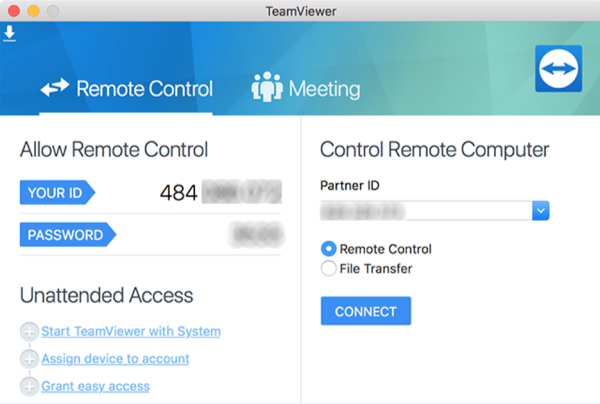
- When the app opens, you need to note down two things from your screen.
- The first one is Your ID and the second one is Password.
- Note these down as you are going to need to enter these on your Windows PC.
- Open the TeamViewer app on your Windows PC.
- Enter the ID and password you noted down in the previous step.
- Your PC will connect to your Mac.

Note down ID and password for remote access
Once a connection between your PC and Mac is established, you will be able to access Mac’s iMessage feature on the screen of your Windows PC. That is how you use iMessage on a Windows PC.
Method 2. How to Send iMessage from Mac
Since Macs are built by Apple and run Apple’s macOS operating system, setting up and using iMessage on your Mac is relatively easier than doing so on a Windows computer. Your Mac already has the app you need to access iMessage and the following are the steps on how to actually send and receive messages.
- Click on Launchpad in your Dock.
- Search for and click on Messages. It will launch the built-in Messages app on your Mac.
- When the Messages app opens, you just need to confirm you want to use iMessage.
- Click on the File menu at the top.
- Select the option that says New Message to send a new message.

Send a new iMessage from Mac
That’s all there is to accessing iMessage on a Mac. You can find all the sent and received iMessage in the Messages app on your Mac.
Method 3. How to Send iMessage on Computer By Jailbreaking
Jailbreaking allows you to perform a number of tasks on your iOS based device that Apple does not officially permit you to do. It basically means you take advantage of a backdoor in the operating system of your device and make your device use unofficial tweaks.
Jailbreaking your device poses the risk of bricking your phone and never be able to use it again. If you are fine with that, the following is how you access iMessage on a computer by jailbreaking your device.
- Get your iOS device jailbroken using the method that works for your specific device and iOS version.
- A simple Google search will let you find out the working method for your phone.
- Launch Cydia after you have jailbroken your device and download and install the Remote Messages app.
- Follow the on-screen instructions.
- You should be able to access the iMessage of your iOS device on your computer.
Bonus Tip. How to Access iMessage and Messages on Computer without Jailbreak
If you do not wish to jailbreak your iOS device but you would still like to be able to somehow view your text and iMessage on your computer, you can do so using a third-party application – AnyTrans.
Meet AnyTrans, an application that allows you to access both normal text messages and iMessage of your device on your computer. The app makes it possible for you to view all of your sent and received iMessage on your Windows PC and Mac with ease. The following are some of the features the app provides with regard to messages:
- It supports both regular text messages as well as iMessage.
- Multiple options for you to export messages from your iOS device to your computer.
- View iMessage saved in an iTunes or an iCloud backup on your computer.
- Easy to use.
If you do not want the hassle of jailbreaking, AnyTrans is a perfect solution for you to access iMessage on a computer and the following is how it works.
Step 1. Connect your iPhone and computer.
Free Download AnyTrans on your computer > Launch it > Connect your iOS device to your computer, and click on the Device Manager option in the app.
Free Download * 100% Clean & Safe
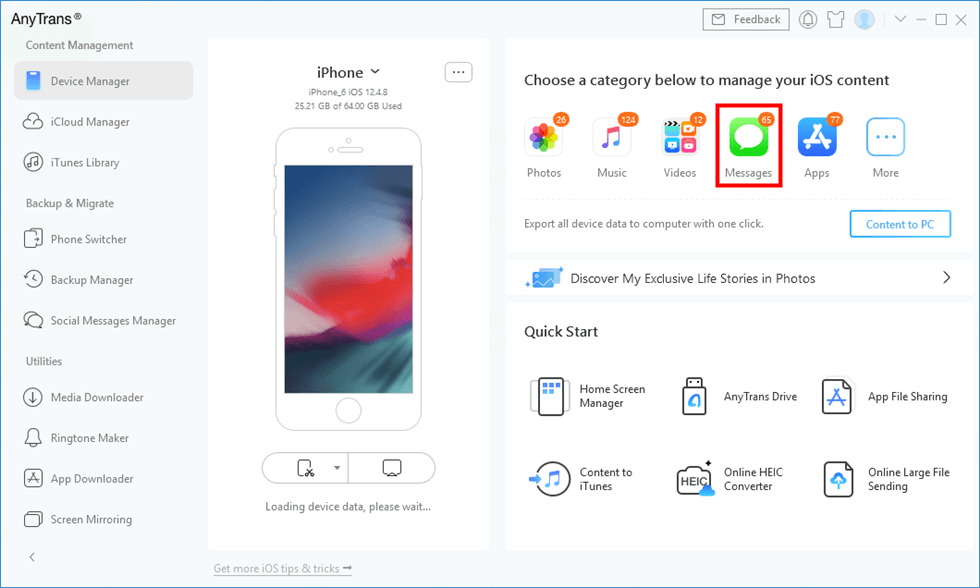
Step 2. Choose Messages category to view
On the following screen, it will ask what content you would like to view on your computer. Select the Messages option as you want to view your iMessage on your computer.

Click Messages in AnyTrans
Step 3. Set the output format
The following screen will let you specify the format you want your iMessage in. Select a format from the dropdown menu and click on the Save button to save your changes.
Step 4. View messages on your computer
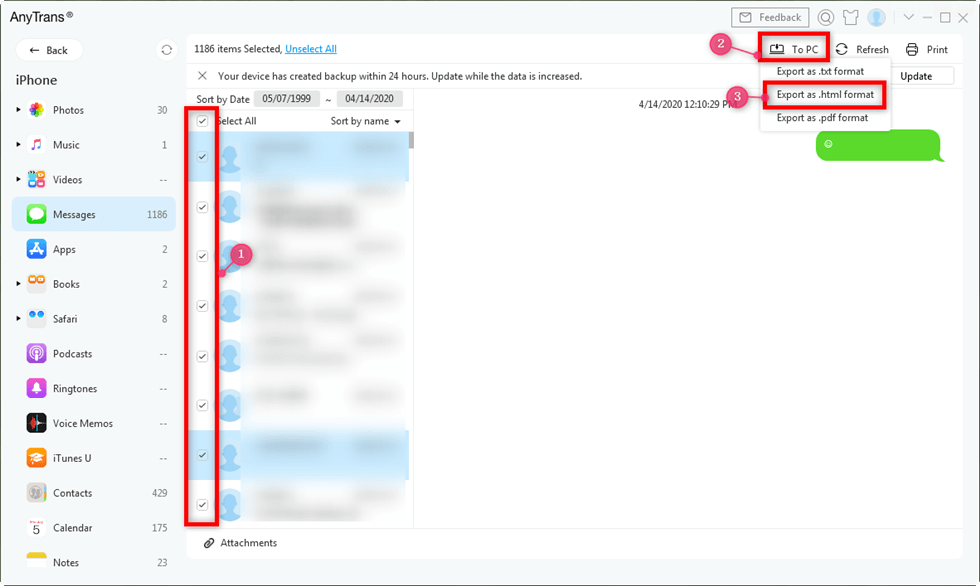
On the screen that follows, select the messages you would like to export to your computer and click on the To Computer button at the top.

Export iPhone Messages to TXT, PDF, or HTML
The Bottom Line
If you hate the fact that iMessage is only available for Apple devices and you wish to use it on your other devices, the above guide should help you get iMessage on almost all of your computers. We hope it helps you out.
Product-related questions? Contact Our Support Team to Get Quick Solution >

