How to Turn on/off AirDrop on iPhone in iOS 13/12/11
Want to turn on or turn off AirDrop on your iPhone, iPad or iPod touch? Or don’t know where is AirDrop on your device? Read on this guide to learn how to use AirDrop on iPhone, iPad and iPod touch in iOS 13/12/11.
AirDrop is an excellent feature that allows iOS users to quickly transfer files like photos, contacts, videos, music, etc. from iPhone iPad to other iOS devices and Macs. And in the latest iOS 12, Apple adds the ability for AirDrop to share passwords, which makes a more delightful iOS experience.
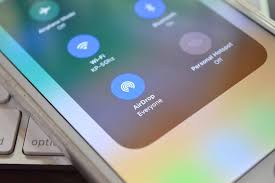
How to Use AirDrop on iPhone/iPad
However, plenty of iOS users especially iPhone iPad newbie don’t know where is AirDrop after updating to iOS 12, or the latest iOS 13 (beta), or have no idea of how to turn on/off AirDrop on iPhone iPad in iOS 13/12/11.
So, here in this article, we would like to show you how to turn on or off AirDrop in iOS 13, iOS 12 and iOS 11. Moreover, we will share the detailed steps to use AirDrop on iPhone 6/7/8/X/XR/XS (Max). Below methods are also apply to iPad and iPod touch.
Part 1. How to Turn on/off AirDrop on iPhone in iOS 13/12
Method 1. Turn on/off AirDrop in iOS 13/12 via Control Center
Step 1: Unlock your device > Swipe up from the bottom of the screen to access Control Center. On iPhone X/XR/XS (Max), swipe down from the upper-right corner of the screen.
Step 2: Touch and hold the Airplane Mode, Cellular Data, Wi-Fi and Bluetooth section > Tap AirDrop > Choose one of these options:
Receiving Off: You won’t receive any AirDrop requests.
Contacts Only: Only your contacts can see and send files to your device.
Everyone: All nearby iOS devices using AirDrop can see and send files to your device.
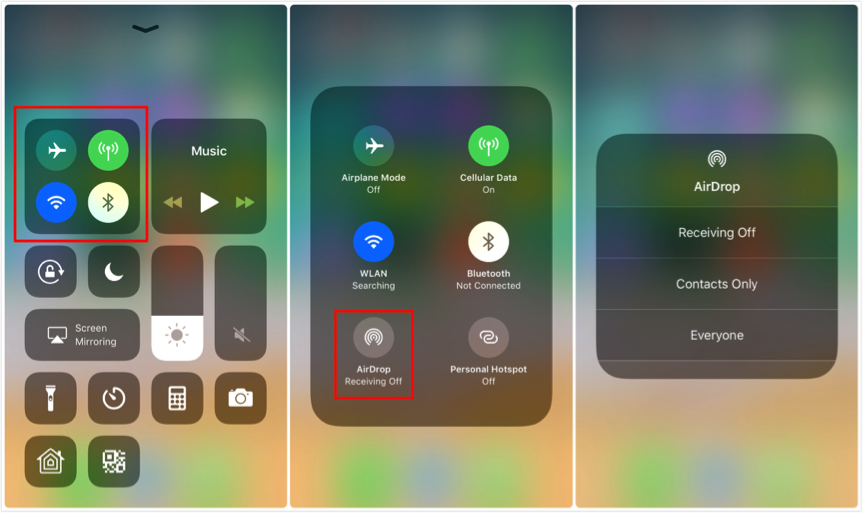
How to Turn on/off AirDrop in iOS 12 on iPhone – Control Center
Method 2. How to Turn on/off AirDrop in iOS 13/12 via Settings
Open Settings on your device > Tap on General > Tap on AirDrop > Choose one of these options: Receiving Off, Contacts Only or Everyone.
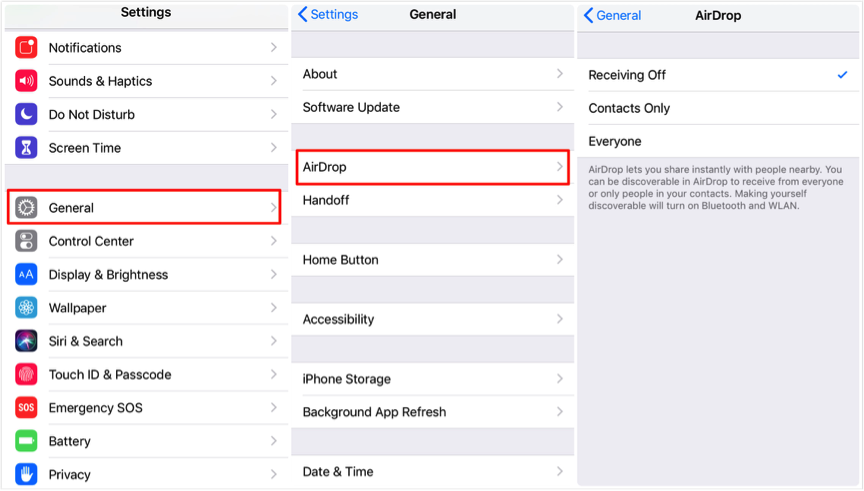
How to Turn on/off AirDrop in iOS 12 on iPhone 6/7/8/X – Settings
How to Use AirDrop on iPhone/iPad in iOS 13/12
Step 1: Open Photos app and select the photos you want to share > Tap Share button on the bottom-left corner.
Step 2: Tap the AirDrop user you want to share the photos with > Wait for a while. when the people tap Accept, your photos should be shared successfully.
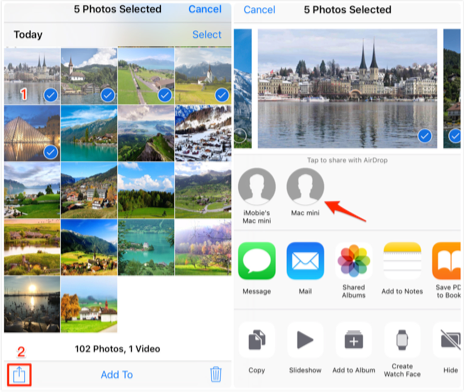
How to Use AirDrop on iPhone 6/7/8/X in iOS 12
Part 2. How to Use AirDrop on iPhone/iPad in iOS 11
With iOS 11, Apple has also redesigned the Control Center, and all the controls are back to being on one page. Here are two methods to turn on or off AirDrop on iOS 11 devices.
Method 1. How to Enable AirDrop From Control Center in iOS 11
Step 1: Swipe up from the bottom edge of the display to reveal the Control Center.
Step 2: In the top-left corner, you can see a box that’s filled with the toggles like Wi-Fi and Bluetooth. Firmly press and hold the button to expand it.
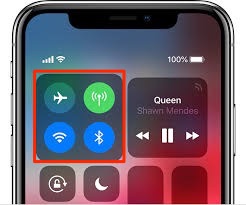
Enable AirDrop in iOS 11 – Step 2
Step 3: Tap on AirDrop to enable it, and you will see the options: Receiving Off, Contacts Only, and Everyone > Choose one of them you prefer.
Receiving Off – If you choose this option, you will not show up as an available destination for anyone nearby, and won’t receive any AirDrop requests. But you can still send AirDrop files and data to others.
Contacts Only – Your device will only show up to your contacts people.
Everyone – All nearby iOS devices using AirDrop can see your device.
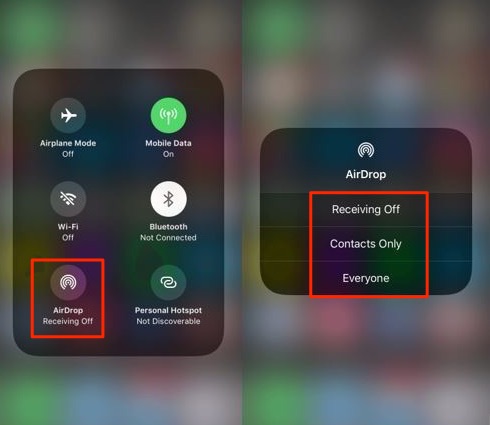
How to Enable AirDrop From Control Center in iOS 11 – Step 3
Method 2. How to Enable AirDrop from Settings in iOS 11
Go to Settings > General > TapAirDrop > Choose the one you prefer: Receiving Off, Contacts Only or Everyone.
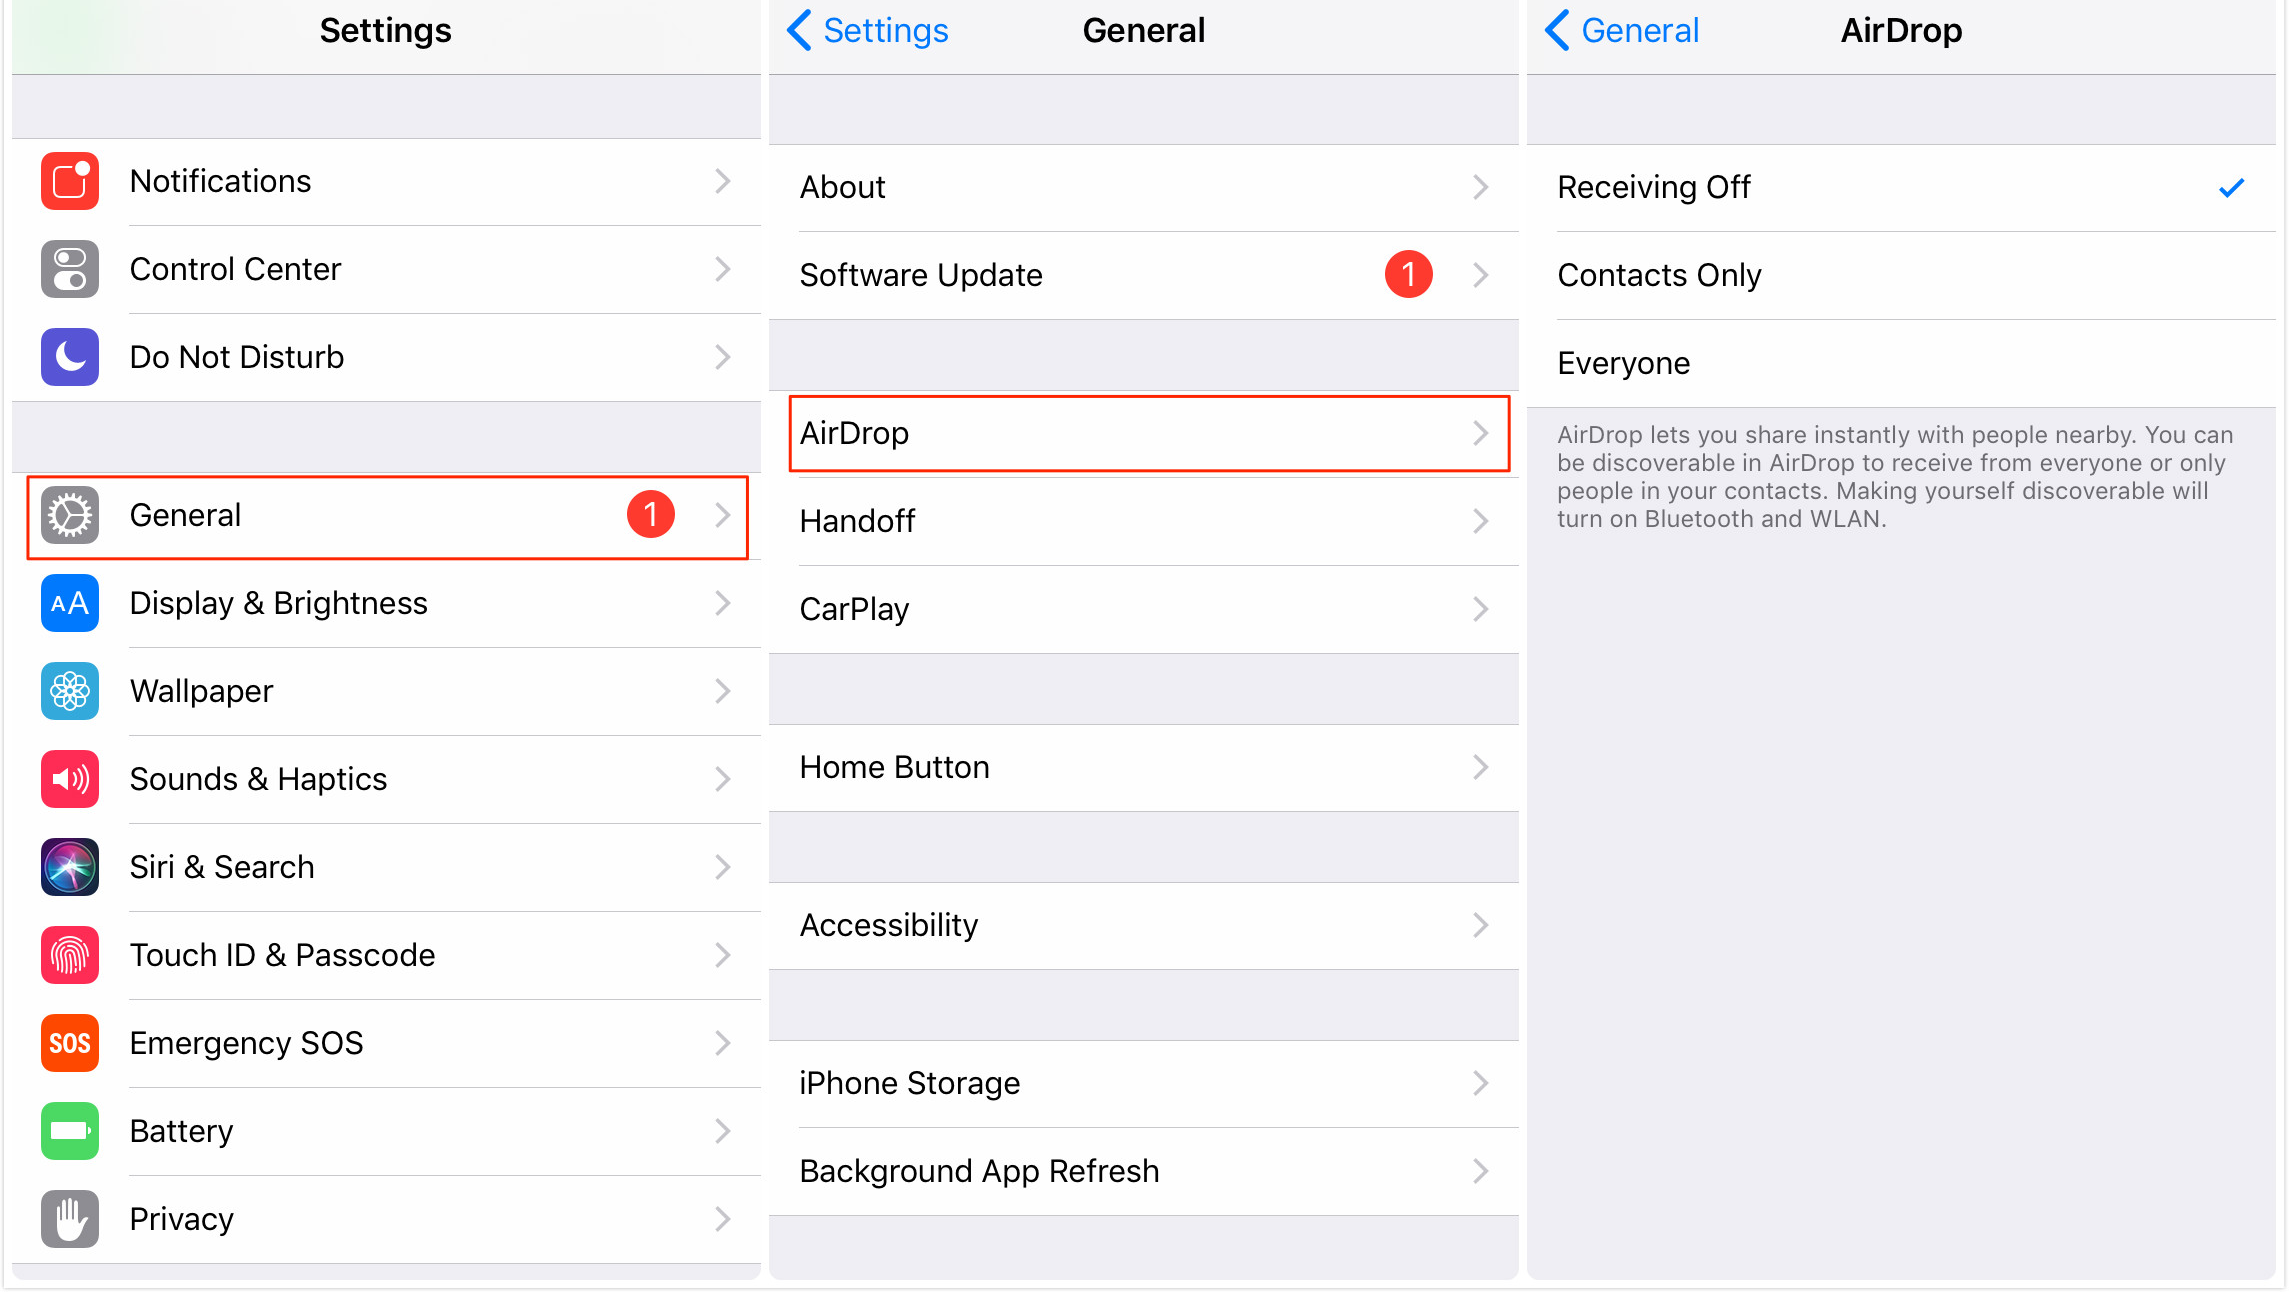
How to Enable AirDrop from Settings in iOS 11
After you set the option, you can use AirDrop to share files, do as the following (here we take photos as an example):
- Choose the photos you want to share in the Photos app > Tap the Share icon.
- Tap on the AirDrop button > Choose one of the nearby devices to send the selected photos to that device.
Part 3. How to Share A Password on iPhone XS (Max)/XR/X/8/7/6
Step 1: Go to Settings on your device > Tap on Password & Accounts option > Tap on Website & App Password > Enter your device password to view the saved passwords.
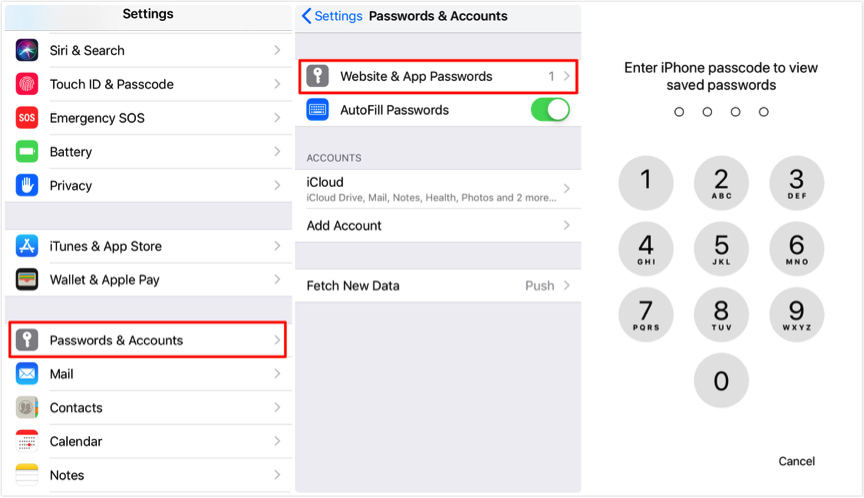
How to Share A Password in iOS 12 on iPhone – Step 1
Step 2: Choose the website that contains the password you want to share > Press deeply or touch and hold the Password > Tap on AirDrop > Choose the user you want to share the password with.
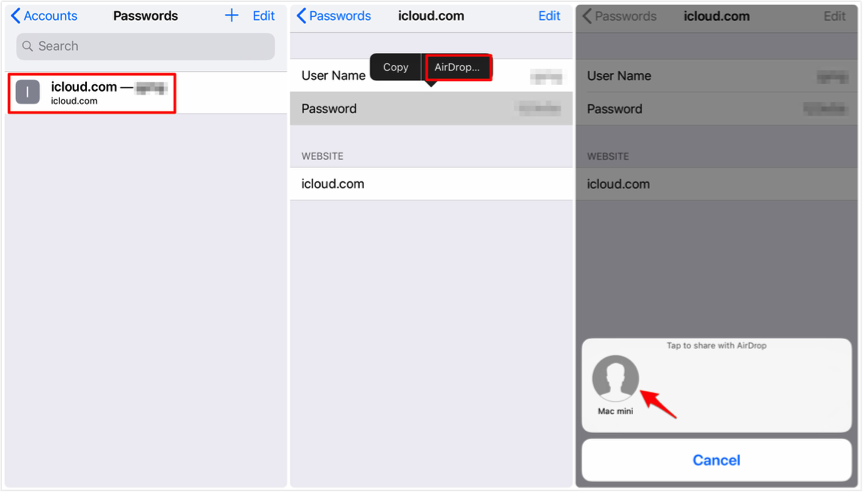
How to Share A Password in iOS 12 on iPhone – Step 2
The Bottom Line
Hope this guide can help you make a good command of AirDrop in iOS 12, like how to turn on/off AirDrop in iOS 12, how to use AirDrop, and even how to share a password with AirDrop in iOS 12. If you find this guide useful, just share it to help more people.
Product-related questions? Contact Our Support Team to Get Quick Solution >

