Ways to Transfer Videos from iPhone to Windows 10
In this tutorial, we will show you how to transfer videos from iPhone to Windows 10 in detail.
You may need to transfer videos from your iPhone to Windows devices in daily life due to various reasons. For instance, your phone can’t contain new data because your iCloud account is running out of space, or you want to share data like videos and photos to other people’s computers.
Since the Windows system is now updated to Windows 10 version and many Windows 10 users urge to find a way to transfer videos from iPhone to PC, in this article, we will mainly discuss how to transfer videos from iPhone to Windows 10 computer. In this tutorial, some useful data transferring tools will be introduced. Among them, AnyTrans is highly recommended.
Part 1. Transfer Videos from iPhone to Windows 10 with AnyTrans
AnyTrans is an effect iOS/iPadOS data manager. If you need to clean up iPhone storage, back up multimedia files, or edit and save iPhone videos on a computer, AnyTrans can save a lot of time for you.
Features of AnyTrans:
- Transfer videos, photos from iPhone to Windows PC
- Transfer Photo Videos, Movies, Vlogs, Home Videos, and TV Shows
- Sync apps between iPhone devices with one simple click
- Transfer and backup WhatsApp data
- Compatible with iPhone 12 series and iOS 14
Free Download * 100% Clean & Safe
Follow the tutorial here and start transfer videos:
Step 1. Connect your iPhone to a Windows computer as a start. Once your phone is recognized, the interface below will display. Unfold the “Videos” option and tick the video files you want to transfer.
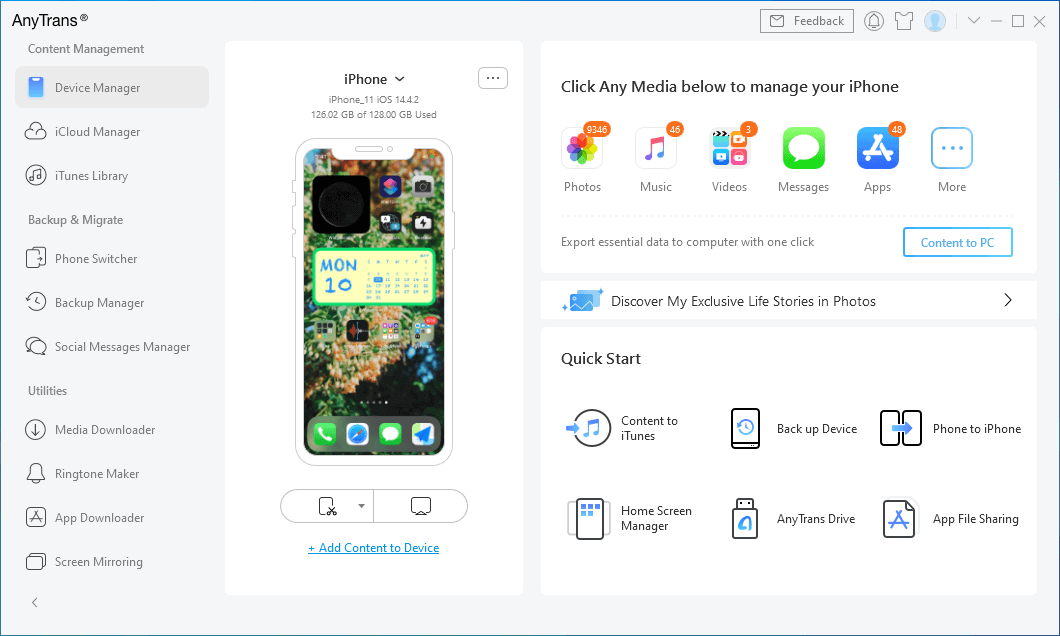
Go to Device Manager and Click Videos
Step 2. After choosing videos, right-click the “To PC” button on the top to start transferring them to Windows. If you are satisfied with the video’s exported format, click “Next”, and the application will start transferring for you.
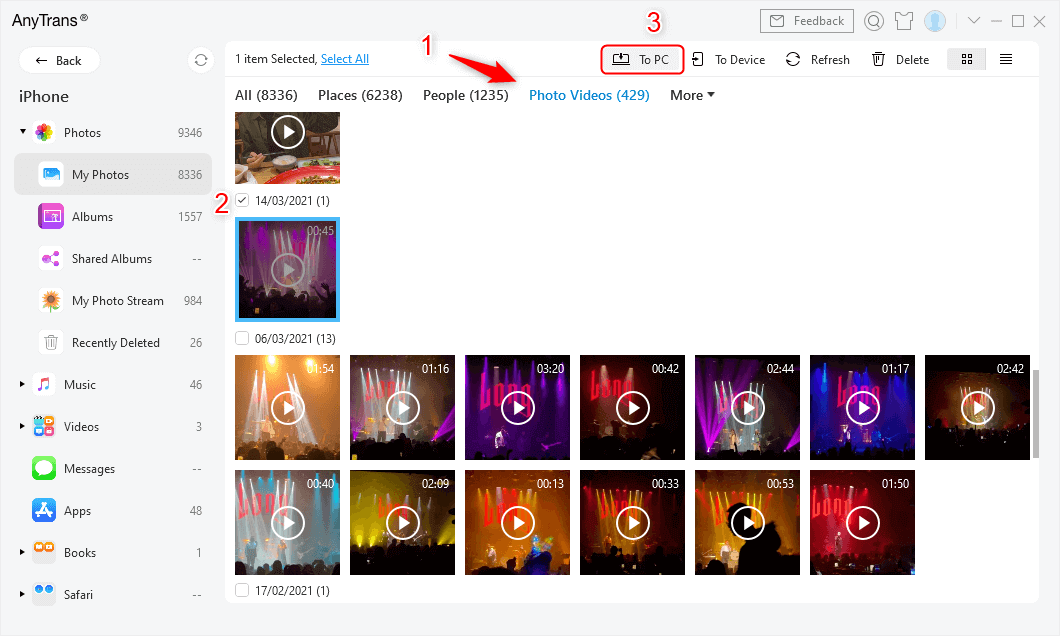
Choose Any Photo Videos to Transfer to Computer
Step 3. Once the transferring process is completed, you may locate videos exported on the computer by clicking “View files”. To transfer more videos, please click “Transfer more”.
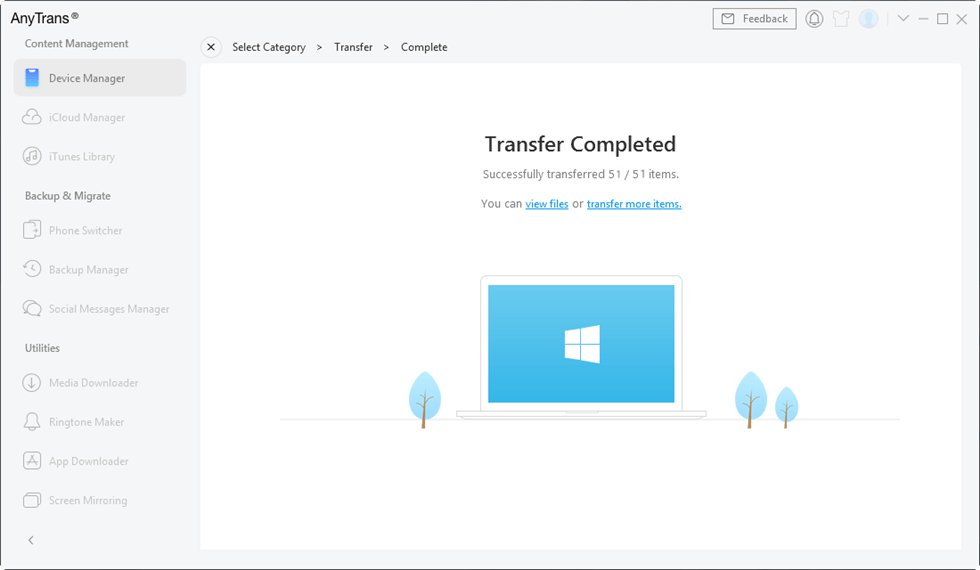
AnyTrans Transfer Completed
Part 2. Transfer Videos to Windows 10 with Photos App
You can transfer videos on your phone to your PC by connecting your device to your computer and using the Windows Photos app. Before you start, you need to make sure that your device is qualified to do so. Take a look at the tips below:
1. Make sure that you have the latest version of iTunes on your PC.
2. Importing photos to your PC requires iTunes 12.5.1 or later.
3. If you have iCloud Photos turned on, you need to download the original, full-resolution versions of your photos to your iPhone before you import them to your PC.
4. If some videos are rotated incorrectly in the Windows Photos app, you can add these videos to iTunes to play them in the correct orientation.
5. If you have trouble importing photos from your iPhone to Windows 10, open “Settings” on your phone and tap “Camera”, “Formats”, and “Most Compatible” successively.
Now you can start transferring videos following the steps here:
- Connect your iPhone to your PC with a USB cable.
- If asked, unlock your iPhone using your password.
- If you see a prompt on your phone asking you to “Trust This Computer”, tap “Trust” or “Allow” to continue.
- Click “Import” and choose “From a USB device”.
- Tick the videos you want to transfer and start transferring.
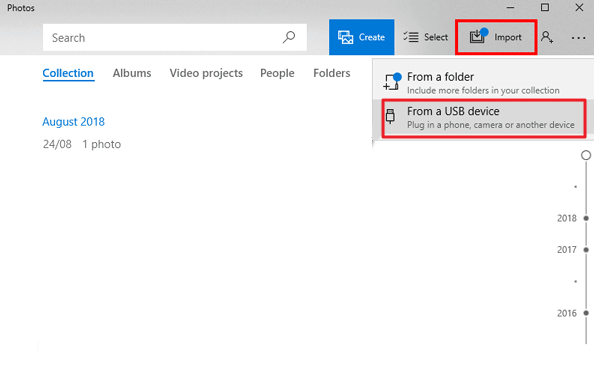
Import Files from A USB Device
Part 3. Transfer Videos to Windows 10 with File Explorer
There is another tool you may take into consideration – File Explorer. It is a management application in Windows 10, which allows you to browse folders and files. If you want to transfer video from iPhone to PC, File Explorer is a steady hand for you. To do this, you are required to follow the given instruction.
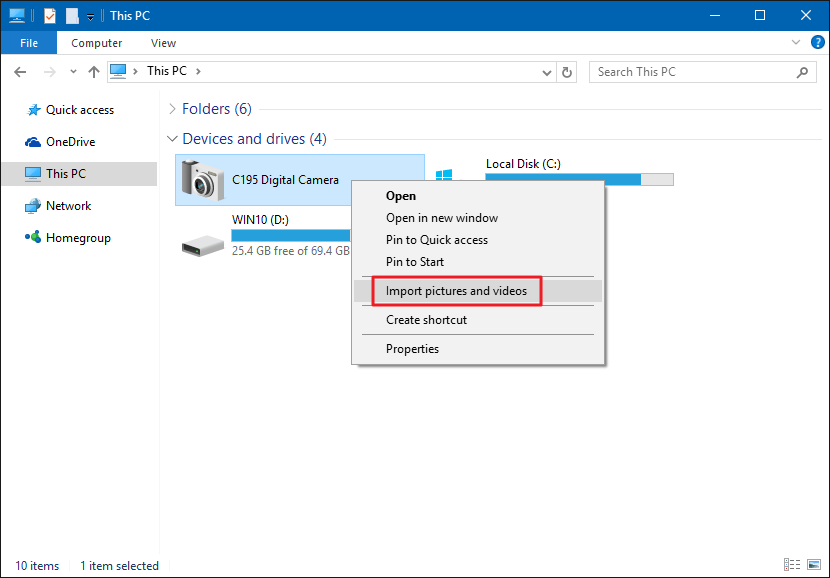
Import Pictures and Videos with File Explorer
- Connect your iPhone to the computer using a USB cable.
- Open “File Explorer” from the “Start” menu.
- Open the “This PC” option and find your iPhone.
- Right-click on your device name and then select the “Import pictures and videos” option.
- Select “Review, organize, and group items to import” and click on “Next” to continue.
- Select the videos that you want to transfer, and click on “Import” to start transferring.
Part 4. Transfer Videos from iPhone to Windows PC with iCloud
Apple offers a special software called “iCloud for Windows” to access the virtual storage space from your PC. This application is compatible with all versions of the operating system Windows 7 or higher, Windows 10 concluded. Download the software to your PC, and start to transfer videos following the steps below.
- Open your iPhone and head to the “Settings” option > Scroll down to tap “Photos” > Active “iCloud Photo Library.
- Download and install “iCloud for Windows” on your computer > Sign in with your Apple ID > Enable the “Photos” feature in the iCloud control panel.
- Click the “Options” button to choose where videos and photos will be stored on your PC > Click the “Apply” button to start transferring.
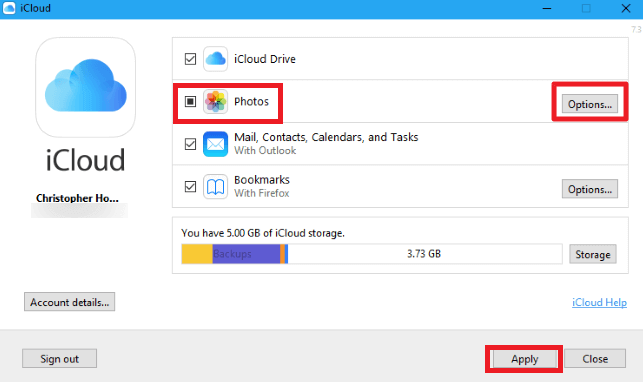
Click Photos to Transfer with iCloud
The Bottom Line
For most people, AnyTrans is a good option when it comes to video transfer. It is safe to say that AnyTrans will not let you down because it has various functions. Except for transferring videos between devices with different systems, it allows you to transfer videos from iPhone to iPhone/iPad. Other types of files like music, apps, contacts, messages, notes, books, ringtones, etc. are also supported. Download AnyTrans and start transfer videos from iPhone to Windows 10 now!
Free Download * 100% Clean & Safe
If you found this article useful, please don’t forget to share it with more people. Any problems about transferring videos from iPhone to a computer are welcomed in the Comments Section below.
Product-related questions? Contact Our Support Team to Get Quick Solution >

