3 Ways to Transfer iTunes Music to iPhone
If you have created a playlist of your favorite songs on iTunes and want to transfer it to your iPhone, you’re in luck! In this guide, we have put together 3 different ways how to sync music from iTunes to iPhone
AnyTrans – How to Transfer iTunes Music to iPhone
Free download AnyTrans to transfer iTunes music from Windows PC or Mac to your iPhone, and you can transfer iTunes Library to iPhone directly. No need to erase any data. Easy to do. Supports the latest iPhone 14 and 15.
If you’re an Apple device user, you know how important it is to have your favorite tunes on your iPhone. Luckily, syncing music from iTunes to your device is super easy and seamless, whether you’ve purchased your music from the iTunes Store or have your own library on your computer.
Even though Apple Music has taken over, iTunes is still a crucial tool for managing and organizing your music collection.
In this guide, we’ll show you the steps on how to sync music from iTunes to iPhone without any hassle so you can enjoy your tunes anytime, anywhere!
Why Do You Need to Sync iTunes Music to iPhone?
There are several reasons why you might want to sync iTunes music to your iPhone:
- Offline Access – Syncing your music on your iPhone lets you listen to your favorite songs even when you don’t have an internet connection.
- Data Backup – It’s a great way to keep your favorite tunes safe and sound in case anything unexpected happens to your device or you experience data loss.
- Customization – Syncing your music is a great way to keep your custom playlists, organization, and preferences up-to-date!
- Seamless Listening – Syncing provides a consistent and enjoyable listening experience, as your music is readily available on your iPhone.
- Independence from Streaming – It’s a great option if you want to listen to your purchased music or tracks that aren’t available on streaming platforms.
- Reduced Data Usage – Syncing enables you to listen to it without consuming any mobile data.
- Enhanced Control – You have greater control over your music collection and its organization on your iPhone.
- Privacy – For those concerned about privacy or subscription costs, syncing allows you to enjoy your music without an online presence or monthly fees.
Now that you know why it’s a good idea to sync music from iTunes to iPhone, let us take you through 3 ways to sync music from iTunes to iPhone.
How to Sync Music from iTunes to iPhone
The first and most common method of transferring music from iTunes to iPhone is via the auto-sync option. Just make sure you have the latest iTunes version, and you’re good to go. Here’s what to do:
- Connect your iPhone to your PC using a lightning cable.
- Once iTunes detects your device, click on the “Device” icon at the top and then select “Music” from the menu on the left.
- Now, select the “Sync Music” option, and choose “Entire Music Library” or “Selected Playlists, Artists, Albums, and Genres.” according to your preference.
- Lastly, click on “Apply” at the bottom to sync your music from iTunes to your iPhone automatically.
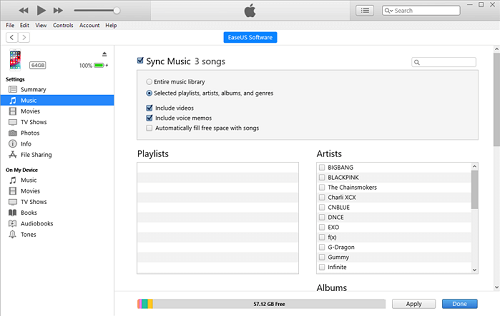
How to Sync Music from iTunes to iPhone
Limitations
Syncing music from iTunes to iPhone via auto-sync is the most common and preferred method by Apple users; however, it comes with its set of limitations:
- You can only sync one iTunes library with one iPhone at a time.
- If you have subscribed to Apple Music, you can only stream saved songs on your device, not sync them.
- You cannot sync DRM-protected music.
- The iPhone supports AAC, ALAC, MP3, WAV, and AIFF audio formats. Any music file other than this format cannot be synced to your device.
- Auto-syncing can sometimes transfer unwanted music to your iPhone, or even fail to include the latest additions.
Transfer Music from iTunes to iPhone without iTunes Syncing [Best iTunes Alternative]
We all want to access music while on the go, even if we don’t have an internet connection. Therefore, transferring music from iTunes to iPhone is the answer! For this, we recommend using AnyTrans – iPhone Data Manager.
AnyTrans is an all-in-one solution to manage your iPhone, iPad, and iPod data. With this powerful iOS data transfer and management tool, you can easily transfer and manage all your music, videos, photos, messages, contacts, and more. It’s the perfect way to keep everything organized and at your fingertips!
Key Features:
- With AnyTrans, you can transfer contacts, photos, videos, messages, ringtones, music, and other iPhone data from your old iPhone to your new iPhone 15.
- Transfer music from iTunes to iPhone without erasing data 1-click.
- 1-click to scan, analyze, and backup data without compromising the quality.
- Won’t erase anything on your iPhone, all data will be kept 100% secure.
- Supports freely choosing what you want to transfer, so you can selectively transfer data more conveniently.
- It allows you to exchange or migrate data from one iPhone to another, or an Android to iPhone.
Free get AnyTrans and follow the steps to transfer music from iTunes to iPhone>>
Free Download * 100% Clean & Safe
How to Transfer Music From iTunes to iPhone via AnyTrans:
Step 1. Download AnyTrans on your computer and launch it > Click iTunes Library mode.
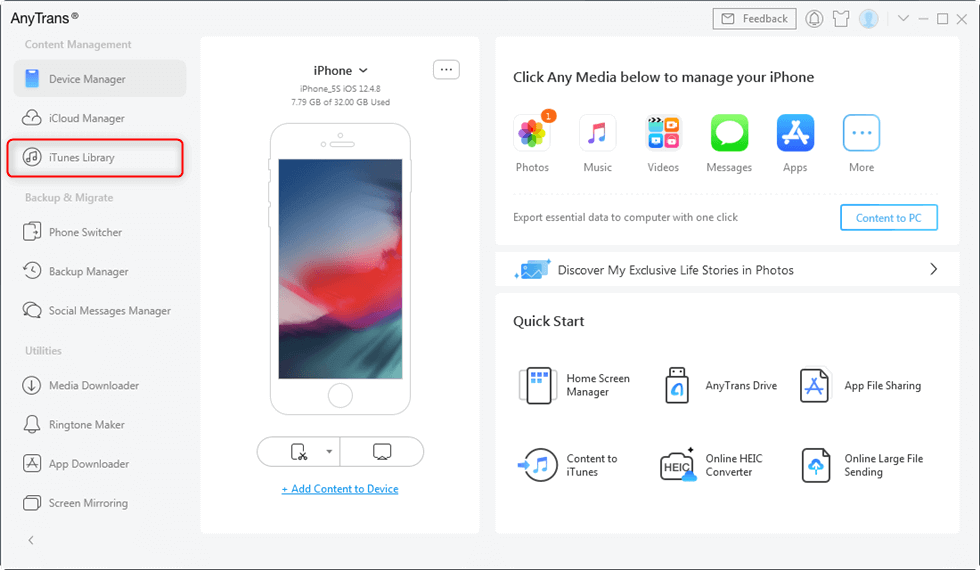
Click on iTunes Library
Step 2. All the music files on iTunes will be displayed in front of you. Click on “To Device” from the menu at the top, and select the music you want to transfer to your iPhone.
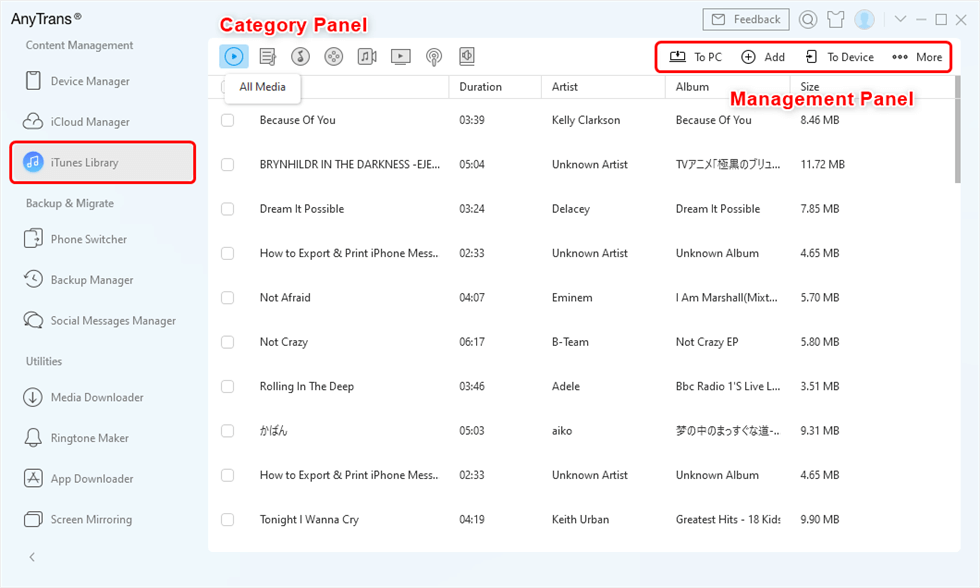
Manage iTunes Library with AnyTrans
Step 3. All the files that you selected will be successfully transferred to your iPhone in just a few minutes.
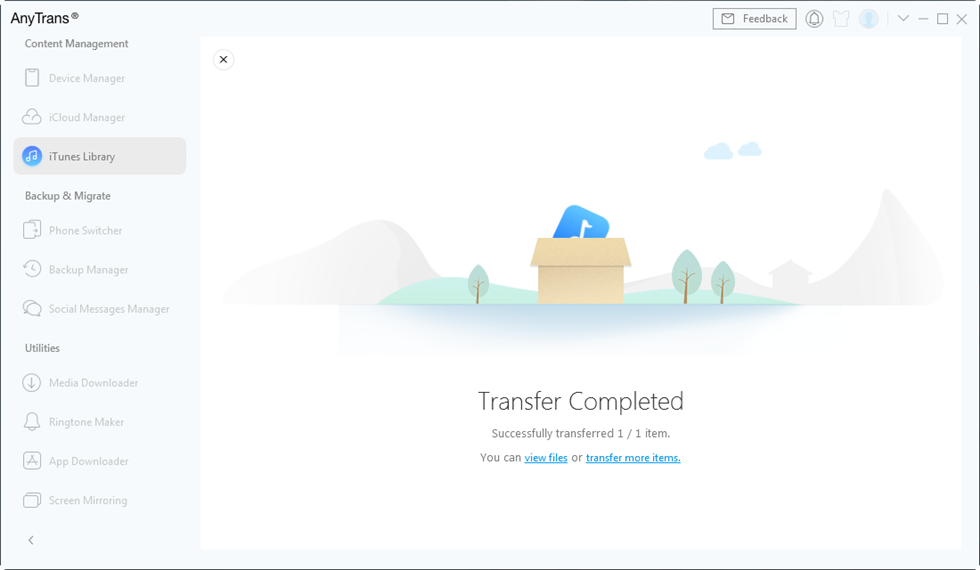
Wait until Transferring Process Complete
Free Download * 100% Clean & Safe
How to Transfer Music from iTunes to iPhone via Manual Transfer Mode
With the iTunes auto-sync feature, all your music gets synced with your iPhone. However, if you would like to handpick the files that you want to sync, you can make use of the “Manual Transfer Mode.” Here’s how to go about it:
- Connect your iPhone to your PC and launch iTunes.
- Go to “Summary” and select “Manually Manage Music and Videos.”
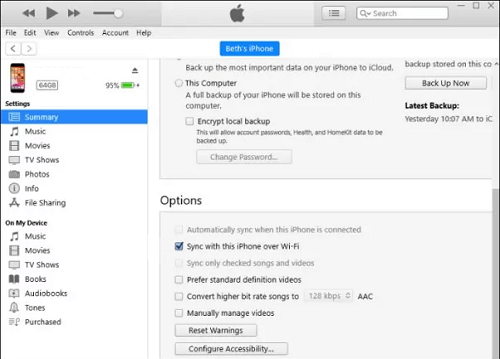
Select Manually Manage Music and Videos
- Now go to “Library > Songs” and drag-and-drop the songs you want to transfer to your device’s name on the left side menu.
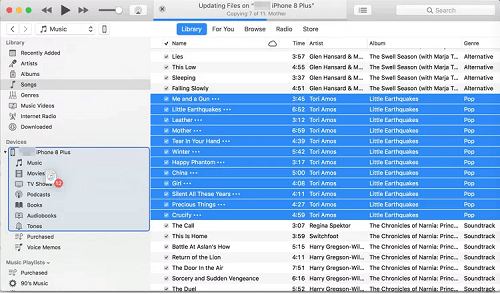
Drag And Drop Songs to Device
Limitations
Manually syncing music from iTunes to your iPhone provides a level of control, but it also comes with some limitations and potential drawbacks:
- If you have a large music library, it can take a long time to sync all of your music to your iPhone.
- When you manually sync your iPhone, you won’t receive automatic updates to your music library. If you happen to buy new songs or albums, you’ll need to remember to add them to your iPhone manually.
- If you are not careful, you can accidentally delete music from your iPhone when you sync it.
- If you want to add or remove music from your iPhone, you have to sync your iPhone again. This can be inconvenient if you are on the go.
Conclusion
Whether you’re traveling or just want to listen to music casually, having some tunes on your iPhone is essential. In this article, we have shown you how to sync music from iTunes to iPhone automatically and manually. Plus, we have also discussed the steps to transfer music files from the iTunes library to your iPhone via AnyTrans.
AnyTrans offers a safe and quick approach to bringing your precious data to the iPhone. It transfers messages between both devices with high quality. This software has got all the stand-out features you seek in a professional iOS data transfer software. So just give AnyTrans a free try now>>
Free Download * 100% Clean & Safe
iPhone Transfer Tips
iPhone Manager
- [Solved] How to Fix A Device Attached to the System Is Not Functioning
- How to Access iCloud Photo Library on Mac
- How to Backup iPhone with Broken Screen
- Top 8 Backup Software for Mac
- How to Delete Blocked Numbers on iPhone
4 Ways to Export iPhone Contacts to Excel or CSV- Full Guide on How to Export Safari Bookmarks on iPhone iPad
- How to Delete Duplicate Photos on iPhone? (2025)
- How to Sync Notes from iPhone to Mac with/without iCloud
- iBooks Not Syncing? 7 Quick Fixes Here
- How to Go to iOS Setup Assistant? How to Use It to Transfer Data?
- How to Select All Photos on iCloud on Various Devices
- How to Transfer Google Photos to iCloud (4 Ways)
- 3 Ways to Transfer iTunes Music to iPhone
- How to Transfer Text Messages from Android to iPhone with/without Computer
- Ways to Transfer Videos from iPhone to Windows 10
- Easy Ways on How to View iCloud Photos on PC
- What Happens When I Delete iCloud Backup [2025]
Cloud Transfer
Product-related questions? Contact Our Support Team to Get Quick Solution >

