How to Transfer File between iPhone and Mac
For a lot of people, computer and smartphone are both just tools for completing important tasks and they can be used interchangeably. In order for this to be possible, sometimes it’s necessary to transfer file between iPhone and Mac.
You can do a lot of things on your iPhone – send and receive e-mail, compose text documents, record audio or video… Files created in this process can be very valuable, and some users like to access them from a Mac computer for processing, sharing, or another purpose.
Apple devices are mutually compatible, so there are quite a few methods supported for sending files between an iPhone and a Mac laptop. It’s savvy to be aware of all the possibilities for file transfer across platforms, so you can choose the most suitable tool for this job while taking into account specific circumstances and requirements.
Transfer File between iPhone and Mac via AnyTrans
How to transfer files between iPhone and Mac even without iTunes and iCloud? Installing third-party software capable of transferring files between iPhone and Mac could be the best solution if you frequently have the need to share data. AnyTrans is a one-click way to transfer files from iPhone to Mac computer and download files from Mac to iPhone without iCloud. You can transfer any type of file such as photos, ringtones and music from iPhone/iPad to computer (Mac and Windows) in one simple click. This all-in-one iOS data management software can also help you to transfer data from iPhone to iPhone or from Android to iPhone.
- It supports transferring almost all kinds of data between iPhone and Mac, like music, contacts, photos, live photos, videos, notes, ringtones, messages and so on.
- Also supports transferring data between iOS devices, between iOS device and iTunes Library, between computer and iCloud, and even from Android to iPhone/iPad.
- It is developed by an Apple certificated developer and also Norton and McAfee secured, which means there is no risk of information leakage.
- It works well on both Mac and PC computer, and supports all iPhones, iPads and iPods (iPhone 13 and iOS 15 supported).
Here is what you have to do in order to send files from your iPhone to Mac using this versatile and reliable software:
Step 1. Free download AnyTrans on your Mac computer > Connect your iPhone to the computer with a USB cable and start AnyTrans on your Mac.
Step 2. After your iPhone is recognized by the software, click on the Device Manager function and choose the Content to Mac option.
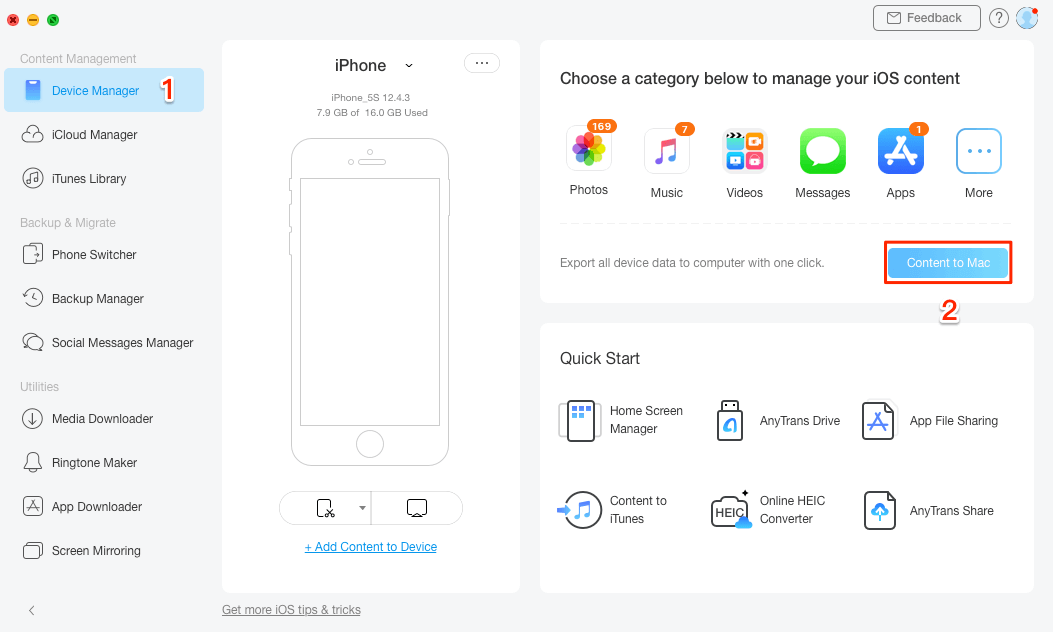
Go to Device Manager and Choose Photos
Step 3. Choose file category and method of transfer you want. Click on the Next button and wait for the data transfer to be completed.
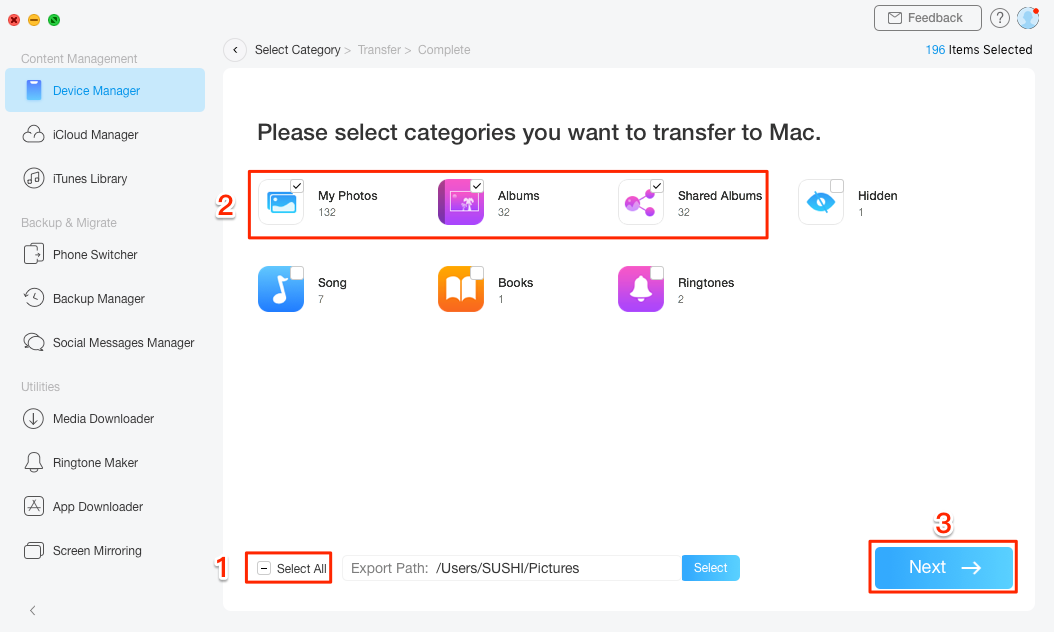
Check All the Albums that Contain Photos
Transfer File between iPhone and Mac with iCloud
Apple has a dedicated cloud storage service named iCloud that all iPhone and Mac users have access to. In addition to being the primary backup location, this service can also function as the conduit for transferring files of all types. If you already have an account on iCloud, this could be one of the simplest ways to move files in just a few simple steps.
Step 1. Open the file you want to transfer on your phone and tap Share.
Step 2. Select Save to File and then choose iCloud Drive as the storage location.
Step 3. Choose Save to confirm the transfer to the cloud.
Step 4. Use Finder application on your Mac to access the file from iCloud Drive.
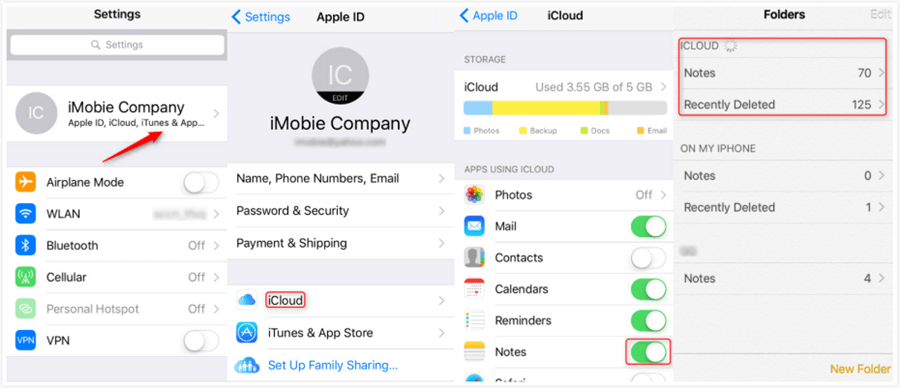
How to Transfer Notes from iCloud to iPhone Easily
Send File from iPhone to Mac or vice versa with iTunes
iTunes is another very popular software that a majority of Apple device owners are familiar with. This software has numerous functions within the Apple ecosystem, and it often provides a bridge for cross-platform communication. It’s super easy to send files of any size between your smartphone and computer by following this sequence of actions:
Step 1. Run iTunes on your Mac computer.
Step 2. Click on the Device button in the top bar of the interface.
Step 3. Click on File sharing and select the app from which you want to copy files.
Step 4. Select the files and click on Save to option before selecting the destination folder.
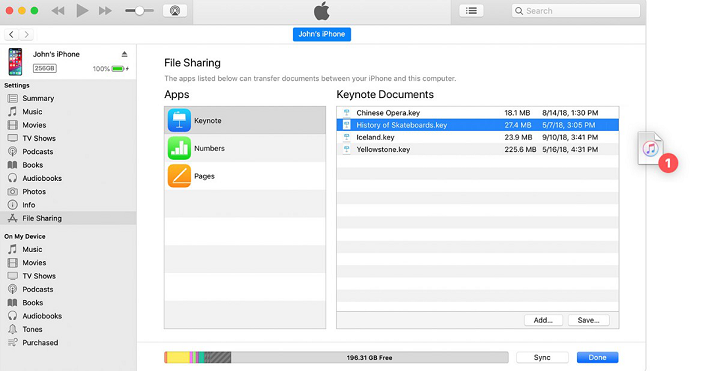
Files to Computer with iTunes
How to share files between iPhone and Mac using AirDrop
In case you own Mac computer of the latest generation, you have a great tool for wireless data transfers you can use to send files to your iPhone. AirDrop function needs to be enabled on your device, after which it becomes really simple to send and receive files from it. The following steps will allow you to AirDrop files from iPhone to Mac within minutes:
Step 1. Find the file you want to transfer on your phone and tap on the Share icon.
Step 2. Select the destination device (your Mac) from the available options.
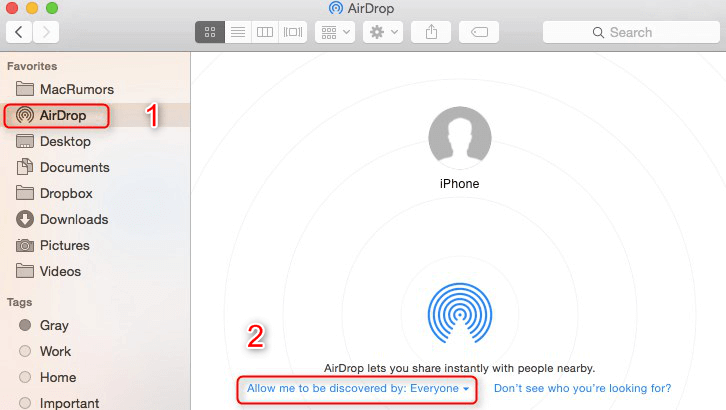
How to AirDrop iPhone to Mac
Step 3. Transfer will happen automatically, and you will see a Sent message when it’s done.
Step 4. Open the Downloads folder on the Mac to find the file you just sent.
Share files from Mac to iPhone and back through E-mail
Sometimes old communication channels work best, so you can simply use e-mail to send files from one device to another. This method could be especially practical for smaller files that won’t exceed the size limit for your inbox. You can use any e-mailing service that you normally would, only in this case you will be the recipient as well as the sender. Here is what you need to do.
Step 1. Create a new e-mail from your iPhone and attach the file you want to share.
Step 2. Send this e-mail to the same mail address from which you are sending.
Step 3. Access your inbox from the Mac, open the message, and download the attachment.
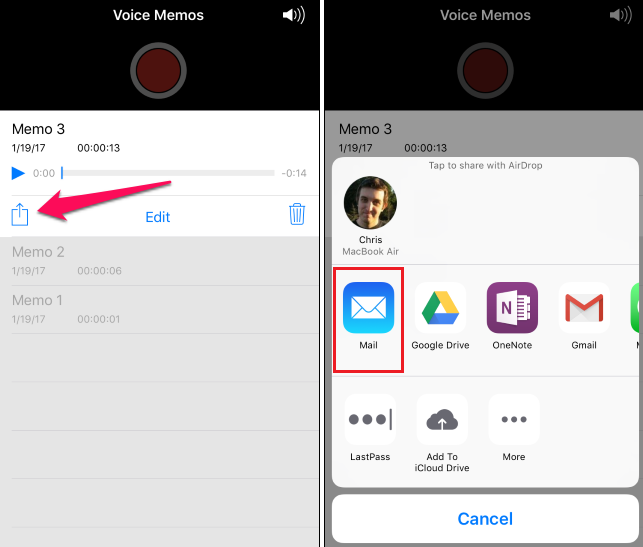
How to Transfer Voice Memos from iPhone to Computer via Email
Transfer files between Mac and iPhone with DropBox
DropBox is another cloud-based tool you can use to transfer files between iPhone and Mac or vice versa. It supports transfers of large files and is compatible with practically any device, so there are a few limitations if you opt for this method. If you have a DropBox account already active, just go through those steps to fulfill the task you had in mind:
Step 1. Log into your DropBox account from the iPhone.
Step 1. Tap on the + symbol and then on Transfer files.
Step 3. Choose Add from DropBox and then Continue.
Step 4. Set an expiration date to determine for how long the files will be available.
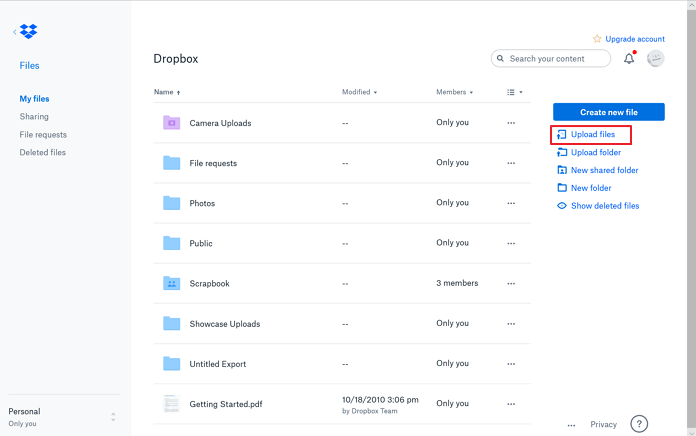
Transfer Files with Dropbox
The Bottom Line
With so many reliable methods for transferring files at your disposal, you will never have a problem when you need to access files that you keep on a different device. With this option, your Mac computer and iPhone can both be used to the maximum and you can derive the most value from their pairing. However, keep in mind that the ability to transfer files doesn’t absolve you from the need to perform regular backup.

Joy Taylor


Senior writer of the iMobie team as well as an Apple fan, love to help more users solve various types of iOS & Android-related issues.
Screenify
AnyEnhancer
FocuSee
Vozard
AnyMiro
AnyMirror


